GC1421, GC1420
4239.000.7578.1www.philips.com
u
A
E F G
B C D
1
2 3 4 5
6
7 8 9
10 11
Congratulations on your purchase and welcome to Philips! To fully benet from the
support that Philips offers, register your product at www.philips.com/welcome.
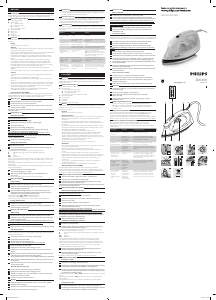
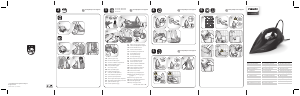
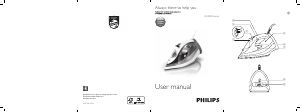
Cap of lling opening
Steam control
- = minimum steam
- = maximum steam
- t = no steam
- u = Calc-Clean function
Temperature light
Mains cord
Water tank
Soleplate
Temperature dial
Read this user manual carefully before you use the appliance and save it for future
reference.
- Never immerse the iron in water.
- Check if the voltage indicated on the type plate corresponds to the local mains
voltage before you connect the appliance.
- Do not use the appliance if the plug, the mains cord or the appliance itself shows
visible damage, or if the appliance has been dropped or leaks.
- If the mains cord is damaged, you must have it replaced by Philips, a service
centre authorised by Philips or similarly qualied persons in order to avoid a
hazard.
- Never leave the appliance unattended when it is connected to the mains.
- This appliance is not intended for use by persons (including children) with
reduced physical, sensory or mental capabilities, or lack of experience and
knowledge, unless they have been given supervision or instruction concerning
use of the appliance by a person responsible for their safety.
- Children should be supervised to ensure that they do not play with the
appliance.
- Do not let the mains cord come into contact with the hot soleplate of the iron.
- If the appliance has an earthed plug, it must be plugged into an earthed wall
socket.
- Check the mains cord regularly for possible damage.
- The soleplate of the iron can become extremely hot and may cause burns if
touched.
- When you have nished ironing, when you clean the appliance, when you ll or
empty the water tank and also when you leave the iron even for a short while:
set the steam control to the ‘no steam’ position, put the iron on its heel and
remove the mains plug from the wall socket.
- Always place and use the iron on a stable, level and horizontal surface.
- This appliance is intended for household use only.
This Philips appliance complies with all standards regarding electromagnetic elds
(EMF). If handled properly and according to the instructions in this user manual, the
appliance is safe to use based on scientic evidence available today.
1 Removeanystickerorprotectivefoilfromthesoleplate.
2 Lettheironheatuptomaximumtemperature.
3 Passtheironoverapieceofdampclothforseveralminutestoremoveany
residuesfromthesoleplate.
Note: The iron may give off some smoke when you use it for the rst time. This ceases
after a short while.
Neverimmersetheironinwater.
1 Makesuretheapplianceisunplugged.
2 Setthesteamcontroltothe‘nosteam’position(Fig.2).
3 Tilttheironbackwards.
4 Openthecaptheofllingopening(Fig.3).
5 Fillthewatertankwithtapwateruptothemaximumlevel.(Fig.4)
DonotllthewatertankbeyondtheMAXindication.
Donotputperfume,vinegar,starch,descalingagents,ironingaidsorother
chemicalsinthewatertank.
Note: If the tap water in your area is very hard, we advise you to mix it with an equal
amount of distilled water or to use distilled water only.
6 Closethecapofthellingopening.
1 Puttheirononitsheel.
2 Tosettherequiredironingtemperature,turnthetemperaturedialtothe
appropriateposition(Fig.5).
Check the laundry care label for the required ironing temperature:
1 Synthetic fabrics (e.g. acrylic, viscose, polyamide, polyester)
1 Silk
2 Wool
3 Cotton, linen
If you do not know what kind or kinds of fabric an article is made of, determine the
right ironing temperature by ironing a part that is not visible when you wear or use
the article.
Silk, woollen and synthetic materials: iron the reverse side of the fabric to prevent
shiny patches.
Start ironing the articles that require the lowest ironing temperature, such as those
made of synthetic bres.
3 Putthemainspluginanearthedwallsocket.
, Thetemperaturelightgoeson(Fig.6).
4 Whenthetemperaturelighthasgoneout,waitawhilebeforeyou
startironing.
The temperature light goes on from time to time during ironing.
1 Makesurethatthereisenoughwaterinthewatertank.
2 Selecttherecommendedironingtemperature(seechapter‘Preparingforuse’,
section‘Settingthetemperature’).
3 Afterthetemperaturelighthasgoneout,setthesteamcontroltothe
appropriatesteamposition.Makesurethatthesteamsettingyouselectis
suitablefortheironingtemperatureselected:(Fig.7)
Temperature settings 2 to 3 for minimum steam 1.
Temperature settings 3 to MAX for maximum steam 2.
The iron starts to produce steam as soon as it reaches the set temperature.
1 Setthesteamcontroltothe‘nosteam’position(Fig.2).
2 Selecttherecommendedironingtemperature(seechapter‘Preparingforuse’,
section‘Settingthetemperature’).
1 Removethemainsplugfromthewallsocketandlettheironcooldown.
2 Wipescaleandanyotherdepositsoffthesoleplatewithadampclothanda
non-abrasive(liquid)cleaner.
Tokeepthesoleplatesmooth,avoidhardcontactwithmetalobjects.Neverusea
scouringpad,vinegarorotherchemicalstocleanthesoleplate.
3 Cleantheupperpartoftheappliancewithadampcloth.
4 Regularlyrinsethewatertankwithwater.Emptythewatertankaftercleaning.
Use the Calc-Clean function once every two weeks. If the water in your area is very
hard (i.e. when akes come out of the soleplate during ironing), use the Calc-Clean
function more frequently.
1 Setthesteamcontroltothe‘nosteam’position(Fig.2).
2 SetthetemperaturedialtoMAX.
3 Fillthewatertanktothemaximumlevel.
Donotpourvinegarorotherdescalingagentsintothewatertank.
4 Putthemainspluginthewallsocket.
5 Unplugtheironwhenthetemperaturelightgoesout.
6 HoldtheironoverthesinkandsetthesteamcontroltotheCalc-Clean
position.
7 HoldthesteamcontrolattheCalc-Cleanpositionandgentlyshaketheiron
untilallthewaterinthetankhasbeenusedup(Fig.8).
, Steamandboilingwatercomeoutofthesoleplate.Scale(ifany)isushedout.
8 AfteryouhaveusedtheCalc-Cleanfunction,setthesteamcontroltothe‘no
steam’position.
9 RepeattheCalc-Cleanprocessifthewaterthatcomesoutoftheironstill
containsscaleparticles.
1 Connecttheirontothemainstoletthesoleplatedry.
2 Unplugtheironwhenthetemperaturelightgoesout.
3 Movetheirongentlyoverapieceofusedclothtoremoveanywaterstains
thathaveformedonthesoleplate.
4 Lettheironcooldownbeforeyoustoreit.
1 Unplugtheapplianceandsetthesteamcontroltothe‘nosteam’position.
2 Emptythewatertank(Fig.9).
3 Windthemainscordroundthecordstoragefacility.(Fig.10)
4 Storetheirononitsheelinasafeanddryplace.
Поздравляем с покупкой продукции Philips! Для получения полной поддержки,
оказываемой компанией Philips, зарегистрируйте прибор на веб-сайте www.
philips.com/welcome.
Крышка наливного отверстия
Парорегулятор
- = минимальная подача пара
- = максимальная подача пара
- t= глажение без пара
- u= функция очистки от накипи Calc-Clean
Индикатор нагрева
Сетевой шнур
Резервуар
Подошва
Дисковый регулятор нагрева
Перед началом эксплуатации прибора внимательно ознакомьтесь с настоящим
руководством и сохраните его для дальнейшего использования в качестве
справочного материала.
- Запрещается погружать утюг в воду.
- Перед подключением прибора убедитесь, что номинальное напряжение,
указанное на заводской бирке, соответствует напряжению местной
электросети.
- Не пользуйтесь прибором, если сетевая вилка, сетевой шнур или сам
прибор имеют видимые повреждения, а также если прибор роняли, или он
протекает.
- В случае повреждения сетевого шнура его необходимо заменить. Чтобы
обеспечить безопасную эксплуатацию прибора, заменяйте шнур только в
авторизованном сервисном центре Philips.
- Не оставляйте включенный в сеть прибор без присмотра.
- Данный прибор не предназначен для использования лицами (включая
детей) с ограниченными возможностями сенсорной системы или
ограниченными умственными или физическими способностями, а также
лицами с недостаточным опытом и знаниями, кроме как под контролем и
руководством лиц, ответственных за их безопасность.
- Не позволяйте детям играть с прибором.
- Сетевой шнур не должен касаться горячей подошвы утюга.
- Если прибор оснащен вилкой с заземлением, его необходимо подключать
только к заземленной розетке.
- Регулярно проверяйте, не поврежден ли сетевой шнур.
- Прикосновение к сильно нагретой подошве утюга может привести к
ожогам.
- По окончании глажения во время очистки утюга при наполнении
резервуара или слива воды, а так же в случае, если утюг даже на короткое
время оставлен без присмотра, установите парорегулятор в положение
глажения без пара, поставьте утюг вертикально и отключите его от
электросети.
- Используйте и устанавливайте прибор на горизонтальной, ровной и
устойчивой поверхности.
- Прибор предназначен только для домашнего использования.
Данный прибор Philips соответствует всем стандартам в отношении
электромагнитных полей (ЭМП). В соответствии с современными научными
данными при правильном обращении согласно инструкциям, приведенным в
руководстве пользователя, применение прибора безопасно.
1 Удалитевсенаклейкиизащитныепленкисподошвыутюга.
2 Нагрейтеутюгдомаксимальнойтемпературы.
3 Втечениенесколькихминутпроглаживайтевлажнуюткань,чтобы
удалитьзагрязнениесподошвыутюга.
Примечание: При первом включении утюга возможно незначительное выделение
дыма, которое вскоре прекратится.
Запрещаетсяпогружатьутюгвводу.
1 Убедитесь,чтоприборотключенотэлектросети.
2 Установитепарорегуляторвположениеглажениябезпара(Рис.2).
3 Наклонитеутюгназад.
4 Откройтекрышкуналивногоотверстия(Рис.3).
5 Заполнитерезервуардляводыдоотметкимаксимальногоуровня
водопроводнойводой.(Рис.4)
НезаполняйтерезервуардляводывышеотметкиМАХ.
Недобавляйтевпарогенератордухи,уксус,крахмал,химическиесредствадля
удалениянакипи,добавкидляглаженияилидругиехимическиесредства.
Примечание: Если водопроводная вода в вашей местности слишком жесткая,
рекомендуется разбавить её равным количеством дистиллированной воды или
использовать только дистиллированную воду.
6 Закройтекрышкуналивногоотверстия.
1 Поставьтеутюгвертикально.
2 Задайтенужнуютемпературуглажения,повернувдисковыйрегулятор
нагревавнеобходимоеположение(Рис.5).
Проверьте, какая рекомендуемая температура глажения указана на ярлыке
текстильного изделия (памятке по уходу):
1 Синтетические ткани (например, акрил, вискоза, полиамид, полиэстер)
1 Шелк
2 Шерсть
3 Хлопок, лен
Если материал изделия неизвестен, определите температуру глажения,
прогладив участок, незаметный при носке или использовании изделия.
Изделия, изготовленные из шелка, шерстяных и синтетических материалов,
следует гладить с изнанки, чтобы не допустить появления лоснящихся пятен.
Начинайте глажение с изделий из синтетических волокон, для которых
требуется минимальная температура глажения.
3 Вставьтевилкушнурапитаниявзаземленнуюрозеткуэлектросети.
, Загоритсяиндикаторнагрева(Рис.6).
4 Начинатьглажениеследуетчерезнекотороевремяпослетого,как
погаснетиндикаторнагрева.
Во время глажения индикатор нагрева периодически загорается.
1 Убедитесь,чторезервуардляводызаполнен.
2 Установитерекомендуемуютемпературуглажения(см.разделУстановка
температурывглавеПодготовкаприборакиспользованию).
3 Послетого,какпогаснетиндикаторнагрева,установитепарорегуляторв
соответствующееположение.Убедитесь,чтоположениепарорегулятора
соответствуетглажениюс:(Рис.7)
Температурные режимы от 2 до 3 используются для минимальной подачи
пара 1.
Температурные режимы от 3 до MAX используются для максимальной
подачи пара 2.
Пар начинает выходить при достижении установленного уровня нагрева.
1 Установитепарорегуляторвположениеглажениябезпара(Рис.2).
2 Установитерекомендуемуютемпературуглажения(см.разделУстановка
температурывглавеПодготовкаприборакиспользованию).
- Do not throw away the appliance with the normal household waste at the end
of its life, but hand it in at an ofcial collection point for recycling. By doing this,
you help to preserve the environment (Fig. 11).
If you need service or information or if you have a problem, please visit the Philips
website at www.philips.com or contact the Philips Consumer Care Centre in your
country (you nd its phone number in the worldwide guarantee leaet). If there is
no Consumer Care Centre in your country, go to your local Philips dealer.
This chapter summarises the most common problems you could encounter with your
iron. If you are unable to solve the problem, contact the Consumer Care Centre in
your country.
Problem Cause Solution
The iron is plugged
in but the soleplate
is cold.
There is a connection
problem.
Check the mains cord, the plug and the
wall socket.
The temperature dial is
set to MIN.
Set the temperature dial to the required
temperature.
The iron does not
produce any steam.
There is not enough
water in the water tank.
Fill the water tank (see chapter ‘Preparing
for use’).
The steam control is set
to the ‘no steam’ position.
Set the steam control to a steam setting
(see chapter ‘Using the appliance’).
Water leaks from
the soleplate during
ironing.
The iron is not hot
enough.
Set the temperature dial to a
temperature suitable for steam ironing (
2 to MAX). Put the iron on its heel and
wait until the temperature light goes out
before you start ironing.
Flakes and impurities
come out of the
soleplate during
ironing.
You have used hard
water, which has caused
scale akes to develop
inside the soleplate.
Use the Calc-Clean function one or
more times (see chapter ‘Cleaning and
maintenance’).
Water leaks from
the soleplate while
the iron cools down
or after it has been
stored.
You have put the iron in
horizontal position while
there is still water in the
water tank.
Empty the water tank and set the steam
control to the ‘no steam’ position before
you store the iron (see chapter ‘Storage’).
Store the iron on its heel.
1 Отключитеутюготэлектросетиидайтеемуостыть.
2 Удалитенакипьидругиезагрязнениясподошвыутюгаспомощью
лоскутаткани,смоченногонеабразивным(жидким)чистящимсредством.
Чтобысохранитьповерхностьподошвыутюгагладкой,оберегайтеееот
контактаствердымиметаллическимипредметами.Запрещаетсяприменять
дляочисткиподошвыутюгагубкисабразивнымпокрытием,уксусили
химическиевещества.
3 Верхнююповерхностьприбораможноочищатьвлажнойтканью.
4 Регулярнопромывайтерезервуардляводы.Послепромывкиводу
необходимослить.
Используйте функцию очистки от накипи один раз в две недели. Если вода в
вашей местности очень жесткая (в этом случае при глажении из подошвы утюга
выпадают хлопья), функцию очистки от накипи необходимо использовать чаще.
1 Установитепарорегуляторвположениеглажениябезпара(Рис.2).
2 УстановитедисковыйрегуляторнагревавположениеМАХ.
3 Заполнитерезервуардляводыдоотметкимаксимальногоуровня.
Недобавляйтеврезервуардляводыуксусидругиесредствадляудаления
накипи.
4 Вставьтевилкусетевогошнураврозеткуэлектросети.
5 Когдаиндикаторнагревапогаснет,отключитеутюготэлектросети.
6 Удерживаяутюгнадраковиной,установитепарорегуляторвположение.
7 УстановитепарорегуляторвположениеочисткиотнакипиCalc-Clean,
слегкапотряситеутюг,поканезакончитсяводаврезервуаре(Рис.8).
, Изподошвыутюгабудутвыходитьпарикипящаявода,вымываяхлопья
накипи(приналичии).
8 ПослеиспользованияфункцииCalc-Cleanустановитепарорегуляторв
положениеглажениябезпара.
9 Есливвыходящейводеостаютсячастицынакипи,повторитеоперацию
очисткиCalc-Clean.
1 Подключитеутюгкэлектросетиивысушитеподошву.
2 Когдаиндикаторнагревапогаснет,отключитеутюготэлектросети.
3 Осторожнопроведитеутюгомпоненужнойткани,чтобыудалитьс
подошвыостаткиводы.
4 Передтемкакпоместитьутюгвместохранения,дайтеемуостыть.
1 Отключитеустройствоотсети,установитепарорегуляторвположение
глажениябезпара.
2 Слейтеводуизрезервуарадляводы(Рис.9).
3 Намотайтешнурпитаниянаприспособлениедляхранения
шнура.(Рис.10)
4 Хранитеутюг,установивегоназаднийторецкорпуса,всухоми
безопасномместе.
- После окончания срока службы не выбрасывайте прибор вместе с
бытовыми отходами. Передайте его в специализированный пункт для
дальнейшей утилизации. Этим вы поможете защитить окружающую
среду (Рис. 11).
Для получения дополнительной информации, обслуживания или в случае
возникновения проблем посетите веб-сайт Philips www.philips.com или
обратитесь в центр поддержки потребителей Philips в вашей стране
(номер телефона центра указан на гарантийном талоне). Если подобный центр в
вашей стране отсутствует, обратитесь в местную торговую организацию Philips.
Данный раздел посвящен наиболее общим вопросам относительно
использования утюга. Если самостоятельно справиться с возникшими
проблемами не удается, обратитесь в центр поддержки покупателей Philips в
вашей стране.
Проблема Причина Способырешения
Утюг включен в
сеть, но подошва
холодная.
Неправильное
подключение.
Проверьте исправность шнура питания,
вилки и розетки электросети.
Дисковый
регулятор нагрева
установлен в
позицию MIN.
Установите необходимую температуру,
повернув дисковый регулятор нагрева в
соответствующее положение.
Утюг не
вырабатывает пара.
В резервуаре
недостаточно воды.
Заполните резервуар водой (см. главу
Подготовка к использованию).
Парорегулятор
установлен в
положение
глажения без пара.
Установите парорегулятор в положение
глажения с паром (см. главу “Эксплуатация
прибора”).
Во время глажения
из отверстий в
подошве утюга
выходит вода.
Утюг недостаточно
горячий.
Установите терморегулятор в положение
для глажения с паром (от 2 до MAX).
Установите утюг вертикально и дождитесь
выключения индикатора нагрева перед
началом глажения.
Во время глажения
из отверстий
подошвы
поступают хлопья
накипи и грязь.
В результате
использования
жесткой воды
в отверстиях
подошвы
образовалась
накипь.
Воспользуйтесь несколько раз функцией
очистки от накипи Calc-Clean (см. главу
Чистка и обслуживание).
После глажения
или хранения
утюга из
отверстий
подошвы вытекает
вода.
Утюг был
установлен в
горизонтальное
положение, в
то время как
в резервуаре
оставалась вода.
Перед тем как убрать утюг на хранение,
слейте воду из резервуара для воды и
установите парорегулятор в положение
глажения без пара (см. главу “Хранение”).
Храните утюг в вертикальном положении.
4239.000.7578.1.indd 1 04-11-09 23:46

Join the conversation about this product
Here you can share what you think about the Philips GC1420 Iron. If you have a question, first carefully read the manual. Requesting a manual can be done by using our contact form.