GB GB
GB GB GB
DE/AT/CH
Please note, once the battery indicator lights up,
the lights no longer comply with the Road Traffic Act.
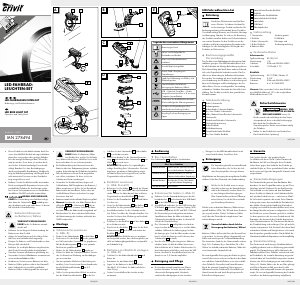
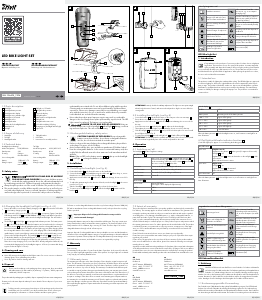
Installation
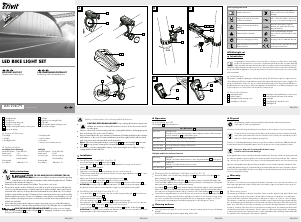
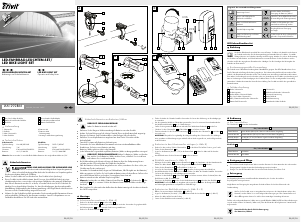
Installing the headlight
(see Fig. A)
Unscrew the retaining screw
3
from the bracket
1
.
Position the bracket
1
in the desired location on
the handlebar. If necessary, use the reducer
rubbers
2
to ensure an optimal fit.
Reinstall the retaining screw
3
.
Tighten the screw hand tight. To prevent damage,
do not use tools for this step.
To adjust to the optimal angle to the direction of
travel, loosen the angle adjustment screw
7
2–3 turns using a cross-tip screwdriver.
Adjust to the desired angle and tighten the angle
adjustment screw
7
.
Slide the headlight
6
into the bracket
1
until
you hear it lock into place.
To release, press the headlight lock
8
and slide
the headlight
6
forward out of the bracket
1
.
ATTENTION! Routinely verify the headlamp ad-
justment. The light cone must point straight ahead,
in the direction of travel, and must not be adjusted
too high so as not to blind oncoming traffic.
Installing the tail light
(see Fig. B and C)
Secure the bracket
9
to the seat post or the rear
cross-bar using the rubber tab
11
. Be sure there
are no objects in front of the tail light
14
.
Tighten and hook in the rubber tab
11
.
Loosen the retaining screw
15
on the bracket
9
and adjust to the desired angle.
Then tighten the screw. Tighten the screw hand
tight. To prevent damage, do not use tools for
this step.
Slide the tail light
14
into the bracket
9
until you
hear it lock into place.
To release the tail light
14
, pull down on the tail
light lock
10
and slide off the tail light
14
.
ATTENTION! The tail lamp must be installed
and adjusted so the reference axis is parallel to
the median longitudinal plane of the vehicle and
parallel to the road.
Inserting batteries into the tail
light (see Fig. D)
Slide the battery cover
16
off to the back.
Remove the battery compartment
17
.
Insert the batteries in the rear light (4 x AAA
1.5 V). Verify correct polarity.
Then reassemble the light.
Operation
Switching on / off
The headlight
6
has three brightnesses.
On/Off switch
press once Power mode (40 Lux) for riding
in unlit areas
press twice Standard mode (20 Lux) for
riding in lit areas
press three times Eco mode (10 Lux) for riding in
well lit areas
press four times off
Charging the headlight
(see Fig. E)
Remove the rubber cover from the battery charg-
ing socket
19
and connect the USB cable
18
to
the battery charging socket
19
.
Then connect the USB plug of the USB cable
18
to a computer/laptop/standard USB charger
with 5 V DC and 500–1000 mA. Using chargers
with different specifications can damage the re
-
chargeable battery, thus the headlight. Doing so
will void the warranty.
The headlight
6
has a battery indicator. If the
indicator lights up red, the rechargeable batteries
are drained. The indicator will light up green
whilst charging. When the rechargeable batteries
are ready to be used again, the indicator will ex
-
tinguish and you can use the headlight
6
.
For the built-in rechargeable battery to operate at
full power, please do not charge the battery for
less than 6 hours the first time. Please do not stop
charging sooner, even if the LED is already extin
-
guished. After this, a charging time of approx.
3.5 hours is recommended.
Cleaning and Care
Never fully immerse the lights. Do not use corro-
sive or abrasive cleaning agents. Doing so will
damage the lights.
Clean the LED bicycle light set with a slightly
damp, lint-free cloth.
Disposal
The packaging is made of environmentally
friendly materials, which may be disposed
of through your local recycling facilities.
Contact your local refuse disposal authority for more
details on how to dispose of your worn-out product.
To help protect the environment, please
dispose of the product properly, not with-
out household waste, when it has reached
the end of its useful life. Please contact
your local authority for information on col
-
lection points and their opening hours.
Defective or used batteries/rechargeable batteries
must be recycled according to 2006 / 66 / EC and its
amendments. Return batteries/rechargeable batteries
and / or the appliance using the recycling facilities
provided.
Environmental damage due to
incorrect battery/rechargeable
battery disposal!
Never dispose of batteries/rechargeable batteries in
your household waste. They may contain toxic heavy
metals and are subject to hazardous waste regula
-
tions. The chemical symbols of the heavy metals are:
Cd = cadmium, Hg = mercury, Pb = lead. Therefore,
dispose of used batteries/rechargeable batteries
through your local collection site.
Improper battery disposal destroys valuable resources
and the hazardous substances in the batteries may pose
a significant danger to the health and environment.
Separate collection/disposal of old batteries prevents
dangers to the health and environment, and valuable
resources regained by recycling.
Warranty
Dear customer,
This device is covered by a 3-year warranty from the
date of purchase. In the event of product defects, you
have legal rights against the retailer of this product.
Your statutory rights are not limited in any way by our
warranty detailed below.
Warranty terms
The warranty period begins on the date of purchase.
Please retain the original receipt safely. This documen
-
tation is required as the proof of purchase. Should a
defect in material or manufacture occur within three
years from the date of purchase of this product, we
will repair or replace - at our choice - it free of charge.
This warranty is conditional on the defective device
and the receipt of purchase being presented within
the three year warranty period, and that there is a
brief written description of the nature of the defect
and of the date it arose. If the defect is covered by
our warranty, you will receive the repaired product or
a replacement. A repair or exchange of the device
does not extend a new warranty period. The warranty
period will not be extended by repairs made under
warranty. This also applies to replaced and repaired
parts. Any damage or defects present at the time of
purchase must be reported immediately after unpack
-
ing. Repairs made after the expiration of the warranty
period are subject to payment.
Extent of warranty
The device was manufactured to strict quality guide-
lines and diligently inspected prior to shipment. The
warranty applies to defects in material or manufac
-
ture. This warranty does not apply to product parts
subject to regular wear and therefore considered
wear parts or damage to fragile parts, e.g. switches,
rechargeable batteries, or made from glass. This war
-
ranty becomes void if the device has been damaged
or improperly used or maintained. Proper use of the
product requires strictly observing all instructions for
use. Purposes and practices which the operating in
-
structions warn of or advise against must be avoided
without fail. This product is only intended for private,
non-commercial use. Any incorrect or improper use of
the device, use of force and changes not performed
by our authorized service branch will void the warranty.
Please follow the instructions below to ensure your
claim is processed quickly:
· Please have your receipt and the product num
-
ber ready as your proof of purchase.
· Please refer to the type plate or the cover sheet
of these instructions for the product number.
· In the event of malfunctions or other defects,
please first contact the following service depart
-
ment by phone or e-mail.
· A product determined defective may then be
returned to the specified service address free of
charge, including the proof of purchase (receipt)
and information about the defect and when it
occurred. Please note, the service department
must be notified before returning the product!
This and many other manuals, product videos and
software are available for download at
www.lidl-service.com.
GB
KLB GmbH
Diekbree 8, DE-48157 Münster, GERMANY
Tel: +49 2 51 132 37 57
www.klb-service.eu
IAN 278494
Protection type: IP44 according to
DIN EN 60529
Rechargeable Li-ion battery: 1300 mAh, 3.7 V
Backlight
Model designation: XC-117DK6 / Quattro L3
Rated output: 0.3 W
Protection type: IP44 according to
DIN EN 60529
Batteries: 4 x 1.5 V AAA LR03
Note: Only use rechargeable 1.2 V batteries or
comparable 1.5 V alkaline batteries for the rear light.
Safety instructions
DANGER TO
LIFE AND RISK OF ACCIDENT
FOR INFANTS AND CHILDREN!
Never leave children unsupervised with the pack
-
ing material due to the suffocation hazard posed
by swallowing parts thereof. Children frequently
underestimate the dangers.
Always keep the product away from children. This
product is not a toy!
This product is not intended to be used by per-
sons (including children) with impaired physical,
sensory or mental capacity, or lacking experience
or knowledge unless supervised by a person re
-
sponsible for their safety. Please note, damages
caused by incorrect handling, non-compliance
with the operating instructions or interference with
the device by unauthorised individuals are excluded.
Never take the product apart. Improper repairs
may result in considerable danger to the user.
Repairs should only be carried out by specialist
personnel. The LED lights are not replaceable.
RISK OF LOSS OF LIFE
AND ACCIDENT! Using the incorrect charger
may cause the headlight
6
to be damaged,
overheat or even explode. Doing so will void the
warranty.
Safety advice concerning
batteries/rechargeable
batteries
CAUTION! EXPLOSION HAZ-
ARD! Never recharge the batteries!
Remove batteries during extended periods of non-use.
When inserting the battery ensure the polarity is
correct! This is shown in the battery compartment.
If necessary, clean the battery and device con-
tacts before inserting the battery.
Remove spent batteries immediately from the
device. There is an increased risk of leaks!
Always replace all the batteries at the same time.
Do not mix alkaline batteries and rechargeable
batteries.
Never mix old and new batteries.
Do not dispose of battery/rechargeable batteries
in household waste!
Every consumer is legally obliged to dispose of
batteries/rechargeable batteries in the proper
manner!
CAUTION! EXPLOSION HAZ-
ARD! Keep battery/rechargeable
batteries away from children, do not
throw batteries/rechargeable batteries into fire,
do not short-circuit and do not take apart.
Failure to observe this notice may result in deep
discharging the batteries. This poses a risk of
leaking.
If the batteries have leaked inside the product,
please remove them immediately to prevent
product damage!
Avoid contact with the skin, eyes and mucous
membranes if fluid has leaked from the batter
-
ies / rechargeable battery. In the event of contact
with battery acid, thoroughly flush the affected
area with clean water and seek immediate medi
-
cal attention.
Never recharge single-use batteries! Explosion
hazard!
Note: If the red rechargeable battery/battery
control light
5
13
on the headlight
6
or the tail
light
14
lights up, please replace the batteries or
recharge the rechargeable batteries immediately.
List of pictograms used
Read the instructions!
Danger to life and risk of accident for
infants and children!
Observe the warnings and safety notices!
Caution! Explosion hazard!
Green Dot - Packaging recycling.
Symbol identifying electrical and
electronic devices.
Environmental damage through incorrect
disposal of the batteries/rechargeable
batteries!
USB – Universal Serial Bus – Connection
port, e.g. on a computer (charging only).
K XXXXX
Federal Motor Transport Authority test
symbol (K followed by approval number).
Product and packaging should be disposed
in an environmentally friendly manner.
21
PAP
Recycling code for cardboard disposal.
LED Bike Light Set
Introduction
Congratulations on the purchase of your
new device. In doing so you have chosen
a top-quality product. The instructions for
use are to be considered as part of this product. It
contains important safety, assembly and disposal in
-
formation. Before using the product, please familiarise
yourself with all the safety information and instructions
for use. The product must only be used as described
and for the specified fields of application. If you pass
the product on to anyone else, please be sure to also
include all documentation.
Intended use
This product is suitable for lighting the roadway whilst
cycling. The LED Bicycle Light Set is approved as ex
-
clusive lighting for all bicycles. Light distribution must
not be impaired by other bicycle parts or luggage.
The product is intended for outdoor use. Any use
other than the aforementioned or any product modifi
-
cation is prohibited and can result in injuries and
product damage. The manufacturer is not liable for
damages resulting from improper use. This product is
not intended for commercial use.
Parts Description
1
Headlight bracket
2
Reducer rubber
3
Headlight bracket retaining screw
4
Headlight on/off switch
5
Headlight battery/rechargeable battery control light
6
Headlight
7
Headlight angle adjustment screw
8
Headlight lock
9
Backlight bracket
10
Backlight lock
11
Backlight bracket rubber tab
12
Backlight on/off switch
13
Backlight battery control lamp
14
Backlight
15
Backlight retaining screw
16
Backlight battery cover
17
Battery compartment
18
USB cable
19
Charging socket
Scope of delivery
1 Headlight
1 Backlight
1 Headlight bracket
1 Backlight bracket
4 Batteries AAA
Reducer rubbers
1 USB cable
1 Instructions for assem
-
bly and use
Technical Data
Headlight
Model designation: XC-195 / LI-1
Rated output: 1 W
Anweisungen genau einzuhalten. Verwendungszwecke
und Handlungen, von denen in der Bedienungsanleitung
abgeraten oder vor denen gewarnt wird, sind unbedingt
zu vermeiden. Das Produkt ist lediglich für den privaten
und nicht für den gewerblichen Gebrauch bestimmt. Bei
missbräuchlicher und unsachgemäßer Behandlung,
Gewaltanwendung und bei Eingriffen, die nicht von
unserer autorisierten Service-Niederlassung vorge
-
nommen wurden, erlischt die Garantie.
Um eine schnelle Bearbeitung Ihres Anliegens zu ge
-
währleisten, folgen Sie bitte den folgenden Hinweisen:
· Bitte halten Sie für alle Anfragen den Kassenbon
und die Artikelnummer als Nachweis für den
Kauf bereit.
· Die Artikelnummer entnehmen Sie bitte dem
Typenschild oder dem Titelblatt dieser Anleitung.
· Sollten Funktionsfehler oder sonstige Mängel
auftreten, kontaktieren Sie bitte zunächst die
nachfolgend benannte Serviceabteilung telefo
-
nisch oder per E-Mail.
· Ein als defekt erfasstes Produkt können Sie dann
unter Beifügung des Kaufbelegs (Kassenbon)
und Angabe, worin der Mangel besteht und
wann er aufgetreten ist, für Sie portofrei an die
Ihnen mitgeteilte Service-Anschrift übersenden.
Bitte beachten Sie, dass unbedingt vor Versand
die Serviceabteilung informiert werden muss!
Auf www.lidl-service.com können Sie diese und viele
weitere Handbücher, Produktvideos und Software
herunterladen.
DE
KLB GmbH
Diekbree 8, DE-48157 Münster, DEUTSCHLAND
Tel: 02 51 132 37 57
www.klb-service.eu
AT
KLB GmbH
Diekbree 8, DE-48157 Münster, DEUTSCHLAND
Tel: +49 2 51 132 37 57
www.klb-service.eu
CH
KLB GmbH
Diekbree 8, DE-48157 Münster, DEUTSCHLAND
Tel: +49 2 51 132 37 57
www.klb-service.eu
IAN 278494
KLB GMBH
Diekbree 8
DE-48157 Münster, GERMANY
Stand der Informationen · Last
Information Update: 10 / 2016
Ident.-No.: 14128102016-DE

Join the conversation about this product
Here you can share what you think about the Crivit IAN 278494 Bicycle Light. If you have a question, first carefully read the manual. Requesting a manual can be done by using our contact form.