
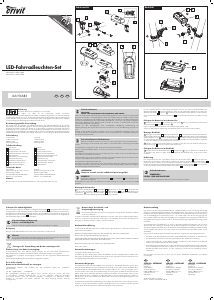
GB/IE/NI
Artikel-Nr. / Item No. 14159
LED BIKE LIGHT SET
LED-FAHRRADLEUCHTEN-SET
Bedienungs- und Sicherheitshinweise
LED BIKE LIGHT SET
Operation and safety notes
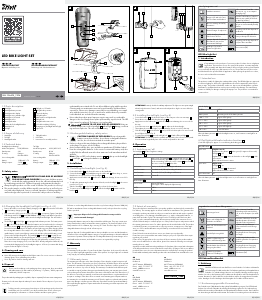
B
14
13
D
16
A
7
1
8
ESC
F1
~
`
!
1
F2
@
TAB
CAPS
USB
16
4
5
6
C
12
2b
2a
2a
2b
11a
11b
3
17
12
14
10
9
10
18
17
13
15
IAN 326408_1904
List of pictograms used
Read the instructions!
USB – Universal Serial Bus – inter-
face to port, e.g. on a computer
(charging only)
Danger to life and risk of acci-
dents for infants and children!
K XXXXX
German Federal Motor Transport
Authority test symbol (K followed
by approval number)
Observe warnings and safety
information!
Dispose of the product and packa-
ging in an environmentally-friendly
manner.
Caution! Danger of explosion!
21
PAP
Recycling code for the disposal of
cardboard
Symbol identifying electrical
and electronic devices
Product meets the applicable Euro-
pean product-specific directives.
Improper disposal of recharge-
able batteries may result in
environmental damage!
01
PET
Recycling code for the disposal of
polyester fibres and films
Splash-proof, protection
against foreign bodies
Direct current (DC)
LED Bike Light Set
1. Introduction
Congratulations on the purchase of your new product. You have chosen a high-qua-
lity product. The instructions for use are a part of this product. It contains important
safety, assembly and disposal information. Before using the product, please familia-
rise yourself with all safety notes and instructions for use. The product must only be used as
described and for the specified fields of application. When passing the product on to others,
be sure to also include all documentation.
1.1 Intended use
This product is suitable for lighting the roadway whilst cycling. The LED bike light set is approved
as exclusive lighting for all bicycles. Light distribution must not be impaired by other bicycle
parts or cargo. The product is intended for outdoor use. Any use not described above or product
modification is prohibited and can result in injuries and product damage. The manufacturer
assumes no liability for damage resulting from improper use. This product is not intended for
commercial use.
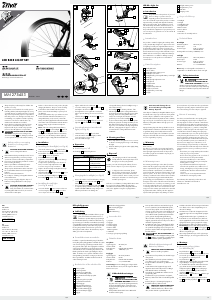
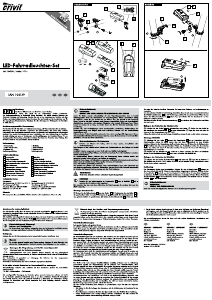
1.2 Parts description
1
Headlight
2a
Headlight battery monitor
2b
Headlight mode display
3
Headlight sensor indicator light
4
Headlight on/off switch
5
Headlight sensor
6
Headlight bracket
7
Rubber tab for headlight bracket
8
Headlight lock
9
Tail light
10
Tail light on / off switch
11a
Tail light battery monitor
11b
Day-mode display
12
Tail light bracket
13
Rubber tab for tail light bracket
14
Tail light lock
15
Tail light bracket star screw
16
USB cable including USB plug
17
Charging port (headlight and tail light)
18
Light sensor
1.3 Scope of delivery
1 Headlight
1 Tail light
1 Headlight bracket
1 Tail light bracket
1 USB cable
1 Instructions for assembly and use
1.4 Technical data
Headlight (auto-dimming)
Model designation: LI-3B / XC-266A
Rated power: 2 W
IP rating: IP44 per
DIN EN 60529
Li-ion rechargeable
battery: 1300 mAh, 3.7 V
Charger output: 5 V DC
max. 1000 mA
Tail light
Model designation: LR-3B / XC-316SP
Rated power: 0.2 W
IP rating: IP44 per
DIN EN 60529
Li-ion rechargeable
battery: 300 mAh, 3.7 V
Charger output: 5 V DC
max. 1000 mA
2. Safety notes
DANGER TO LIFE AND RISK OF ACCIDENT
FOR INFANTS AND CHILDREN! Never leave children unsuper-
vised with the packing material due to the suffocation hazard posed
by swallowing parts thereof. Children frequently underestimate the dangers.
Always keep the product out of the reach of children. This product is not a toy!
This product may be used by children aged 8 years and up, as well as by per-
sons with reduced physical, sensory or mental capacities or lacking experience
and knowledge when supervised or instructed in safe product use and they
understand the associated risks. Do not allow children to play with the product.
Cleaning and user maintenance must not be performed by children without
supervision. Please note, damages caused by incorrect handling, non-compli-
ance with the instructions for use or interference with the device by unauthor-
ised individuals are excluded from the warranty.
Never take the product apart. Improper repairs may result in considerable
danger to the user. Always have repairs performed by a professional. The LED
lights cannot be replaced. The battery is not replaceable.
DANGER TO LIFE AND RISK OF ACCIDENTS! Using an
incorrect charger can result in headlight
1
and tail light
9
damage, overheat-
ing and even explosion. This will void the warranty.
2.1 Rechargeable battery safety notes
CAUTION! DANGER OF EXPLOSION! Keep rechargeable
batteries away from children, do not throw rechargeable batteries
into fire, do not short-circuit and do not take apart.
Failure to observe this may discharge the rechargeable battery beyond their
end voltage. This poses a risk of leaking.
Avoid contact with the skin, eyes and mucous membranes if fluid has leaked
from the rechargeable batteries. In the event of contact with battery acid, thor-
oughly flush the affected area with clean water and seek immediate medical
attention.
Note: If the red LED on the battery monitor
2a
,
11a
lights up on the headlight
1
or tail light
9
, recharge the batteries promptly.
3. Installation
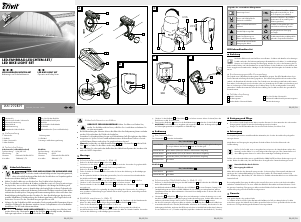
3.1 Installing the headlight (see Fig. A)
Position the bracket
6
in the desired location on the handlebar.
Secure the bracket
6
to the handlebar using the rubber tab
7
. When doing so, ensure
that there are no objects in front of the headlight
1
.
Apply tension to the rubber tab
7
and hook in. To prevent damage, do not use tools for
this step.
To adjust the optimum angle to the direction of travel, turn the headlight
1
to the correct
position (see Fig. A).
Slide the headlight
1
into the bracket
6
until you hear it lock into place.
To remove, press the headlight lock
8
and slide the headlight
1
forward out of the
bracket
6
.
ATTENTION! Routinely check the headlamp adjustment. The light cone must point straight
ahead, in the direction of travel, and must not be adjusted too high so as not to blind on-
coming traffic.
3.2 Installing the tail light (see Fig. B)
Secure the bracket
12
in the desired location on the seat post or the rear seat stays
13
.
Ensure the are no objects blocking the tail light
9
.
Apply tension to the rubber tab
13
and hook in. To prevent damage, do not use tools for
this step.
Loosen the star screw
15
on the bracket
12
and adjust to the desired angle.
Then tighten the screw hand tight. To prevent damage, do not use tools for this step.
Slide the tail light
9
into the bracket
12
until you hear it lock into place. Be sure to install
the tail light as shown in Fig. B.
To remove the tail light
9
, press the tail light lock
14
and take off the tail light
9
.
ATTENTION! The tail lamp must be installed and adjusted so the reference axis is paral-
lel to the median longitudinal plane of the vehicle and parallel to the road.
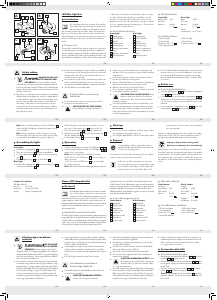
4. Operation
4.1 Switching on / off
The headlight
1
has three brightness settings.
On / Off switch
4
press once
Auto mode: The headlight
1
is equipped with a sensor
5
which automatically adjusts the brightness of the headlight
1
to the surroundings. When the sensor is active
5
(auto-mode),
the sensor control light
3
flashes blue.
press twice Power mode (60 Lux) for riding in unlit areas
press three times Standard mode (30 Lux) for riding in lit areas
press four times Eco mode (15 Lux) for riding in well-lit areas
press five times Power off
Mode display
2b
Sensor mode lowest LED flashes
(The upper 3 LEDs display the light intensity)
4 LEDs 60 lux
3 LEDs 30 lux
Mode display
2b
2 LEDs 15 lux
Battery status: Operating mode of the battery monitor
100 % - 75 % 4 green LEDs light up
75 % - 50 % 3 green LEDs light up
50 % - 25 % 2 green LEDs light up
25 % - 10 % 1 green LED lights up
10 % - 0 % 1 red LED flashes
When the battery monitor
2a
for the headlight comes on, it will continue to emit light for at
least 30 minutes.
4.2 Tail light with brake indicator function
9
(3 red LEDs light up for approx. 3 seconds during the braking process)
On / Off switch
10
press once
Daytime mode
Daytime mode indicator
11b
flashes green (for approx. 60 seconds).
Tail light
9
is off.
Brightness sensor
18
is active and switches on the tail light
9
in dark
environments.
Brake indicator function is active.
press twice
Night mode
Tail light
9
is on.
Brightness sensor
18
is deactivated.
Brake indicator function is active.
press three times
off
When the battery monitor
11a
for the tail light comes on, it will continue to emit light for at
least 30 minutes.
4.3 Charging the headlight / tail light (see Fig. A + D)
Remove the rubber cover from the battery charging socket
17
and connect the USB cable
16
to the battery charging socket
17
.
Then connect the USB connector on the USB cable
16
to a computer / laptop / standard
USB-charger with 5 V DC
and 500-1000mA. Using charger with different specifica-
tions can damage the batteries, and in turn the headlight and tail light. This will void the
warranty.
The headlight
1
and tail light
9
are equipped with a battery monitor. The battery moni-
tor
2a
for the headlight flashes red when the batteries are low and need to be recharged.
The battery monitor
11a
for the tail light lights up blue when the rechargeable batteries are
low and need to be recharged. The battery monitor lights up green whilst charging. When
the rechargeable batteries are ready for use, all 4 charging LEDs of the headlight rechar-
geable battery control system light up continuously and the rechargeable battery control
system on the tail light extinguishes. The headlight
1
and tail light
9
are ready for use.
For the built-in batteries to operate at full power, be sure to charge the headlight battery
for at least 6 hours when charging for the first time (tail light battery: at least 5 hours).
Please do not stop charging sooner, even if the LED is already extinguished. After this, the
recommended charging time for the headlight is approx. 4.5 hours (recommended charg-
ing time for the tail light is 2.5 hours).
5. Cleaning and care
Never fully immerse the headlight and tail light in water. Do not use corrosive or abrasive
cleaning agents. These will damage the product.
Use a dry, lint-free cloth for cleaning and care.
6. Disposal
b
a
Please note the markings on the packaging when sorting waste, these are marked
with abbreviations (a) and numbers (b) meaning: 1-7: plastics / 20-22: paper and
cardboard / 80-98: composites.
The product and the packaging are recyclable, dispose separately for better waste management.
Contact your local waste disposal authority for more details of how to dispose of your worn-
out product.
To help protect the environment, please dispose of the product properly when it has
reached the end of its useful life, not in the household waste. Please contact your
municipality for information on collection facilities and their opening hours.
Defective or used rechargeable batteries must be recycled according to Directive 2006/66/
EC and its amendments. Return rechargeable batteries and / or the product to the recycling
facilities provided.
Improper disposal of rechargeable batteries may result in
environmental damage!
Rechargeable batteries may not be disposed with household waste. They may contain toxic
heavy metals and are subject to hazardous waste regulations. The chemical symbols of the
heavy metals are: Cd = cadmium, Hg = mercury, Pb = lead. Therefore dispose of used re-
chargeable batteries through a local collection point.
Improper disposal of rechargeable batteries destroys valuable resources and the hazardous
substances in the rechargeable batteries may pose a significant danger to human health and
environment. Separate collection/disposal of rechargeable batteries prevents dangers to hu-
man health and environment, and valuable resources are regained by recycling.
7. Warranty
Dear customer,
The warranty for this product is 3 years from the date of purchase. In the event of product de-
fects, you have legal rights against the retailer of this product. Your legal rights are not limited
in any way by our warranty detailed below.
7.1 Warranty terms
The warranty period begins on the date of purchase. Please keep the original receipt in a safe
place. This document is required as your proof of purchase. Should this device show any fault
in materials or manufacture within three years from date of purchase, it will be repaired or re-
placed - at our choice - by us free of charge. This warranty is conditional on the defective prod-
uct and the receipt of purchase being presented within the three year warranty period, and
on there being a brief written description of the nature of the defect and of the date it arose. If
the defect is covered by our warranty, we will return the repaired device or replacement thereof.
A repair or exchange of the device does not extend a new warranty period. Repairs made un-
der warranty do not extend the warranty period. This also applies to replaced and repaired
parts. Any damage or defects present at the time of purchase must be reported immediately
after unpacking the appliance. Repairs made after the warranty period has expired are sub-
ject to payment.
7.2 Extent of warranty
The product has been manufactured to strict quality guidelines and meticulously examined be-
fore delivery. The warranty applies to defects in material or manufacture. This guarantee does
not apply to product parts which are subject to normal wear and tear and can be regarded
as wearing parts, or for damage to breakable parts, e.g., switch, rechargeable batteries, or
parts which are made of glass. This warranty becomes void if the product has been dam-
aged, or used or maintained improperly. All instructions provided in the instructions for use
must be followed strictly to constitute proper use of the product. Purposes and practices which
the operating instructions warn of or advise against must be avoided without fail. This product
is intended for private, non-commercial use only. Any incorrect or improper use of the appli-
ance, use of force and modifications not performed by our authorized service branch will
void the warranty.
Please follow the instructions below to ensure your claim is processed quickly:
Please have your receipt and the item number ready as your proof of purchase when enquir-
ing about your product.
Please refer to the type plate or the cover sheet of these instructions for the product number.
In the event of malfunctions or other defects, please first contact the following service depart-
ment by phone or e-mail.
A product recorded as defective along with the proof of purchase (sales receipt) and a description
of the defect and when it occurred can then be returned free of charge to the service address
provided. Please note, the service department must be notified before returning the product!
Download this and many other manuals, product videos and software from www.lidl-service.com.
GB
KLB GmbH
Diekbree 8
48157 Münster, GERMANY
Phone: +49 2 51 132 37 57
www.klb-service.eu
IE
KLB GmbH
Diekbree 8
48157 Münster, GERMANY
Phone: +49 2 51 132 37 57
www.klb-service.eu
NI
KLB GmbH
Diekbree 8
48157 Münster, GERMANY
Phone: +49 2 51 132 37 57
www.klb-service.eu
IAN 326408_1904
GB/IE/NIGB/IE/NIGB/IE/NIGB/IE/NI
GB/IE/NI GB/IE/NI GB/IE/NI
Legende der verwendeten Piktogramme
Anweisungen lesen!
USB – Universal Serial Bus –
Verbindungsstelle zum Anschluss,
z. B. an einen Computer (nur aufla-
den)
Lebens- und Unfallgefahr für
Kleinkinder und Kinder!
K XXXXX
Deutsches Prüfzeichen des Kraft-
fahrt-Bundesamtes (K mit nach-
folgender Zulassungsnummer)
Warn- und Sicherheitshinweise
beachten!
Produkte und Verpackungen
sollen umweltschonend entsorgt
werden.
Vorsicht! Explosionsgefahr!
21
PAP
Recycling-Code zur Entsorgung
von Pappe
Symbol zur Erkennung von
Elektro- und Elektronikgeräten
Produkt entspricht den produkt-
spezifisch geltenden europäischen
Richtlinien.
Umweltschäden durch falsche
Entsorgung der Akkus!
01
PET
Recycling-Code zur Entsorgung
von Polyesterfasern und Folien
Spritzwassergeschützt,
Schutz vor Fremdkörpern
Gleichstrom (DC)
LED-Fahrradleuchten-Set
1. Einleitung
Herzlichen Glückwunsch zum Kauf Ihres neuen Produktes. Sie haben sich damit für
ein hochwertiges Produkt entschieden. Die Bedienungsanleitung ist Bestandteil dieses
Produktes. Sie enthält wichtige Hinweise zur Sicherheit, Montage und Entsorgung.
Machen Sie sich vor der Benutzung des Produktes mit allen Bedien- und Sicherheitshinweisen
vertraut. Benutzen Sie das Produkt nur wie beschrieben und für die angegebenen Einsatzbe-
reiche. Händigen Sie alle Unterlagen bei Weitergabe des Produktes an Dritte mit aus.
1.1 Bestimmungsgemäße Verwendung
Das Produkt ist zur Fahrbahnausleuchtung beim Fahrradfahren geeignet. Das LED-Fahrrad-
leuchten-Set ist für alle Fahrräder als alleinige Beleuchtung zugelassen. Die Lichtverteilung
darf durch keine anderen Fahrradteile oder Gepäckstücke behindert werden. Das Produkt ist
zur Anwendung im Außenbereich bestimmt. Eine andere Verwendung als zuvor beschrieben
DE/AT/CH

Join the conversation about this product
Here you can share what you think about the Crivit IAN 326408 Bicycle Light. If you have a question, first carefully read the manual. Requesting a manual can be done by using our contact form.