DE/AT/CH
GB/IE/NI GB/IE/NI GB/IE/NI
GB/IE/NIGB/IE/NIGB/IE/NI
Improper disposal of rechargeable batteries destroys valuable resources and the hazardous substances in
the rechargeable batteries may pose a significant danger to human health and environment. Separate
collection/disposal of rechargeable batteries prevents dangers to human health and environment, and
valuable resources are regained by recycling.
7. Warranty
Dear customer,
The warranty for this product is 3 years from the date of purchase. In the event of product defects, you
have legal rights against the retailer of this product. Your legal rights are not limited in any way by our
warranty detailed below.
7.1 Warranty terms
The warranty period begins on the date of purchase. Please keep the original receipt in a safe place. This
document is required as your proof of purchase. Should this device show any fault in materials or manu
-
facture within three years from date of purchase, it will be repaired or replaced - at our choice - by us free
of charge. This warranty is conditional on the defective product and the receipt of purchase being presented
within the three year warranty period, and on there being a brief written description of the nature of the
defect and of the date it arose. If the defect is covered by our warranty, we will return the repaired device
or replacement thereof. A repair or exchange of the device does not extend a new warranty period. Repairs
made under warranty do not extend the warranty period. This also applies to replaced and repaired parts.
Any damage or defects present at the time of purchase must be reported immediately after unpacking the
appliance. Repairs made after the warranty period has expired are subject to payment.
7.2 Extent of warranty
The product has been manufactured to strict quality guidelines and meticulously examined before delivery.
The warranty applies to defects in material or manufacture. This guarantee does not apply to product parts
which are subject to normal wear and tear and can be regarded as wearing parts, or for damage to break
-
able parts, e.g., switch, rechargeable batteries, or parts which are made of glass. This warranty becomes
void if the product has been damaged, or used or maintained improperly. All instructions provided in the
instructions for use must be followed strictly to constitute proper use of the product. Purposes and practices
which the operating instructions warn of or advise against must be avoided without fail. This product is in
-
tended for private, non-commercial use only. Any incorrect or improper use of the appliance, use of force
and modifications not performed by our authorized service branch will void the warranty.
Please follow the instructions below to ensure your claim is processed quickly:
Please have your receipt and the item number ready as your proof of purchase when enquiring about
your product.
Please refer to the type plate or the cover sheet of these instructions for the product number.
In the event of malfunctions or other defects, please first contact the following service department by
phone or e-mail.
A product recorded as defective along with the proof of purchase (sales receipt) and a description of the
defect and when it occurred can then be returned free of charge to the service address provided. Please
note, the service department must be notified before returning the product!
Download this and many other manuals, product videos and software from www.lidl-service.com.
Then connect the USB connector on the USB cable
16
to a computer / laptop / standard USB-
charger with 5 V DC and 500-1000mA. Using charger with different specifications can damage the
batteries, and in turn the headlight and tail light. This will void the warranty.
The headlight
1
and tail light
9
are equipped with a battery monitor. The battery monitor
2
for
the headlight flashes red when the batteries are low and need to be recharged. The battery monitor
11
for the tail light lights up red when the batteries are low and need to be recharged. The battery
monitor lights up green whilst charging. When the batteries are ready for use, all 4 charging LEDs of
the headlight battery monitor light up, on the tail light the battery monitor extinguishes. The headlight
1
and tail light
9
are ready for use.
For the built-in batteries to operate at full power, be sure to charge the headlight battery for at least
6 hours when charging for the first time (tail light battery: at least 5 hours). Please do not stop charg-
ing sooner, even if the LED is already extinguished. After this, the recommended charging time for the
headlight is approx. 3.5 hours (recommended charging time for the tail light is 2.5 hours).
5. Cleaning and care
Never fully immerse the headlight and tail light in water. Do not use corrosive or abrasive cleaning
agents. These will damage the product.
Use a dry, lint-free cloth for cleaning and care.
6. Disposal
The packaging is made from environmentally-friendly materials which can be disposed of through your
local recycling facilities.
Contact your local waste disposal authority for more details of how to dispose of your worn-out product.
To help protect the environment, please dispose of the product properly when it has reached
the end of its useful life, not in the household waste. Please contact your municipality for infor
-
mation on collection facilities and their opening hours.
Defective or used rechargeable batteries must be recycled according to Directive 2006/66/EC and its
amendments. Return rechargeable batteries and / or the product to the recycling facilities provided.
Improper disposal of rechargeable batteries may result in environmental
damage!
Rechargeable batteries may not be disposed with household waste. They may contain toxic heavy metals
and are subject to hazardous waste regulations. The chemical symbols of the heavy metals are: Cd =
cadmium, Hg = mercury, Pb = lead. Therefore dispose of used rechargeable batteries through a local
collection point.
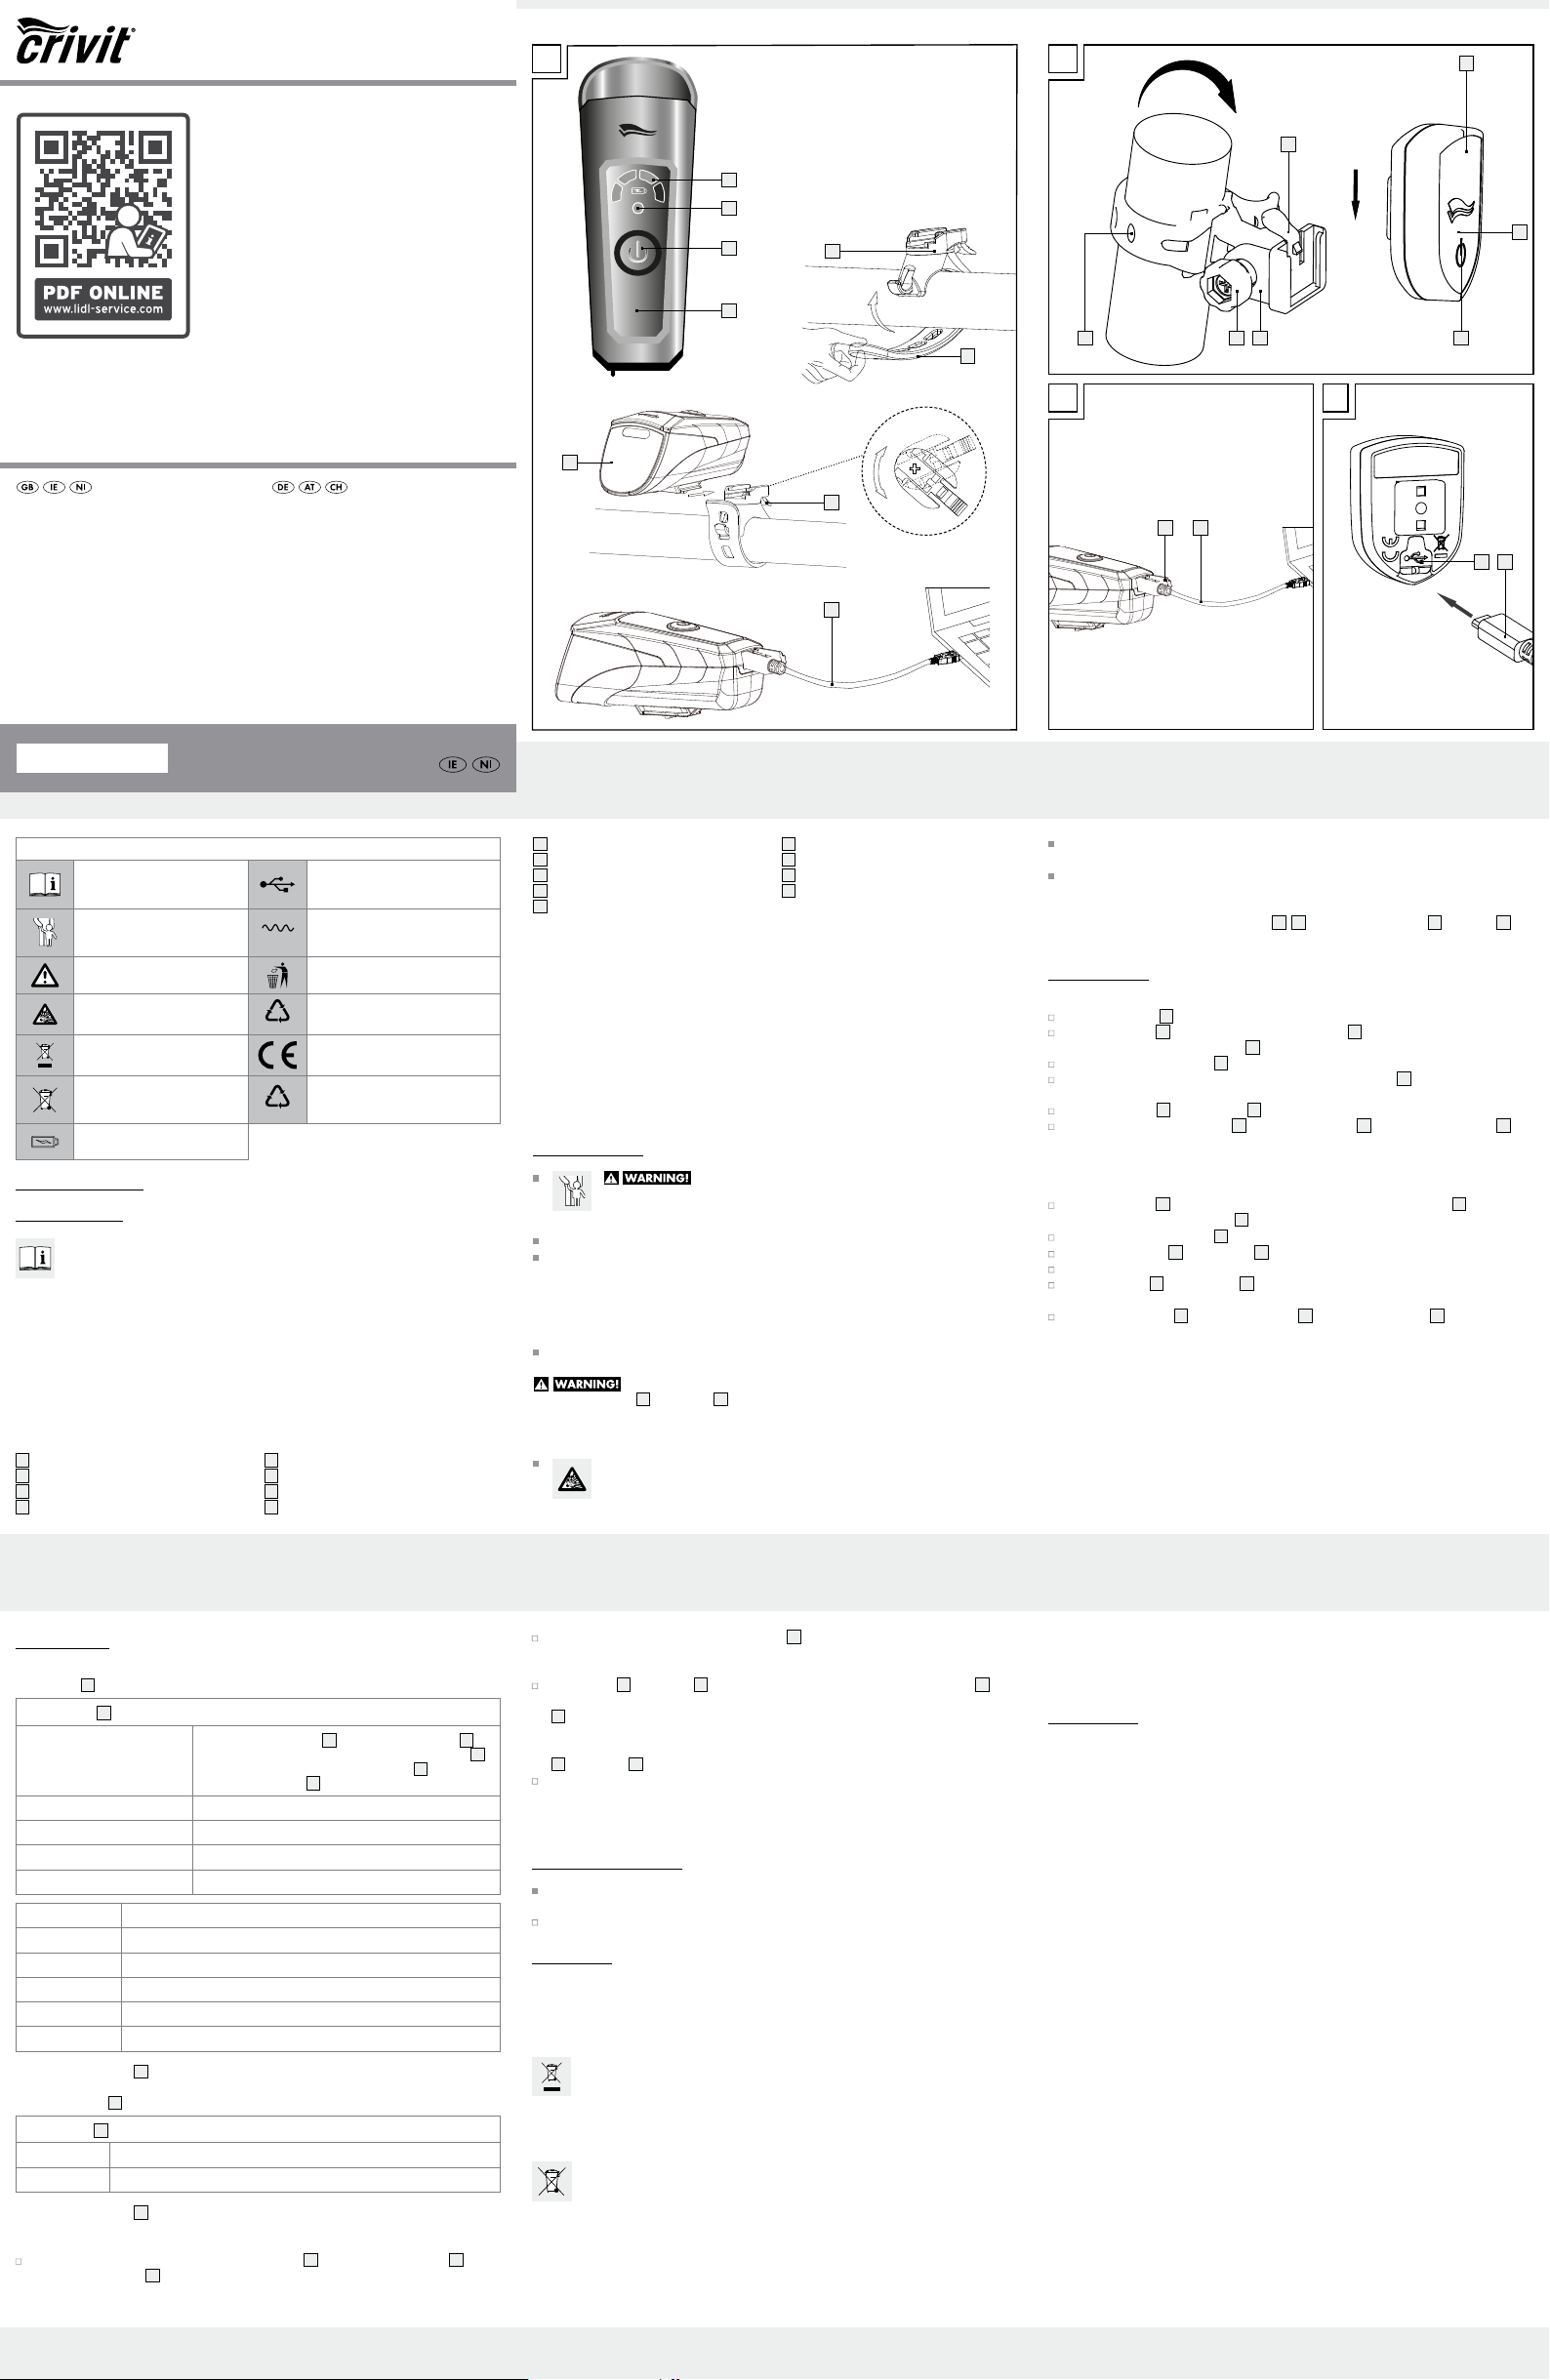
4. Operation
4.1 Switching on / off
The headlight
1
has three brightness settings.
On / Off switch
4
press once
Auto mode: The headlight
1
is equipped with a sensor
5
which automatically adjusts the brightness of the headlight
1
to the surroundings. When the sensor is active
5
(auto-mode),
the sensor control light
3
flashes green.
press twice Power mode (60 Lux) for riding in unlit areas
press three times Standard mode (30 Lux) for riding in lit areas
press four times Eco mode (15 Lux) for riding in well-lit areas
press five times Power off
Battery status: Operating mode of the battery monitor
100 % - 75 % 4 green LEDs light up
75 % - 50 % 3 green LEDs light up
50 % - 25 % 2 green LEDs light up
25 % - 10 % 1 green LED lights up
10 % - 0 % 1 red LED flashes
When the battery monitor
2
for the headlight comes on, it will continue to emit light for at least 30 minutes.
4.2 Tail light
9
On/Off switch
10
press once Power on
press twice Power off
When the battery monitor
11
for the tail light comes on, it will continue to emit light for at least 30 minutes.
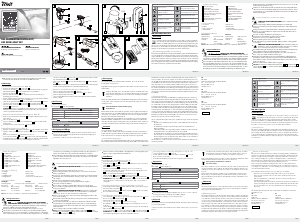
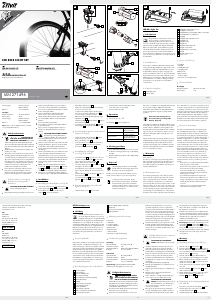
4.3 Charging the headlight / tail light (see Fig. C + D)
Remove the rubber cover from the battery charging socket
17
and connect the USB cable
16
to the
battery charging socket
17
.
Failure to observe this may discharge the rechargeable battery beyond their end voltage. This poses
a risk of leaking.
Avoid contact with the skin, eyes and mucous membranes if fluid has leaked from the rechargeable
batteries. In the event of contact with battery acid, thoroughly flush the affected area with clean water
and seek immediate medical attention.
Note: If the red LED on the battery monitor
2
,
11
lights up on the headlight
1
or tail light
9
,
recharge the batteries promptly.
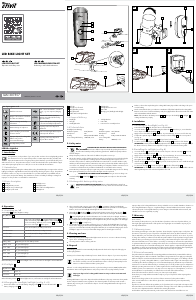
3. Installation
3.1 Installing the headlight (see Fig. A)
Position the bracket
6
in the desired location on the handlebar.
Secure the bracket
6
to the handlebar using the rubber tab
7
. When doing so, ensure that there
are no objects in front of the headlight
1
.
Apply tension to the rubber tab
7
and hook in. To prevent damage, do not use tools for this step.
To adjust the optimum angle to the direction of travel, turn the headlight
1
to the correct position
(see Fig. A).
Slide the headlight
1
into the bracket
6
until you hear it lock into place.
To remove, press the headlight lock
8
and slide the headlight
1
forward out of the bracket
6
.
ATTENTION! Routinely check the headlamp adjustment. The light cone must point straight ahead, in
the direction of travel, and must not be adjusted too high so as not to blind oncoming traffic.
3.2 Installing the tail light (see Fig. B)
Secure the bracket
12
in the desired location on the seat post or the rear seat stays
13
. Ensure the
are no objects blocking the tail light
9
.
Apply tension to the rubber tab
13
and hook in. To prevent damage, do not use tools for this step.
Loosen the star screw
15
on the bracket
12
and adjust to the desired angle.
Then tighten the screw hand tight. To prevent damage, do not use tools for this step.
Slide the tail light
9
into the bracket
12
until you hear it lock into place. Be sure to install the tail light
as shown in Fig. B.
To remove the tail light
9
, press the tail light lock
14
and take off the tail light
9
.
ATTENTION! The tail lamp must be installed and adjusted so the reference axis is parallel to the me
-
dian longitudinal plane of the vehicle and parallel to the road.
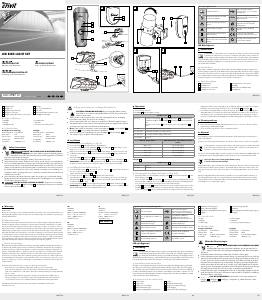
9
Tail light
10
Tail light on / off switch
11
Tail light battery monitor
12
Tail light bracket
13
Rubber tab for tail light bracket
14
Tail light lock
15
Tail light bracket star screw
16
USB cable
17
Charging port (headlight and tail light)
1.3 Scope of delivery
1 Headlight
1 Tail light
1 Headlight bracket
1 Tail light bracket
1 USB cable
1 Instructions for assembly and use
1.4 Technical data
Headlight (auto-dimming) Tail light
Model designation: LI-3A / XC-266 Model designation: LR-2 / XC-249
Rated power: 2 W Rated power: 0.2 W
IP rating: IP44 per DIN EN 60529 IP rating: IP44 per DIN EN 60529
Li-ion rechargeable battery: 1300 mAh, 3.7 V Li-ion rechargeable
battery: 300 mAh, 3.7 V
2. Safety notes
DANGER TO LIFE AND RISK OF ACCIDENT FOR INFANTS
AND CHILDREN! Never leave children unsupervised with the packing material due to
the suffocation hazard posed by swallowing parts thereof. Children frequently underesti
-
mate the dangers.
Always keep the product out of the reach of children. This product is not a toy!
This product may be used by children aged 8 years and up, as well as by persons with reduced phys-
ical, sensory or mental capacities or lacking experience and knowledge when supervised or in-
structed in safe product use and they understand the associated risks. Do not allow children to play
with the product. Cleaning and user maintenance must not be performed by children without supervi
-
sion. Please note, damages caused by incorrect handling, non-compliance with the instructions for use
or interference with the device by unauthorised individuals are excluded from the warranty.
Never take the product apart. Improper repairs may result in considerable danger to the user. Always
have repairs performed by a professional. The LED lights cannot be replaced.
DANGER TO LIFE AND RISK OF ACCIDENTS! Using an incorrect charger can
result in headlight
1
and tail light
9
damage, overheating and even explosion. This will void the
warranty.
2.1 Rechargeable battery safety notes
CAUTION! DANGER OF EXPLOSION! Keep rechargeable batteries away from
children, do not throw rechargeable batteries into fire, do not short-circuit and do not take
apart.
List of pictograms used
Read the instructions!
USB – Universal Serial Bus – interface
to port, e.g. on a computer (charging
only)
Danger to life and risk of accidents
for infants and children!
K XXXXX
German Federal Motor Transport
Authority test symbol (K followed by
approval number)
Observe warnings and safety
information!
Dispose of the product and packaging
in an environmentally-friendly manner
Caution! Danger of explosion!
21
PAP
Recycling code for the disposal of
cardboard
Symbol identifying electrical and
electronic devices
Product meets the applicable European
product-specific directives
Improper disposal of rechargeable
batteries may result in
environmental damage!
01
PET
Recycling code for the disposal of
polyester fibres and films
Headlight battery monitor
LED Bike Light Set
1. Introduction
Congratulations on the purchase of your new product. You have chosen a high-quality product.
The instructions for use are a part of this product. It contains important safety, assembly and
disposal information. Before using the product, please familiarise yourself with all safety notes
and instructions for use. The product must only be used as described and for the specified fields of appli
-
cation. When passing the product on to others, be sure to also include all documentation.
1.1 Intended use
This product is suitable for lighting the roadway whilst cycling. The LED bike light set is approved as exclusive
lighting for all bicycles. Light distribution must not be impaired by other bicycle parts or cargo. The product is
intended for outdoor use. Any use not described above or product modification is prohibited and can
result in injuries and product damage. The manufacturer assumes no liability for damage resulting from
improper use. This product is not intended for commercial use.
1.2 Parts description
1
Headlight
2
Headlight battery monitor
3
Headlight sensor indicator light
4
Headlight on/off switch
5
Headlight sensor
6
Headlight bracket
7
Rubber tab for headlight bracket
8
Headlight lock
IAN 307557
Artikel-Nr. / Item No. 14148
B
10
14
121513
D
16
17
A
7
1
8
ESC
F1
~
`
16
2
3
4
5
6
LED BIKE LIGHT SET
LED-FAHRRADLEUCHTEN-SET
Bedienungs- und Sicherheitshinweise
C
1617
11
9
LED BIKE LIGHT SET
Operation and safety notes

Join the conversation about this product
Here you can share what you think about the Crivit IAN 307557 Bicycle Light. If you have a question, first carefully read the manual. Requesting a manual can be done by using our contact form.