
Open the front entrance making sure that the zip is fully
undone. Roll the entrance fully back and secure in place
w
ith the loop and toggles.
Fit the inner tent starting with the base, connecting each
corner clip (which is fitted to an adjustable strap) to the
c
aptive receiver fitted to the tents groundsheet.
Next, working from the back, attaching each loop to it’s
respective toggle.
The entrance to the inner tents is
single skinned with a mesh panel at
the top, which has an internal zipped
curtain. The entrance can be zipped
closed or opened and rolled back out of
the way.
The inner tent is fitted with a rear window that is in line
with the rear vent of the flysheet. This allows light and
air to enter the sleeping area if required.
Breton 500 only...
The five berth inner tent is fitted with a divider which
can be used to create two separate areas. It can also be
un-zipped and rolled up to create one large area.
The front entrance is single skinned and can be rolled
back and retained by a set of loops and toggles.
When closed, the zip cover/baffle must be carefully
pressed into place ensuring the velcro tabs are aligned
and the skirt correctly positioned, secured by tent pegs,
to avoid water ingress should it rain.
The side entrance is duel skinned with one mesh (fly
screen)and one solid. One or both and can be rolled out
of the way or can be raised
to create a porch. Your
SunnCamp stockist can
supply as an additional
item, a set of porch poles
that simply slot together.
When used as a porch, insert
the spike end of the porch
poles into the eyelets at the
entrance’s two corner
pegging points, then hook a
guy rope over the spike and
secure to the ground with a
peg. Adjust each guy rope tension to bring the porch
square.
When closed, the zip cover/baffle must be carefully
secured into place, ensuring the velcro tabs are aligned
and the skirt correctly positioned, secured by tent pegs,
to avoid water ingress should it rain.
All windows have curtains, which can be
closed and are secured in place with
velcro tape.
When open, carefully roll the curtain and
secure with toggle and loop.
The rear and over window
vents are simple flaps that
are held closed by a Velcro
s
trip. When opened, a
small support is used to
‘prop’ the vent open.
Once the tent has been fully erected, check that the
weather skirting, to the base of the tent, is correctly laid
to help prevent water ingress. These can be secured in
place using the elasticated pegging points
It is advisable to have a ‘Fire’ bucket filled with water,
placed outside the tent.
Hopefully it will never be needed, but if it is, you will be
glad you made the effort.
The tent fabric is fire retardant, NOT fire proof and
therefore you must not smoke or use a naked flame in or
near it. This includes the traditional ‘camp fire’.
Guy ropes can cause a trip hazard and should be marked
so that passers by can see them.
Tent pegs are also a trip hazard and should not be left
‘half in’.
Cleaning…
Both inside and outside of the tent should only be
cleaned using fresh clean water and a damp cloth. Do not
use detergents or chemical cleaners.
Storing…
The tent is best stored in its original carry-bag. However,
if the tent is dismantled when wet, you MUST thoroughly
dry the tent as soon as possible.
After a wet pack-up, erect the tent as soon as possible
and allow its flysheet, guy ropes and of course the carry-
bag to fully dry naturally before repacking everything
away. If stored when the flysheet and/or guyropes are
wet, the tent will suffer from mildew and will become
unusable. Please note that damage caused by incorrect
storage is NOT covered by the manufacturer’s warranty.
Repairs…
Repairs to the tent should only be made by the
manufacturer’s recommended agents. Repairs made by an
unauthorised third party will make the manufacturer’s
warranty void.
This tent is designed for light use in normal weather
conditions. It is not suitable for storms, gales, sub zero
or tropical conditions.
Prolonged exposure to direct sunlight can weaken the
fabric of the tent. To avoid the risk of UV deterioration,
site the tent in a shaded area, where it will be protected
from exposure to strong sunlight.
UV DETERIORATION
STORM AND WEATHER SUITABILITY
INNER TENT
CLEANING, STORING AND REPAIRS
SAFETY
WEATHER SKIRT
VENTS
FRONT ENTRANCE
SIDE ENTRANCE
WINDOWS
sure that the pole body is
fully inserted into its
a
djoining ferrule. Steel
legs simply slot together.
Take all shock corded poles and slot together. Next, slot
t
he steel leg poles together.
Lay the tent out on the selected ground area with the
entrance correctly positioned.
Remove the protective transit bags from the six captive
elbow fittings. The elbow fittings are tethered to the
flysheet by elastic cord and should not be removed. Make
sure you place the protective bags in the tent carry-bag
for safe keeping.
Insert the black shock corded
poles into the sleeves marked
with a black band. Then insert the
end of each pole into the captive
elbow fittings. Note: the elbow
fitting has a narrow aperture for
the black poles and a wider
aperture for the steel poles.
Next, connect a steel leg to each elbow fitting. Each leg
end slots onto a pin on a ring. The pin and ring are
attached to an adjustable webbing strap.
The ring is also used as the
securing point for the tent
peg.
Starting with one pole, insert
the ring pin into the end of
the pole. Next, go to the
other end of the pole and
insert the ring pin. Repeat
with the remaining two.
You can now attach the pole clips onto each pole to bring
the tent flysheet into the correct
shape.
Bring the tent to an upright position
by pegging out the side guy ropes.
(These may need to be re-pegged at a
later stage.)
You should now ensure that all entrances
to the tent are closed with all zips fully
secured.
If this is not done now, the tent will be
out of alignment when fitting the tent
pegs.
Starting with the four corner tags, secure the tent to the
ground using the tent pegs. Then secure all remaining
tags.
When inserting into the ground,
the peg should be set at a 45-
degree angle away from the tent.
Pegs should be hammered into
the ground using a suitable
mallet and NOT pressed in with
the foot. Most bent pegs are caused by using your foot
rather than a mallet.
P
eg removal can be made easier if you use a suitable
extractor.
Pegs used to secure an entrance or
d
oor opening can be left slightly
raised. This will allow easy hooking
a
nd unhooking when opening or
closing the door.
Secure each guy rope, positioning
its peg at a suitable distance from
the tent.
Once in position, tighten the
ropes equally to bring the tent to
its natural shape. DO NOT over
tighten.
To tighten, hold the rope above
the slider and pull the slider up. To
release, hold the rope above the slider and pull the slider
down. Remember that all guy ropes are a trip hazard,
especially in the dark.
To improve the tents rigidity, the two
sets of roof tension poles will be
inserted inside the tent once the main
erection is complete.
Open the front entrance making sure
that the side zips are fully undone. Roll
it fully back and secure in place with
the loop and toggle.
Slot the first set of tension poles
together. Make sure that the mini quick
lock, fitted to one end of the roof pole,
is released to allow adjustment.
Next, insert the fixed end of the roof tension pole into
the left or right hand retainer sleeve at the rear of the
tent. Keep the pole captive within the retainer sleeve as
you walk to the front of the tent.
Raise the pole and insert the adjustable end section in to
the front retainer sleeve. Carefully pull the pole and end
section apart to bring them under tension, then close the
mini quick lock to retain the pole in place.
Once in place, secure the tension pole along the length
of the tent with the captive ribbons using a bow.
Finally, fit the remaining pole to the other side of the
tent.
Insert the front canopy pole into the
sleeve of the canopy. Both ends of
the pole are fitted with a spike which
is designed to fit into the metal eye
fitted to the upper most, front pole
clip fabric.
Starting at one side of the tent,
insert the spike end into the eyelet.
Next, go to the other end and insert the spike into the
opposite eyelet to bring the pole under tension.
FRONT CANOPY POLE
ROOF TENSION POLES
GUY ROPES
TENT PEGS
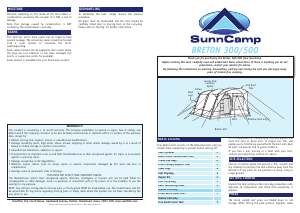
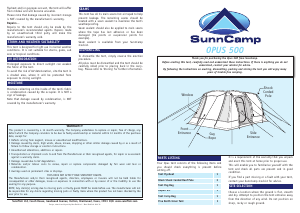
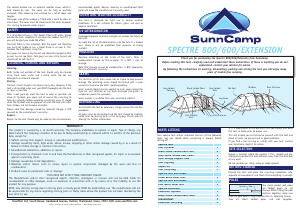
TENT
ENTRANCE
Captive
Elbow
Fitting
Steel
Leg
Canopy
Pole
Steel
Leg
Pole
Clip
Eyelet
Side
Skirt
Porch Pole
Spike
Porch
Guy
Rope


Join the conversation about this product
Here you can share what you think about the SunnCamp Breton 500 Tent. If you have a question, first carefully read the manual. Requesting a manual can be done by using our contact form.