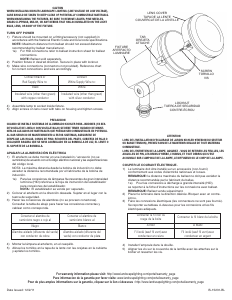
INSTRUCCIONES DE SEGURIDAD
LEA ESTO PRIMERO
CONSERVE ESTAS INSTRUCCIONES
PRECAUCIÓN – RIESGO DE DESCARGA ELÉCTRICA –
Desconecte la electricidad en el panel principal del interruptor automático o caja principal de fusibles antes de
comenzar y durante la instalación.
ADVERTENCIA:
Si el artefacto se instala a menos de 1,5m (5 pies) de las paredes interiores de la piscina, debe ser alimentado
por un transformador o una fuente de alimentación clasicada que cumpla con el artículo 680.23 (A) (2) del
NEC.
ADVERTENCIA:
Este artefacto está diseñado para ser instalado de acuerdo con las especicaciones del Código Nacional de
Electricidad (NEC) y del Código Local. El incumplimiento con estos códigos e instrucciones podrá provocar
lesiones graves y / o daños a la propiedad y anulará la garantía.
1) ADVERTENCIA: Este artefacto no se debe instalar a menos de 10 pies (3m) de una piscina, spa o fuente.
2) De acuerdo con los requisitos del Código Nacional de Electricidad (NEC), el cable para enterramiento
directodebeserenterradounmínimode6pulgadas[152mm]debajodelasuperciedelsuelo.
NOTA: Si se necesita cable para enterramiento directo adicional, póngase en contacto con su distribuidor
local Kichler®.
•Elcable8GApuedesercompradoenlongitudesde250pies(76m),15503-BK.
•Elcable10GApuedesercompradoenlongitudesde250pies(76m),15504-BK.
•Elcable12GApuedesercompradoenlongitudesde100pies(30m),15501-BK;250pies(76m),
15502-BK;500pies(152m),15505-BK;y1000pies(304m),15506-BK.
3) Las conexiones de cableado deben realizarse con el (los) dispositivo (s) de conexión de cable aprobado /
listadoadecuadoparalaaplicación.Noexcedalasespecicacionesdecombinacióndelcableadodel
fabricanteparaeltamañoylacantidaddeconductores.
PRECAUCIÓN
AL INSTALAR LA ILUMINACIÓN DE PAISAJE DE KICHLER (VOLTAJE DE LÍNEA O BAJA TENSIÓN), DEBE TENERSE CUIDA-
DO PARA MANTENERLO LIBRE DE MATERIALES POTENCIALMENTE COMBUSTIBLES.
CUANDO MANTENGA LOS ARTEFACTOS, ASEGÚRESE DE RETIRAR LAS HOJAS, AGUJAS DE PINO, RECORTES DE PASTO,
ABONO, O CUALQUIER DESPERDICIO QUE SE HAYA ACUMULADO EN EL FOCO (BOMBILLA), LENTE, O CUERPO DEL
ARTEFACTO.
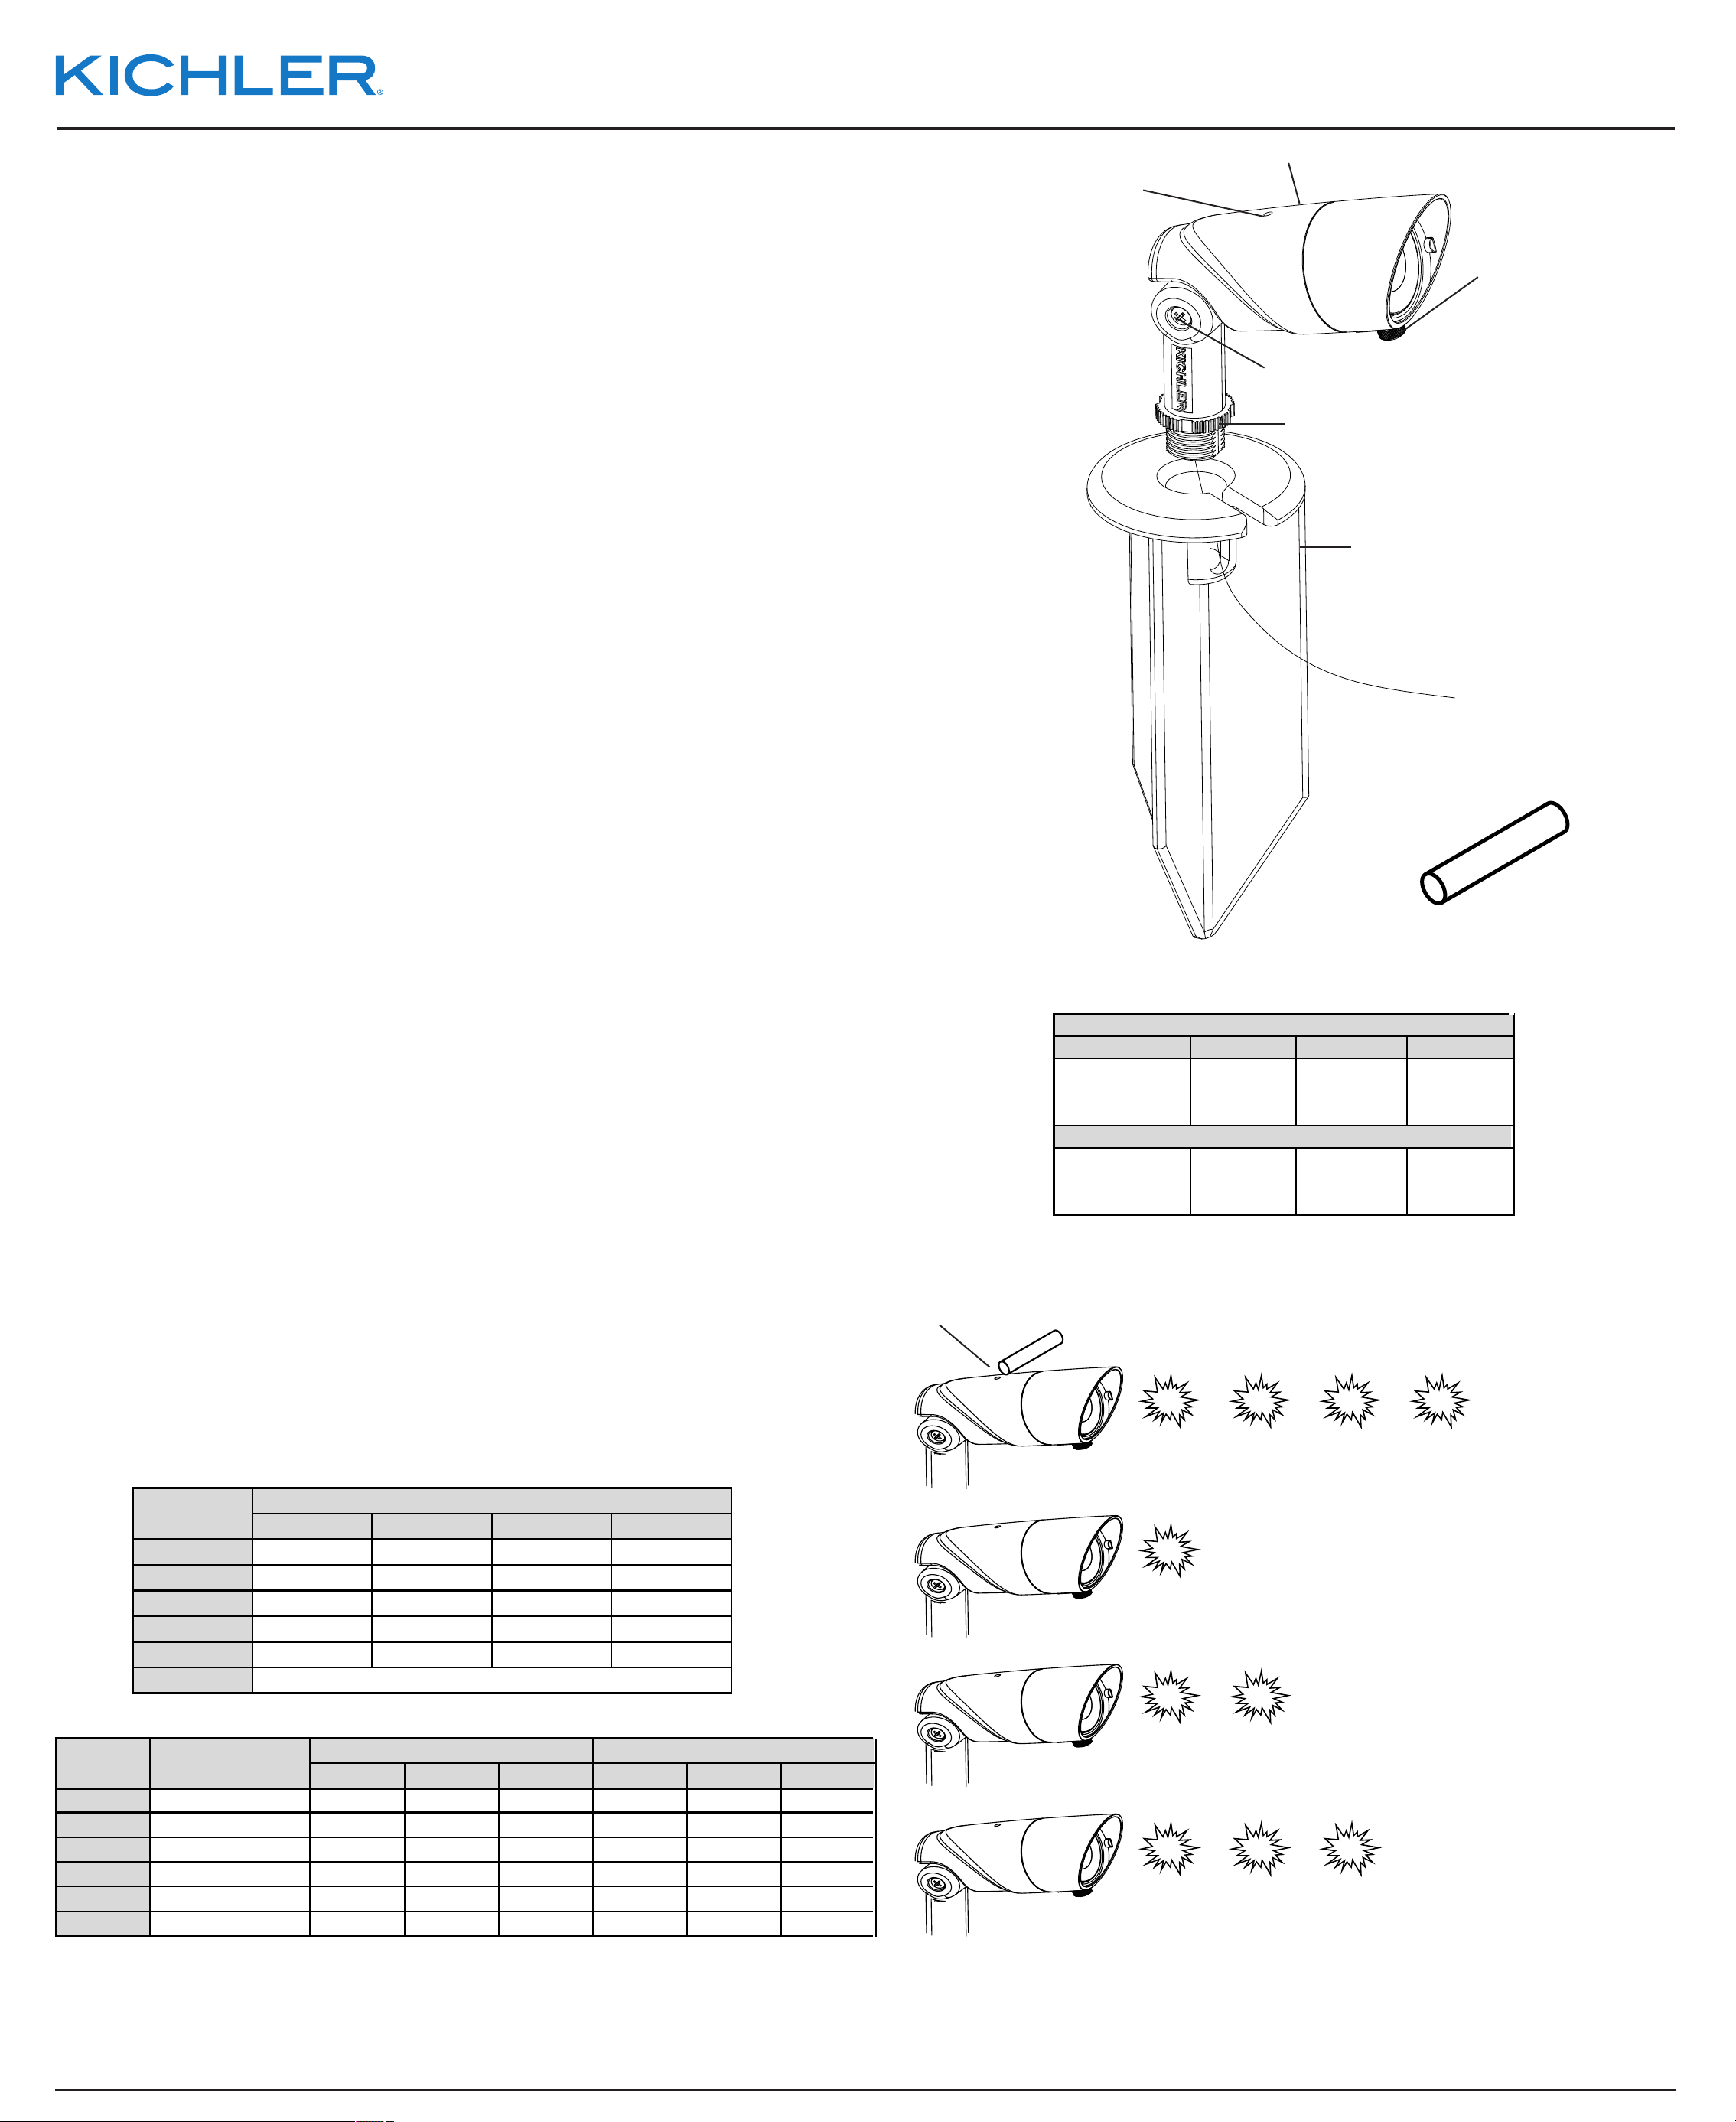
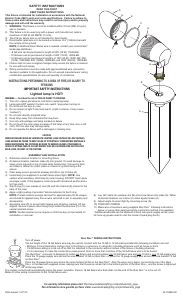
ENSAMBLAJE E INSTALACIÓN
1) Determine la ubicación deseada para el montaje del artefacto.
2) En la ubicación deseada, martille la estaca en el suelo. Para evitar daños a la estaca, coloque una
tablaenlapartesuperiordelaestacamientrasmartillea.Silatierraesduraylaestacaesdifícilde
instalar, haga un corte cruzado en la tierra con una pala plana.
3) Despeje el área en el suelo en la ranura de cable en la parte superior de la estaca.
4) Coloqueelcablede12Venlaranuradelcableadoyjeelartefactoenlaestaca.Apunteel
artefactoenladireccióndeseadayasegúreloapretandolatuercadeseguridad.Siesnecesario,
utiliceunallaveounalicateparaelajustenaldelatuerca.
5) AjusteelángulodelaluzdecontrasteaojandoeltornilloPhillips.
6) Ajusteelángulodelacampanaaojandoeltornillodemariposa.
7) DESCONECTE LA ENERGÍA.
8) Realicelasconexionesdecableutilizandolosconectoresdecablesuministradossiguiendolas
instrucciones incluidas, o usando otro método de conexión de cableado aprobado
(no suministrado).
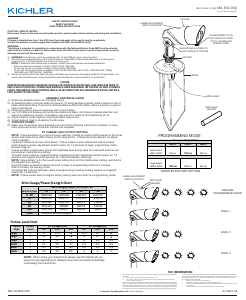
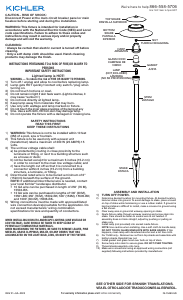
PARA CAMBIAR EL AJUSTE DE SALIDA DE LUZ:
• NOTA:Elartefactocambiaentérminosdeajustesdellumen;empiezaenelmedio(200lúmenes)
paralaacentuaciónpequeñayempiezaenlaparteinferior(400lúmenes)paralaacentuación
grande.Sisedeseanestosniveles,nosenecesitaningúnajuste.
• Localiceelhoyueloenlapartesuperiordelartefacto.(Estosellamaunlocalizadordeinterruptorde
ajuste de lumen)
• Mantengaelimánenellocalizadordelinterruptordeajustedellumendurante1.5segundospara
empezarelmododeprogramación.Remuevaelimán.
• Elartefactoparpadearácontinuamente4vecesenelniveldebrillototalyseapagarádurante2
segundosyluegoseiluminaráenelajusteoriginaldefábrica.
• Paracambiarlosajustesdellumen,elimándebevolveraaplicarseallocalizadordelinterruptorde
ajustedellumendurante1.5segundosyelimándeberetirarsedurante1segundo
entre la conmutación.
• NOTA: elartefactoparpadea1vezparaelajustedelumenmásbajo;2vecesparaelajustedel
lumenmedioy3vecesparaelajustedellumenmásalto.
• Unavezquesejaelartefactoyseremueveelimán,éstepermaneceenelmododeprogramación
durante 2 minutos.
• Despuésde2minutos,lamemoriaestáestablecida.
• Paracambiarlaluminosidaddelasalida,vuelvaalmododeprogramaciónmanteniendoelimánen
el localizador magnético durante 1.5 segundos.
• NOTA: Elartefactovuelvealaconguraciónoriginaldefábricacuandosevuelveaponerenmodo
de programación.
Para informacion de la garantia por favor visite: kichler.com/warranty
*INDICAAJUSTEDEFÁBRICA
MODODEPROGRAMACIÓN
LOCALIZADORDEL
INTERRUPTORDE
AJUSTEDELUMEN
IMÁNDECONMUTACIÓN
MODODE
PROGRAMACIÓN
ORIGINAL
NIVEL1
NIVEL2
NIVEL3
LOCALIZADORDELINTER-
RUPTORDEAJUSTEDE
LUMEN
ARTEFACTO
TORNILLOPHILLIPSPARAAJUSTAR
ELÁNGULODELARTEFACTO
TORNILLOPARAAJUS-
TARELÁNGULODE
LACAMPANAOPARA
AFLOJARYREMOVER
LACAMPANA
TUERCADESEGURIDAD
ESTACA
CABLES
CONDUCTORES
IMÁNDE
CONMUTACIÓN
NOTA: CuandodimensionesutransformadoruseelVAmásaltoqueespera
usar dependiendo del nivel de lumen deseado para evitar sobrecargar poten-
cialmente el transformador.
Estamos aquí para ayudarle 866-558-5706
Horario: Lunes-Viernes 9am a 5pm EST (hora ocial del este)
REV:02-MAR-2021
IS-16015-US
Este disposivo cumple con la parte 15 de las Reglas de la FCC. La operación es sujeto a las dos
condiciones siguientes:
1) Este disposivo no puede causar interferencia dañina, y
2) Este disposivo debe aceptar cualquier interferencia recibida, incluyendo interferencias que
puedan causar un funcionamiento no deseado.
Nota: Este equipo ha sido probado y cumple con los límites para un disposivo digital de Clase B, de
acuerdo con la parte 15 de las Reglas de la FCC. Estos límites están diseñados para proveer protección
razonable contra interferencias dañinas en una instalación residencial. Este equipo genera, uliza y
puede irradiar energía de radiofrecuencia y, si no se instala y uliza de acuerdo con las instrucciones,
puede causar interferencias en las comunicaciones por radio. Sin embargo, no hay garanzar que
no se produzcan interferencias en una instalación en parcular. Si este equipo causa interferencia
perjudicial a la recepción de radio o televisión, que puede determinarse encender y apagar el equipo,
se recomienda al usuario que intente corregir la interferencia mediante una o más de las siguientes
medidas:
• Reorientar o reubicar la antena receptora.
• Aumente la separación entre el equipo y el receptor.
• Conecte el equipo a una toma de corriente en un circuito disnto al que está conectado el
receptor.
• Consulte al distribuidor oa un técnico de radio / TV experimentado para obtener ayuda.
INFORMACIÓN DE LA FCC
Tabla de Calibre/Potencia/Longitud del Cable
020 1860/567 1150/351 730/223 450/137
40 930/283 580/177 370/113 230/70
60 620/189 390/119 240/73 150/46
80 470/143 290/88 180/55 110/34
100 370/113 230/70 140/43 90/27
Consulte a Soporte Técnico
Calibre/Longitud del Cable (ft/m) por Tendido
Tabla de Carga del Artefacto
9V 12V 15V 9V 12V 15V
Grande
3
17
17.5
18
12.5
12 12
Grande
2
12 13 13 9 8 8
Grande
1
8 9
9
6 5.5 5.5
Pequeño
3 7.5 7.5 8 5.5 5.5 5.5
Pequeño
2 5.5 5.5 5.5 3.5 3.5 3.5
Pequeño
1 3.5 3.5 3.5
Estilo del
Artefacto
Nivel de Flujo
Luminoso (Lumen)
Voltaje AC (VA) Voltaje DC (W)
Gen3LumenTableforIS05112017.xlsx
Confidential 1
Nivel1 Nivel2 Nivel3
Tabla de nivel de flujo luminoso (lumen) (para 2700K/3000K)
Contraste Pequeño
100Lm
*400Lm
*200Lm 300Lm
835Lm600Lm


Join the conversation about this product
Here you can share what you think about the Kichler 16015CBR30 VLO Lamp. If you have a question, first carefully read the manual. Requesting a manual can be done by using our contact form.