
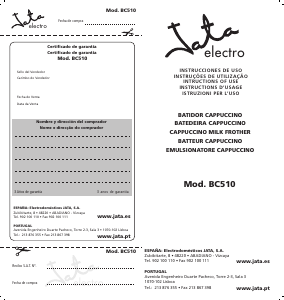
76
FRANÇAIS
ATTENTION
• Lisez attentivement ces instructions avant de mettre l’appareil en
fonctionnement et conservez-les pour de futures consultations.
• Cet appareil n’est pas destiné à l’usage des personnes (y compris des
enfants) dont les capacités physiques, sensorielles ou mentales sont
limitées ou manquant d’expérience et de connaissances à moins qu’elles
ne reçoivent des instructions précises concernant l’utilisation de cet
appareil ou ne soient supervisées par une personne responsable de la
sécurité.
• Ne laissez jamais à la portée des enfants sacs en plastique ou éléments
de l’emballage. Ils peuvent être d’éventuelles sources de danger.
• Ne le branchez pas sans être sûrs que le voltage indiqué sur la plaque
de caractéristiques et celui de votre maison coïncident.
• Assurez-vous que vous disposez d’une prise de terre adaptée.
• Le fonctionnement de cet appareil est exclusivement électrique. Ne le
placez pas sur le feu ou sur toute autre source de chaleur, et ne
l’introduisez pas dans le micro-ondes.
• Ne branchez jamais l’appareil lorsque le lait n’atteint pas le niveau
minimum. Ne remplissez jamais l’appareil au-delà du niveau maximum
indiqué sur le témoin de niveau d’eau à l’intérieur de la carafe.
• N’utilisez cet appareil que pour faire chauffer le lait, sans aucun additif.
• TRÈS IMPORTANT: Ne jamais plonger la carafe ni le corps principal,
ainsi que sa base dans l’eau ou dans tout autre liquide.
• Maintenir l’appareil hors de portée des enfants.
• Les surfaces extérieures sont brûlantes. Saisissez l’appareil uniquement
par sa poignée.
• Utilisez uniquement la base fournie.
• Débranchez l’appareil avant de le retirer de sa base.
• Cet appareil a été conçu exclusivement pour un usage domestique.
• Si le câble d’alimentation de l’appareil se détériorait, il devra être
remplacé par un Service Technique Autorisé.
CONSIGNES D’UTILISATION
• Soulevez la poignée (3) pour la mettre en position. Pour la replier
maintenez appuyé le poussoir (2) et pliez-le.
• Mettez l’accessoire batteur (5) sur l’axe situé à l’intérieur de la carafe.
• Versez du lait entre le niveau minimum (MIN) et le niveau maximum
(MAX) indiqués par le témoin de niveau inscrits à l’intérieur (4).
• Le lait utilisé doit être entier, et tenez en compte que moins de lait fait
que se produise plus de mousse et plus haute température atteint le
lait. Contrairement, si vous remplissez le lait jusqu’à l’indication maximale
(MAX), il y aura moins de mousse et la température du lait sera inférieure.
• Fermez le couvercle (1) et situez l’appareil sur la base (8).
• Branchez l’appareil et placez le bouton de marche/arrêt (7) sur la
position “I”.
• Le témoin lumineux s’allumera et le lait commencera à chauffer.
• Les temps de chauffe peuvent varier selon la quantité de lait à chauffer.
• Attendez à ce que l’accessoire batteur ait arrêté. Alors le lait aura la
température et une certaine mousse en fonction de la quantité de lait
versée.
• Vous povez aussi chauffer le lait sans produire de la mousse.
• Pour cela, retirez l’accessoire batteur (5), versez le lait, connectez
l’appareil. Environ 2 ou 3 minutes plus tard en fonction de la quantité
versée, le lait sera chaud.
• Never connect it without the milk level being over the minimum level,
and not going over the maximum level indicated in the inner part of
the jug.
• Do not use any other liquid or additive than milk in the jug.
• VERY IMPORTANT Do never immerse the jug nor the main body water
or other liquids.
• Keep the appliance out of the reach of children.
• The exterior parts of the jug get hot. Use the handle to manipulate.
• The appliance must be used only with the base provided.
• Disconnect from the mains before removing it from its base.
• This appliance has being designed for domestic use only.
• If the cable gets damaged it must be changed by an Authorised Service
Centre.
INSTRUCTIONS OF USE
• Lift the handle (3) to let it in its position. To fold it again, press the
handle opening knob (2) and turn it downwards.
• Put the foaming accessory (5) in the shaft located inside the jug (4).
• The milk level must be between the minimum (MIN.) level and the
maximum (MAX.) inside the jug.
• Please keep in mind that the milk must be full-fat milk, and that the
less milk you put, the more foam is formed and milk reaches a higher
temperature. If on the opposite you fill the jug until its MAX level, less
foam will be formed and the temperature of the milk will be lower.
• Place again the lid (1) and put the appliance on the base (8).
• Plug the appliance to the mains and press the on switch (7) to the
position “I”.
• The indicator will light on and the foaming accessory will start turning
and the appliance will start heating.
• The time to heat the milk will vary according to the amount of water.
• Wait until the foaming accessory stops working. Then the milk has the
correct temperature and foam according to the poured quantity.
• You can also heat milk without foaming.
• To do so, remove the foaming accessory (5), pour the milk and connect
the appliance. In a 2-3 minutes period depending on the poured quantity,
the milk will be hot.
MAINTENANCE AND CLEANING
• Before you proceed to cleaning it, ensure the appliance is unplugged
from the mains.
• The base (8) can be cleaned with a dry cloth but do never immerse it
in water.
• Clean the outside of the jug with a slightly damped cloth.
• You can clean the inner part of the jug with water and soap. Do never
rinse it under the faucet (Fig. A) and do never introduce the main body
(6) into water or any other liquid.
• Do not use chemical or abrasive products, such as metallic scourers,
which may deteriorate the surfaces of the appliance.
ENVIRONMENT PROTECTION
• Dispose the appliance according to the local garbage regulations.
• Never throw it away to the rubbish. So you will help to the improvement
of the environment.


Join the conversation about this product
Here you can share what you think about the Jata BC510 Milk Frother. If you have a question, first carefully read the manual. Requesting a manual can be done by using our contact form.