MANUFACTURER’S TIPS
BEFORE FIRST USE
Wash the oven accessories with mild soapy water. Rinse with clean water and let
them dry completely.
Use a damp cloth to lightly wipe the inner walls of the oven. A small amount of
mild detergent may be used. Never use any abrasive polishing agent. Do not wet
the electric heating elements or soak the inside of the oven with water.
Place wire racks, and other accessories to the desired positions inside the oven.
Do not obstruct exhaust vents.
With the doors closed, heat the oven at its highest temperature setting for 5
minutes. An odor may be detected. This is normal and the smell should dissipate
within 5 minutes.
Turn o the oven, unplug the power cord and let the oven cool.
Remove any further smoky smell or burnt residue inside the oven by wiping the
insides again with a damp cloth.
TO USE THE OVEN
To avoid any mistakes in turning on your oven, we recommend you always follow
the following sequence of settings
1) Check that oven is at a proper location so it will not create any damage or
injury from the heat generated.
2) Plug cord into power supply and switch ON.
3) Set it to the TEMPERATURE required
4) Set the cooking FUNCTION
5) Turn TIMER knob clockwise to the required cooking time or simply turn knob
anti-clockwise to the ON position.
OPERATING YOUR OVEN
1) Temperature: The temperature knob controls the thermostat which maintains
the internal cavity temperature from 150˚ F to 500˚ F for the various cooking
functions.
Note: The oven will not function if the temperature is set at ZERO.
2) Function: When the function knob is at the uppermost “0” position, there is no
function being set and the oven is in OFF mode.
Select one of these six choices of cooking functions:
3) Timer: The range of the timer is 0 to 120 minutes.
The TIMER KNOB is used to set the desired cooking duration and also functions
as the OFF / ON switch for the oven.
Turn counter-clockwise to the ON position and the oven will function continuously
at the pre-selected temperature until it is manually turned o.
Turn it clockwise to set the baking time. If this is less than 20 minutes, turn the
knob past the 20 minutes mark and then turn it back to the desired time. If longer
than 20 minutes, just turn the Knob directly to the desired time.
4) Power Indicator Light – RED: Operating the TIMER knob turns the oven ON or
OFF.
The Red light comes ON when the Timer knob is turned to the ON position or
when the required cooking time is selected after the desired temperature and
functions had been pre-selected. The Red light will switch OFF at the end of the
pre selected cooking duration or when the Timer Knob is manually turned to the
OFF position.
5) Pre-heat “READY” Indicator Light – GREEN: When the pre-selected oven
temperature has been reached, the Green indicator light will come ON. This light
8 9
will not function when the GRILL function is selected.
6) Oven Accessories:
Always use the accessories provided when using the oven.
FUNCTIONS OVERVIEW
1) SLOW COOK
The SLOW COOK function is perfect for braising and when using less expensive
cuts of meats. Meats are being cooked in liquids or stock on a low temperature
for a longer period of time creating very tender meat stews. Always cook the
hardest ingredients first.
2) CONVECTION BAKE
As a general rule, you should reduce the temperature by 40˚ F from those recom
-
mended at recipes for normal baking. Always check your baked items about 10
minutes before the end of the cooking time.
For roasting larger items such as turkey and meat roasts, use the same tempera
-
ture as indicated on the standard recipe, but reduce the cooking time. Do start
checking your baked items 20-40 minutes before stated cooking time is reached.
With convection assisted baking and roasting, the key is even flow of heated air.
Avoid using bake pans with high sides. For roasting meats, use the shallowest
bake tray possible. Avoid using large, high-sided roasting pans. For the same
reason, avoid cooking anything with a lid when you use the convection assist
feature as the lid will block the airflow.
If required to catch drips, place the baking tray one level below the wire rack so
that a satisfactory air flow is possible.
When using a deep bake pan, especially at position 1 (bottom rack position), make
sure the pan is centered on the wire rack so that you have an air passageway in
the back as well as the front of the pan.
3) BAKE
The electric oven is equipped with two wire racks and has three possible rack
positions. These racks can be easily rearranged at various levels. For cake
baking, use only one rack placed at the lower or middle position.
4) ROTISSERIE
Line the bake tray with foil and place it at position 1 (lower level) to function as a
drip try. When using the rotisserie there is no need to preheat the oven.
Tying meats ensures even cooking. Use only butcher’s twine to tie items when
preparing for the rotisserie function.
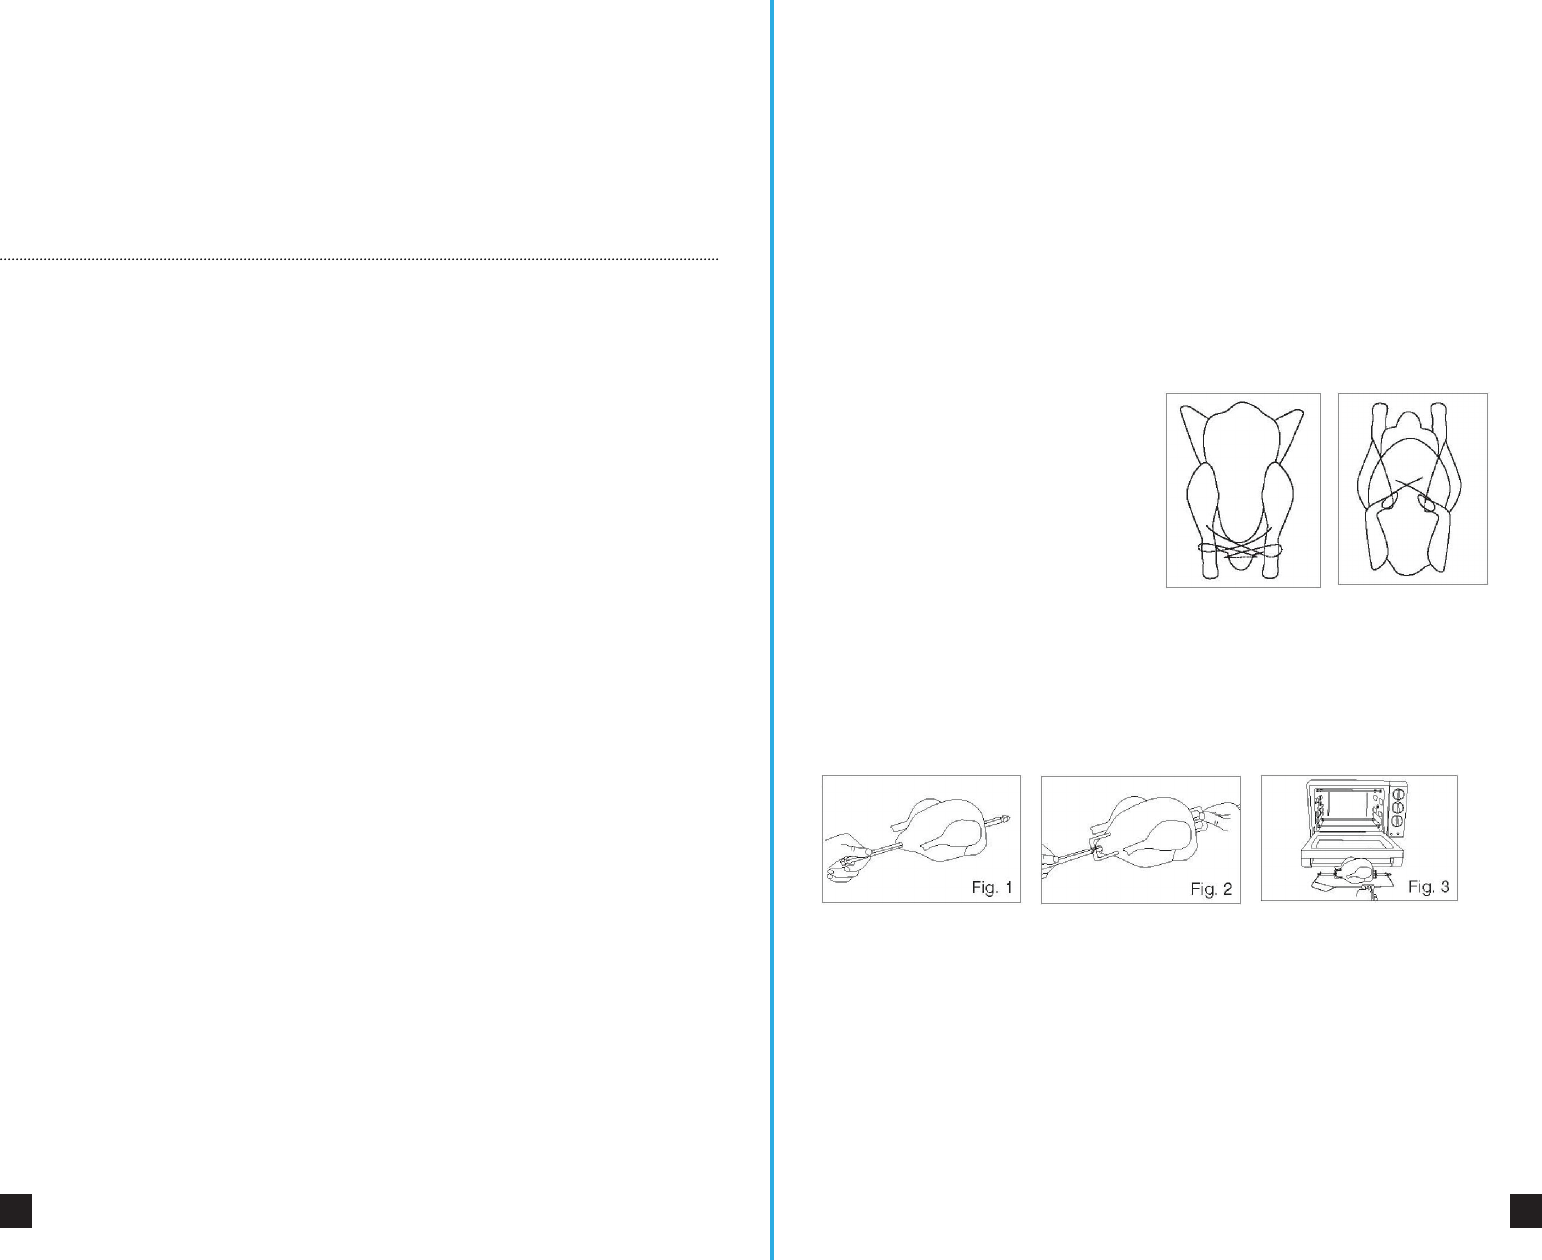
5 TRUSSING A CHICKEN
There are other dierent methods for trussing. Use what you are familiar with.
a) Tuck wings underneath the chicken. Use a length of butcher’s twine that is
about 4 to 5 times the length of the chicken. Place the middle of the twine under
the tail, bring both sides up and
cross over the top of the tail. Wrap
ends of the twine around the end of
each drumstick and pull to draw the
legs together, crossing ends over
each other again.
b) Turn bird over. Pull ends of twine
up over the thighs and wrap around
the upper wings, with the tips of the
wings in the loop. The twine is wrapped around the wing close to the body, and
then both ends are brought to the upper side. Fold up the flap of skin at the neck,
and tie the two ends of twine over it.
Note:
To ensure a crispy skin, leave door ajar for last 15 minutes of cooking time.
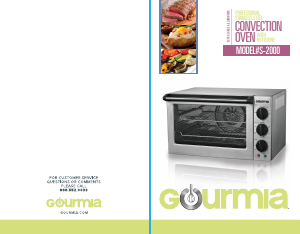
Please follow the diagrams below when using the rotisserie:
a)
First insert the rotisserie spit into the food for rotisserie (Fig. 1).
b)
Insert the two skewers at dierent angles to hold the food more firmly.
c) Next, install the fixing the screws to secure the meat or poultry to the rotisserie
spit (Fig. 2).
d) Place rotisserie spit with food axed into cold oven.
Note:
The ends of the rotisserie spit are marked with L for left side and R for right
side of oven. Use them as a guide for inserting into rotisserie sockets (Fig. 3).
e) Set the Temperature to 450˚ F or as specified in recipe.
f) Set the Function Knob to Rotisserie.
g) Always use handgrip to remove rotisserie item from the oven (Fig. 3). Handgrip
may dier for dierent models.
h) Always use a potholder or oven mitt when removing hot food from the oven.
6) BROIL
Set the temperature to 450˚ F or as directed in recipe.
Keep the door ajar 1 to 2 inches.
Use rack position # 3 or other desired position. Refer to BROIL reference chart for
recommended grilling times.
ADDITIONAL TIPS
• It is useful to rotate items that are being baked regularly to ensure evenness in
cooking.
• When baking, use only one wire rack. Minor adjustment in the position of the
baking tin is possible by placing the wire upside down into its slots in the oven. If
necessary to bake with more than one rack, rotate items that are on both baking
trays as well as rotate the rack positions halfway through bake time.
• To ensure even flow of air when using convection function, place baking tray or
other cooking containers away from the back of the oven. Leave about 1 to 2
inches of air space around all sides for even air circulation.
• Make sure the wire racks are already in their desired position before turning ON
the oven.
• Bake at the shortest time suggested on the recipe and check for doneness
before allowing for more time as needed. A stainless steel knife inserted into the
center of the baked item should come out clean when food is done.
• When baking pastry, browning is most effective when using metallic bakeware as
opposed to glass or ceramic.
• Both the convection bake and the ROTISSERIE function create the finest tastes in
meats and poultry with minimal seasoning and simple preparation.
SUGGESTED BROILING TIMES
COOKING TIMES, TEMPERATURE AND FUNCTION SETTINGS

Join the conversation about this product
Here you can share what you think about the Gourmia S2000 Oven. If you have a question, first carefully read the manual. Requesting a manual can be done by using our contact form.