DE/AT/CH DE/AT/CH DE/AT/CH DE/AT/CH
DE/AT/CH DE/AT/CH DE/AT/CH
GB/IE GB/IE GB/IE GB/IE GB/IE GB/IE
Extent of warranty
The product was carefully manufactured according to strict quality guidelines and diligently in-
spected prior to shipment. The warranty applies to defects in material or manufacture. This war-
ranty does not apply to product parts subject to regular wear and therefore considered wear
parts or damage to fragile parts, e.g. switches, rechargeable batteries, or made from glass.
This warranty becomes void if the device has been damaged or improperly used or maintained.
Proper use of the product requires strictly observing all instructions for use.
Purposes and practices which the operating instructions warn of or advise against must be
avoided without fail. This product is only intended for private, non-commercial use. Any incor-
rect or improper use of the device, use of force and changes not performed by our authorized
service branch will void the warranty.
Please follow the instructions below to ensure your claim is processed quickly:
· Please have your receipt and the product number ready as your proof of purchase.
· Please refer to the type plate or the cover sheet of these operating instructions for the
product number.
· In the event of malfunctions or other defects, please first contact the following service
department by phone or e-mail.
· A product determined defective may then be returned to the specified service address free
of charge, including the proof of purchase (receipt) and information about the defect and
when it occurred. Please note, the service department must be notified before returning
the product!
This and many other manuals, product videos and software are available for download at
www.lidl-service.com.
GB
KLB GmbH
Diekbree 8
DE-48157 Münster, GERMANY
Tel: +49 2 51 132 37 57
www.klb-service.eu
IE
KLB GmbH
Diekbree 8
DE-48157 Münster, GERMANY
Tel: +49 2 51 132 37 57
www.klb-service.eu
IAN 300377
To help protect the environment, please dispose of the product properly, not without
household waste, when it has reached the end of its useful life. Please contact your
local authority for information on collection points and their opening hours.
Faulty or drained batteries must be recycled in accordance with Directive 2006/66/EC and its
amendments. Return the batteries and/or the product to a collection site.
Improper disposal of batteries can harm
the environment!
Never dispose of batteries in your household waste. They may contain toxic heavy metals and
are subject to hazardous waste regulations. The chemical symbols of the heavy metals are: Cd =
cadmium, Hg = mercury, Pb = lead. For this reason, dispose of used batteries at a local collec-
tion point.
Improper battery disposal destroys valuable resources and the hazardous substances in the
batteries may pose a significant danger to the health and environment. Separate collection/
disposal of old batteries prevents dangers to the health and environment, and valuable resources
regained by recycling.
Warranty
Dear customer,
The warranty for this product is 3 years from the date of purchase. In the event of product defects,
you have legal rights against the retailer of this product. Your statutory rights are not limited in
any way by our warranty detailed below.
Warranty terms
The warranty period begins on the date of purchase. Please retain the original receipt safely. This
documentation is required as the proof of purchase. Should a defect in material or manufacture
occur within three years from the date of purchase of this product, we will repair or replace - at
our choice - it free of charge. This warranty is conditional on the defective product and the receipt
of purchase being presented within the three year warranty period, and on there being a brief
written description of the nature of the defect and of the date it arose. If the defect is covered
by our warranty, you will receive the repaired product or a replacement. A repair or exchange
of the device does not extend a new warranty period. The warranty period will not be extended
by repairs made under warranty. This also applies to replaced and repaired parts. Any damage
or defects present at the time of purchase must be reported immediately after unpacking. Repairs
made after the expiration of the warranty period are subject to payment.
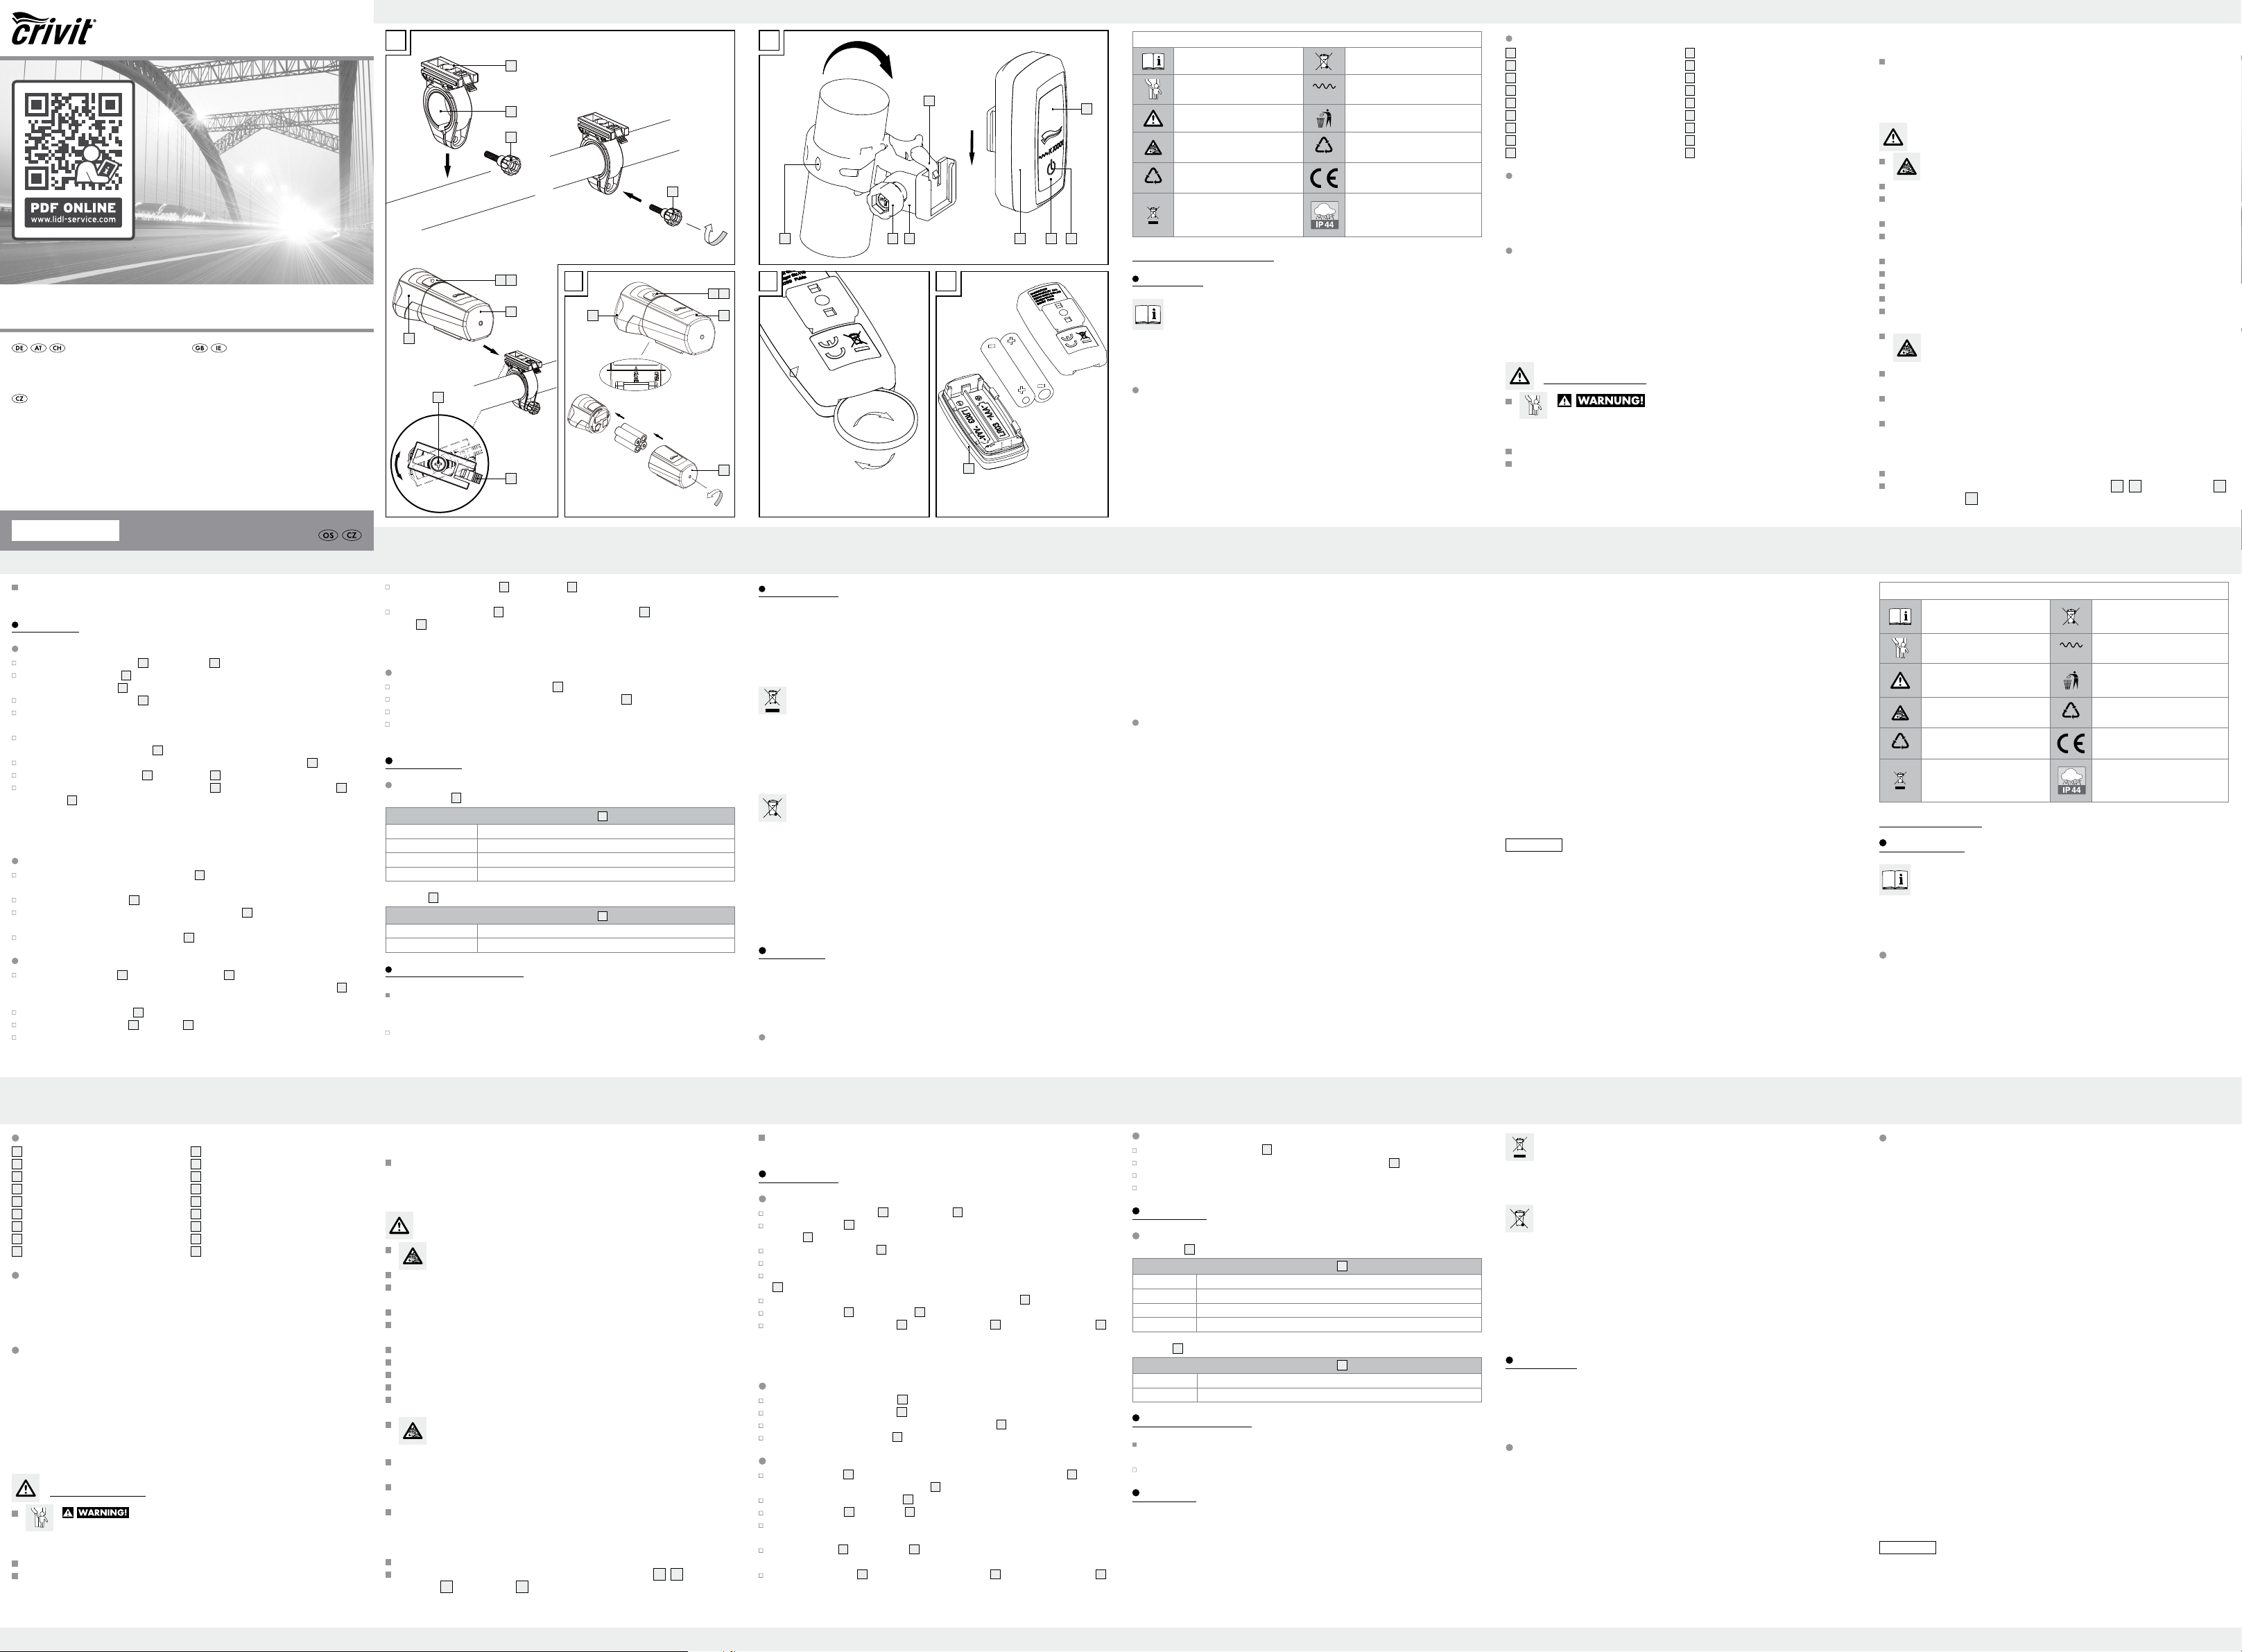
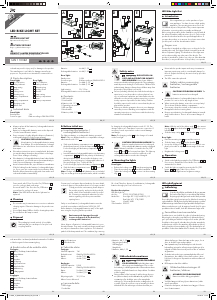
Inserting batteries into the tail light (see Fig. D + E)
Open the tail light using a coin
15
(see Fig. D).
Insert the batteries (2 x AAA, 1.5 V) into the battery compartment
18
(see Fig. E).
Please ensure the correct polarity.
Re-assemble the tail light by pressing the two housing parts together (see Fig. D).
Operation
Switching on / off
The headlight
7
has three brightnesses.
On / Off switch
4
press once Power mode (60 Lux) for riding in unlit areas
press twice Standard mode (30 Lux) for riding in lit areas
press three times Eco mode (15 Lux) for riding in well lit areas
press four times off
Tail light
15
On / Off switch
13
press once power on
press twice power off
Cleaning and care
Never fully immerse the headlight and tail light in water. Do not use corrosive or abrasive
cleaning agents. Doing so will damage the headlight or tail light.
Use a dry, lint-free cloth when you are cleaning the product.
Disposal
The packaging is made of environmentally friendly materials, which may be disposed of through
your local recycling facilities.
Contact your local refuse disposal authority for more details on how to dispose of your worn-out
product.
Please note that once the headlight or tail light battery control light lights up, the
lights no longer comply with the Road Traffic Act.
Installation
Installing the headlight (see Fig. A)
Unscrew the retaining screw
3
from the bracket
1
.
Position the bracket
1
in the desired location on the handlebar. If necessary, use the reducer
rubbers
2
to ensure an optimal fit.
Reinstall the retaining screw
3
.
Tighten the screw hand tight. To prevent damage, do not use tools for this step.
To adjust to the optimal angle to the direction of travel, loosen the angle adjustment screw
8
2–3 turns using a cross-tip screwdriver.
Adjust to the desired angle and tighten the angle adjustment screw
8
.
Slide the headlight
7
into the bracket
1
until you hear it lock into place.
To release, press the headlight lock
9
and slide the headlight
7
forward out of the bracket
1
.
ATTENTION! Routinely verify the headlamp adjustment. The light cone must point straight
ahead, in the direction of travel, and must not be adjusted too high so as not to blind on-
coming traffic.
Inserting the batteries in the head lamp (see Fig. B)
Turn the front part of the head lamp
7
until the small arrow is in the “open“ position (see Fig. B).
Remove the battery compartment
6
.
Insert the batteries (4 x AA, 1.5 V) in the battery compartment
6
. Ensure the correct polarity.
Then reassemble the head lamp
7
.
Installing the tail light (see Fig. C)
Secure the bracket
10
to the seat post or the rear cross-bar using the rubber tab
12
. Be sure
there are no objects in front of the tail light
15
.
Tighten and hook in the rubber tab
12
.
Loosen the star screw
16
on the bracket
10
and adjust to the desired angle.
Then tighten the screw. Tighten the screw hand tight. To prevent damage, do not use tools
for this step.
Slide the tail light
15
into the bracket
10
until you hear it lock into place. Ensure that the tail
light is assembled as depicted in Fig. C.
To release the tail light
15
, press down on the tail light lock
11
and slide off the tail light
15
.
ATTENTION! The tail lamp must be installed and adjusted so the reference axis is parallel
to the median longitudinal plane of the vehicle and parallel to the road.
caused by incorrect handling, noncompliance with the operating instructions or
interference with the device by unauthorised individuals are excluded.
Never take the product apart. Improper repairs may result in considerable danger
to the user. Repairs should only be carried out by specialist personnel. The LED
light bulbs cannot be replaced.
Safety advice concerning batteries / rechargeable batteries
CAUTION! EXPLOSION HAZARD! Never recharge the batteries!
Remove batteries during extended periods of non-use.
When inserting the battery ensure the polarity is correct! This is shown in the
battery compartment.
If necessary, clean the battery and product contact before inserting the battery.
Immediately remove drained batteries from the product. There is an increased
risk of leaks!
Always replace all the batteries at the same time.
Do not use regular batteries and rechargeable batteries together.
Never mix old and new batteries.
Do not dispose of battery / rechargeable batteries in household waste!
Every consumer is legally obliged to dispose of batteries/rechargeable batteries
in the proper manner!
CAUTION! EXPLOSION HAZARD! Keep battery / rechargeable
batteries away from children, do not throw batteries / rechargeable
batteries into fire, do not short-circuit and do not take apart.
Failure to observe this notice may result in deep discharging the batteries. This
poses a risk of leaking.
If the batteries have leaked inside the product, please remove them immediately
to prevent product damage!
Avoid contact with the skin, eyes and mucous membranes if fluid has leaked
from the batteries / rechargeable battery. In the event of contact with battery
acid, thoroughly flush the affected area with clean water and seek immediate
medical attention.
Never recharge single-use batteries! Explosion hazard!
Note: If the red rechargeable battery / battery control light
5
,
14
on the
headlight
7
or the tail light
15
lights up, please replace the batteries or recharge
the rechargeable batteries immediately.
Parts Description
1
Headlight bracket
2
Reducer rubber
3
Headlight bracket retaining screw
4
Headlight on / off switch
5
Headlight battery control light
6
Head lamp battery compartment
7
Headlight
8
Headlight angle adjustment screw
9
Headlight lock
10
Tail light bracket
11
Tail light lock
12
Tail light bracket rubber tab
13
Tail light on / off switch
14
Tail light battery control lamp
15
Tail light
16
Star screw tail light bracket
17
Lighting unit with battery compartment
18
Rear light battery compartment
Scope of delivery
1 Headlight
1 Tail light
1 Headlight bracket
1 Tail light bracket
4 Batteries AA
2 Batteries AAA
Reducer rubbers
1 Instructions for assembly and use
Technical Data
Headlight
Model designation: L-Lux 60 / XC-196B
Rated output: 1 W
Protection type: IP44 according to
DIN EN 60529
Batteries: 4 x 1.5 V AA LR6
Tail light
Model designation: D-LED 5 / XC-247
Rated output: 0.2 W
Protection type: IP44 according to
DIN EN 60529
Batteries: 2 x 1.5 V AAA LR03
Note: Please only use 1.2 V batteries or equivalent rechargeable batteries.
Safety instructions
DANGER TO LIFE AND RISK OF ACCIDENT
FOR INFANTS AND CHILDREN! Never leave children unsupervised
with the packing material due to the suffocation hazard posed by swallowing
parts thereof. Children frequently underestimate the dangers.
Always keep the product away from children. This product is not a toy!
This product is not intended to be used by persons (including children) with im-
paired physical, sensory or mental capacity, or lacking experience or knowledge
unless supervised by a person responsible for their safety. Please note, damages
GB/IEDE/AT/CHDE/AT/CH
List of pictograms used
Read the instructions!
Environmental damage due to incorrect
disposal of the batteries / rechargeable
batteries!
Danger to life and accident hazard
for toddlers and small children!
K XXXXX
Federal Motor Transport Authority test
symbol (K followed by approval num
ber)
Observe the warnings and
safety notes!
Products and packaging should be
disposed in an environmentally friendly
manner
Caution! Danger of explosion!
21
PAP
Recycling code for cardboard disposal
01
PET
Recycling code for the disposal of
polyester fibres and films
Product meets the applicable European
product-specific directives
Symbol identifying electrical and
electronic devices
Splash-proof, protection against
foreign bodies
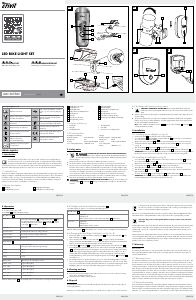
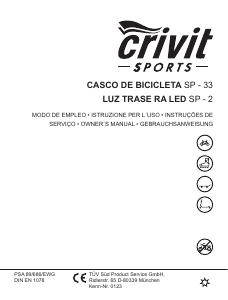
LED Bike Light Set
Introduction
Congratulations on the purchase of your new product. In doing so you have chosen
a top-quality product. The instructions for use are to be considered as part of this product.
It contains important safety, assembly and disposal information. Before using the
product, please familiarise yourself with all the safety information and instructions for use. The
product must only be used as described and for the specified fields of application. If you pass
the product on to anyone else, please be sure to also include all documentation.
Intended use
This product is suitable for lighting the roadway whilst cycling. The LED Bicycle Light Set is ap-
proved as exclusive lighting for all bicycles. The light cone must not be impaired by other bicycle
parts or luggage. The product is intended for outdoor use. Any use other than the aforementioned
or any product modification is prohibited and can result in injuries and product damage. The
manufacturer is not liable for damages resulting from improper use. This product is not intended
for commercial use.
DE
KLB GmbH
Diekbree 8, DE-48157 Münster, DEUTSCHLAND
Tel: 02 51 132 37 57
www.klb-service.eu
AT
KLB GmbH
Diekbree 8, DE-48157 Münster, DEUTSCHLAND
Tel: +49 2 51 132 37 57
www.klb-service.eu
CH
KLB GmbH
Diekbree 8, DE-48157 Münster, DEUTSCHLAND
Tel: +49 2 51 132 37 57
E-Mail: ch@klb-service.eu
www.klb-service.eu
IAN 300377
Kaufdatum dieses Produkts ein Material- oder Fabrikationsfehler auf, wird das Produkt von uns –
nach unserer Wahl – für Sie kostenlos repariert oder ersetzt. Diese Garantieleistung setzt voraus,
dass innerhalb der Drei-Jahres-Frist das defekte Produkt und der Kaufbeleg (Kassenbon) vorgelegt
und schriftlich kurz beschrieben wird, worin der Mangel besteht und wann er aufgetreten ist.
Wenn der Defekt von unserer Garantie gedeckt ist, erhalten Sie das reparierte oder ein neues
Produkt zurück. Mit Reparatur oder Austausch des Produkts beginnt kein neuer Garantiezeitraum.
Die Garantiezeit wird durch die Gewährleistung nicht verlängert. Dies gilt auch für ersetzte und
reparierte Teile. Eventuell schon beim Kauf vorhandene Schäden und Mängel müssen sofort nach
dem Auspacken gemeldet werden. Nach Ablauf der Garantiezeit anfallende Reparaturen sind
kostenpflichtig.
Garantieumfang
Das Produkt wurde nach strengen Qualitätsrichtlinien sorgfältig produziert und vor Anlieferung
gewissenhaft geprüft. Die Garantieleistung gilt für Material- oder Fabrikationsfehler. Diese Ga-
rantie erstreckt sich nicht auf Produktteile, die normaler Abnutzung ausgesetzt sind und daher
als Verschleißteile angesehen werden können oder für Beschädigungen an zerbrechlichen Teilen,
z. B. Schalter, Akkus oder die aus Glas gefertigt sind. Diese Garantie verfällt, wenn das Produkt
beschädigt, nicht sachgemäß benutzt oder gewartet wurde. Für eine sachgemäße Benutzung
des Produkts sind alle in der Bedienungsanleitung aufgeführten Anweisungen genau einzuhalten.
Verwendungszwecke und Handlungen, von denen in der Bedienungsanleitung abgeraten oder
vor denen gewarnt wird, sind unbedingt zu vermeiden. Das Produkt ist lediglich für den privaten
und nicht für den gewerblichen Gebrauch bestimmt. Bei missbräuchlicher und unsachgemäßer
Behandlung, Gewaltanwendung und bei Eingriffen, die nicht von unserer autorisierten Service-
Niederlassung vorgenommen wurden, erlischt die Garantie.
Um eine schnelle Bearbeitung Ihres Anliegens zu gewährleisten, folgen Sie bitte den folgenden
Hinweisen:
· Bitte halten Sie für alle Anfragen den Kassenbon und die Artikelnummer als Nachweis für
den Kauf bereit.
· Die Artikelnummer entnehmen Sie bitte dem Typenschild oder dem Titelblatt dieser
Bedienungsanleitung.
· Sollten Funktionsfehler oder sonstige Mängel auftreten, kontaktieren Sie bitte zunächst die
nachfolgend benannte Serviceabteilung telefonisch oder per E-Mail.
· Ein als defekt erfasstes Produkt können Sie dann unter Beifügung des Kaufbelegs (Kassen-
bon) und Angabe, worin der Mangel besteht und wann er aufgetreten ist, für Sie portofrei an
die Ihnen mitgeteilte Service Anschrift übersenden. Bitte beachten Sie, dass unbedingt vor
Versand die Serviceabteilung informiert werden muss!
Auf www.lidl-service.com können Sie diese und viele weitere Handbücher, Produktvideos und
Software herunterladen.
Entsorgung
Die Verpackung besteht aus umweltfreundlichen Materialien, die Sie über die örtlichen
Recyclingstellen entsorgen können.
Möglichkeiten zur Entsorgung des ausgedienten Produkts erfahren Sie bei Ihrer Gemeinde oder
Stadtverwaltung.
Werfen Sie Ihr Produkt, wenn es ausgedient hat, im Interesse des Umweltschutzes nicht
in den Hausmüll, sondern führen Sie es einer fachgerechten Entsorgung zu. Über Sammel-
stellen und deren Öffnungszeiten können Sie sich bei Ihrer zuständigen Verwaltung
informieren.
Defekte oder verbrauchte Batterien müssen gemäß Richtlinie 2006/66/EG und deren Änderungen
recycelt werden. Geben Sie Batterien und / oder das Produkt über die angebotenen Sammel-
einrichtungen zurück.
Umweltschäden durch falsche Entsorgung
der Batterien!
Batterien dürfen nicht über den Hausmüll entsorgt werden. Sie können giftige Schwermetalle ent-
halten und unterliegen der Sondermüllbehandlung. Die chemischen Symbole der Schwermetalle
sind wie folgt: Cd = Cadmium, Hg = Quecksilber, Pb = Blei. Geben Sie deshalb verbrauchte
Batterienbei einer kommunalen Sammelstelle ab.
Bei unsachgemäßer Entsorgung der Batterien gehen wertvolle Ressourcen verloren und durch in
den Batterien enthaltene Schadstoffe kann es zu einer erheblichen Gefahr für Gesundheit und Um-
welt kommen. Durch die getrennte Sammlung / Entsorgung von Altbatterien werden Gefahren für
Gesundheit und Umwelt vermieden und durch Recycling wertvolle Rohstoffe zurückgewonnen.
Garantie
Sehr geehrte Kundin, sehr geehrter Kunde,
Sie erhalten auf dieses Produkt 3 Jahre Garantie ab Kaufdatum. Im Falle von Mängeln dieses
Produkts stehen Ihnen gegen den Verkäufer des Produkts gesetzliche Rechte zu. Diese gesetzlichen
Rechte werden durch unsere im Folgenden dargestellte Garantie nicht eingeschränkt.
Garantiebedingungen
Die Garantiefrist beginnt mit dem Kaufdatum. Bitte bewahren Sie den Originalkassenbon gut auf.
Diese Unterlage wird als Nachweis für den Kauf benötigt. Tritt innerhalb von drei Jahren ab dem
Schieben Sie das Rücklicht
15
auf den Halter
10
bis er hörbar einrastet. Achten Sie darauf,
dass das Rücklicht wie in Abb. C montiert wird.
Zum Lösen des Rücklichts
15
drücken Sie die Rücklichtarretierung
11
und ziehen das Rück-
licht
15
ab.
ACHTUNG! Das Rücklicht muss so angebaut und eingestellt werden, dass die Bezugsachse
parallel zur Fahrzeuglängsmittelebene und parallel zur Fahrbahn liegt.
Batterien ins Rücklicht einlegen (s. Abb. D + E)
Öffnen Sie mit einer Münze das Rücklicht
15
(s. Abb. D).
Legen Sie die Batterien (2 x AAA, 1,5 V) in das Batteriefach
18
ein (s. Abb. E).
Achten Sie dabei auf die korrekte Polung.
Setzen Sie das Rücklicht wieder zusammen, indem Sie die beiden Gehäuseteile zusammen
drücken (s. Abb. D).
Bedienung
Ein- / ausschalten
Der Scheinwerfer
7
besitzt drei Leuchtstärken.
Ein- / -Aus-Schalter
4
einmal drücken Power Modus (60 Lux) für Fahrten in unbeleuchteter Umgebung
zweimal drücken Standard Modus (30 Lux) für Fahrten in beleuchteter Umgebung
dreimal drücken Eco Modus (15 Lux) für Fahrten in gut beleuchteter Umgebung
viermal drücken ausschalten
Rücklicht
15
Ein- / -Aus-Schalter
13
einmal drücken einschalten
zweimal drücken ausschalten
Reinigung und Pflege
Scheinwerfer und Rücklicht niemals komplett unter Wasser tauchen. Benutzen Sie keine
ätzenden oder scheuernden Reinigungsmittel. Hierdurch entstehen Beschädigungen an
Scheinwerfer bzw. Rücklicht.
Verwenden Sie zur Pflege ein trockenes und fusselfreies Tuch.
Bitte beachten Sie, dass nach dem Aufleuchten der Batterie-Kontrollleuchten
Scheinwerfer bzw. Rücklicht nicht mehr der StVZO entsprechen.
Montage
Scheinwerfer montieren (s. Abb. A)
Drehen Sie die Halteschraube
3
aus dem Halter
1
.
Positionieren Sie den Halter
1
an der gewünschten Stelle am Lenker. Verwenden Sie gegebenen-
falls die Reduziergummis
2
, um eine optimale Passform zu gewährleisten.
Drehen Sie die Halteschraube
3
wieder ein.
Ziehen Sie dabei die Schraube handfest. Verwenden Sie hierzu kein Werkzeug, um
Beschädigungen zu vermeiden.
Um den optimalen Winkel zur Fahrtrichtung einzustellen, lösen Sie mit einem Kreuzschrauben-
dreher die Winkelverstellschraube
8
um 2–3 Umdrehungen.
Stellen Sie den gewünschten Winkel ein und ziehen die Winkelverstellschraube
8
wieder fest.
Schieben Sie den Scheinwerfer
7
auf den Halter
1
bis er hörbar einrastet.
Zum Lösen drücken Sie die Scheinwerferarretierung
9
und schieben den Scheinwerfer
7
vom Halter
1
aus nach vorne.
ACHTUNG! Überprüfen Sie regelmäßig die richtige Einstellung Ihres Scheinwerfers. Der
Lichtkegel muss geradeaus in Fahrtrichtung zeigen und darf nicht zu hoch eingestellt sein,
um den Gegenverkehr nicht zu blenden.
Batterien in den Scheinwerfer einlegen (s. Abb. B)
Drehen Sie den vorderen Teil des Scheinwerfers
7
, bis der kleine Pfeil auf der Position „open“
steht (s. Abb. B).
Ziehen Sie das Batteriefach
6
ab.
Legen Sie die Batterien (4 x AA, 1,5 V) in das Batteriefach
6
. Achten Sie dabei auf die
korrekte Polung.
Anschließend setzen Sie den Scheinwerfer
7
wieder zusammen.
Rücklicht montieren (s. Abb. C)
Befestigen Sie den Halter
10
anhand der Gummilasche
12
an der Sattelstütze oder der Hinter-
baustrebe. Achten Sie dabei darauf, dass sich keine Gegenstände vor dem Rücklicht
15
be-
finden.
Ziehen Sie die Gummilasche
12
straff und haken Sie diese ein.
Lösen Sie die Sternschraube
16
des Halters
10
und stellen Sie den gewünschten Winkel ein.
Anschließend ziehen Sie die Schraube wieder fest. Ziehen Sie dabei die Schraube handfest.
Verwenden Sie hierzu kein Werkzeug, um Beschädigungen zu vermeiden.
Legende der verwendeten Piktogramme
Anweisungen lesen!
Umweltschäden durch falsche
Entsorgung der Batterien / Akkus!
Lebens- und Unfallgefahr für
Kleinkinder und Kinder!
K XXXXX
Prüfzeichen des Kraftfahrt-Bundesamtes
(
K mit nachfolgender Zulassungsnum
me
r)
Warn- und Sicherheitshinweise
beachten!
Produkte und Verpackungen sollen
umweltschonend entsorgt werden
Vorsicht! Explosionsgefahr!
21
PAP
Recycling-Code zur Entsorgung von
Pappe
01
PET
Recycling-Code zur Entsorgung von
Polyesterfasern und von Folien
Produkt entspricht den produktspezifisch
geltenden europäischen Richtlinien
Symbol zur Erkennung von Elektro-
und Elektronikgeräten
Spritzwassergeschützt,
Schutz vor Fremdkörper
LED-Fahrradleuchten-Set
Einleitung
Herzlichen Glückwunsch zum Kauf Ihres neuen Produktes. Sie haben sich damit für
ein hochwertiges Produkt entschieden. Die Bedienungsanleitung ist Bestandteil dieses
Produktes. Sie enthält wichtige Hinweise zur Sicherheit, Montage und Entsorgung. Ma-
chen Sie sich vor der Benutzung des Produktes mit allen Bedien- und Sicherheitshinweisen ver-
traut. Benutzen Sie das Produkt nur wie beschrieben und für die angegebenen Einsatzbereiche.
Händigen Sie alle Unterlagen bei Weitergabe des Produktes an Dritte mit aus.
Bestimmungsgemäße Verwendung
Das Produkt ist zur Fahrbahnausleuchtung beim Fahrradfahren geeignet. Das LED-Fahrradleuchten-
Set ist für alle Fahrräder als alleinige Beleuchtung zugelassen. Der Lichtkegel darf durch keine
anderen Fahrradteile oder Gepäckstücke behindert werden. Das Produkt ist zur Anwendung im
Außenbereich bestimmt. Eine andere Verwendung als zuvor beschrieben oder eine Veränderung
des Produktes ist nicht zulässig und kann zu Verletzungen und Beschädigungen des Produktes führen.
Für aus unsachgemäßer Verwendung entstandene Schäden übernimmt der Hersteller keine Haftung.
Das Produkt ist nicht für den gewerblichen Einsatz bestimmt.
Bedienungsanleitung oder Eingriff durch nicht autorisierte Personen von der Ge-
währleistung ausgeschlossen sind.
Nehmen Sie das Produkt keinesfalls auseinander. Durch unsachgemäße Repa-
raturen können nicht unerhebliche Gefahren für den Benutzer entstehen. Lassen
Sie Reparaturen nur von Fachkräften durchführen. Ein Wechsel der LED-Leucht-
mittel ist nicht möglich.
Sicherheitshinweise zu Batterien / Akkus
VORSICHT! EXPLOSIONSGEFAHR! Laden Sie Batterien niemals
wieder auf!
Entfernen Sie bei längerer Nichtverwendung die Batterien aus dem Produkt.
Achten Sie beim Einlegen auf die richtige Polarität! Diese wird im Batteriefach
angezeigt.
Reinigen Sie Batterie- und Produktkontakt vor dem Einlegen falls erforderlich.
Entfernen Sie erschöpfte Batterien umgehend aus dem Produkt. Es besteht er-
höhte Auslaufgefahr!
Tauschen Sie immer alle Batterien gleichzeitig aus.
Verwenden Sie keine Batterie zusammen mit einem Akku.
Kombinieren Sie keine neuen Batterien mit alten.
Batterien / Akkus gehören nicht in den Hausmüll!
Jeder Verbraucher ist gesetzlich verpflichtet, Batterien / Akkus ordnungsgemäß
zu entsorgen!
VORSICHT! EXPLOSIONSGEFAHR! Halten Sie Batterien / Akkus von
Kindern fern, werfen Sie die Batterien / Akkus nicht ins Feuer, schließen
Sie sie nicht kurz und nehmen Sie sie nicht auseinander.
Bei Nichtbeachtung der Hinweise können die Batterien über ihre Endspannung
hinaus entladen werden. Es besteht die Gefahr des Auslaufens.
Falls die Batterien in Ihrem Produkt ausgelaufen sein sollten, entnehmen Sie
diese sofort, um Schäden am Gerät vorzubeugen!
Vermeiden Sie Kontakt mit Haut, Augen und Schleimhäuten, falls Flüssigkeit aus
den Batterien / Akkus ausgetreten ist. Spülen Sie bei Kontakt mit Batteriesäure
die betroffenen Stellen sofort mit reichlich klarem Wasser und suchen Sie umge-
hend einen Arzt auf.
Batterien niemals wieder aufladen! Explosionsgefahr!
Hinweis: Leuchtet die rote Batterie-Kontrollleuchte
5
,
14
im Scheinwerfer
7
oder im Rücklicht
15
auf, so ersetzen Sie bitte die Batterien bzw. laden die Akkus
wieder umgehend auf.
Teilebeschreibung
1
Halter Scheinwerfer
2
Reduziergummis
3
Halteschraube Scheinwerferhalter
4
Ein- / Aus-Schalter Scheinwerfer
5
Batterie-Kontrollleuchte Scheinwerfer
6
Batteriefach Scheinwerfer
7
Scheinwerfer
8
Winkelverstellschraube Scheinwerfer
9
Scheinwerferarretierung
10
Halter Rücklicht
11
Rücklichtarretierung
12
Gummilasche Halter Rücklicht
13
Ein- / Aus-Schalter Rücklicht
14
Batterie-Kontrollleuchte Rücklicht
15
Rücklicht
16
Sternschraube Rücklichthalter
17
Leuchteinheit mit Batteriefach
18
Batteriefach Rücklicht
Lieferumfang
1 Scheinwerfer
1 Rücklicht
1 Halter Scheinwerfer
1 Halter Rücklicht
4 Batterien AA
2 Batterien AAA
Reduziergummis
1 Montage- und Bedienungsanleitung
Technische Daten
Scheinwerfer
Typ-Bezeichnung: L-Lux 60 / XC-196B
Nennleistung: 1 W
Schutzart: IP44 nach DIN EN
60529
Batterien: 4 x 1,5 V AA LR6
Rücklicht
Typ-Bezeichnung: D-LED 5 / XC-247
Nennleistung: 0,2 W
Schutzart: IP44 nach
DIN EN 60529
Batterien:
2 x 1,5 V AAA LR03
Hinweis: Bitte verwenden Sie ausschließlich Batterien oder vergleichbare Akkus mit 1,2 V.
Sicherheitshinweise
LEBENS- UND UNFALLGEFAHR FÜR
KLEINKINDER UND KINDER! Lassen Sie Kinder niemals unbeauf-
sichtigt mit dem Verpackungsmaterial, denn es besteht Erstickungsgefahr durch das
Verschlucken von Verpackungsteilen. Kinder unterschätzen häufig die Gefahren.
Halten Sie das Produkt stets von Kindern fern. Das Produkt ist kein Spielzeug!
Dieses Produkt ist nicht dafür bestimmt, durch Personen (einschließlich Kinder)
mit eingeschränkten physischen, sensorischen oder geistigen Fähigkeiten oder
mangels Erfahrungen bzw. Wissen benutzt zu werden. Es sei denn, sie werden
durch eine für ihre Sicherheit zuständige Person beaufsichtigt. Beachten Sie, dass
Beschädigungen durch unsachgemäße Handhabung, Nichtbeachtung der
IAN 300377
LED-FAHRRADLEUCHTEN-SET /
LED BIKE LIGHT SET
Art. no. 14147
SADA LED SVĚTEL
Pokyny pro obsluhu a bezpečnostní pokyny
LED-FAHRRADLEUCHTEN-SET
Bedienungs- und Sicherheitshinweise
LED BIKE LIGHT SET
Operation and Safety Notes
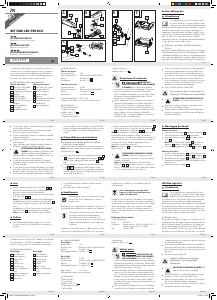
A
9
D
E
18
LOCK
LOCK
C
131417
11
101612
B
7 6
6
4 5
3
2
1
3
6
4 5
7
8
15

Join the conversation about this product
Here you can share what you think about the Crivit IAN 300377 Bicycle Light. If you have a question, first carefully read the manual. Requesting a manual can be done by using our contact form.