
4 5
1. Introduction
Thank you for choosing the Cat Mate Timer Control Cat Flap.
WE RECOMMEND THAT YOU CAREFULLY READ THESE INSTRUCTIONS TO
BECOME FAMILIAR WITH THE CAT FLAP BEFORE YOU INSTALL IT.
The Cat Mate Timer Control Cat Flap allows you to choose the times you do not
wish your cat(s) to go out through the flap to avoid high risk periods, e.g. high traffic,
night time, etc. A secure rotary 5 way lock allows you complete control of your cat’s
movement through the flap.
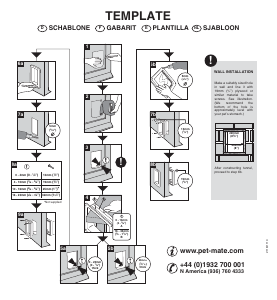
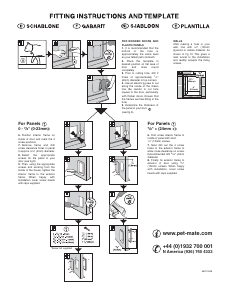
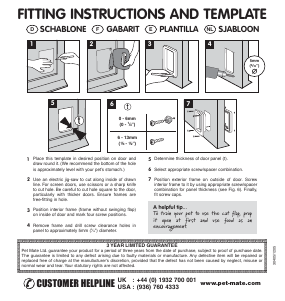
2. Fitting Instructions
Wood / Plastic / Metal Door Panels
2.1 Place the exterior frame in desired position on panel and draw round the
outside of the tunnel section as shown in Fig. 3. We recommend the bottom of
the hole is approximately level with your pet's stomach.
2.2 Use an electric jigsaw to cut 2mm (
1
/
16
”) outside of drawn line. Be careful to
cut hole square to the door, particularly with thicker doors. Ensure frames are
free-fitting in hole.
2.3 Determine thickness of door panel.
2.4 For door panels 0 - 20mm (
3
/
4
”) thick:
2.4.1 Position exterior frame on outside of door and mark four hole positions
(Fig. 4).
2.4.2 Remove frame and carefully drill screw clearance holes square to panel
at 6mm (
1
/
4
”) diameter (Fig. 5).
2.4.3 For panels less than 18mm (
3
/
4
”) thick, cut excess tunnel from exterior
frame as shown in Fig. 6 with a hacksaw or plastic cutting disc.
2.4.4 Fit seal to exterior frame. Position exterior frame on outside of door.
Screw interior frame to it by using 32mm (1
1
/
4
”) screws for panels from
6 - 20mm (
1
/
4
” -
3
/
4
”) thick. For panels less than 6mm (
1
/
4
”) thick use 19mm
(
3
/
4
”) screws. Finally, fit screw caps (Fig. 7).
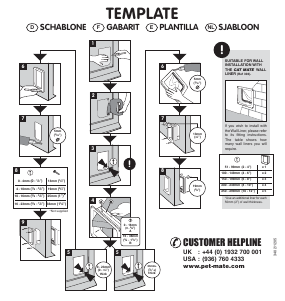
2.5 For door panels 20mm (
3
/
4
”) + thick:
2.5.1 Carefully drill out four holes in interior frame to allow close clearance on
screws (recommended drill 5mm (
3
/
16
”) diameter) as shown in Fig. 8.
2.5.2 Fit seal to exterior frame. Screw exterior frame on outside of door using
13mm (
1
/
2
”) screws.
2.5.3 Screw interior frame to inside of door using 19mm (
3
/
4
”) screws. Finally, fit
screw caps.
Walls / Glass Panels
You will require an adapter kit available from your cat flap supplier or direct from
Pet Mate (Product Ref. 361) to enable easy installation.
3. Fitting the batteries
3.1 Remove the battery cover by pushing up the retaining clip and pulling out
(Fig. 9).
3.2 Insert 2 x AA batteries using the orientation symbols marked on the inside of the
battery compartment. Replace the battery cover.
3.3 The cat flap will self test for approximately 10 seconds after which the clock will
show 0:00.
Good quality alkaline batteries should normally last approximately 24 months
(dependent on use). You may use all popular batteries including 1.5v lithium
batteries but the low battery indicator will only work correctly with standard
alkaline batteries.
4. Setting the clock
4.1 Press and hold the SET and ADJ buttons for 5 seconds until the hour figure on
the clock starts to flash.
NOTE: Hours are always displayed in a 24 hour clock format.
4.2 Press the ADJ button to adjust clock to the correct hour. Hold down the ADJ
button for longer than 3 seconds to scroll through.
4.3 Press the SET button and the minute figure will flash. Adjust the minutes using
the ADJ button, then press SET to save the setting. Do not press any buttons
for 30 seconds, the display will then show current time.
5. Setting the Timer Control
NOTE: Setting procedure will time out if no button is pressed for 30 seconds.
5.1 Set 5 way lock to position E , Fig. 2.
5.2 Press and hold the SET and ADJ buttons for 5 seconds until the hour figure on
the clock starts to flash.
5.3 Press the SET button three times. Segment 3 , Fig. 1 will flash.
5.4 To select a time period for the timed lock to be operative (e.g. 8am - 10am, as
Fig. 1) repeatedly press the ADJ button until the flashing segment ( 3 , Fig.1)
reaches the start of the desired period(s). (In this example indicated by flashing
of segment of 8 - 9.)
5.5 Press SET so that the OUT arrow ( 5 , Fig. 1) disappears.
5.6 Press ADJ and the next segment will then flash. (In this example you would
again press SET.) In this manner you may program multiple time periods if
required.
5.7 To DESELECT a time segment in which the timed lock is operative, press the
ADJ button repeatedly until the flashing segment is positioned at the relevant
segment. Then press SET.
When you have programmed all the time segments you require, do not press any
buttons for 30 seconds.
NOTE: When the timer lock is operative the current time segment will flash.

Join the conversation about this product
Here you can share what you think about the Cat Mate 359W Timer Control Cat Flap. If you have a question, first carefully read the manual. Requesting a manual can be done by using our contact form.
reply | This was helpful (0) (Translated by Google)
reply | This was helpful (0)