
w
w
w
.
p
e
t
-
m
a
t
e
.
c
o
m
+
4
4
(
0
)
1
9
3
2
7
0
0
0
0
1
·
N
A
m
e
r
i
c
a
(
9
3
6
)
7
6
0
4
3
3
3
F
I
T
T
I
N
G
I
N
S
T
R
U
C
T
I
O
N
S
A
N
D
T
E
M
P
L
A
T
E
1003/0711
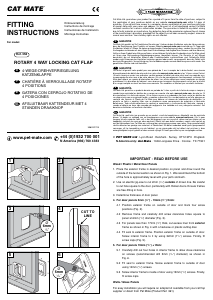
3 YEAR LIMITED WARRANTY
Pet Mate Ltd guarantee your purchase for a period of three years from the date of original purchase
against any defect arising due to faulty materials or manufacture. Accordingly any defective item
will be repaired free of charge or replaced at the manufacturer’s option provided that
the defect has not been caused by neglect, misuse or normal wear and
tear and proof of purchase date is supplied. Your
statutory rights are not affected.
(
1
/16 -
3
/8”)
(
3
/8” -
11
/16”)
(
11
/16” -
7
/8”)
(
7
/8” - 1
1
/4”)
(1
1
/4” +)
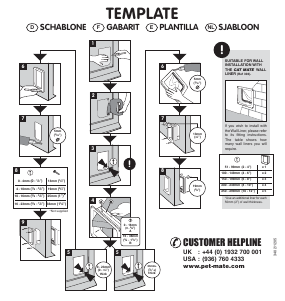
12 - 10mm
10 - 17mm
17 - 23mm
23 - 30mm
30mm +
Door Thickness
Türdickte
Epaisseur de la porte
Short Screw
kurze Schraube
Vis courtes
Long Screw
lange Schraube
Vis longues
Spacer under screwhead
Abstandsstück
Pièce d’écartement
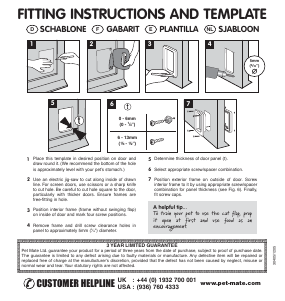
Use 2 off 8g (Ø 4.2) self tapping screws cut to length = door thickness + 12mm (
1
/2”)
Zwei Ø 4.2 Schneidschrauben passend zuschneiden = Türdickte + 12mm
Prenez due vis autotaraudeuses de Ø 4.2mm coupés à la longueur voulue, soit l'épaisseur
de la porte + 12mm
✓
✓
✓
✓✓
✓
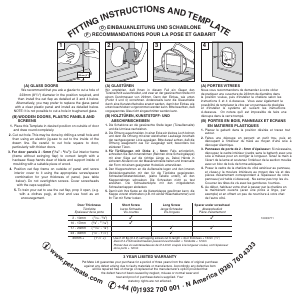
(A) PORTES VITREES
Nous vous recommandons de demander à votre vitrier
de pratiquer une ouverture de 223mm de diamètre dans
la position voulue, puis d'installer la chatière selon les
instructions 3 et 4 ci-dessous. Vous avez également la
possibilité de remplacer la vitre par un panneau de plexiglas
et d'installer le système en suivant les instructions
ci-dessous. On notera qu'il est impossible de faire une
découpe dans la verre trempé.
(B) PORTES EN BOIS, PANNEAUX ET ECRANS
EN MATIERES PLASTIQUES
1. Placez le gabarit dans la position désirée et tracez tout
autour.
2. Faites une découpe en perçant un petit trou, puis en
découpant à l'intérieur du tracé au moyen d'une scie à
découper électrique.
3. Panneaux de porte de 2 - 5mm d’épaisseur: Si nécessaire,
découpez le cadre intérieur (cadre sans le battant) avec une
scie à métaux pour en corriger la longueur. Tenez la main à
l’écart de la lame et soutenez l’intérieur de la section moulée
avec un bloc de bois de forme adéquate.
4. Posez le cadre de la chatière du côté extérieur au panneau,
et vissez-y la moulure intérieure au moyen des vis et des
pièces d'écartement correspondant à l'épaisseur de votre
panneau (voir table ci-dessous). Ne serrez pas trop les vis.
Couvrez les têtes de vis avec les garnitures fournies.
5. Au début, habituez votre chat à passer par la chatière en
la maintenant ouverte (avec une pince à linge, par
exemple) et en offrant un peu de nourriture à votre chat
de l'autre côté.
(A) GLASTÜREN
Wir empfehlen, daß Ihnen in diesem Fall ein Glaser den
Türeinschnitt ausschneidet, und zwar an der gewünschten Stelle mit
einem Durchmesser von 223mm. Dann den Einbau, wie unten
(Punkt 3 und 4) vornehmen. Andererseits kann die Glasschiebe
durch eine Kunststoffscheibe ersetzt werden, damit der Einbau wie
unten beschrieben vorgenommen werden kann. Bitte beachten, daß
vorgespanntes Glas nicht eingeschnitten werden kann.
(B) HOLZTÜREN, KUNSTSTOFF- UND
ABSCHIRMSCHEIBEN
1. Die Schablone an die gewünschte Stelle legen (Türaußenseite)
und die Umrisse nachziehen.
2. Die Öffnung ausschneiden. In einer Ecke ein kleines Loch bohren
und dann die Öffnung mit einer elektrischen Laubsäge innerhalb
der nachgezogenen Linie aussägen. Bitte darauf achten, daß die
Öffnung waagerecht zue Tür ausgesägt wird; besonders bei
stärkeren Türen.
3. Für Türfüllungen mit Dicke 2 - 5mm: Falls erforderlich,
schneiden Sie den Innenrahmen (Rahmen ohne Schwingklappe)
mit einer Säge auf die richtige Länge zu. Dabei Hände in
sicherem Abstand von der Messerschneide halten und Innenseite
der Form mit einem geeigneten Holzstück unterstützen.
4. Den Klappenrahmen an die Außenseite legen und den inneren
Verkleidungsstreifen mit den für die Türdickte gegeigneten.
Schrauben/Abstandstücken, (siehe Tabelle unten), an den
Klappenrahmen schrauben. Die Schrauben nicht zu fest
anziehen. Die Schraubenköpfe mit den mitgelieferten
Schraubenkappen abdecken.
5. Damit sich Ihre Katze an die Katzenklappe gewöhnen kann, die
Klappe vorerst offenhalten (z.B. mit einder Wäscheklammer) und
Ihr Tier mit Futter locken.
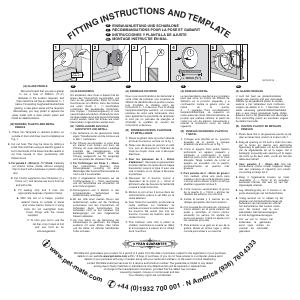
(A) GLASS DOORS
We recommend that you ask a glazier to cut a hole of
223mm (8
3
/4") diameter in the position required, and
then install the cat flap as detailed at 3 and 4 below.
Alternatively, you may prefer to replace the glass panel
with a clear plastic panel and install as detailed below.
NOTE: It is not possible to cut a hole in toughened glass.
(B) WOODEN DOORS, PLASTIC PANELS AND
SCREENS
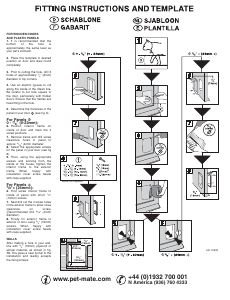
1. Place this Template in desired position on outside of door
and draw round completely.
2. Cut out hole. This may be done by drilling a small hole and
then using an electric jig-saw to cut to the inside of the
drawn line. Be careful to cut hole square to door,
particularly with thicker doors.
3. For door panels 2 - 5mm (
1
/16” -
3
/16”): Cut interior frame
(frame without swinging flap) to correct length with a
hacksaw. Keep hands clear of blade and support inside of
moulding with a suitable piece of wood.
4. Position cat flap frame on outside of panel and screw
interior cover to it using the appropriate screw/spacer
combination for your thickness of panel, (see table
below). Do not overtighten screws. Cover screwheads
with the caps supplied.
5. To train your cat to use the cat flap, prop it open, (e.g.
with a clothes peg), at first and use food as an
encouragement.
approx.
125mm (5”)
1
3
2
4
RECOMMANDATIONS POUR LA POSE ET GABARIT
F
EINBAUANLEITUNG UND SCHABLONE
D


Join the conversation about this product
Here you can share what you think about the Cat Mate 210W Glass Cat Flap. If you have a question, first carefully read the manual. Requesting a manual can be done by using our contact form.