Please Read and Save this Use and Care document.
IMPORTANT SAFEGUARDS
When using electrical appliances, basic safety precautions should always be fol-
lowed to reduce the risk of fire, electric shock, and/or injury to persons, including
the following:
•Read all instructions.
•Do not touch hot surfaces.
•To protect against electric shock, do not place cord, plug or appliance in water or
other liquids.
•Close supervision is necessary when any appliance is used near children.
•Unplug from outlet when not in use and before cleaning. Allow to cool before
putting on or taking off parts and before cleaning the appliance.
•Do not operate any appliance with a damaged cord or plug or after the appliance
malfunctions, or has been damaged in any manner. Return appliance to the
nearest authorized service facility for examination, repair or adjustment.
•The use of an accessory not evaluated for use with this appliance may cause
injuries.
•Do not use outdoors.
•Do not let cord hang over the edge of table or counter, or touch with hot surfaces.
•Do not place on or near a hot gas or electric burner or in a heated oven.
•Do not use this appliance for other than intended use.
•To disconnect, turn any control to OFF then remove plug from wall outlet.
•Scalding may occur if the lid is removed during the brewing cycle.
•This appliance is not intended for use by persons (including children) with reduced
physical, sensory or mental capabilities, or lack of experience and knowledge,
unless they have been given supervision or instruction concerning use of the
appliance by a person responsible for their safety.
•Children should be supervised to ensure that they do not play with the appliance.
SAVE THESE INSTRUCTIONS.
This product is for household use only.
POLARIZED PLUG (120V MODELS ONLY)
This appliance has a polarized plug (one blade is wider than the other). To reduce the risk of
electric shock, this plug is intended to fit into a polarized outlet only one way. If the plug does not
fit fully into the outlet, reverse the plug. If it still does not fit, contact a qualified electrician. Do not
attempt to modify the plug in any way.
TAMPER-RESISTANT SCREW
Warning: This appliance is equipped with a tamper-resistant screw to prevent removal of
the outer cover. To reduce the risk of fire or electric shock, do not attempt to remove the
outer cover. There are no user-serviceable parts inside. Repair should be done only by
authorized service personnel.
ELECTRICAL CORD
1. A short power cord (OR DETACHABLE POWER CORD) is provided to reduce the risk resulting
from becoming entangled in or tripping over a longer cord.
2. Longer detachable power cords or extension cords are available and may be used if care is
exercised in their use.
3. If a long detachable power cord or extension cord is used,
a) The marked electrical rating of the detachable power cord or extension cord should be at least as
great as the electrical rating of the appliance.
b) If the appliance is of the grounded type, the extension cord should be a grounding-type
3-wire cord.
c) The longer cord should be arranged so that it will not drape over the countertop or tabletop where
it can be pulled on by children or tripped over.
Note: If the power cord is damaged, it should be replaced by qualified personnel or in Latin
America by an authorized service center.
HOW TO USE
This product is for household use only.
GETTING STARTED
1. Wash removable parts as instructed in the CARE AND CLEANING instructions prior to use.
2. Plug the power cord into a standard electrical outlet.
3. Brew water through as instructed in BREWING COFFEE, but do not add coffee grounds or soft
pods. When finished, discard the water
from your mug.
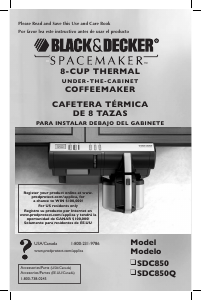
ADJUSTING THE MUG TRAY
The mug tray can accommodate a travel
mug in the nested position (A) or a regular
mug in the stacked position (D).
• Adjust the mug tray to the position that best
accommodates your mug and ensure the
mug tray is securely in place before brewing.
• For an exceptionally tall travel mug, the mug
tray can be removed entirely.
BREWING COFFEE
1. Fill the mug you wish to use with cold water. If desired, leave room for sweetener, cream or
milk.
2. Lift cover. Pour the cold water from your mug into the water reservoir. Do not fill past the Max
fill line in the water reservoir.
3. If desired, add sweetener, cream or milk to your mug. Place the mug on the adjustable mug tray.
4. Place the filter basket into the holder. Ensure the handle is to the left and the back center notch
is resting securely in place.
5. Place the permanent filter into the filter basket with the handle to the right so that it rests
securely in the filter basket.
6. Add coffee; then close the cover.
a. If using ground coffee: For a regular mug (8 fl oz), place approximately 1 ½ tablespoons into
the filter basket. For a travel mug (16 fl oz), use approximately 3 tablespoons.
b. If using soft pods: This unit accepts 70mm soft pods. For a regular mug (8 fl oz), place one
soft pod into the filter basket between filter and basket. For a travel mug (16 fl oz), place an
additional soft pod in the permanent filter.
7. Press the ON|OFF button. The blue light will illuminate and brewing will begin. (It is not required
to set the clock first).
NOTE: Do not remove your mug while coffee is brewing.
NOTE: Your coffeemaker can also be used to brew hot water for tea, hot chocolate, instant
oatmeal, soup, etc. Remove the permanent filter and only wash basket to avoid coffee flavor and
follow the brewing directions without adding coffee grounds or soft pods.
Caution: Be careful when opening the cover after brewing as this area is hot and steamy. Use the
lift tab located on the front of the cover.
SETTING THE CLOCK
1. Press the HOUR button until the correct hour appears on the display. The blue dot in the
corner of the display indicates P.M.
2. Press the MIN button until the correct time appears on the display.
3. Follow these instructions at any time to adjust the clock time.
Note: The time will need to be reset if the unit is unplugged or power is interrupted.
SETTING THE AUTO BREW TIME
1. Press the PROG|AUTO button. The blue light above the button will flash.
2. Use the HOUR and MIN buttons to program the desired Auto Brew time. The blue dot in the
corner of the display indicates P.M. – to select an A.M. Auto Brew time, ensure the dot is not
illuminated.
3. Once the desired Auto Brew time is displayed, press and hold the PROG|AUTO button until the
light above the button stops flashing and stays illuminated. This indicates the Auto Brew time is
set.
3. Prepare the coffeemaker by following steps 1 through 6 in the BREWING COFFEE directions (do
not press the ON|OFF button).
4. To adjust the Auto Brew time after it has been set, press the PROG|AUTO button, then press the
HOUR and MIN buttons to adjust the set time.
Note: Once the Auto Brew time is set, use the PROG|AUTO button to display the Auto Brew time
and toggle the Auto Brew feature on and off. The light above the button illuminates when Auto
Brew is activated. Check the light to ensure you have not unintentionally activated or deactivated
Auto Brew after you check the Auto Brew time.
CARE AND CLEANING
This appliance contains no user serviceable parts. Contact Consumer Support for assistance.
CLEANING
1. Unplug the unit and ensure it has cooled before cleaning.
2. To clean the permanent filter and filter basket: open the cover, remove the permanent filter and
filter basket, discard grounds or soft pods, and place in the dishwasher on the top rack or clean
in warm, soapy water.
3. The coffeemaker exterior may be cleaned with a soft damp cloth.
Important: Do not use abrasive cleansers or scouring pads. Never immerse the
coffeemaker in water.
CLEANING WITH VINEGAR
Mineral deposits left by hard water can clog your coffeemaker. Cleaning is recommended once a
month. Excessive steaming or a prolonged brewing cycle is a sign that a cleaning is needed.
1. Combine 8 ounces of white vinegar and 8 ounces of water. Pour this solution into the water
reservoir.
2. Place a 16 ounce mug (travel mug) on the mug tray.
3. Press the ON|OFF button. Allow the unit to complete a brew cycle.
4. Repeat with new vinegar and water – do not reuse the first solution.
5. Repeat with cold water only to flush out any remaining solution. You may have to repeat this
step to remove any remaining vinegar taste.
6. Wash and dry the permanent filter and filter basket as instructed in CLEANING.
NEED HELP?
For service, repair or any questions regarding your appliance, call the appropriate 800 number on
this sheet. Please DO NOT return the product to the place of purchase. Also, please DO NOT mail
product back to manufacturer, nor bring it to a service center. You may also want to consult the
website listed on the cover of this manual.
TWO-YEAR LIMITED WARRANTY
(Applies only in the United States and Canada)
What does it cover?
• Anydefectinmaterialorworkmanshipprovided;however,Applica’sliabilitywillnotexceedthe
purchase price of product.
For how long?
• Twoyearsfromthedateoforiginalpurchasewithproofofsuchpurchase.
What will we do to help you?
• Provideyouwithareasonablysimilarreplacementproductthatiseitherneworfactory
refurbished.
How do you get service?
• Saveyourreceiptasproofofdateofsale.
• Visittheonlineservicewebsiteatwww.prodprotect.com/applica,orcall
toll-free 1-800-231-9786, for general warranty service.
• Ifyouneedpartsoraccessories,pleasecall1-800-738-0245.
What does your warranty not cover?
• Damagefromcommercialuse
• Damagefrommisuse,abuseorneglect
• Productsthathavebeenmodifiedinanyway
• Productsusedorservicedoutsidethecountryofpurchase
• Glasspartsandotheraccessoryitemsthatarepackedwiththeunit
• Shippingandhandlingcostsassociatedwiththereplacementoftheunit
• Consequentialorincidentaldamages(Pleasenote,however,thatsomestatesdonotallowthe
exclusion or limitation of consequential or incidental damages, so this limitation may not apply
to you.)
How does state law relate to this warranty?
• Thiswarrantygivesyouspecificlegalrights.Youmayalsohaveotherrightsthatvaryfromstate
to state or province to province.
Por favor lea este instructivo antes de usar el producto
INSTRUCCIONES IMPORTANTES
DE SEGURIDAD.
Cuando se utilizan aparatos eléctricos, siempre se debe respetar ciertas medidas
de seguridad a fin de reducir el riesgo de un incendio, un choque eléctrico y lol
lesiones a las personas, incluyendo las siguientes:
•Lea todas las instrucciones.
•No toque las superficies calientes.
•Para protegerse contra una descarga eléctrica, no coloque el cable, el enchufe o el
aparato en agua u otros líquidos.
•Se requiere supervisión cuando cualquier aparato es utilizado por o cerca de niños.
•Desenchufe del tomacorriente cuando no esté en uso y antes de limpiarlo. Deje
que se enfríe antes de colocar o quitar piezas y antes de limpiarlo.
•No opere ningún aparato con un cable o enchufe dañado, después de un mal
funcionamiento, o si se ha dañado de alguna manera. Devuelva el aparato al centro
de servicio autorizado más cercano para su revisión, reparación o ajuste.
•El uso de un accesorio no evaluado para ser utilizado con este aparato podría
ocasionar lesiones.
•No lo use al aire libre.
•No permita que el cable cuelgue del borde de la mesa o mostrador, ni que toque
superficies calientes.
•No lo coloque sobre o cerca de una hornilla de gas o eléctrica o en un horno
caliente.
•No utilice el aparato para usos distintos del indicado.
•Para desconectar, ponga todos los controles en la posición OFF y luego retire el
enchufe del tomacorriente.
•Pueden ocurrir quemaduras si se retira la tapa durante el ciclo de preparación.
•Este aparato no está diseñado para ser usado por personas (incluído niños) con
capacidad limitada física, mental o sensoriales disminuidas y falta de experiencia o
conocimiento que les impida utilizar el aparato con toda seguridad sin supervisión
o instrucción.
•Se debe asegurar la supervisión de los niños para evitar que usen el aparato como
juguete.
CONSERVE ESTAS INSTRUCCIONES.
Este aparato electrico es para uso domestico unicamente.
ENCHUFE POLARIZADO (SOLAMENTE PARA LOS MODELOS DE 120V)
Este aparato cuenta con un enchufe polarizado (un contacto es más ancho que el otro). A fin
de reducir el riesgo de un choque eléctrico, este enchufe encaja en un tomacorriente polarizada
en un solo sentido. Si el enchufe no entra en le tomacorriente, inviértalo y si aun así no encaja,
consulte con un electricista. Por favor no trate de alterar esta medida de seguridad.
TORNILLO DE SEGURIDAD
Advertencia: Este aparato cuenta con un tornillo de seguridad para evitar la remoción de
la cubierta exterior del mismo. A fin de reducir el riesgo de incendio o de choque eléctrico,
por favor no trate de remover la cubierta exterior. Este producto no contiene piezas
reparables por el consumidor. Toda reparación se debe llevar a cabo únicamente por
personal de servicio autorizado.
CABLE ELÉCTRICO
1. El producto se debe de proporcionar con un cable eléctrico corto (o uno separable), a fin de reducir el
riesgo de tropezar o de enredarse en un cable más largo.
2. Existen cables eléctricos más largos y separables o cables de extensión que uno puede utilizar
si toma el cuidado debido.
3. Si se utiliza un cable separable o de extensión,
a) El régimen nominal del cable separable o del cable de extensión debe
ser, como mínimo, igual al del régimen nominal del aparato.
b) Si el aparato es de conexión a tierra, el cable de extensión debe ser un
cable de tres alambres de conexión a tierra.
c) Uno debe de acomodar el cable más largo de manera que no cuelgue
del mostrador o de la mesa, para evitar que un niño tire del mismo o que
alguien se tropiece.
Nota: Si el cordón de alimentación es dañado, en América Latina debesustituirse por personal
calificado o por el centro de servicio autorizado.
COMO USAR
Este product es solamente para uso
doméstico.
PRIMEROS PASOS
1. Lave las piezas removibles según las
instrucciones de la sección de CUIDADO Y
LIMPIEZA antes de su uso.
2. Enchufe el cable en un tomacorriente
estándar.
3. Cuele agua siguiendo las instrucciones en
la sección de COLADO DE CAFÉ sin agregar
café molido o bolsitas de café. Cuando
termine, deseche el agua de la taza.
AJUSTE DE LA BANDEJA PARA LA TAZA
La bandeja puede acomodar una taza portátil encajada en posición sobre (A) la base o una taza
regular al ajustarse a una posición más alta (D).
• Ajuste la bandeja a la posición adecuada para acomodar su taza y asegúrese de que la bandeja
esté bien colocada en su lugar antes de comenzar el colado.
• La bandeja se puede retirar para acomodar una taza extremadamente alta.
COLADO DE CAFÉ
1. Llene la taza que desee usar con agua fría. Si desea, deje espacio suficiente para el azúcar, la
crema o la leche.
2.Abralatapa.Viertaelaguafríadelatazaeneltanquedeagua.Noexcedalalíneadenivel
máximo (Max) marcada en el tanque de agua.
3. Si desea agregue azúcar, crema o leche en la taza. Coloque la taza en la bandeja de altura
ajustable.
4. Coloque el cesto del filtro en su compartimiento. Asegúrese de que el asa esté mirando hacia la
izquierda y que la abertura en la parte de atrás, esté descansando con seguridad en su lugar.
5. Coloque el filtro permanente adentro del cesto removible con el asa mirando hacia la derecha
de manera que caiga con seguridad en su lugar.
6. Agregue café molido. Cierre la tapa.
a. Si está usando café molido: Para una taza regular (8 onzas), coloque aproximadamente 1
½ cuchara en el cesto del filtro. Para una taza portátil (16 onzas), use aproximadamente 3
cucharadas de café.
b. Si está usando las bolsitas de café: Esta unidad acepta bolsitas de 70 mm.Para una taza
normal (8 fl oz), una cápsula blanda dentro de la canasta del filtro y mediadores canasta del
filtro. Para una taza portátil (16 onzas), coloque una bolsita adicional en el filtro permanente.
7. Presione el botón de encendido/apagado (ON/OFF). La luz azul se ilumina y el ciclo de colado
comienza. (No es requerido programar el reloj antes de comenzar el ciclo de colado.)
Nota: No retire su taza durante el ciclo de colado.
Nota: Su cafetera también se puede utilizar para colar agua caliente para preparar otras
bebidas como el té, chocolate caliente, la avena instantánea, sopas y mucho más. Quite el filtro
permanente y sólo lavar la cesta para evitar el COLADO DEL CAFÉ y siga las instrucciones cerveza
sin agregar café molido o las vainas blandas.
Precaución: Tenga cuidado al abrir la tapa después que haya terminado el ciclo de
colado ya que esta área de la cafetera emite vapor y permanece caliente. Use la lengüeta
localizada en el frente de la tapa para ayudarle a levantarla.
PROGRAMACIÓN DEL RELOJ
1. Presione el botón de hora (HOUR) hasta que aparezca la hora correcta en la pantalla. El punto
azul en la esquina de la pantalla indica P.M.
2. Presione el botón de los minutos (MIN) hasta que los minutos correctos aparezcan en la
pantalla.
3. Siga estas instrucciones para ajustar el rejol en cualquier momento.
Nota: Si se desenchufa la unidad o si se interrumpe la corriente, la hora debe ser reajustada.
PROGRAMACIÓN DE LA FUNCIÓN DE COLADO AUTOMÁTICO
1. Presione el botón PROG/AUTO. La luz azul localizada arriba del botón parpadea.
2. Use los botones HOUR y MIN para programar la hora deseada de inicio del colado automático.
El punto azul en la esquina de la pantalla indica P.M.; para seleccionar A.M., asegúrese de que
el punto azul no esté iluminado.
3. Una vez que aparezca la hora deseada para iniciar el colado automático, presione y sostenga
el botón PROG/AUTO hasta que la luz localizada arriba del botón pare de parpadear y cambie a
una luz solida. Esto indica que la hora de inicio del colado automático ha sido activada.
4. Prepare la cafetera para el ciclo de colado siguiendo los pasos del 1 al 6 en la sección de
A.
C.
B.
D.
A.
C.
B.
D.
WARNING
RISK OF FIRE OR ELECTRIC SHOCK. DO NOT OPEN.
The lightning symbol refers to “dangerous voltage”; the exclamation symbol refers
to maintenance instructions. See below.
Warning: To reduce the risk of fire or electric shock, do not remove the cover of the
coffeemaker. There are no user-serviceable parts inside. Repair should be done by
authorized service personnel only.


Join the conversation about this product
Here you can share what you think about the Black and Decker CM620B Coffee Machine. If you have a question, first carefully read the manual. Requesting a manual can be done by using our contact form.