Congratulations on your purchase of the Axiom
®
A10W cyclocomputer. With all the features that a professional rider
needs to keep track of a ride, the A10W is the perfect training tool for any cyclist. The added convenience of wireless
transmission makes installation simple.
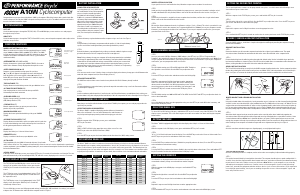
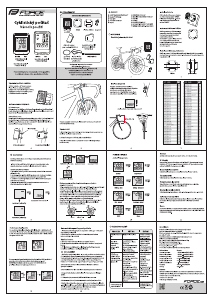
LEFT KEY
Use this button to progress through the TRP, RID, AVS, STP and MAX display screens and to access and progress
through the set-up screens.
RIGHT KEY
Use this button to progress through the TCNT, CLK and ODO screens, start and stop the stopwatch and to adjust values
within the set-up screens.
WHEEL SIZE SETTING (WS1, WS2)
Wheel circumference is used to calculate speed and distance. Setting
range is 0000mm-3999mm (KMH) and 000.0"-157.4" (MPH). The A10W
includes two wheel size settings, WS1 and WS2, allowing you to use the
computer on two bikes with different wheel sizes (e.g. your road bike
and mountain bike).
SPEEDOMETER (SPD) (MPH or KMH)
Displays instantaneous speed, up to 120KMH (75MPH). Accurate to
whole mile or kilometer. Always displayed at the top of the screen.
SPEED COMPARISON (
▲
•
▼
)
Compares current speed to average speed. As you ride, a
(
▲
), (•) or (
▼
) will appear in the upper left corner of the display to
indicate whether your current speed is above (
▲
) equal to (•) or
below (
▼
) your average speed. This function is automatic, requires
no programming and cannot be disabled.
TRIP DISTANCE (TRP)
Displays distance traveled during current ride, up to 999.99 mi. or km.
AUTOMATIC RIDE TIMER (RID)
Auto start/stop timer records actual ride time up to 9:59:59.
Activated by front wheel movement.
AVERAGE SPEED (AVS)
Displays average speed. Calculated using true ride time
(RID) and trip distance (TRP).
STOPWATCH (STP)
Manual stopwatch allows you to time your entire ride or
portions of your ride, up to 9:59:59.
MAXIMUM SPEED (MAX)
Displays the fastest speed attained during a ride, up to 120KMH
(75mph).
SECOND TRIP COUNTER (TCNT)
Displays distance traveled with a quick reset option, which is particular-
ly useful when following route sheets with turn by turn instructions or
tracking point to point distances within a ride.
CLOCK (CLK)
Displays time of day in a 12 hour or 24 hour format.
ODOMETER (ODO)
Displays cumulative ride distance, up to 99,999 mi. or km.
AUTO SLEEP
To prolong battery life, the A10W will automatically enter "sleep" mode
after 5 minutes of non-use. The computer will automatically restart as soon as it receives input from the speed sensor,
or when any button is pressed. Note: To prolong battery life, we recommend removing the head unit from the handle-
bar bracket between rides.
SCROLL MODE
In the RID, TRP or AVS display screen, pressing the LEFT key for 1.5 seconds will activate the scroll function. The com-
puter will automatically scroll once through the RID, TRP and AVS screens, displaying each screen for 1.5 seconds.
The TRP, RID, AVS and MAX display screens are reset simul-
taneously. In any of these four display screens, pressing the
RIGHT key for 5 seconds will reset the data in all four screens
to zero.
The STP display screen is reset independently. In the STP dis-
play screen, pressing the RIGHT key for 5 seconds will reset
the stopwatch to zero.
The TCNT display screen is reset independently. In the TCNT
display screen, pressing the RIGHT key for 5 seconds will
reset the trip counter to zero.
To reset ALL display screens and ALL programmed settings (including CLK, ODO and wheel size settings), use a pencil
to depress the ‘AC’ button on the underside of the computer head. See Figure 1.
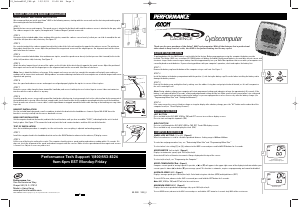
COMPUTER HEAD/RECEIVER
To prolong battery life, the A10W battery is
not installed at the factory. Before program-
ming or using the computer the battery
(included) must be installed. The Axiom
®
A10W uses a common 3V CR2032 button
cell battery. Replacement batteries are avail-
able at most camera and electronic shops.
Under normal usage a battery should last
approximately one year. Note: Most prob-
lems that occur with cyclocomputers are
caused by dead or weak batteries. If you are
having problems with your computer’s oper-
ation, check and replace the battery first.
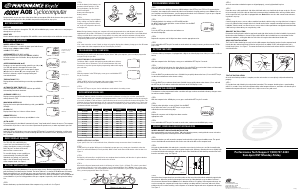
STEP 1
Remove the battery cap from the bottom of the computer using a small coin. See Figure 2.
STEP 2
Install the battery in the battery compartment with the positive (+) side facing the battery
cap. Be careful when installing the battery not to damage the battery contact.
STEP 3
Reinstall the battery cap and tighten firmly, making sure that the rubber O-ring does not get
pinched or distorted, as this will compromise the unit’s watertight seal.
Note: During a battery change your computer will retain programmed values and odome-
ter mileage for approximately 30 seconds. If the battery is not replaced within 30 seconds,
all data will be cleared and default settings restored. Make a note of your current wheel
size settings and cumulative odometer mileage before replacing the battery so you can
reprogram these values if necessary once the new battery is installed. (see "Programming
Wheel Size" and "Setting the Odometer").
STEP 4
If for some reason the screen is blank or shows an irregular display after a battery change, press the AC button on the
underside of the computer head (see "Reset Display Screens").
SENSOR/TRANSMITTER
The A10W sensor/transmitter comes from the factory with the A23 LR23 12V battery already installed.
STEP 1
To replace the battery, remove the battery cap from the top of the transmitter using a small coin. Remove the old bat-
tery and dispose of properly.
STEP 2
Install a new battery with the positive (+) end facing the cap. Reinstall the battery cap and tighten firmly, making sure
that the rubber O-ring does not get pinched or distorted, as this will compromise the unit’s watertight seal. See Figure 3.
Now that you are familiar with the features of your Axiom
®
A10W cyclocomputer, you are ready to program the unit
specifically for your bike.
SELECTING MILES OR KILOMETERS
The Axiom
®
A10W is capable of displaying speed and distance information in
either miles or kilometers. You can switch between miles and kilometers at
any time by entering the programming mode and changing your selection.
STEP 1
With the computer in the TRP display screen, press and hold the
LEFT key for 5 seconds.
STEP 2
"KMH" or "MPH" will flash in the upper right corner of the screen. Press the
RIGHT key to select miles (MPH) or kilometers (KMH).
STEP 3
Press the LEFT key to set your choice and advance to the first wheel size (WS1) setting screen.
The Axiom
®
A10W uses wheel circumference (measured in millimeters or inches) to calculate speed and distance.
Note that while your computer can be programmed to +/-1mm (+/- 0.1") for total accuracy, discrepancies of as much as
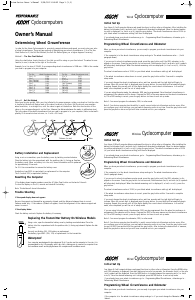
50mm (2") will not have a significant effect on the accuracy of the unit for most normal rides. The following chart lists
the programming sizes for some of the most popular tire sizes currently in use. These numbers are estimations which
may not precisely match the circumference of your wheel, due to variations in tire size between brands and models.
WHEEL SIZE CALCULATION
If your specific tire size is not listed in the chart, follow these steps to measure wheel circumference.
STEP 1
Stand your bicycle upright. With your tire inflated to its proper pressure, rotate your front wheel so that the valve is
located at the bottom (6 o’clock position). Make a mark on the floor to indicate the valve location. See Figure 4.
STEP 2
Roll the bicycle forward in a straight line for one complete wheel revolution, until the valve is again at the bottom.
Make a mark on the floor to indicate the valve location.
STEP 3
Measure the distance between the marks in millimeters or inches (1 inch = 25.4mm). This value is your wheel circum-
ference. Enter this value in the computer (see "Programming Wheel Size"). Note: If you set your computer to read in
kilometers, you must program the wheel size in millimeters. If you set your computer to read in miles, you must pro-
gram the wheel size in inches.
STEP 1
Once you select miles (MPH) or kilometers (KMH) and press the LEFT key (see STEP 3 of "Programming the
Computer"), the computer will automatically advance to the first wheel size (WS1) programming screen. Note: If you
set your computer to read in kilometers, you must program the wheel size in millimeters. If you set your computer to
read in miles, you must program the wheel size in inches.
STEP 2
The WS1 default settings are 2155 for KMH and 84.8 for MPH. The digit at
the right of the screen will flash. Use the RIGHT key to adjust the value.
STEP 3
Press the LEFT key to set the value and advance to the next flashing digit.
STEP 4
Repeat this sequence until all digits have been set to the appropriate
value. Press the LEFT key again to set the WS1 value in memory and
advance to the second wheel size (WS2) programming screen. If you do
not wish to program a value for the second wheel size setting, press and
hold the LEFT key for 5 seconds to return to the TRP display screen.
STEP 5
The WS2 default settings are 2000 for KMH and 78.7 for MPH. Use the RIGHT and LEFT keys to adjust the wheel size
value as described above.
STEP 6
Once all the digits have been set to the appropriate value, press the LEFT key to set the WS2 value in memory, and
return to the TRP display screen.
To select WS1 or WS2 before a ride, press and hold the LEFT key for 5 seconds in any of the RID, AVS, STP or MAX
display screens, but not the TRP screen. Don’t forget to select the correct wheel size when switching the computer
between bikes.
The Axiom
®
A10W is equipped with a digital clock that displays time of day in a 12 hour or 24 hour format.
STEP 1
With the computer in the CLK display screen, press and hold the LEFT key for 5 seconds.
STEP 2
"24:" or "12:" will flash in the lower line of the display. Press the RIGHT key to select the 12 hour or 24 hour mode. Press
the LEFT key to set your choice and advance to the hours setting.
STEP 3
Press the RIGHT key to advance the hours. (Hold this key to quickly advance the hours.) Press the LEFT key to set the
value and advance to the minutes setting.
STEP 4
Press the RIGHT key to advance the minutes. (Hold this key to quickly advance the minutes.) Press and hold the LEFT
key for 5 seconds to set the value and return to the CLK display screen.
The odometer can be programmed so that cumulative mileage can be
restored after a battery change or transferred from another computer.
STEP 1
With the computer in the ODO display screen, press and hold the LEFT key
for 5 seconds.
STEP 2
The digit at the right of the screen will flash. Use the RIGHT key to adjust the
value.
Press the LEFT key to set your choice and advance to the next flashing digit.
STEP 3
Repeat this sequence until all digits have been set to the appropriate value.
STEP 4
Press and hold the LEFT key for 5 seconds to set the odometer value and return to the ODO display screen.
The second trip distance counter can be programmed at any time—a useful feature while following a route
sheet with turn by turn instructions.
STEP 1
With the computer in the TCNT display screen, press and hold the LEFT key for 3 seconds.
STEP 2
The digit at the right of the screen will flash. Use the RIGHT key to adjust the value. Press the LEFT key to set
your choice and advance to the next flashing digit.
STEP 3
Repeat this sequence until all digits have been set to the appropriate value.
STEP 4
Press and hold the LEFT key for 3 seconds to set the value in memory and return to the TCNT display screen.
Since the A10W is wireless, installation is simple and straight forward. Begin by attaching the computer mounting
bracket o the handlebars.
BRACKET INSTALLATION
STEP 1
Determine whether you will mount the computer head to the left or right of your handlebar stem. The speed
sensor/transmitter should then be attached to the fork on the same side of the bike as the computer head.
STEP 2
Remove the backing from the adhesive pad on the underside of the bracket. Use the included O-ring to attach the
bracket to the handlebar as shown in Figures 5A & 5B. Use the included shim to accommodate smaller diameter han-
dlebars, sticking the adhesive side of the shim to the underside of the bracket.
HEAD UNIT INSTALLATION
The Twist-Click bracket design securely locks the A10W computer head into the bracket. Set the computer head into
the bracket, and twist the head clockwise until you hear an audible ‘CLICK’, indicating that the unit is locked firmly in
place. See Figure 6. To remove the head unit, twist the head counterclockwise and then lift it out of the bracket.
WHEEL MAGNET AND SENSOR INSTALLATION
STEP 1
Using the included rubber shim and zip-ties, loosely mount the sensor (so that you can slide it around) to the fork blade
so that it’s on the same side of the bike as the handlebar bracket. The A10W transmission range is 24" (60cm). The sen-
sor/transmitter must be mounted within 24" of the receiver (computer head) in order for the receiver to pick up the sig-
nal. The sensor/transmitter battery cap should face up. See Figure 7. Note: We recommend mounting the sensor to
the front (leading) edge of the fork blade to avoid problems should the sensor ever come into contact with the spokes.
STEP 3
Attach the wheel magnet loosely to one of the spokes on the same side of the wheel and directly opposite the
sensor/transmitter. Adjust the position of the magnet and sensor by sliding both pieces up or down to achieve 1-3mm
clearance between the two. Note: 1mm is about the thickness of a penny. If the magnet and sensor are not close
enough, the computer will not pick up a reading or readings will be inconsistent and erratic. Most problems that occur
when installing a new computer are related to magnet and sensor alignment and spacing. See Figure 8.
STEP 4
Once the transmitter and wheel magnet are aligned properly, securely tighten both in place.
TEST OF INSTALLATION
Once the installation procedure is complete, test the unit to make sure everything is adjusted and working properly.
STEP 1
Pick up the front end of the bicycle and spin the front wheel. The computer should register a speed reading within 1-2
seconds. If not, check the alignment of the wheel magnet and sensor, and make sure that the space between the mag-
net and sensor is 3mm or less. Adjust as necessary and re-test. Note: Wireless cyclocomputers are occasionally
affected by electromagnetic interference. Common sources of electromagnetic signals include high voltage
power lines, motor driven equipment and other wireless devices (such as heart rate monitors). If you experience
unusually high speed readings, check your surroundings for possible sources of electromagnetic signals and
move away from the source.


Join the conversation about this product
Here you can share what you think about the Axiom A10W Cycling Computer. If you have a question, first carefully read the manual. Requesting a manual can be done by using our contact form.