Manual FOX R Series 1 Man XL Tent

Need a manual for your FOX R Series 1 Man XL Tent? Below you can view and download the PDF manual for free in English. This product currently has 7 frequently asked questions, 0 comments and has 0 votes. If this is not the manual you want, please contact us.

Is your product defective and the manual offers no solution? Go to a Repair Café for free repair services.

Manual

Loading…

For more information visit
WWW.FOXINT.COM
Designed & Developed in the UK • FOX is a Registered Trade Mark • Made in China
INSTRUCTIONS
F INSTRUCTIONS
INSTRUCTIES
D ANLEITUNG
I ISTRUZIONI
H UTASÍTÁS
ИНСТРУКЦИИ
NÁVOD
INSTRUKCJA
NÁVOD
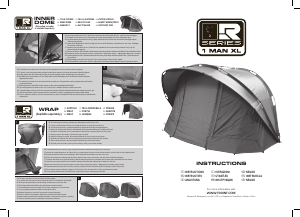
WRAP
(Available seperately)
F SURTOILE
WRAP
D WRAP
I TELO ADDIZIONALE
H PONYVA
НАКИДКА
PŘEHOZ
NARZUTA
PREHOZ
2
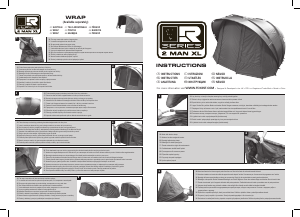
Fit the elasticated loops over the bivvy pegs working from the back towards the front and peg out the front porch.
F Attachez les sangles élastiques sur les vrilles du bivvy en commençant de l’arrière vers l’avant. Arrimez ensuite le porche à l’aide de vrilles supplémentaires.
Bevestig de elastische lussen over de tentharingen. Werk hierbij vanaf de achterzijde van de bivvy naar voren.
D Ziehen Sie die elastischen Schlaufen über die Häringe, dabei von hinten nach vorne arbeiten, dann das Vorzelt mit Häringen befestigen.
I Fissate gli anelli elastici sopra ai picchetti del bivvy partendo dalla parte posteriore e procedendo verso la parte frontale, picchettando anche la veranda.
H Akassza a ponyva gumis rögzítőit a sátor cövekeihez. Haladjon hátulról előrefelé, majd legvégül cövekelje le az első részt.
Натяните эластичные петли поверх колышков, начиная сзади и продвигаясь вперед, и зафиксируйте колышками тамбур накидки.
Připevněte elastické smyčky přes kotvící kolíky od bivaku, postupujte od zadní části směrem dopředu a zakolíkujte i přední úložný prostor.
Zaczep elastyczne pętle na wkrętach mocujących. Zacznij od tyłu i idź w kierunku przodu. Przymocuj przedsionek do podłoża.
Pevne upevnite elastické slučky cez nožičky bivaku, s pracovaním smerom od zadu postupne do predu.
Throw the wrap over the bivvy positioning the rubber badge central to the bivvy door.
F Jetez la surtoile par-dessus le bivvy avec le badge caoutchouc au centre de la porte du bivvy.
Gooi de wrap over de bivvy, waarbij het rubberen logo centraal boven de deur wordt gepositioneerd.
D Werfen Sie das Wrap über das Bivvy, dabei platzieren Sie die gummierte Markierung in der Mitte der Bivvytür.
I Stendete il telo addizionale sul bivvy posizionando il badge centrale in gomma sulla porta del bivvy stesso.
H Dobja a ponyvát a sátor tetejére. A gumi jelvény legyen az ajtónál.
Набросьте накидку на палатку, расположив резиновый логотип по центру входной двери.
Přehoďte přehoz přes bivak do pozice, kdy gumové logo bude umístěno uprostřed vchodu do bivaku.
Narzuć narzutę na namiot, aby gumowa patka znajdowała się na środku drzwi namiotu.
Prehoďte prehoz cez bivak s presnou pozíciou centrály a značky oproti vchodu do bivaku
1
The wrap comes with solid, clear and mozzy mesh door options.
F La surtoile est fournie avec les options de porte tissu plein, PVC transparent et moustiquaire.
De wrap wordt geleverd met een ondoorzichtige, transparante en mozzy mesh deur.
D Der Überwurf enthält eine Stofftür sowie optionale klare & Insektennetztüren
I Il telo addizionale viene fornito completo di porta solida, trasparente e in rete anti-insetto.
H A ponyva gyárilag tartalmaz teli, átlátszó és szúnyoghálós ajtót is.
Накидка комплектуется сплошной, прозрачной и москитной дверьми.
Přehoz je dodáván s neprůhledným, průhledným a moskytiérovým dveřím panelem.
Narzuta zawiera opcjonalne drzwi z pełnego materiału, w wersji przezroczystej oraz z moskitiery.
Prehoz je dodávaný s pevnými, prehľadnými a moskytierovými dverami.
3
2
If required the inner dome can be left in place and the groundsheet can be removed by simply unzipping it.
F Si besoin, la toile interne peut rester montée et le tapis de sol enlevé par le biais de sa fermeture à glissière intégrale.
Indien gewenst kan de binnentent blijven zitten en kan het grondzeil worden verwijderd door de rits te openen.
D Bei Bedarf kann das Innenzelt an Ort und Stelle bleiben und die Bodenplane durch das Öffnen des Reißverschlusses
abgenommen werden.
I Se necessario, la cellula interna può essere lasciata in posizione e il telo-pavimento rimosso semplicemente utilizzando la
cerniera perimetrale.
H ASzükség esetén a belső fülkét a helyén hagyva az alja a cipzár segítségével eltávolítható.
При необходимости Вы можете снять пол, отстегнув его с помощью молнии, оставив лишь кокон.
V případě potřeby může být vnitřní ložnice ponechána a podlaha může být odstraněna jednoduchým odepnutím pomocí zipu.
Jeśli jest to potrzebne, namiot wewnętrzny można pozostawić na miejscu, a podłogę można w prosty sposób odpiąć.
Ak je to vyžadované môže byť vnútorný dom ponechaný na mieste a vonkajší dom môže byť odobratý pomocou jednoduchého
odzipsovania.
1
Lay the groundsheet in the bivvy. Start from the back working up and towards the front - attach the clips and toggles
F Etendez la surtoile dans le bivvy. Commencez par l’arrière pour progresser vers l’avant. Attachez les clips.
Leg de binnentent met grondzeil in de bivvy. Begin achterin de bivvy en werk naar de voorkant. Bevestig de clips en
houtje-touwtje sluitingen.
D Legen Sie die Bodenplane in das Bivvy. Beginnen Sie von der Rückseite aus und arbeiten sich nach vorne - befestigen
Sie die Clips und Knebel.
I Stendete il telo-pavimento nel bivvy. Partite dal retro procedendo verso la parte frontale, fissando le clip e gli altri
elementi appositi di aggancio.
H
Fektesse az aljzatot a sátor belsejébe. Csatlakoztassa a műanyag pöcköket a karikákba alulról felfelé és hátulról előrefelé haladva.
Разложите пол внутри палатки. Начните с задней части, продвигаясь вперед – зафиксируйте фастексы и пуговицы.
Položte podlahu do bivaku. Začněte směrem od zadní strany a pokračujte směrem do přední části – připevněte pomocí
klipů a přezek.
Rozłóż podłogę w namiocie. Zacznij od tyłu i idź w kierunku przodu. Zamocuj klipsy i pętelki.
Položte podlahu do vnútra bivaku. Začnite v zadnej časti a pokračujte smerom dopredu s upínaním podlahy do klipov.
INNER
DOME
(Depending on model
or available seperately)
F TOILE INTERNE
INNER DOME
D INNENZELT
I CELLULA INTERNA
H BELSŐ FÜLKE
ВНУТРЕННИЙ
VNITŘNÍ LOŽNICE
NAMIOT WEWNĘTRZNY
VNÚTORNÝ DOM
Download manual in English (PDF, 2.56 MB)
(Consider the environment and only print this manual if it is really necessary)

Loading…

Rating

Let us know what you think about the FOX R Series 1 Man XL Tent by leaving a product rating. Want to share your experiences with this product or ask a question? Please leave a comment at the bottom of the page.
Are you satisfied with the FOX R Series 1 Man XL Tent?
Yes No
Be the first to rate this product
0 votes

Join the conversation about this product

Here you can share what you think about the FOX R Series 1 Man XL Tent. If you have a question, first carefully read the manual. Requesting a manual can be done by using our contact form.

More about this manual

We understand that it’s nice to have a paper manual for your FOX R Series 1 Man XL Tent. You can always download the manual from our website and print it yourself. If you would like to have an original manual, we recommend you contact FOX. They might be able to provide an original manual. Are you looking for the manual of your FOX R Series 1 Man XL Tent in a different language? Choose your preferred language on our homepage and search for the model number to see if we have it available.

Specifications

Brand FOX
Model R Series 1 Man XL
Category Tents
File type PDF
File size 2.56 MB

All manuals for FOX Tents
More manuals of Tents

Frequently Asked Questions about FOX R Series 1 Man XL Tent

Our support team searches for useful product information and answers to frequently asked questions. If you find an inaccuracy in our frequently asked questions, please let us know by using our contact form.

Can I store my tent when it's wet? Verified

Only for very short periods of time. When a tent is stored while wet for a week or longer, it can get moldy. This is harmful for your tent and possibly your health.

This was helpful (384) Read more

How do I impregnate a tent? Verified

Pitch the tent, clean the cloth and let it dry. Apply the impregnation agent on the cloth with a plant sprayer or other spray. It is also possible to use a paint roller or brush. The cloth needs to be fully saturated with the impregnation agent. Also treat the inside of the tent. Thoroughly clean any windows with a moist cloth. Do not let the impregnation agent dry on it. Let the tent cloth fully dry. Repeat the treatment if needed.

This was helpful (285) Read more

Can I repair a tear or hole in the canvas of my tent myself? Verified

There are special pieces of self-adhesive patches of cloth available for synthetic tent canvases. Stick one of these patches on both sides of the hole or tear. For cotton tent canvases or mixed material tent canvases it's best to use patches that can be ironed on. This will require an iron.

This was helpful (218) Read more

The zipper of my tent won't run smoothly, what can I do? Verified

When a zipper is running smoothly, use a dry PTFE spray or silicone spray. Do not spray onto the cloth and preventively spray to prevent future problems.

This was helpful (156) Read more

There are water drops on the inside of the tent, does this mean it is leaking? Verified

No, this is probably condensation. Make sure the tent is properly ventilated to keep condensation at a minimum.

This was helpful (129) Read more

What tent pegs are best to use for which surfaces? Verified

On grassland or forest surfaces you can use semi circular or plastic pegs. On rocky surfaces you need to use rock pegs. On clay surfaces you can use semi circular, plastic or universal pegs. On gravel surfaces you need semi circular or universal pegs and on sand you need to use wooden pegs.

This was helpful (105) Read more

The impregnation agent leaves white stains or a white haze on the tent cloth, what can I do about this? Verified

If the agent leaves a white haze or white stains on the tent cloth, this means you have applied more impregnation agent on those areas. This is not harmful and the stains often disappear over time. It is not advisable to use less impregnation agent to prevent stains. The cloth needs to be fully saturated with the impregnation agent to give good results.

This was helpful (97) Read more
Manual FOX R Series 1 Man XL Tent

Related products

Related categories