Manual FOX R Series 1 Man XL Tent

Need a manual for your FOX R Series 1 Man XL Tent? Below you can view and download the PDF manual for free in English. This product currently has 7 frequently asked questions, 0 comments and has 0 votes. If this is not the manual you want, please contact us.

Is your product defective and the manual offers no solution? Go to a Repair Café for free repair services.

Manual

Loading…

9
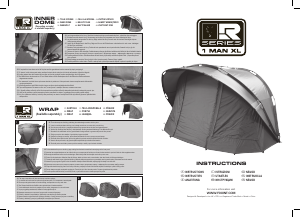
Mozzy mesh panels are also located on the rear of the bivvy for added ventilation.
F Le bivvy est également équipé de fenêtres de ventilation arrière avec panneau moustiquaire.
Aan de achterzijde bevinden zich mozzy mesh panelen voor extra ventilatie.
D Mückennetzeinsätze für eine zusätzliche Belüftung befinden sich auch auf der Rückseite des Bivvys.
I Pannelli in rete anti-zanzare sono collocati sulla parte posteriore del bivvy per una migliore ventilazione interna.
H Szúnyoghálós panelek a sátor hátulján is találhatók a jobb szellőzés érdekében.
Москитные панели в задней части палатки улучшают вентиляцию.
Moskytiérové ventilační okna jsou umístěny na zadní straně bivaku, aby bylo zaručeno lepší proudění vzduchu.
Dla poprawy wentylacji z tyłu namiotu znajdują się także panele z moskitiery.
Moskytiérové panely sú taktiež lokalizované v prednej časti bivaku z dôvodu lepšej ventilácie.
8
The bivvy comes with optional clear & mozzy mesh door options.
F Il est fourni avec une option e porte en moustiquaire et une en PVC transparent.
De bivvy wordt geleverd met optionele transparante en mozzy mesh deuren.
D Enthalten sind optionale klare & Insektennetztüren.
I Il bivvy prevede come opzioni una porta trasparente e una in rete anti-insetto.
H A sátor átlátszó és szúnyoghálós ajtóval is használható, melyek a csomagban találhatók.
Палатка комплектуется дополнительными прозрачной и москитной дверьми.
Bivak je dodávan s vyměnitelným průhledným PVC a moskytiérovým panelem.
Namiot zawiera opcjonalne drzwi w wersji przezroczystej oraz z moskitiery.
Bivak je dodávaný s prehľadnými dvermi, a moskytierovými dvermi.
5
Peg out the bivvy starting from the back working towards the front.
F Arrimez le bivvy au sol depuis l’arrière en progressant vers l’avant.
Bevestig de haringen. Begin aan de achterzijde en werk naar de voorkant.
D Befestigen Sie das Bivvy von hinten her mit Häringen und arbeiten Sie sich nach vorne.
I Picchettate il bivvy al suolo partendo dal retro e lavorando verso la parte frontale.
H Cövekelje le a sátrat hátulról kezdve és haladjon előrefelé.
Зафиксируйте палатку колышками, начиная сзади и продвигаясь вперед.
Zakolíkujte bivak, postupujte od zadní části směrem dopředu.
Przypnij namiot do podłoża. Zacznij od tyłu i idź w kierunku przodu.
Pripevnite kolíky prednej časti bivaku.
7
The bivvy is fitted with a solid door as standard.
F Le bivvy est monté en usine avec la version de porte en tissu plein.
De bivvy is standaard uitgevoerd met een ondoorzichtige deur.
D Das Bivvy ist serienmäßig mit einer grünen Stofftür ausgestattet.
I Il bivvy viene fornito di serie con una porta solida.
H A sátor eredetileg a teli ajtóval van szerelve.
Первоначально палатка оснащена сплошной дверью.
Bivak je standardně dodáván s neprůhledným dveřním panelem.
Standardowo namiot wyposażony jest w drzwi z pełnego materiału.
Bivak je dodávaný s pevnými dvermi v štandardnom vybavení.
6
Clip on the side support struts between the peak and front pole assemblies
F Placez les petites barres de support entre ces arceaux avant et arrière du petit toit à l’avant.
Klem de side support bars tussen de luifel en voorste balein.
D Befestigen Sie die seitlichen Stützstreben zwischen der Spitzenstange und den vorderen Stangen.
I Agganciate le clip dei supporti laterali fra la parte superiore e il palo di assemblaggio frontale.
H Pattintsa a távtartó rudat az előtető és az első pálcasor rúdjai közé.
Присоедините боковые поддерживающие распорки между козырьком и передним ребром.
Připevněte boční rozpěry mezi kšilt a přední žebro.
Zamocuj boczne rozpórki miedzy pałąkiem daszka a przednim pałąkiem.
Lepšieho vypnutia dosiahnete vďaka dotiahnutiu napínacích pásov na oboch bokoch prístrešku.
4
Ensure the spike on the bottom of the rear tension pole fits into the eyelet on the back pegging point webbing.
F Assurez-vous que la pointe du mât de tension arrière soit dans l’œillet sur la sangle d’arrimage arrière.
Steek de punt van de achterste tension pole in het gat van de tentharing strap.
D Stellen Sie sicher, dass die Spitze an der Unterseite der hinteren Spannstange in die Öse am Gurt des hinteren Befestigungspunkts passt.
I Assicuratevi che lo spillo posto all’estremità del palo di tensionamento posteriore si posizioni nell’occhiello del punto di ancoraggio sul retro del bivvy.
H Győződjön meg róla, hogy a hátsó rúd tüskéje a cövekelő fülön található fémkarikában van és feszítse meg a rudat.
Убедитесь, что нижний штырь задней поддерживающей стойки вошел в люверс на плетеном хлястике для фиксации колышками.
Ujistěte se, že špička zadní napínací tyče zapadne do očka na zadním popruhu.
Upewnij się, aby ostrze na końcu tylnej rozpórki mieściło się w oczku tylnego paska mocującego.
Upevnite spojku v spodnej časti a postavte sa ku zadnej časti bivaku, pripevnite a napnite tyče podpornej konštrukcie. Začnite od prednej časti a
postupujte smerom dozadu.
3
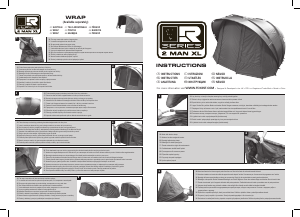
Attach and tension the frame support poles from the rear. Start at the front rib and work towards the back.
F Attachez et mettez en tension les mâts de support de cadre depuis l’arrière. Commencez par l’arceau avant et progressez vers l’arrière.
Bevestig de frame support stokken en breng ze op spanning. Begin bij de voorste balein en werk naar de achterkant.
D Befestigen und spannen Sie die Rahmenstützstangen von hinten. Beginnen Sie an der vorderen Rippe und arbeiten Sie sich nach hinten.
I Fissate e tensionate i pali di supporto del telaio dalla parte posteriore. Partite dalla stecca frontale e procedete verso la parte posteriore
H Helyezze be és feszítse meg a távtartó rudakat a sátor mögött állva. Kezdje az első rúddal és haladjon hátrafelé.
Присоединяйте и растягивайте поддерживающие каркас распорки, находясь сзади палатки. Начните с переднего ребра и
продвигайтесь к заднему.
Připevněte a napněte opěrné tyče, které jsou součástí rámu. Začněte u předního žebra a pokračujte směrem dozadu.
Przymocuj i napnij rozpórki z tyłu namiotu. Zacznij od przedniego pałąka i idź w kierunku tyłu.
Postavte sa ku zadnej časti bivaku, pripevnite a napnite tyče podpornej konštrukcie. Začnite od prednej časti a postupujte smerom dozadu.
2
Attach the tension strap.
F Attachez les deux sangles de tension.
2. Bevestig de tension strap.
D Befestigen Sie den Spanngurt.
I Fissate la cinghia di tensionamento.
H Csatlakoztassa a feszítő pántot.
Присоедините натяжной ремень.
Připevněte napínací popruh.
Przymocuj pasek napinający.
Upnite napínací popruh.
1
Lay the bivvy out and join the poles ensuring they are fully pushed together.
F Etalez le bivvy et joignez les sections arceaux en s’assurant de les pousser à fond.
Spreid de bivvy uit en verbind de stokken, zorg dat ze volledig in elkaar zitten.
D Legen Sie das Bivvy auf den Boden und stecken Sie die Stangen zusammen, wichtig ist, dass diese vollständig ineinandergeschoben werden.
I Dispiegare il bivvy sul terreno e unire i i pali, assicurandosi che siano perfettamente inseriti l'uno nell'altro.
H Fektesse a sátrat a földre illessze össze a csöveket meggyőződve arról, hogy azok teljesen össze legyenek dugva.
Разложите палатку и соедините опоры, убедившись, что они соединились правильно.
Vyjměte bivak z obalu a spojte bezpečně tyče dohromady.
Rozłóż namiot i połącz pałąki, upewniając się, że są one wsunięte do końca.
Vytiahnite bivak z obalu a bezpečne spojte tyče dohromady.
Download manual in English (PDF, 2.56 MB)
(Consider the environment and only print this manual if it is really necessary)

Loading…

Rating

Let us know what you think about the FOX R Series 1 Man XL Tent by leaving a product rating. Want to share your experiences with this product or ask a question? Please leave a comment at the bottom of the page.
Are you satisfied with the FOX R Series 1 Man XL Tent?
Yes No
Be the first to rate this product
0 votes

Join the conversation about this product

Here you can share what you think about the FOX R Series 1 Man XL Tent. If you have a question, first carefully read the manual. Requesting a manual can be done by using our contact form.

More about this manual

We understand that it’s nice to have a paper manual for your FOX R Series 1 Man XL Tent. You can always download the manual from our website and print it yourself. If you would like to have an original manual, we recommend you contact FOX. They might be able to provide an original manual. Are you looking for the manual of your FOX R Series 1 Man XL Tent in a different language? Choose your preferred language on our homepage and search for the model number to see if we have it available.

Specifications

Brand FOX
Model R Series 1 Man XL
Category Tents
File type PDF
File size 2.56 MB

All manuals for FOX Tents
More manuals of Tents

Frequently Asked Questions about FOX R Series 1 Man XL Tent

Our support team searches for useful product information and answers to frequently asked questions. If you find an inaccuracy in our frequently asked questions, please let us know by using our contact form.

Can I store my tent when it's wet? Verified

Only for very short periods of time. When a tent is stored while wet for a week or longer, it can get moldy. This is harmful for your tent and possibly your health.

This was helpful (389) Read more

How do I impregnate a tent? Verified

Pitch the tent, clean the cloth and let it dry. Apply the impregnation agent on the cloth with a plant sprayer or other spray. It is also possible to use a paint roller or brush. The cloth needs to be fully saturated with the impregnation agent. Also treat the inside of the tent. Thoroughly clean any windows with a moist cloth. Do not let the impregnation agent dry on it. Let the tent cloth fully dry. Repeat the treatment if needed.

This was helpful (290) Read more

Can I repair a tear or hole in the canvas of my tent myself? Verified

There are special pieces of self-adhesive patches of cloth available for synthetic tent canvases. Stick one of these patches on both sides of the hole or tear. For cotton tent canvases or mixed material tent canvases it's best to use patches that can be ironed on. This will require an iron.

This was helpful (223) Read more

The zipper of my tent won't run smoothly, what can I do? Verified

When a zipper is running smoothly, use a dry PTFE spray or silicone spray. Do not spray onto the cloth and preventively spray to prevent future problems.

This was helpful (161) Read more

There are water drops on the inside of the tent, does this mean it is leaking? Verified

No, this is probably condensation. Make sure the tent is properly ventilated to keep condensation at a minimum.

This was helpful (135) Read more

What tent pegs are best to use for which surfaces? Verified

On grassland or forest surfaces you can use semi circular or plastic pegs. On rocky surfaces you need to use rock pegs. On clay surfaces you can use semi circular, plastic or universal pegs. On gravel surfaces you need semi circular or universal pegs and on sand you need to use wooden pegs.

This was helpful (110) Read more

The impregnation agent leaves white stains or a white haze on the tent cloth, what can I do about this? Verified

If the agent leaves a white haze or white stains on the tent cloth, this means you have applied more impregnation agent on those areas. This is not harmful and the stains often disappear over time. It is not advisable to use less impregnation agent to prevent stains. The cloth needs to be fully saturated with the impregnation agent to give good results.

This was helpful (102) Read more
Manual FOX R Series 1 Man XL Tent

Related products

Related categories