Manual Vango Bute 400 Tent

Need a manual for your Vango Bute 400 Tent? Below you can view and download the PDF manual for free in English. This product currently has 7 frequently asked questions, 0 comments and has 0 votes. If this is not the manual you want, please contact us.

Is your product defective and the manual offers no solution? Go to a Repair Café for free repair services.

Manual

Loading…

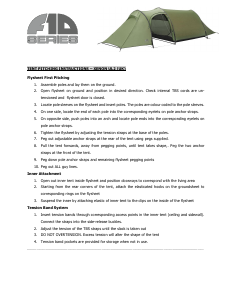
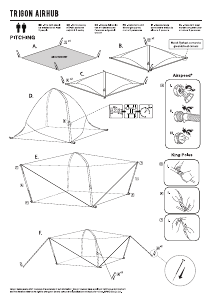
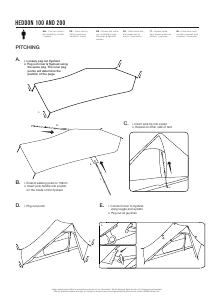
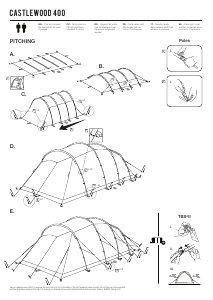
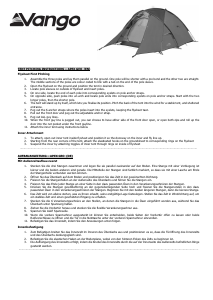
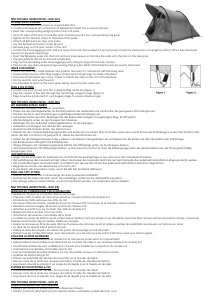
Inserire i corrispondenti paletti verticali nei paletti del tetto
Su entrambi i lati della tenda fissare le estremità di ciascun paletto al corrispondente anello e perno
Tirare le cinghie da tensione alla base dei paletti
Attaccare tutte le clip dei paletti del telo esterno ai paletti
Collocare il telo esterno ed i paletti sul terreno
Fissare saldamente gli angoli posteriori della tenda
Posizionare i punti di ancoraggio anteriore e tirare verso il davanti (è più semplice se un'altra persona tiene il palo in acciaio in posizione verticale).
Raggiunta la tensione desiderata, inserire i paletti.
Inserire i pali in fibra di vetro nelle guaine anteriori e posteriori e posizionare le estremità sui paletti sul palo in acciaio
Il telo impermeabile dovrebbe essere piatto e privo di grinze
Picchettare i rimanenti paletti e punti di aggancio usando i picchetti di fissaggio alla base dei paletti
Picchettare TUTTI gli stralli usando i picchetti di fissaggio e assicurandosi che i punti di aggancio in tessuto degli stralli siano uniformemente sottoposti a
tensione
FISSAGGIO INTERNO:
Aprire le tende interne all'interno del telo esterno e posizionare le entrate in modo da farle corrispondere con la zona giorno
Appendere l'interno fissando le olivette della tenda interna mediante gli anelli all'interno del telo esterno
I fissaggi interni sono codificati a seconda del colore in modo da abbinarsi alle clip sul tetto del telo esterno
Iniziare con la parte posteriore e poi procedere verso quella anteriore
È consigliabile rimuovere l'interno se umido quando si smonta la tenda.
Sistema anello con paletto
Collocare il palo terminale del portico in corrispondenza della relativa punta metallica
Fissare gli angoli della tenda attraverso gli anelli metallici usando i paletti.
I picchetti devono essere posizionati a 45 gradi per assicurare la massima presa
SISTEMA ANELLO CON PALETTO:
• Collocare il palo terminale del portico in corrispondenza della relativa punta metallica
• Fissare gli angoli della tenda attraverso gli anelli metallici usando i paletti.
• I picchetti devono essere posizionati a 45 gradi per assicurare la massima presa
TENT PITCHING INSTRUCTIONS BUTE (NL)
BUITENTENT VOOR HET EERST OPZETTEN:
Open de buitenkant en positioneer in de gewenste richting
Lokaliseer de stoksleuven op het dak van de buitentent en plaats de gebogen dakstokken er doorheen
Plaats de overeenkomende rechtopstaande stokken tegen de dak stokken
Plaats aan beide kanten van de tent de uiteinde van de stokken in de overeenkomende ring &pin
Span alle spanbanden aan de basis van de stokken strak.
Bevestig alle buitentent stok clips aan de stokken
Leg de buitentent en stokken op de grond
Pin de hoeken van de tent stevig vast
Pak de voorste haring punten en trek ze weg van de achterkant (dit is makkelijker als een tweede persoon de stalen paal rechtop vast houdt). Als het doek
strak staat, plaats dan de haringen.
Plaats de glasvezel palen in de voorste en achterste stoksleuven en leidt de uiteinden naar de pinnen op de stalen stok
Het grondzeil zou recht en zonder kreukels moeten zijn
Zet de overgebleven stokken en haringpunten vast met pin haringen aan de basis van de stokken
Zet ALLE spanbanden vast met pin haringen zodat de druk op de bevestigingspunten overal gelijk is.
BINNENTENT BEVESTIGING:
Open de binnentent binnen de buitentent en positioneer de deuren zodat deze overeenkomen met het leefgedeelte
Hang de binnentent op door de knevels van de binnentent te bevestigen aan de binnenkant van de buitentent
De binnenste bevestigingen hebben een kleur die overeenkomt met klemmen aan het dak van de buitentent
Begin achteraan en werk naar voren
Het is aan te raden om de binnentent te verwijderen wanneer u de tent opruimt als deze nat is.
Ring & Pin Systeem
Bevestig een kant van de deur stok aan de overeenkomende metalen pin
Zet de hoeken van de tent vast doormiddel van de metalen ring met de pin haringen.
Pinnen dienen in een hoek van 45 graden met de grond te staan voor maximale grip.
RING & PIN SYSTEEM:
• Bevestig een kant van de deur stok aan de overeenkomende metalen pin
• Zet de hoeken van de tent vast doormiddel van de metalen ring met de pin haringen.
• Pinnen dienen in een hoek van 45 graden met de grond te staan voor maximale grip
TENT PITCHING INSTRUCTIONS BUTE (CZ)
STAVĚNÍ TROPIKA POPRVÉ:
Otevřete tropiko a umístěte jej v požadovaném směru
Najděte odpovídající tunýlky na střešní části tropika a vsuňte zakřivené střešní tyčky
Spojte odpovídající vzpřímené tyče se střešními tyčemi
Na obou stranách stanu napíchněte konce každé tyče na odpovídající čep
Zatáhněte všechny stahovatelné popruhy na opěrném bodu tyček
Připněte všechny svorky tropika na tyče
Rozložte tropiko a tyčky na zem
Bezpečně připevněte do zadních rohů stanu
Vyhledejte přední vykolíkované body z přední strany (toto je jednodušší, pokud druhá osoba drží ocelovou tyč ve svislé poloze). Jakmile bude úpl
napnutý od zadní části, vložte kolíky.
Vložte sklolaminátové tyče do předních a zadních tunýlků a konce tyčí napíchněte na ocelové čepy
Podlážka by měla být rovná a bez ohybů
Zakolíkujte zbývající tyčky do fixačních bodů pomocí kolíků na spodní části tyček
Přikolíkujte VŠECHNY napínací šňůry pomocí kolíků a ujistěte se, že připojovací body napínacích šňer jsou rovnoměrně napnuty
VNITŘNÍ PŘÍSLUŠENSTVÍ:
Roztáhněte vnitřní stan vevnitř tropika a umístěte vchody tak, aby korespondovaly s obývací částí.
Zavěšte vnitřek stanu připnutím kolíčků vnitřního stanu za kroužky na vnitřní straně tropika.
Vnitřní příslušenství má stejnou barvu jako svorky na střeše tropika
Nejdříve udělejte zadní část, poté postupujte dopředu.
Doporučuje se vyndat vnitřní ložnici když je stan vlhký
Systém kroužku a kolíku
Vyhledejte jeden konece tyčí a příslušné čepy
Zajistěte rohy stanu pomocí kolíků tak, že je prostrčíte skrz kovové kroužky.
Kolíky by měly být umístěny v úhlu 45 stupňů, aby byla zajištěna maximální pevnost
SYSTÉM KROUŽKU A KOLÍKU:
• Vyhledejte jeden konece tyčí a příslušné čepy
• Zajistěte rohy stanu pomocí kolíků tak, že je prostrčíte skrz kovové kroužky.
• Kolíky by měly být umístěny v úhlu 45 stupňů, aby byla zajištěna maximální pevnost
Download manual in English (PDF, 0.13 MB)
(Consider the environment and only print this manual if it is really necessary)

Loading…

Rating

Let us know what you think about the Vango Bute 400 Tent by leaving a product rating. Want to share your experiences with this product or ask a question? Please leave a comment at the bottom of the page.
Are you satisfied with the Vango Bute 400 Tent?
Yes No
Be the first to rate this product
0 votes

Join the conversation about this product

Here you can share what you think about the Vango Bute 400 Tent. If you have a question, first carefully read the manual. Requesting a manual can be done by using our contact form.

More about this manual

We understand that it’s nice to have a paper manual for your Vango Bute 400 Tent. You can always download the manual from our website and print it yourself. If you would like to have an original manual, we recommend you contact Vango. They might be able to provide an original manual. Are you looking for the manual of your Vango Bute 400 Tent in a different language? Choose your preferred language on our homepage and search for the model number to see if we have it available.

Specifications

Brand Vango
Model Bute 400
Category Tents
File type PDF
File size 0.13 MB

All manuals for Vango Tents
More manuals of Tents

Frequently Asked Questions about Vango Bute 400 Tent

Our support team searches for useful product information and answers to frequently asked questions. If you find an inaccuracy in our frequently asked questions, please let us know by using our contact form.

Can I store my tent when it's wet? Verified

Only for very short periods of time. When a tent is stored while wet for a week or longer, it can get moldy. This is harmful for your tent and possibly your health.

This was helpful (384) Read more

How do I impregnate a tent? Verified

Pitch the tent, clean the cloth and let it dry. Apply the impregnation agent on the cloth with a plant sprayer or other spray. It is also possible to use a paint roller or brush. The cloth needs to be fully saturated with the impregnation agent. Also treat the inside of the tent. Thoroughly clean any windows with a moist cloth. Do not let the impregnation agent dry on it. Let the tent cloth fully dry. Repeat the treatment if needed.

This was helpful (285) Read more

Can I repair a tear or hole in the canvas of my tent myself? Verified

There are special pieces of self-adhesive patches of cloth available for synthetic tent canvases. Stick one of these patches on both sides of the hole or tear. For cotton tent canvases or mixed material tent canvases it's best to use patches that can be ironed on. This will require an iron.

This was helpful (218) Read more

The zipper of my tent won't run smoothly, what can I do? Verified

When a zipper is running smoothly, use a dry PTFE spray or silicone spray. Do not spray onto the cloth and preventively spray to prevent future problems.

This was helpful (156) Read more

There are water drops on the inside of the tent, does this mean it is leaking? Verified

No, this is probably condensation. Make sure the tent is properly ventilated to keep condensation at a minimum.

This was helpful (129) Read more

What tent pegs are best to use for which surfaces? Verified

On grassland or forest surfaces you can use semi circular or plastic pegs. On rocky surfaces you need to use rock pegs. On clay surfaces you can use semi circular, plastic or universal pegs. On gravel surfaces you need semi circular or universal pegs and on sand you need to use wooden pegs.

This was helpful (105) Read more

The impregnation agent leaves white stains or a white haze on the tent cloth, what can I do about this? Verified

If the agent leaves a white haze or white stains on the tent cloth, this means you have applied more impregnation agent on those areas. This is not harmful and the stains often disappear over time. It is not advisable to use less impregnation agent to prevent stains. The cloth needs to be fully saturated with the impregnation agent to give good results.

This was helpful (97) Read more
Manual Vango Bute 400 Tent

Related products

Related categories