SR5240
EN | Instruction manual
NL | Gebruiksaanwijzing
FR | Mode d’emploi
DE | Bedieningsanleitung
ES | Manual de usuario
IT | Manuele utente
PT | Manual de utilizador
SV | Bruksanvisning
PL | Instrukcja obsługi
CS | Návod na použití
SK | Návod na použitie
PARTS DESCRIPTION / ONDERDELENBESCHRIJVING / DESCRIPTION DES PIÈCES / TEILEBESCHREIBUNG /
DESCRIPCIÓN DE LAS PIEZAS / DESCRIZIONE DELLE PARTI / DESCRIÇÃO DOS COMPONENTES /
BESKRIVNING AV DELAR / OPIS CZĘŚCI / POPIS SOUČÁSTÍ / POPIS SÚČASTÍ
1
7
5
6
891011 1213 15
3214 4
16
SERVICE.TRISTAR.EU
Tristar Europe B.V. | Jules Verneweg 87
5015 BH Tilburg | The Netherlands
[WEEE LOGO]
ENInstructionmanual
SAFETY
• Byignoringthesafetyinstructionsthe
manufacturercannotbeholdresponsiblefor
thedamage.
• Ifthesupplycordisdamaged,itmustbe
replacedbythemanufacturer,itsserviceagent
orsimilarlyqualifiedpersonsinordertoavoida
hazard.
• Nevermovetheappliancebypullingthecord
andmakesurethecordcannotbecome
entangled.
• Thisapplianceisonlytobeusedforhousehold
purposesandonlyforthepurposeitismade
for.
• Thisapplianceshallnotbeusedbychildren
from0yearto8years.Thisappliancecanbe
usedbychildrenagedfrom8yearsandabove
iftheyarecontinuouslysupervised.This
appliancecanbeusedbypeoplewithreduced
physical,sensoryormentalcapabilitiesorlack
ofexperienceandknowledgeiftheyhavebeen
givensupervisionorinstructionconcerninguse
oftheapplianceinasafewayandunderstand
thehazardsinvolved.Childrenshallnotplay
withtheappliance.Keeptheapplianceandits
cordoutofreachofchildrenagedlessthan8
years.Cleaningandusermaintenanceshallnot
bemadebychildrenunlessolderthan8and
supervised.
• Toprotectyourselfagainstanelectricshock,do
notimmersethecord,plugorapplianceinthe
wateroranyotherliquid.
• Donotusewhentheapplianceisfallen,ifthere
areanysignsofdamageorwhenitleaks.
• Keeptheapplianceanditscordoutofreachof
childrenlessthan8yearsofagewhenitis
energizedorcoolingdown.
• Theejectedsteamisverypowerful,somake
sureyoudonotaimatpersons,animalsor
delicateitems.
• Allowtheappliancetocooldownbeforeyou
cleanorstoreit.
• Theliquidorsteammustnotbedirected
towardsequipmentcontainingelectrical
components,suchastheinteriorofovens.
•
Surfacemaygethotduringuse.
• WARNING:Thefillingaperturemustnotbe
openedduringuse.
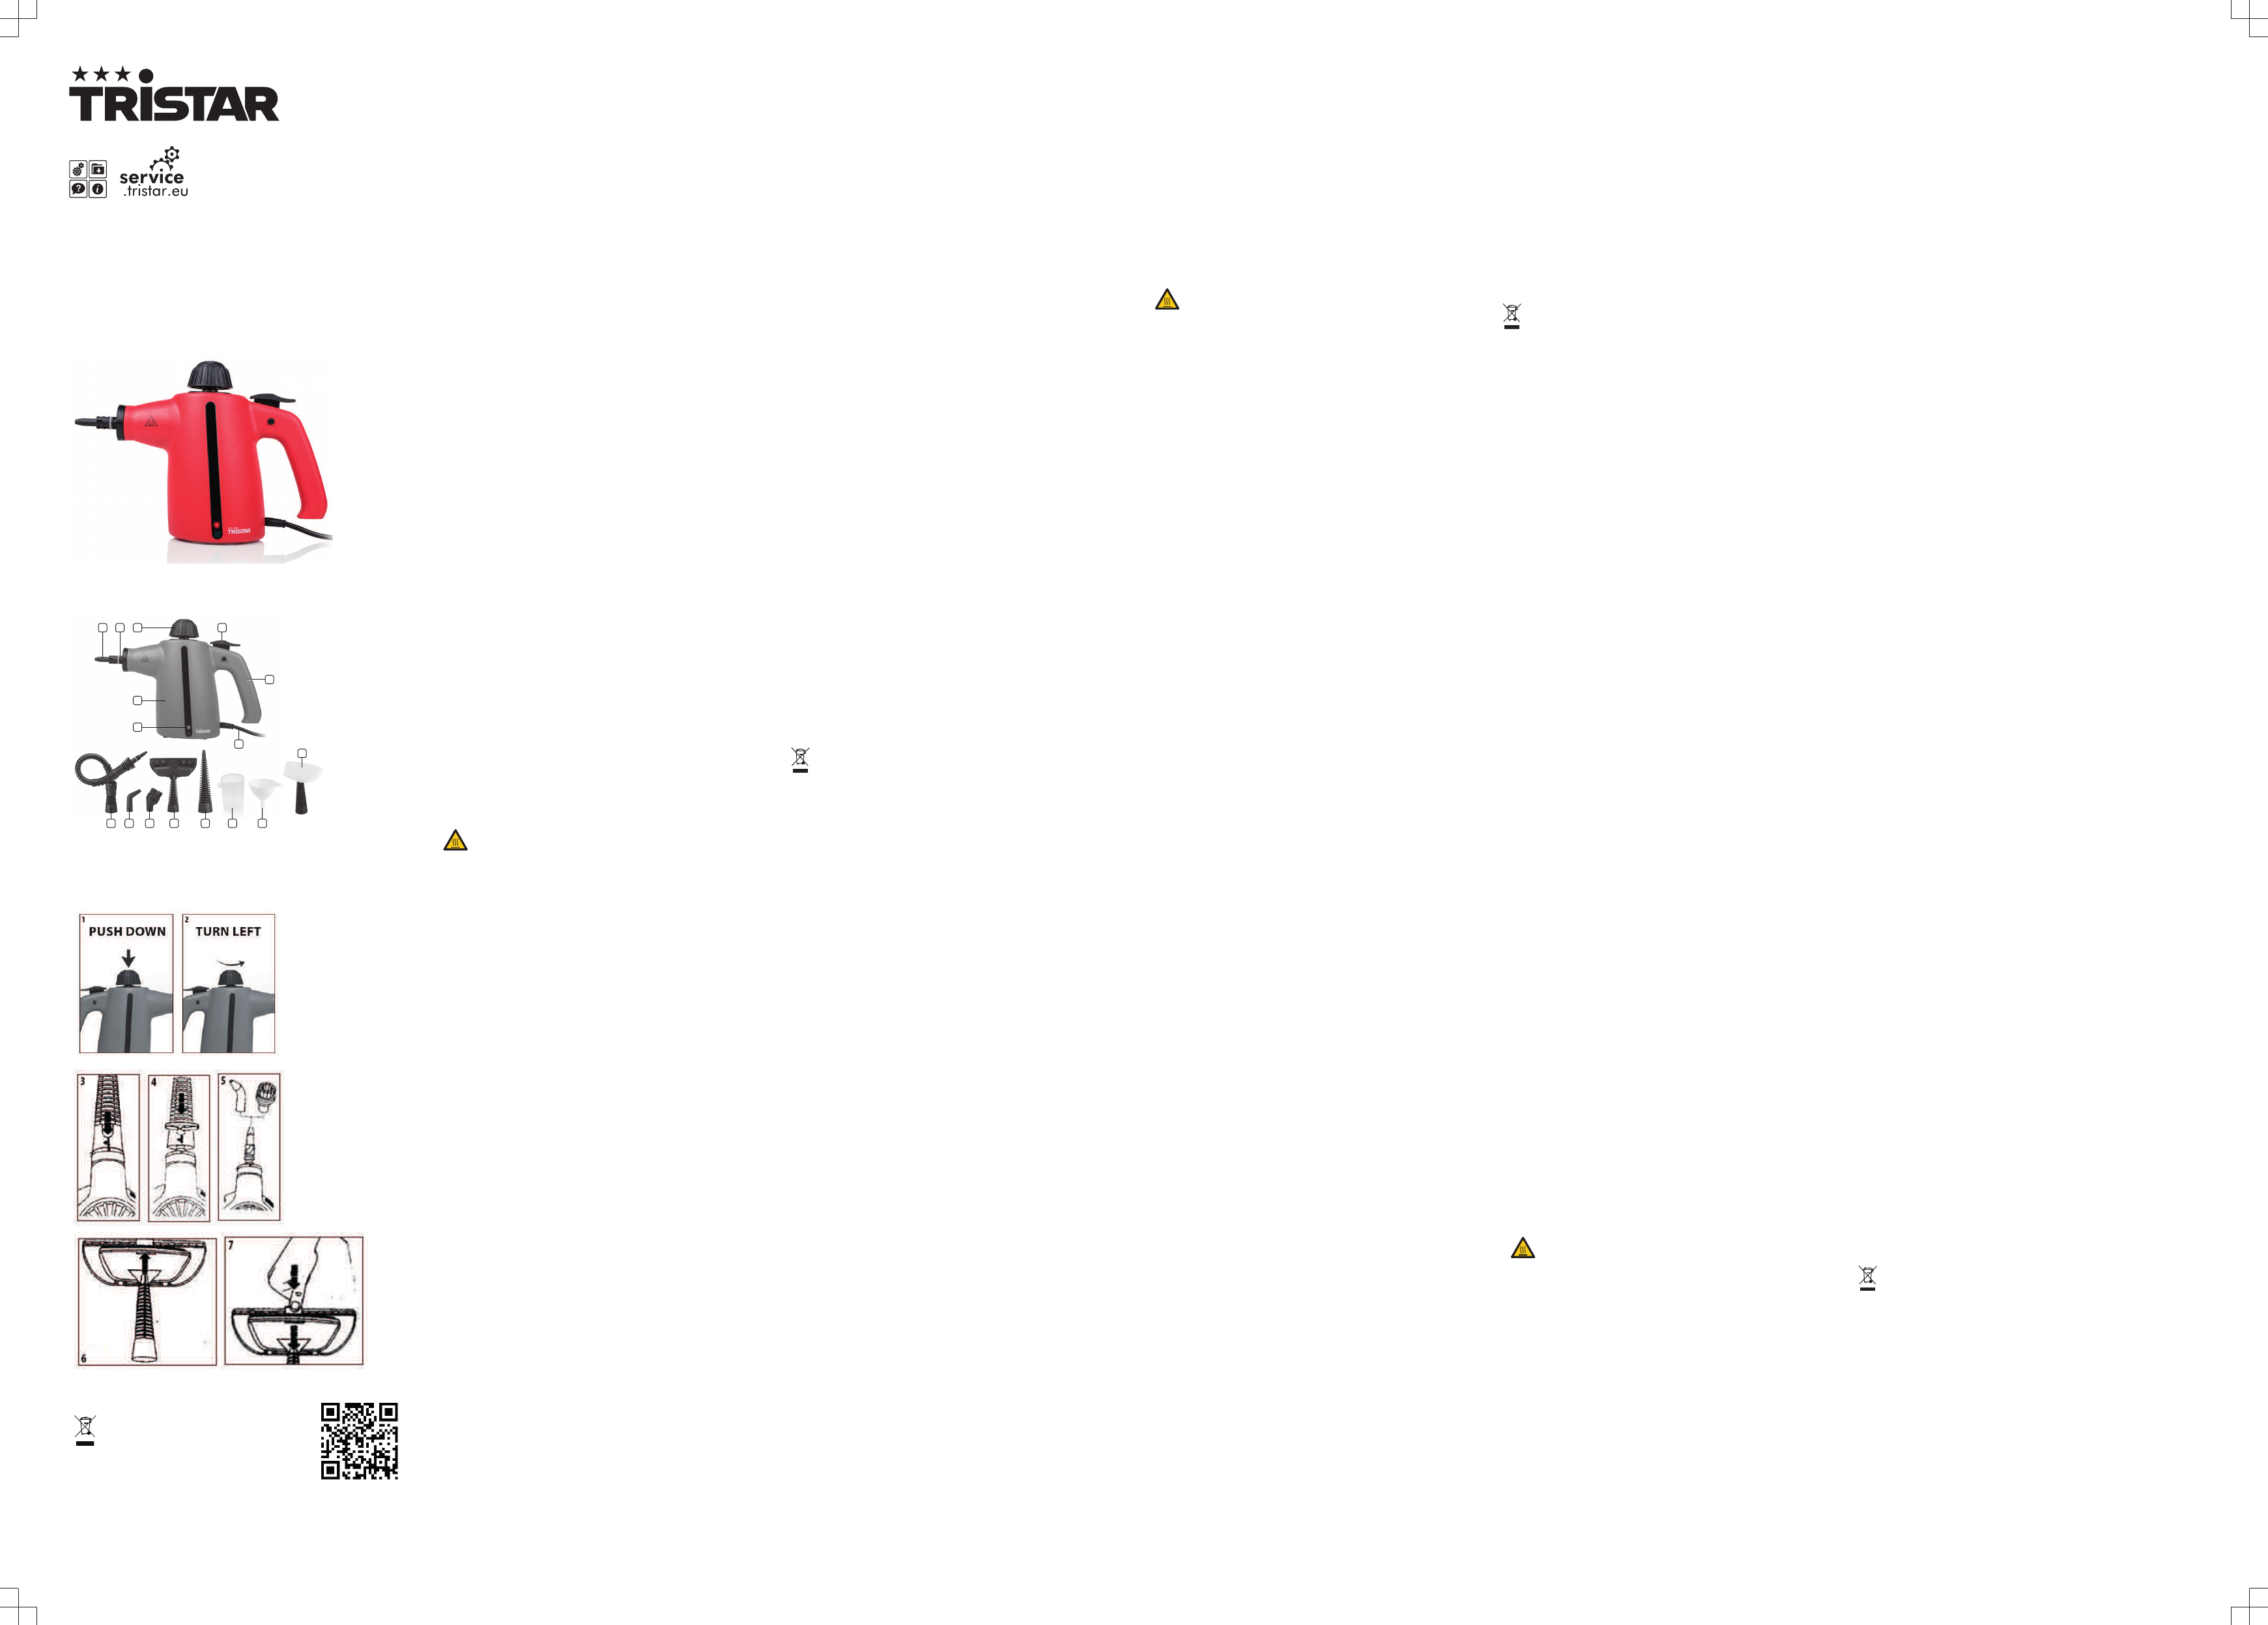
PARTSDESCRIPTION
1. Body
2. Shortspraynozzle
3. Safetycap
4. Steambutton
5. Handle
6. Powercordandplug
7. Powerindicator
8. Funnel
9. Measuringcup
10. Spraynozzlewithroundbrush
11. Bentspraynozzle
12. Longspraynozzle
13. Extendedconnectingspraynozzle
14. Generalspraynozzle
15. Spraynozzlefordoor/window
16. Towelsleeve
BEFORETHEFIRSTUSE
• Unpacktheproduct,checktheaccessoriesanddocumentssupplied
withtheproductandmakesurethattheproductandaccessoriesarenot
damaged.
• Beforeuse,pleasereadtheinstructionmanualcarefully.Thesteam
cleanerisonlyforuseinhouseholds.
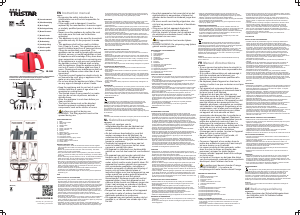
• First,placethesteamcleaneronaflatplatform,pushdownthesafety
cover(1),unscrewthesafetycapcounterclockwise(2),andtheninstall
thefunnel.
• Fillthemeasuringcupwithmaximum175ml.ofcleanwaterandaddthe
waterintothetank.Donotoverfillthetank,somespacemustbeleftin
thetank.Reinstallthesafetycapandtightenitinposition.
• Afterpluginitwilltakearound4minutesthatthesteamcleanerisready
foruse.Atthistimelightlypressthesteambuttonandcheckwhether
steamissprayedoutofthenozzle.Beforeusingpleaseput175ml.of
waterinthetankandspraythis,forexampleintothesink.(Donotaim
thespraynozzleatotherpersons).
• Ifthereissteamsprayedout,pleaseinstallsuitableaccessories
accordingtoyourneedsafteryoureleasethebutton.
• Pressdownthesteambuttonagaininordertocarryouttheoperations
requiredbyyou.
USE
INSTALLATIONOFACCESSORIES
• Installthelongspraynozzleorextendedconnectingspraynozzle.Hold
thepipesectionofthelongspraynozzleinyourhand,alignthearrow
withthesinglelinemarkonshortspraynozzleonthemachinebody,
andinsertthelongspraynozzleinposition.Rotatethelongspraynozzle
inclockwisedirection,andalignthearrowonthelongspraynozzlewith
thedoublelinemarkonshortspraynozzleonthemachinebody,as
showninfigure(3).Toremovethelongspraynozzle,pleaserotatethe
longspraynozzleinversely(counterclockwise)asshowninfigure(4),
andalignthearrowonthespraynozzlewiththesinglelinemarkonthe
machinebody.Thenthelongspraynozzlecanbepulledout.
• Fortheextendedconnectingspraynozzleyouhavetousethesame
procedureasshownabove.
• Installspraywithroundbrushorbentspraynozzle.Fordirectinstallation
onshortspraynozzle,aimthespraynozzlewithroundbrushorbent
spraynozzleatthetopofspraynozzle,asshowninfigure(5),andpush
thespraynozzleupwardsuntilitisinposition.
• Installationofspraynozzlefordoor/window.Firstinstallthegeneral
spraynozzleonshortspraynozzle,asshowninfigure(6)Installthetwo
smallhooksofthespraynozzlefordoor/windowontosuspensionlugs
ofthegeneralspraynozzle,andthentriggerthebighookofthespray
nozzlefordoor/window,andpushthespraynozzlefordoor/windowup
andclutch(7)itontothebodyofthegeneralspraynozzle.
FUNCTIONS
• Disinfectionandsterilization:Installthelongspraynozzleontheshort
spraynozzleandaimthespraynozzleatthepositionthatneeds
disinfection,thenpressdownthesteambutton.Hightemperaturesteam
cankillbacteria.
• Cleaningtheclothes:Installthegeneralspraynozzleontheshortspray
nozzle,andthenmountthetowelsleeve.Aimitatthehungclothes,and
pressdownthesteambuttonandmovethegeneralspraynozzleupand
downaswellastotheleftandtotherightatthesametime.Thenstains
canberemovedfromtheclothes.
• Cleaningdoorsandwindows:Installthegeneralspraynozzleonthe
shortspraynozzle,andtheninstallthespraynozzlefordoor/windowon
it.Aimthisatthedoor/window,andpressdownthesteambuttonand
moveitupanddownaswellastotheleftandtotherightatthesame
time.Thenstainscanberemovedfromthedoor/window.
• Cleaningthefloorboards:Installthebentspraynozzleorroundspray
nozzleonthelongspraynozzle.Forspotsondifficultplacesyoucan
alsousetheextendedconnectingspraynozzle.Thenaimitatthefloor
board,andpressdownthesteambuttontoremovethedirtandstainsin
wallcornersandonthefloor.
REFILLWATERDURINGOPERATION
• Unplugthepowercordanddisconnectthepowersupply.
• Pressdownthesteambuttontoreleasethepressureuntilnosteamis
injectedout.
• Slowlyunscrewthesafetycapbutdonotremoveit,andresidualsteam
willbedischargedslowlyuntilnosteamcomesout.Thenmakesurethe
machinecoolsdownforaboutfiveminutes.Finally,completelyremove
thesafetycap.
• Usethefunnelandmeasuringcuptorefillasuitablequantityofcoldor
hotwaterintothetank.
• Reinstallthesafetycapontothemachinebodyandtightenitinposition.
CLEANINGANDMAINTENANCE
• Whenfinishedcleaning,unplugthepowercordanddisconnectthe
powersupply.
• Pressdownthesteambuttontoreleasethepressureuntilnosteamis
injectedout.
• Slowlyunscrewthesafetycapbutdonotremoveit,andresidualsteam
willbedischargedslowlyuntilnosteamcomesout.Thenmakesurethe
machinecoolsdownforaboutfiveminutes.Finally,completelyremove
thesafetycap.
• Emptytheresidualwaterinthetankandcleantheexternalsurfacewith
apieceofdrycloth.
• Finally,reinstallthesafetycapontothemachinebodyandtightenitin
position.
GUARANTEE
• Thisproductisguaranteedfor24monthsgranted.Yourwarrantyisvalid
iftheproductisusedinaccordancetotheinstructionsandforthe
purposeforwhichitwascreated.Inaddition,theoriginalpurchase
(invoice,salessliporreceipt)istobesubmittedwiththedateof
purchase,thenameoftheretailerandtheitemnumberoftheproduct.
• Forthedetailedwarrantyconditions,pleaserefertoourservicewebsite:
www.service.tristar.eu
ENVIRONMENT
Fixedwidthnarrow,Thisapplianceshouldnotbeputintothe
domesticgarbageattheendofitsdurability,butmustbeofferedata
centralpointfortherecyclingofelectricandelectronicdomestic
appliances.Thissymbolontheappliance,instructionmanualand
packagingputsyourattentiontothisimportantissue.Thematerialsused
inthisappliancecanberecycled.Byrecyclingofuseddomestic
appliancesyoucontributeanimportantpushtotheprotectionofour
environment.Askyourlocalauthoritiesforinformationregardingthepoint
ofrecollection.
Support
Youcanfindallavailableinformationandsparepartsatservice.tristar.eu!
NLGebruiksaanwijzing
VEILIGHEID
• Bijhetnietopvolgenvande
veiligheidsinstructieskandefabrikantniet
verantwoordelijkwordengesteldvoorde
schade.
• Alshetnetsnoerbeschadigdis,moethet
wordenvervangendoordefabrikant,de
onderhoudsmonteurvandefabrikantofdoor
personenmeteensoortgelijkekwalificatieom
gevaartevoorkomen.
• Verplaatshetapparaatnooitdooraanhet
snoertetrekken.Zorgervoordathetsnoer
nergensinverstriktkanraken.
• Ditapparaatisuitsluitendvoorhuishoudelijk
gebruikenvoorhetdoelwaarhetvoorbestemd
is.
• Ditapparaatmagnietwordengebruiktdoor
kinderenvan0tot8jaar.Ditapparaatkan
wordengebruiktdoorkinderenvan8jaaren
ouder,mitszijcontinuondertoezichtstaan.Dit
apparaatkanwordengebruiktdoorpersonen
metverminderdegeestelijke,zintuiglijkeof
mentalevermogensofgebrekaanervaringof
kennis,mitszijondertoezichtstaanof
instructieskrijgenoverhoehetapparaatopeen
veiligemanierkanwordengebruiktalsookde
gevarenbegrijpendiemethetgebruik
samenhangen.Kinderenmogennietmethet
apparaatspelen.Houdhetapparaatenhet
netsnoerbuitenbereikvankinderenjongerdan
8jaar.Laatreinigingenonderhoudnietdoor
kinderenuitvoeren,tenzijzeouderzijndan8
jaarenondertoezichtstaan.
• Dompelhetsnoer,destekkerofhetapparaat
nietonderinwaterofanderevloeistoffenom
elektrischeschokkentevoorkomen.
• Ditapparaatmagnietgebruiktwordenalshet
gevallenis,ertekenenvanschadezijnofals
hetlekt.
• Houdhetapparaatenhetsnoeralshetophet
elektriciteitsnetisaangeslotenoftijdenshet
afkoelenbuitenbereikvankinderenjongerdan
8jaar.
• Destoomwordtzeerkrachtiguitgestoten,dus
richtnietoppersonen,huisdierenofkwetsbare
objecten.
• Zorgervoordathetapparaatafgekoeldis
voordatuhetschoonmaaktenopbergt.
• Richtdevloeistofofstoomnietopapparatuur
dieelektrischeonderdelenbevat,zoalsde
binnenkantvaneenoven.
•
Hetoppervlakkanheetwordentijdens
gebruik.
• WAARSCHUWING:Devulopeningmagtijdens
gebruikwordengeopend.
BESCHRIJVINGVANONDERDELEN
1. Hoofddeel
2. Kortespuitmond
3. Veiligheidsdop
4. Stoomknop
5. Handgreep
6. Voedingskabelenstekker
7. Stroomindicator
8. Trechter
9. Maatbeker
10. Spuitmondmetrondeborstel
11. Gebogenspuitmond
12. Langespuitmond
13. Spuitmondmetverlengdaansluitstuk
14. Algemenespuitmond
15. Spuitmondvoordeuren/ramen
16. Textielovertrek
VOORHETEERSTEGEBRUIK
• Pakhetproductuit,controleerdebijhetproductgeleverdeaccessoires
endocumentenencontroleerofhetproductendeaccessoiresniet
beschadigdzijn.
• Leesvoorgebruikzorgvuldigdeinstructiehandleiding.Destoomreiniger
isuitsluitendgeschiktvoorhuishoudelijkgebruik.
• Plaatsallereerstdestoomreinigeropeenvlakkeondergrond,duwde
beschermkap(1)omlaag,draaideveiligheidsdoplinksomlos(2)en
plaatsvervolgensdetrechter.
• Vuldemaatbekermetmaximaal175mlschoonwaterengiethetwater
inhetreservoir.Gietnietteveelwaterinhetreservoir,ermoetenige
ruimteinhetreservoiroverblijven.Plaatsdeveiligheidsdopterugenzet
hemopzijnplaatsvast.
• Nadatudestekkerinhetstopcontactheeftgestoken,duurthet
ongeveer4minutentotdestoomreingergereedisvoorgebruik.Druk
tegendietijdlichtopdestoomknopencontroleerofstoomuitde
spuitmondkomt.Gietvoorgebruik175mlwaterinhetreservoirenspuit
ditbijvoorbeeldindegootsteen(richtdespuitmondnietopandere
personen).
• Laatalsstoomwordtafgegevendeknoplosenplaatsgeschikte
accessoiresnaaruwbehoefte.
• Druknogmaalsopdestoomknopomdedoorugewenste
werkzaamhedenuittevoeren.
GEBRUIK
ACCESSOIRESPLAATSEN
• Plaatsdelangespuitmondofdespuitmondmethetverlengde
aansluitstuk.Houdhetpijpgedeeltevandelangespuitmondinuwhand,
lijndepijluitmetdeenkelemarkeringslijnopdekortespuitmondophet
hoofddeelvandemachineenschuifdelangespuitmondopzijnplaats.
Draaidelangespuitmondrechtsomenlijndepijlopdelangespuitmond
uitmetdedubbelemarkeringslijnopdekortespuitmondophet
hoofddeelvandemachine,zoalsweergegeveninfiguur(3).Draaiom
delangespuitmondteverwijderendelangespuitmondintegengestelde
richting(linksom)zoalsweergegeveninfiguur(4)enlijntdepijlopde
spuitmonduitmetdeenkelemarkeringslijnophethoofddeelvande
machine.Nukuntudelangespuitmondlostrekken.
• Gebruikvoordespuitmondmethetverlengdeaansluitstukdezelfde
procedurealshierbovenbeschreven.
• Plaatsdespuitmondmetderondeborstelofdegebogenspuitmond.
Richtvoordirecteplaatsingopdekortespuitmonddespuitmondmetde
rondeborstelofdegebogenspuitmondopdebovenkantvande
spuitmond,zoalsweergegeveninfiguur(5)enduwdespuitmond
omhoogopzijnplaats.
• Despuitmondvoordeuren/ramenplaatsen.Plaatsallereerstde
algemenespuitmondopdekortespuitmond,zoalsweergegevenin
figuur(6).Plaatsdetweekleinehakenvandespuitmondvoordeuren/
ramenopdeophangogenvandealgemenespuitmondenhaal
vervolgensdegrotehaakvandespuitmondvoordeuren/ramenover.
Duwdespuitmondvoordeuren/ramenomhoogenzet(7)dezeophet
hoofddeelvandealgemenespuitmondvast.
FUNCTIES
• Desinfecterenensteriliseren:Plaatsdelangespuitmondopdekorte
spuitmond,richtdespuitmondopdetedesinfecterenplekendrukopde
stoomknop.Hetestoomkanbacteriëndoden.
• Kledingreinigen:Plaatsdealgemenespuitmondopdekortespuitmond
enplaatshettextielovertrek.Richtopdehangendekleding,drukopde
stoomknopenbeweegdealgemenespuitmondomhoogenomlaagen
tegelijkertijdnaarlinksennaarrechts.Vervolgenskuntuvlekkenuitde
kledingverwijderen.
• Deurenenramenreinigen:Plaatsdealgemenespuitmondopdekorte
spuitmondenplaatsvervolgensdespuitmondvoordeuren/ramen
hierop.Richtdespuitmondopdedeurofhetraamendrukopde
stoomknop.Beweegdespuitmondomhoogenomlaagentegelijkertijd
naarlinksennaarrechts.Vervolgenskuntuvlekkenvandedeurofhet
raamverwijderen.
• Vloerenreinigen:Plaatsdegebogenspuitmondofderondespuitmond
opdelangespuitmond.Voorvlekkenopmoeilijkeplaatsenkuntuook
gebruikmakenvandespuitmondmethetverlengdeaansluitstuk.Richt
opdevloerendrukopdestoomknopomvuilenvlekkenuithoekenmet
wandenopdevloerteverwijderen.
WATERBIJVULLENTIJDENSGEBRUIK
• Haaldestekkeruitenstopcontactomdevoedinguitteschakelen.
• Drukopdestoomknopomdedrukteverlagentotgeenstoommeer
wordtafgegeven.
• Draaideveiligheidsdoplangzaamlosmaarverwijderhemniet.
Resterendestoomwordtlangzaamafgevoerdtotgeenstoommeer
wordtafgegeven.Laatvervolgenshetapparaatongeveervijfminuten
afkoelen.Verwijdertenslottedegeheleveiligheidsdop.
• Gebruikdetrechterendemaatbekeromhetreservoirmeteen
geschiktehoeveelheidwarmofkoudwatertevullen.
• Plaatsdeveiligheidsdopterugophetapparaatenzethemweervast.
REINIGINGENONDERHOUD
• Haalnahetreinigendestekkeruitenstopcontactomdevoedinguitte
schakelen.
• Drukopdestoomknopomdedrukteverlagentotgeenstoommeer
wordtafgegeven.
• Draaideveiligheidsdoplangzaamlosmaarverwijderhemniet.
Resterendestoomwordtlangzaamafgevoerdtotgeenstoommeer
wordtafgegeven.Laatvervolgenshetapparaatongeveervijfminuten
afkoelen.Verwijdertenslottedegeheleveiligheidsdop.
• Laathetresterendewateruithetreservoirlopenenreinigdebuitenkant
vanhetapparaatmeteendrogedoek.
• Plaatstenslottedeveiligheidsdopterugophetapparaatenzethem
weeropzijnplaatsvast.
GARANTIEVOORWAARDEN
• Opditproductwordteengarantievan24maandenverleend.Uw
garantieisgeldigindienhetproductisgebruiktinovereenstemmingmet
degebruiksaanwijzingenvoorhetdoelwaarvoorhetgemaaktis.
Tevensdientdeorigineleaankoopbon(factuur,kassabonofkwitantie)
tewordenoverlegdmetdaaropdeaankoopdatum,denaamvande
retailerenhetartikelnummervanhetproduct.
• Vooruitgebreidegarantievoorwaardenverwijzenwijunaaronze
servicewebsite:www.service.tristar.eu
MILIEU
Ditapparaatmagaanheteindevandelevensduurnietbijhet
normalehuisafvalwordengedeponeerd,maarmoetbijeenspeciaal
inzamelpuntvoorhergebruikvanelektrischeenelektronischeapparaten
wordenaangeboden.Hetsymboolophetapparaat,inde
gebruiksaanwijzingenopdeverpakkingattendeertuhierop.Deinhet
apparaatgebruiktematerialenkunnenwordengerecycled.Methet
recyclenvangebruiktehuishoudelijkeapparatenlevertueenbelangrijke
bijdrageaandebeschermingvanonsmilieu.Informeerbijuwlokale
overheidnaarhetinzamelpunt.
Support
Ukuntallebeschikbareinformatieenreserveonderdelenvindenop
service.tristar.eu!
FRManueld'instructions
SÉCURITÉ
• Sivousignorezlesinstructionsdesécurité,le
fabricantnesauraitêtretenuresponsabledes
dommages.
• Silecordond'alimentationestendommagé,il
doitêtreremplacéparlefabricant,son
réparateuroudespersonnesqualifiéesafin
d'évitertoutrisque.
• Nedéplacezjamaisl'appareilentirantsurle
cordonetveillezàcequecederniernesoitpas
entortillé.
• Cetappareilestuniquementdestinéàdes
utilisationsdomestiquesetseulementdansle
butpourlequelilestfabriqué.
• L'appareilnedoitpasêtreutilisépardes
enfantsdemoinsde8ans.Cetappareilpeut
êtreutilisépardesenfantsàpartirde8ans
soussupervisioncontinue.Cetappareilnedoit
pasêtreutilisépardespersonnesdontles
capacitésphysiques,sensoriellesoumentales
sontréduitesoumanquantd'expérienceetde
connaissance,saufsiellessontsurveilléesou
siellesontreçudesinstructionspourutiliser
cetappareilentoutesécuritéenétant
conscientesdesdangersliés.Lesenfantsne
doiventpasjoueravecl'appareil.Maintenez
l'appareiletsoncordond'alimentationhorsde
portéedesenfantsdemoinsde8ans.Le
nettoyageetlamaintenanceutilisateurne
doiventpasêtreconfiésàdesenfantssaufs'ils
ont8ansouplusetsontsoussurveillance.
• Afindevouséviterunchocélectrique,
n'immergezpaslecordon,lapriseoul'appareil
dansdel'eauouautreliquide.
• Nepasutiliserl’appareils’ilesttombé,s’il
apparaîtendommagéous’ilfuit.
• Conservezl'appareiletsoncordonhorsde
portéedesenfantsdemoinsde8anslorsqu'il
estsoustensionouqu'ilrefroidit.
• Lavapeurproduiteesttrèspuissante,veillez
doncànepasladirigerendirectiondes
personnes,animauxouobjetsfragiles.
• Laissezrefroidirl’appareilavantdelenettoyer
oudeleranger.
• Leliquideoulavapeurnedoitpasêtredirigé
versleséquipementcontenantdescomposants
électriques,ainsil'intérieurdesfours.
•
Lasurfacepeutdevenirchaudeàl'usage.
• AVERTISSEMENT:L'ouverturede
remplissagedoitresterferméedurantl'usage.
DESCRIPTIONDESPIÈCES
1. Corps
2. Busedepulvérisationcourte
3. Bouchondesécurité
4. Boutondevapeur
5. Poignée
6. Cordond’alimentationavecfiche
7. Indicateurd'alimentation
8. Entonnoir
9. Doseur
10. Busedepulvérisationavecbrosseronde
11. Busedepulvérisationcourbée
12. Busedepulvérisationlongue
13. Busedepulvérisationàrallonge
14. Busedepulvérisationgénérale
15. Busedepulvérisationpourporte/fenêtre
16. Manchonenlinge
AVANTLAPREMIÈREUTILISATION
• Déballezleproduit,vérifiezlesaccessoiresetdocumentsfournisavec
luietassurezvousqueleproduitetlesaccessoiresnesontpas
endommagés.
• Avantusage,veuillezlireattentivementlemanueld'instructions.Le
nettoyeuràvapeurestréservéàunusagedomestique.
• Placezd'abordlenettoyeuràvapeursuruneplateformeplate,pressez
lecachedesécuritéverslebas(1),dévissezdanslesensantihorairele
bouchondesécurité(2)puisinstallezl'entonnoir.
• Remplissezleverremesureurde175ml.d'eauclaire(maximum)et
ajoutezladansleréservoir.Neremplissezpastropleréservoir.Vous
devezylaisserunespacelibre.Replacezlebouchondesécuritéet
serrezle.
• Unefoisbranché,lenettoyeuràvapeurabesoinde4minutesenviron
pourêtreprêtàl'usage.Appuyezalorssurleboutondevapeuret
vérifiezsilavapeurestpulvériséeàtraverslabuse.Avantusage,
versez175ml.d'eaudansleréservoiretpulvérisezla,parexemple
dansunévier.(Nedirigezpaslabusedepulvérisationversautrui.)
• Silavapeurestpulvérisée,installezlesaccessoiresadaptésselonvos
besoinsaprèsavoirrelâchélebouton.
• Appuyezànouveausurleboutondevapeurpoureffectuerles
opérationsvoulues.
UTILISATION
INSTALLATIOND'ACCESSOIRES
• Installezlabusedepulvérisationlongueouàrallonge.Maintenezla
sectiondetuyaudelabusedepulvérisationlonguedanslamain,
alignezlaflècheaveclerepèred'unelignesurlabusedepulvérisation
courteducorpsdelamachineetinsérezlabusedepulvérisationlongue
enposition.Tournezlabusedepulvérisationlonguedanslesens
horaireetalignezlaflèchesurlabusedepulvérisationlongueavecle
repèredelignedoublesurlabusedepulvérisationcourtesurlecorps
delamachine,commeillustréenfigure(3).Pourretirerlabusede
pulvérisationlongue,tournezlabusedepulvérisationlonguedansle
sensinverse(antihoraire)commeillustréenfigure(4)etalignezla
flèchedelabusedepulvérisationaveclerepèredeligneuniquesurle
corpsdelamachine.Vouspouvezensuiteretirerlabusede
pulvérisationlongueentirant.
• Procédezcommeprécédemmentpourlabusedepulvérisationà
rallonge.
• Installezlabusedepulvérisationaveclabrosserondeoulabusede
pulvérisationcourbée.Pouruneinstallationdirectesurlabusede
pulvérisationcourte,dirigezlabusedepulvérisationàbrosserondeou
labusedepulvérisationcourbéeverslehautdelabusede
pulvérisation,commeillustréenfigure(5)etpoussezlabusede
pulvérisationverslehautenposition.
• Installationdebusedepulvérisationpourporte/fenêtre.Installez
d'abordlabusedepulvérisationgénéralesurlabusedepulvérisation
courte,commeillustréenfigure(6).Installezlesdeuxpetitscrochetsde
labusedepulvérisationpourporte/fenêtresurlespattesdesuspension
delabusedepulvérisationgénéralepuisdéclenchezlegrandcrochet
delabusedepulvérisationpourporte/fenêtreetpoussezcelleciversle
hautpourl'accrocher(7)surlecorpsdelabusedepulvérisation
générale.
FONCTIONS
• Désinfectionetstérilisation:Installezlabusedepulvérisationlonguesur
labusedepulvérisationcourteetdirigezlabusedepulvérisationsurla
positionàdésinfecteretappuyezsurleboutondevapeur.Lavapeur
hautetempératuretuelesbactéries.
• Nettoyagedesvêtements:Installezlabusedepulvérisationgénérale
surlabusedepulvérisationcourtepuismontezlemanchonenlinge.
Dirigezsurlesvêtementssuspendusetappuyezsurleboutonde
vapeurtoutendéplaçantlabusedepulvérisationgénérale
verticalementetlatéralementtoutàlafois.Lestachespeuventalorsêtre
éliminéesdesvêtements.
• Nettoyagedesportesetfenêtres:Installezlabusedepulvérisation
généralesurlabusedepulvérisationcourtepuislabusede
pulvérisationpourporte/fenêtredessus.Dirigezsurlaporte/fenêtreet
appuyezsurleboutondevapeurtoutendéplaçantlabusede
pulvérisationverticalementetlatéralementtoutàlafois.Lestaches
peuventalorsêtreéliminéesdesportes/fenêtres.
• Nettoyagedeslamesdeparquet:Installezlabusedepulvérisation
courbéeouàbrosserondesurlabusedepulvérisationlongue.Pourles
pointsd'accèsdifficile,vouspouvezaussiutiliserlabusede
pulvérisationàrallonge.Puisdirigezversleslamesdeparquetet
appuyezsurleboutondevapeurpouréliminersalissuresettachesdes
coinsdemuretdessols.
REMPLISSAGED'EAUENFONCTIONNEMENT
• Débranchezlecordond'alimentationetmettezhorstension.
• Appuyezleboutonàvapeurpourrelâcherlapressionjusqu'àcequela
vapeurnes'échappeplus.
• Dévissezlentementlebouchondesécuritémaissansleretirer.La
vapeurrésiduellesedéchargelentementjusqu'àépuisement.Laissez
ensuitelamachinerefroidirenvironcinqminutes.Enfin,retirez
complètementlebouchondesécurité.
• Utilisezl'entonnoiretleverremesureurpourajouterunequantité
adaptéed'eaufroideouchaudedansleréservoir.
• Replacezlebouchondesécuritésurlecorpsdelamachineetserrezle.
NETTOYAGEETENTRETIEN
• Unefoislenettoyageterminé,débranchezlecordond'alimentationet
mettezhorstension.
• Appuyezleboutonàvapeurpourrelâcherlapressionjusqu'àcequela
vapeurnes'échappeplus.
• Dévissezlentementlebouchondesécuritémaissansleretirer.La
vapeurrésiduellesedéchargelentementjusqu'àépuisement.Laissez
ensuitelamachinerefroidirenvironcinqminutes.Enfin,retirez
complètementlebouchondesécurité.
• Videzleréservoirdel'eaurestanteetnettoyezlasurfaceextérieure
avecunmorceaudechiffonsec.
• Replacezenfinlebouchondesécuritésurlecorpsdelamachineet
serrezle.
GARANTIE
• Ceproduitestgarantipourunepériodede24mois.Votregarantieest
valablesileproduitestutiliséselonlesinstructionsetpourl'usage
auquelilestdestiné.Deplus,lapreuved'achatd'origine(facture,reçu
outicketdecaisse)doitêtreprésentée,montrantladated'achat,lenom
dudétaillantetlenumérod'articleduproduit.
• Pourconnaîtrelesconditionsdegarantiedétaillées,veuillezconsulter
notresiteInternetdeservice:www.service.tristar.eu
ENVIRONNEMENT
Cetappareilnedoitpasêtrejetéaveclesdéchetsménagersàlafin
desaduréedevie,ildoitêtreremisàuncentrederecyclagepourles
appareilsélectriquesetélectroniques.Cesymbolesurl'appareil,le
manueld'utilisationetl'emballageattirevotreattentionsurunpoint
important.Lesmatériauxutilisésdanscetappareilsontrecyclables.En
recyclantvosappareils,vouscontribuezdemanièresignificativeàla
protectiondenotreenvironnement.Renseignezvousauprèsdesautorités
localespourconnaîtrelescentresdecollectedesdéchets.
Support
Vouspouveztrouvertouteslesinformationsetpiècesderechangesur
service.tristar.eu!
DEBedienungsanleitung
SICHERHEIT
• BeimIgnorierenderSicherheitshinweisekann
derHerstellernichtfürSchädenhaftbar
gemachtwerden.

Join the conversation about this product
Here you can share what you think about the Tristar SR-5240 Steam Cleaner. If you have a question, first carefully read the manual. Requesting a manual can be done by using our contact form.