Selecteer het gewenste
programma of
door op of te
drukken. Druk op om
te bevestigen.
Sélectionnez le programme
désiré ou en
appuyant sur ou .
Appuyez sur pour
confirmer.
Wählen Sie die gewünschte
Betriebsart oder
mit oder . Drücken
Sie zum bestätigen.
Select the desired
program or by
pressing or .
Press to confirm.
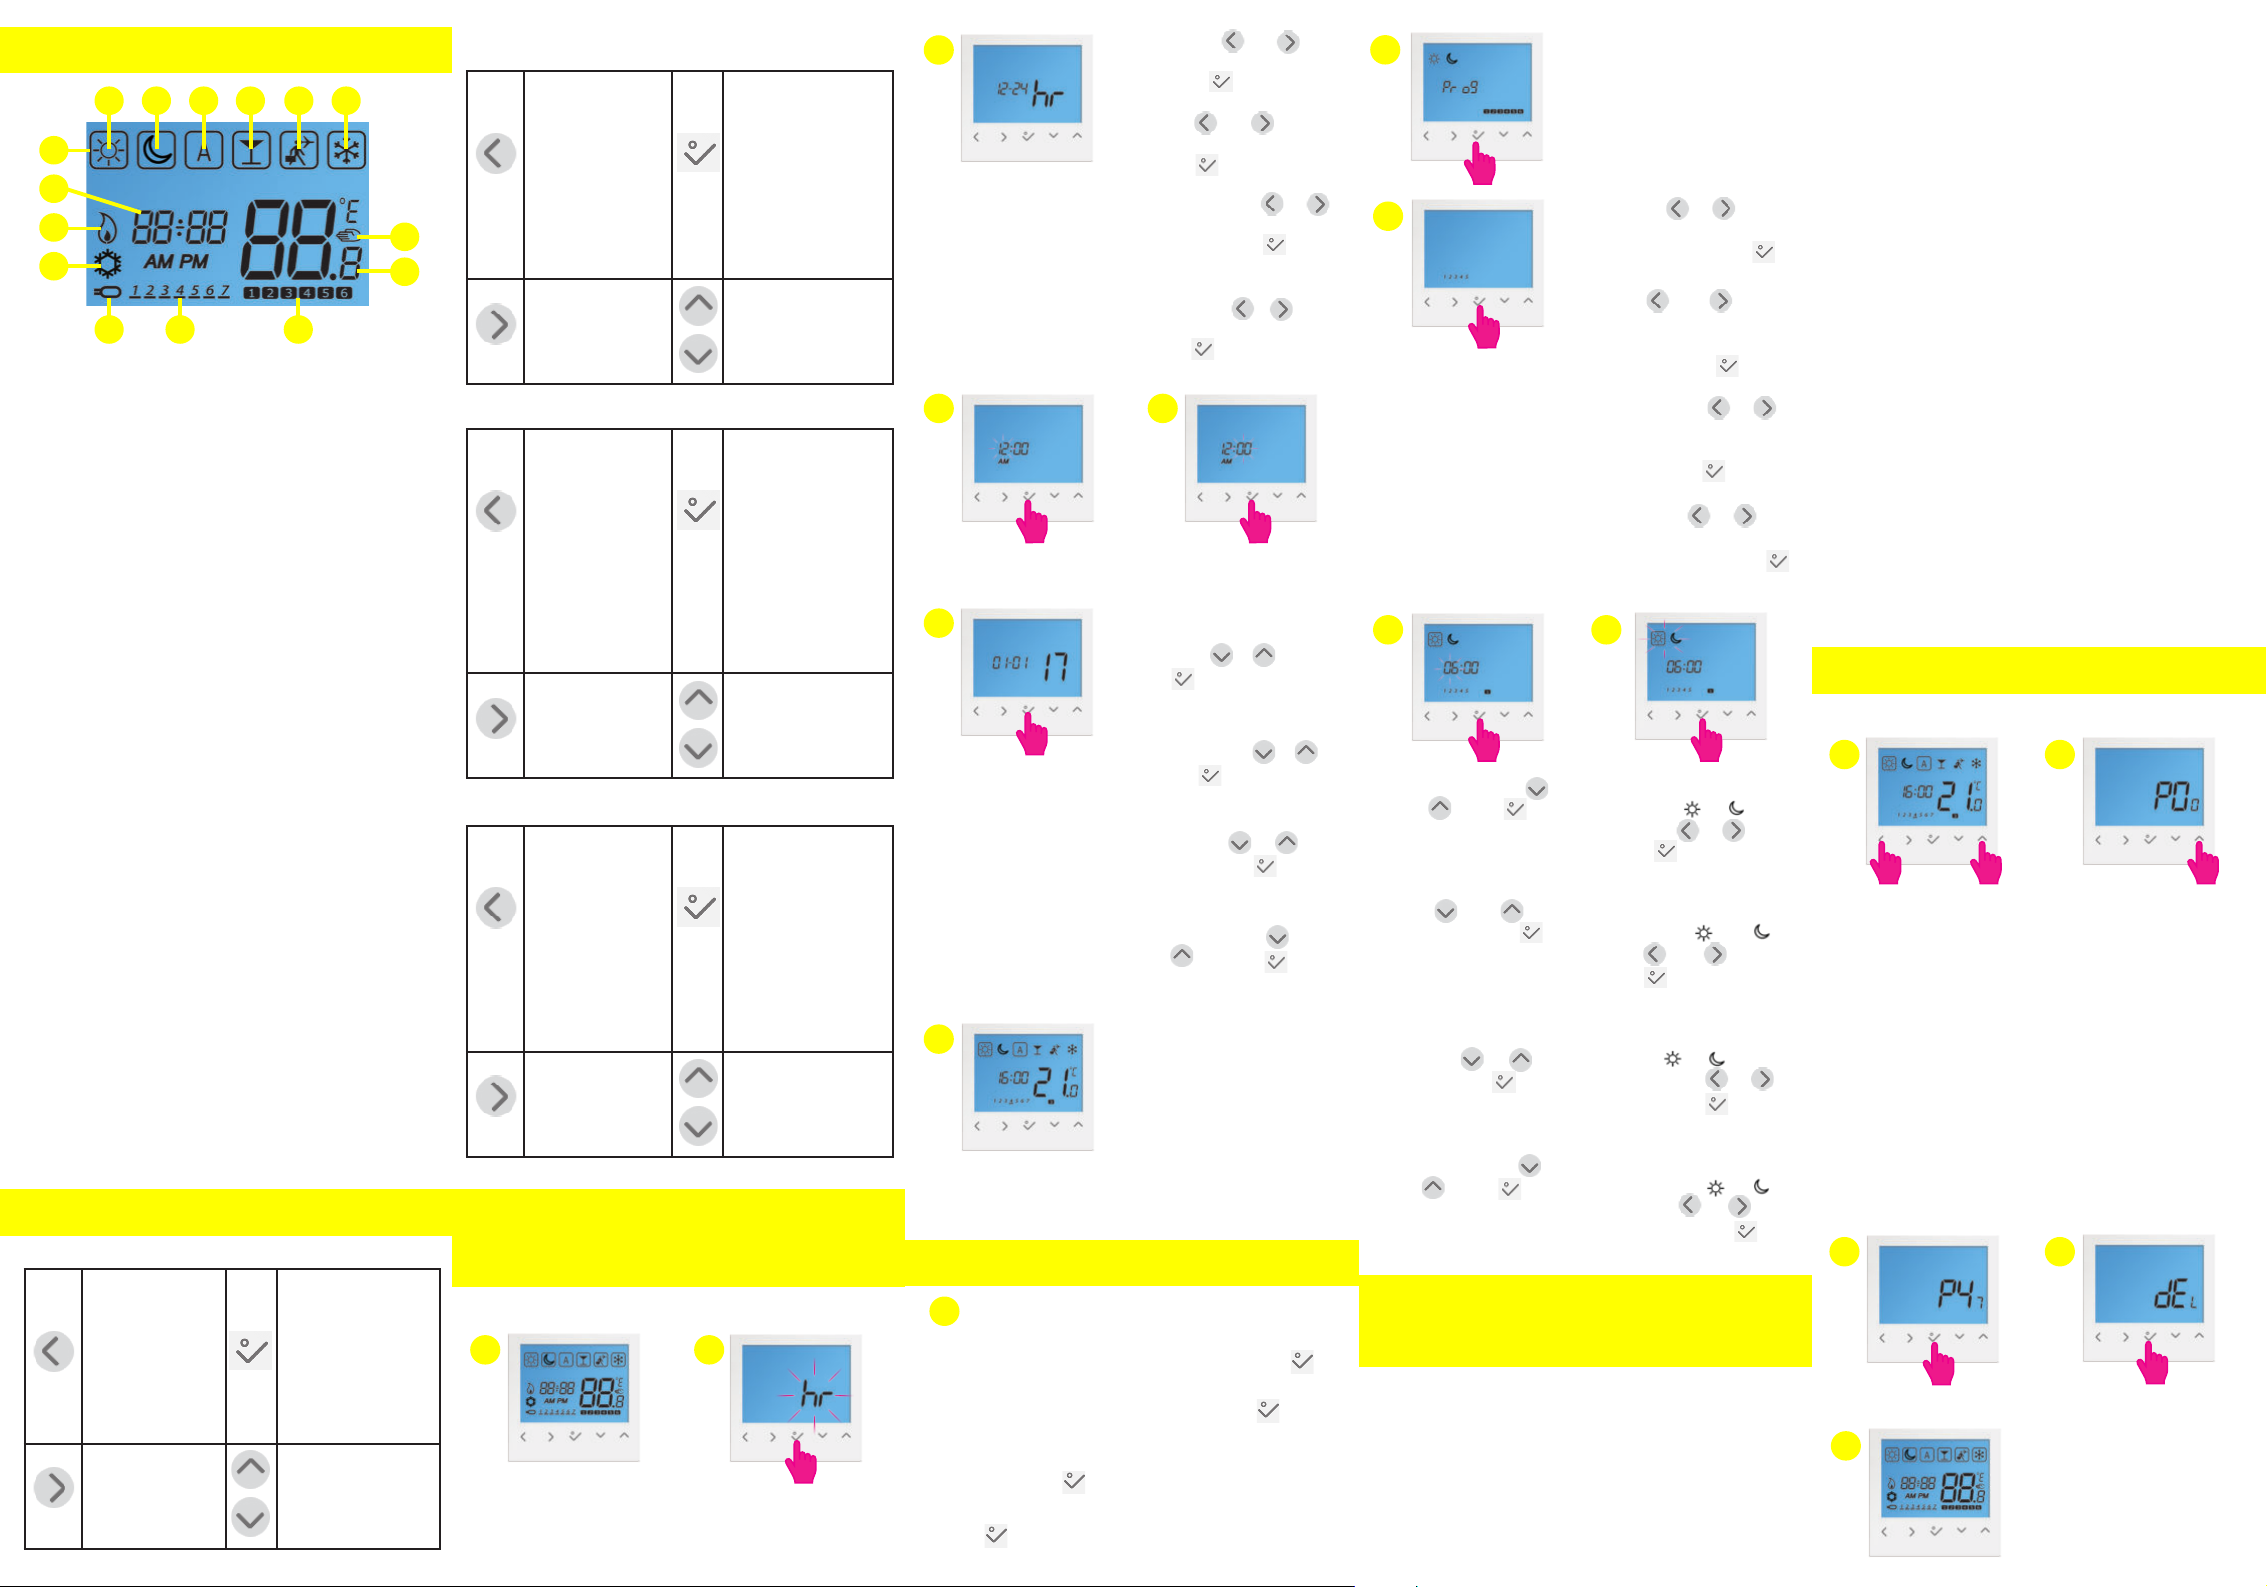
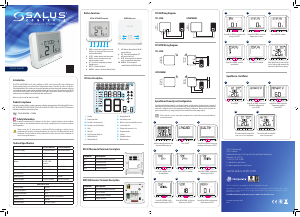
EN LCD Icons
FR Icônes LCD
DE LCD-Symbole
NL LCD-pictogrammen
EN Button Functions
FR Fonctions des boutons
DE Tastenfunktionen
NL Toetsenfuncties
1. BOX indicates which
mode is active
2. Standard temperature
3. Reduced temperature
4. Automatic
5. Party mode
6. Holiday mode
7. Frost protection
8. Temporary override
indicator
9. Temperature indicator
10. Programs number
indicator
11. Day of the week
12. Floor sensor
connected
13. Cool mode
14. Heat mode
15. Time indicator
1. La boîte indique quel
mode est actif
2. Température standard
3. Température réduite
4. Automatique
5. Mode Fête
6. Mode Vacances
7. Protection contre le gel
8. Indicateur de
surpassement
temporaire
9. Indicateur de
température
10. Indicateur de numéro
de programme
11. Jour de la semaine
12. Capteur de plancher
connecté
13. Mode de refroidissement
14. Mode de chauffage
15. Indicateur de temps
1. KÄSTCHEN zeigt die
Betriebsart an
2. Standard Temperatur
3. Absenktemperatur
4. Automatik
5. Party Modus
6. Urlaubs Modus
7. Frostschutz
8. Manueller Betrieb
9. Temperaturanzeige
10. Programmnummer
11. Wochentag
12. Fühler angeschlossen
13. Kühlbetrieb
14. Heizbetrieb
15. Uhrzeit
1. BOX duidt aan welke
modus actief is
2. Standaardtemperatuur
3. Lagere temperatuur
4. Automatisch
5. Partymodus
6. Vakantiemodus
7. Vorstbescherming
8. Tijdelijk negeren
aanduiding
9. Temperatuurindicator
10. Programma’s
cijferindicator
11. Dag van de week
12. Vloersensor verbonden
13. Koelen modus
14. Verwarmen modus
15. Tijdindicator
EN
EN
NL
EN
EN
DE
DE
FR
FR
NL
NL
FR
DE
EN
EN
DE
FR
NL
NL
FR
DE
EN
NL
FR
DE
EN
DE
FR
NL
NL
FR
DE
EN
EN
DE
FR
NL
FR
DE
NL
12 11 10
1
15
14
8
9
13
2 3 4 5 6 7
1. Beweeg links naar
nieuwe modus of nieuwe
instellingen 2. Druk kort
op de toets om terug te
keren naar het vorige
scherm wanneer het in
gebruiker/installateur
instellen modus is.
3. Druk lang op de toets
om terug te keren naar
het startscherm zonder op
te slaan.
1. OK toets: kort drukken om
de selectie te bevestigen.
2. Druk lang om onmiddellijk
terug te keren naar het
starscherm zonder de
instellingsperiode op te slaan.
3. Lang drukken om naar
de Programma/Klok/Oset/
VerwarmenKoelen instelling
voor de gebruiker te gaan.
1. Move right to new
mode or new setting
1. Ingestelde temperatuur
verlagen of verhogen.
2. Dag, Klok, timer (party/
vakantie) verhogen of verlagen
1. Déplacez vers la gauche
pour un nouveau mode ou
de nouveaux paramètres.
2. Appuyez brièvement
pour revenir à l’écran
précédent lorsqu’il est en
mode de conguration
utilisateur/installateur.
3. Appuyez longuement
pour revenir à l’achage
de base sans enregistrer les
modications.
1. Touche OK : appuyez
brièvement pour conrmer la
sélection.
2. Appuyez longuement
pour revenir directement
à l’achage de base avec
enregistrement pendant la
période de réglage.
3. Appuyez longuement pour
accéder à Programmation/
Horloge/Décalage/Chauage-
Refroidissement pour
l’utilisateur.
1. Déplacez vers la droite
pour un nouveau mode ou
de nouveaux paramètres.
1. Augmentez ou diminuez la
température de consigne.
2. Augmentez ou diminuez
les valeurs de Jour, Horloge,
Minuterie (fête/vacances).
1. Nach links bewegen
auf neuen Modus oder
neue Einstellung 2.
Kurz drücken um auf
die vorherigen Anzeige
zurückzukehren wenn Sie
im Anwender/Installatuers
Modus sind.
3. Lange gedrückt halten
um zum Hauptdisplay
zurückzukehren
1. OK Taste: Kurz drücken um
Auswahl zu bestätigen
2. Lang gedrückt halten
um auf Startbildschirm
zurückzukehren
3. Lang gedrückt halten um in
Programm/Uhr/kalibrierung/
Heizen/Kühlen Menü zu
gelangen
1. Nach rechts bewegen
auf neuen Modus oder
neue Einstellung
1. Erhöhung oder Veringerung
der Solltemperatur
2. Einstellung für Tage, Uhr
oder Zeitschaltung (Party/
Urlaub)
1. Move left to new mode
or new settings 2. Short
press to return to the
previous screen when it
is in user/installer setting
mode
3. Long press to return
to home display without
saving
1. OK key: Short press to
conrm selection
2. Long press to direct return
to home display with saving
during the period of setting
3. Long press to enter
Program/Clock/Offset/
HeatCool setting for user
1. Move right to new
mode or new setting
1. Increase or decrease
Setpoint Temperature
2. Increase or decrease Day,
Clock, timer (party/holiday)
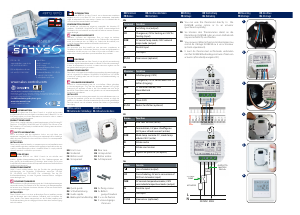
EN Reset
EN Setting Programs
EN Setting time and date
FR Réinitialiser
FR Réglages des programmes
FR Réglage de l’heure et de la date
DE Werksrücksetzung
DE Einstellen der Programme
DE Einstellen von Datum und Uhrzeit
NL Opnieuw
NL Programma’s instellen
NL Instelling tijd&datum
EN Override / Manual Control
FR Surpassement et commande manuelle
DE Überschreiben und manuelle Regelung
NL Negeren&manuele bediening
1
1
4
6
7
3
3
4
3
2
1
2
2
5
4
5
5
Press the indicated keys
at the same time for 3
seconds.
Drücken Sie die
Angezeigten Tasten
zusammen für ca
3sekunden.
Appuyez sur les touches
indiquées en même temps
pendant 3 secondes.
Druk gelijktijdig op de
aangeduide toetsen
gedurende 3 seconden.
Select P47 if you want to
reset to factory settings.
Mit P47 können Sie
den Thermostaten
auf Werkseinstellung
zurücksetzen
Sélectionnez P47 si vous
voulez restaurer les
réglages d’usine.
Selecteer P47 als u de
fabriekinstellingen wilt
herstellen.
U kunt de temperatuur negeren in automatische modus door op
de omhoog- of omlaagpijltjestoetsen te drukken tot u naar het
volgende programma schakelt.
En mode automatique, vous pouvez dépasser la température
en appuyant sur les boutons fléchés vers le haut ou vers le bas
jusqu’au prochain changement de programme.
Wenn Sie im Automatic Betrieb sind können Sie diesen Betrieb
bis zum nächsten Schaltpunkt im Programm überschreiben
indem Sie den Sollwert verändern.
When in automatic mode you can override the temperature by
pressing the up or down arrow buttons until the next switching
of the program.
Manuele bediening: u kunt uw thermostaat instellen in de
manuele modus door alleen het Box-icoon te verplaatsen naar
het zonsymbool of het maansymbool. Hier kunt u de temperatuur
wijzigen door op de omhoog-of omlaagpijtjestoetsen te
drukken. Druk op de vinktoets om te bevestigen.
Commande manuelle : vous pouvez mettre votre thermostat
en mode de commande manuelle en déplaçant l’icône de la
boîte au symbole du soleil ou au symbole de la lune seulement.
Ici vous pouvez modifier votre température en appuyant sur
les boutons fléchés vers le haut ou vers le bas. Appuyez sur le
bouton coche pour confirmer.
Manuelle Regelung: Sie Können den Regler auch manuell
regeln indem Sie das Kästchen auf entweder Sonne oder Mond
setzen und das Kästchen nur auf einem Symbol zu sehen ist. Der
Sollwert ist nun komplett manuell einstellbar und nur manuell
zu verändern.
Manual control: you can set your thermostat into manual control
by moving the box icon to the sun symbol or the moon symbol
only, here you can change your temperature by pressing the left
or right arrow buttons. Press the tick button to confirm.
Stel het uur in met
of . Druk op om
te bevestigen. Herhaal
de procedure om de
minuten in te stellen.
Réglez l’heure en
utilisant ou .
Appuyez sur pour
confirmer. Répétez la
procédure pour régler
les minutes.
Stellen Sie die Stunde
mit oder ein.
Drücken Sie zum
bestätigen.
Wiederholen Sie den
Vorgang für die
Minuten.
Set the hour using
or . Press to
confirm. Repeat the
procedure for setting
the minutes.
Selecteer of om
weekdagen/weekend te
kiezen en druk dan op
om te bevestigen.
Sélectionnez ou
pour choisir jours de
semaine/weekend, puis
appuyez sur pour
confirmer.
Mit oder wählen
Sie Wochentage /
Wochenende und
drücken dann zum
bestätigen.
Select or to
choose weekdays /
weekend then press
to confirm.
You can customise your programs by long pressing
when on the main screen.
Sie können Ihr Programm anpassen indem Sie
gedrückt halten.
Vous pouvez personnaliser vos programmes en appuyant
longuement sur lorsque vous êtes sur l’écran principal.
U kunt uw programma’s aanpassen door lang te drukken
op wanneer u op het hoofdscherm bent.
EN
DE
FR
NL
Select or to
choose 12/24 hr then
press to confirm.
Mit oder 12/24 hr
Anzeige auswählen und
mit bestätigen.
Sélectionnez ou
pour choisir 12/24 h, puis
appuyez sur pour
confirmer.
Selecteer or 12/24
uur te kiezen, druk dan
op om te bevestigen.
EN
Set the hour, the
minutes and the date
using or . Press
to confirm.
DE
Einstellen der Stunden,
Minuten und des
Datums mit or .
Mit zum bestätigen.
FR
Réglez l’heure, les
minutes et la date en
utilisant ou .
Appuyez sur pour
confirmer.
NL
Stel het uur, minuten en
datum in met or
. Druk op om te
bevestigen.
The time and date have
been set.
Uhrzeit und Datum
wurden eingestellt.
L’heure et la date ont été
réglées.
De tijd en datum zijn
ingesteld.


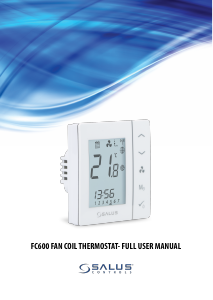

Join the conversation about this product
Here you can share what you think about the Salus BTRP 230 Thermostat. If you have a question, first carefully read the manual. Requesting a manual can be done by using our contact form.