
VISTA 400
robens.de
robens.co.uk
Congratulations on your new
Robens tent, designed and
created to accompany you out
into the great outdoors!
Note how everything is packed
together when you open the
transport sack and pull out the
tent. This will make it easier to
pack away again.
When selecting your campsite,
the ideal place would be an area
as even and clean of rocks,
branches and other sharp objects
as possible, and avoid placing the
tent directly under trees.
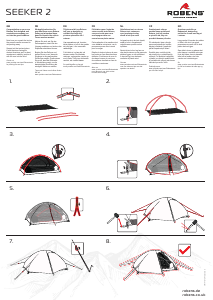
Assemble and raise the tent
Spread out the tent, with the
entrance in the desired direction.
1
Fix the tent all around well
tensioned with pegs through the
webbing loops sewn to the oor and
open the door. Take the air pump to
one of the three valves and unscrew
the cover. The centre button has
two positions: Pushed – The valve
is open to deate the air tubes.
Push again – the button comes out
in normal position for pumping and
camping.
2
Put the nozzle of the pump
into the valve and then twist it a
little to the right to lock it. Then
pump untill you reach 9 psi (0,6
bar), take o the hose and close
the valve cover. Inate both of
the other air tubes whereby the
tents will get its shape. It should
be remembered that changes in
ambient temperature will aect the
air pressure in the tube.
We advise you regularly check air
pressure as part of the daily tent
maintenance routine.
3
Then take the alloy pole, push it
into the sleeve located above door
and place the ends in the eyelets
at the sides of the rst air tube
whereby the pole forms an arch.
4
Pull on the front guy ropes
attached to the canopy, peg them
down and fasten all of the other
ropes to secure the tent against
strong winds.
5
To take down the tent open the
door and then push the buttons
in the valves and the air will come
out.
6
When folding and packing the
tent pay attention that all of the air
can ow out of the air tubes.
Please turn over for more tips and
information.
GB DE DK FR NL
Wir beglückwünschen Sie zum
Kauf Ihres neuen Robens Zeltes
und wünschen Ihnen, dass Sie
hiermit viele schöne Touren
machen werden!
Merken Sie sich beim Önen
des Transportsacks und
Herausziehen des Zeltes wie
alles zusammengepackt ist. Das
wird Ihnen später das Verpacken
erleichtern.
Bei der Auswahl des Aufbauplatzes
achten Sie bitte darauf, dass er
möglichst frei ist von Steinen,
Ästen oder anderen scharfkantigen
Objekten, und vermeiden Sie, das
Zelt unter Bäumen aufzubauen.
Aufbau des Zeltes
Breiten Sie das Zelt aus, mit dem
Eingang in der gewünschten
Richtung.
1
Befestigen Sie das Zelt mit
Heringen durch die Abspann-
schlaufen und önen Sie den
Eingang. Gehen Sie dann mit der
Luftpumpe zu einem der drei Ventile
und schrauben Sie die Abdeckung
ab. Der zentrale Knopf im Ventil hat
zwei Stellungen: Eingedrückt – Das
Ventil ist geönet zum Luftablassen.
Nochmals drücken – Der Knopf
ist außen in Normalposition zum
Pumpen und Zelten.
2
Stecken Sie den Luftschlauch in
die Ventilönung. Ein kurzer Dreh
sichert den Schlauch. Pumpen Sie
bis Sie 9 psi (0,6 bar) erreicht haben,
entfernen Sie den Schlauch und
verschließen Sie das Ventil mit dem
Schraubdeckel. Pumpen Sie ebenso
die beiden anderen Kanäle auf
wobei das Zelt seine Form annimmt.
Beachten Sie dabei bitte, dass
Veränderungen der Umgebungs-
temperatur Auswirkungen auf den
Luftdruck im Schlauch haben.
Wir empfehlen, den Luftdruck
beim täglichen Prüfen des Zelts zu
kontrollieren
3
Schieben Sie die Stange in
den Kanal über dem Eingang und
stecken Sie deren Enden in die
Ösen seitlich am ersten Luftkanal
wobei die Stange einen Bogen formt.
4
Ziehen Sie dann an den
Sturmleinen am Vordach und
befestigen Sie diese ebenso wie
die übrigen Leinen zum Schutz vor
starkem Wind
5
Zum Abbau des Zeltes önen Sie
den Eingang und drücken Sie auf
die Knöpfe in den Ventilen worauf
die Luft ausströmt.
6
Beim Zusammenlegen achten Sie
darauf, dass die restliche Luft aus
den Kanälen entweichen kann.
Für weitere Tipps und Informationen
wenden Sie bitte dieses Blatt.
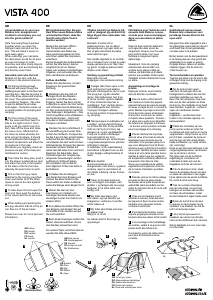
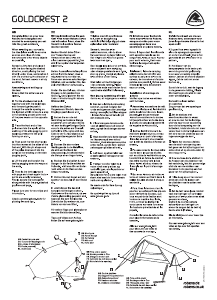
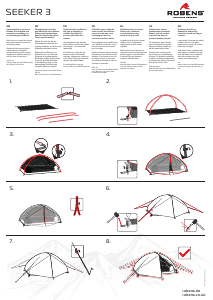
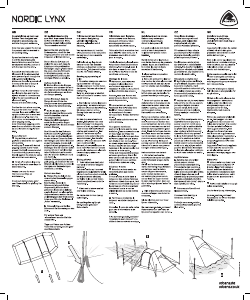
GB Pole sleeve
DE Gestängekanal
DK Kanaler
FR Gaines de mât
NL Stokhoezen
GB Valves
DE Ventile
DK Ventiler
FR Valve
NL Ventiel
Tillykke med dit nye Robens telt,
som er designet og udviklet til at
følge dig på store oplevelser ude
i naturen!
Bemærk, hvordan alt er
pakket sammen, når du åbner
transportposen og tager teltet ud.
Det vil gøre det lettere at pakke
teltet sammen igen.
Den ideelle lejrplads er et område,
der er så jævnt som muligt og uden
skarpe genstande som f.eks. sten
og grene. Undgå at placere teltet
direkte under træer.
Samling og opsætning af teltet
Bred teltet ud med
indgangen i den ønskede retning.
1
Fastgør teltet hele vejen rundt,
godt opstrammet med pløkker
gennem netstropperne, der er syet
fast på gulvet, og åbn derefter
døren. Sæt luftpumpen hen til en
af de tre ventiler, og skru dækslet
af. Den midterste knap har to
indstillinger: Tryk: Ventilen åbnes,
så luftstængerne kan tømmes.
Tryk igen: Knappen udløses
til normal position til oppumpning
og camping.
2
Sæt pumpens mundstykke ind
i ventilen, og drej det lidt til højre
for at låse det fast. Pump derefter,
indtil du når 9 psi (0.6 bar), tag
slangen ud, og luk ventildækslet.
Pump de to andre luftstænger,
hvorved teltet får sin form.
Vær opmærksom på, at ændringer
i omgivelsestemperaturen påvirker
lufttrykket i stangen.
Vi anbefaler, at du regelmæssigt
kontrollerer lufttrykket som en del
af den daglige vedligeholdelse af
teltet.
3
Skub derefter
aluminiumsstangen ind i
stangkanalen over døren, og placer
enderne i øjerne ved siderne af
den første luftstang, så der formes
en bue.
4
Træk i de forreste barduner,
som er fastgjort til solsejlet, sæt
pløkker i, og fastgør alle de øvrige
barduner for at sikre teltet mod
kraftig vind.
5
Når teltet skal tages ned:
Åbn døren, og tryk derefter på
knapperne i ventilerne, hvorefter
luften lukkes ud.
6
Når teltet skal foldes sammen
og pakkes ned:
Sørg for, at al luft
Se næste side for ere tips og
oplysninger.
Félicitations pour l’achat de votre
nouvelle tente Robens, conçue
et créée pour vous accompagner
dans vos excursions en pleine
nature.
Notez la façon dont les éléments
sont agencés dans le sac de
rangement, lorsque vous l’ouvrez
pour sortir la tente. Ceci vous
facilitera le rangement après
démontage.
Idéalement, l’aire de camping
sélectionnée devrait orir une
surface aussi plane et libre de
cailloux, de branches et d’objets
pointus que possible. Évitez aussi
d’installer la tente directement sous
un arbre.
Assemblage et montage de
la tente
Déployez la tente, avec l’entrée
dans la direction souhaitée.
1
Fixez la tente (uniformément
bien tendue) à l’aide des piquets
passant dans les boucles de sangle
cousues au tapis de sol, et ouvrez la
porte. Mettez la pompe à air à côté
d’une des trois valves et dévissez
le bouchon. Le bouton du centre
comporte deux positions : Poussé –
La valve est ouverte pour dégoner
les tubes à air. Appuyez à nouveau
– le bouton sort en position normale
pour le pompage et le camping.
2
Placez l’embout de la pompe
dans la valve et tournez-le ensuite
légèrement vers la droite pour le
verrouiller. Puis pompez jusqu’à ce
que vous atteigniez 9 psi (0,6 bar),
retirez le tuyau et fermez le bouchon
de la valve. Gonez les deux autres
tubes à air et la tente prendra forme.
Gardez à l’esprit que les variations
de température ambiante aecteront
la pression d’air dans le tube.
Nous vous conseillons de vérier
régulièrement la pression d’air lors
de la routine d’entretien quotidien
de la tente.
3
Ensuite, prenez le mât en alliage,
poussez-le dans la gaine située
au-dessus de la porte et placez les
extrémités dans les œillets sur les
côtés du premier tube à air où le mât
forme un arc.
4
Tirez sur les haubans avant
attachés à l’auvent, xez-les avec
les piquets et xez tous les autres
haubans pour sécuriser la tente
contre les vents forts.
5
Pour démonter la tente, ouvrez
la porte et appuyez ensuite sur les
boutons dans les valves et l’air sortira
6
Lors du pliage et de l’emballage
de la tente, veillez à ce que tout l’air
puisse sortir des tubes à air.
Consultez le verso de cette notice
pour plus d’informations et de
conseils.
Gefeliciteerd met uw nieuwe
Robens tent, ontworpen voor
jarenlange trouwe dienst in het
open veld!
Kijk goed hoe alles ingepakt is als u
de opbergzak openmaakt en de tent
eruit haalt. Dan is het gemakkelijk
om alles weer in te pakken.
Bij het kiezen van de kampeerplaats
is de beste plek een stuk grond dat
gelijkmatig is en waar zo weinig
mogelijk stenen, takken of andere
objecten liggen. Zet de tent niet
onder bomen op.
Tent voorbereiden en opzetten
Trek het grondzeil van de tent in alle
richtingen strak met de ingang in de
gewenste richting.
1
Zet de tent rondom goed
vast door de haringen door de
haringlussen te steken die aan het
grondzeil vastzitten en open de
deur. Pak de luchtpomp, loop naar
één van de drie ventielen en draai
de dop los. De middelste knop heeft
twee standen: Ingedrukt – ventiel is
open om luchtbuizen te laten
leeglopen.
Uitgedrukt – ventiel staat naar
buiten in de normale oppomp- en
kampeerstand.
2
Plaats het mondstuk van de
pomp op het ventiel en draai het
mondstuk wat naar rechts om het te
vergrendelen. Pomp hierna op tot 9
psi (0,6 bar), verwijder de pomp en
sluit de dop van het ventiel. Blaas
beide luchtbuizen op, zodat de tent
zijn vorm krijgt.
Denk er aan dat veranderingen in de
omgevingstemperatuur van invloed
zijn op de druk in de buis.
Wij raden aan om de luchtdruk
regelmatig te controleren en
onderdeel te laten zijn van de
dagelijkse controle van de tent.
3
Pak de aluminium stok, steek
deze in de stoksleuf boven de deur
en steek de uiteinden in de oogjes
bij de zijkant van de eerste luchtbuis.
Nu vormt de stok een boog.
4
Trek de voorste scheerlijnen
aan de luifel strak, zet vast met
haringen en monteer alle andere
monteer de scheerlijnen, zodat
de tent bestand is tegen harde wind.
5
Breek de tent af door de deur
te openen en de knoppen op de
ventielen in te drukken. Nu zal de
lucht uit de buizen lopen.
6
Let er bij het opvouwen en
inpakken van de tent op dat alle
lucht uit de luchtbuizen kan stromen.
Sla de bladzijde om voor meer tips
en informatie.
GB Eyelets
DE Ösen
DK Øjer
FR Œillets
NL Ogen
GB Fix all guy ropes
DE Abspannleinen befestigen
DK Spænd alle barduner
FR Serrez les hauban
NL Draai alle scheerlijnen strak
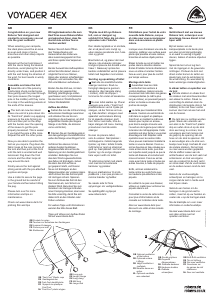
7 PSI 9 PSI
40°0°
1
2
4
6
3
© 09/2018 Oase Outdoors ApS
5

Join the conversation about this product
Here you can share what you think about the Robens Vista 400 Tent. If you have a question, first carefully read the manual. Requesting a manual can be done by using our contact form.