
2
2
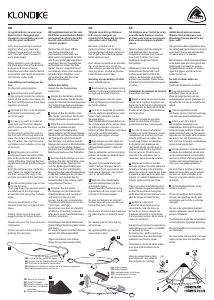
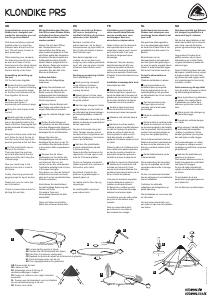
GB Hook adapter
DE Hakenadapter
DK Inderteltadapter med kroge
FR L’adaptateur de crochet
NL Binnententadapter
KLONDIKE
robens.de
robens.co.uk
Congratulations on your new
Robens tent, designed and
created to accompany you out
into the great outdoors!
Note how everything is packed
together when you open the
transport sack and pull out the
tent. This will make it easier to
pack away again.
When selecting your campsite,
the ideal place would be an area
as even and clean of rocks,
branches and other sharp objects
as possible, and avoid placing the
tent directly under trees.
Assembling and setting up the
tent
Put the tent poles together.
1
Spread the oor and ysheet
on the ground, locate the starting
points of the connection zipper on
the oor and ysheet and zip them
together all around.
2
Tension the oor in all directions
and fasten it provisionally with
some pin pegs.
3
In case you want to install an
inner tent, put the hook adapter,
which comes with the inner, on the
long pole.
Put the plastic protection cap on
the slim end of the long pole and
place the pole in the pocket in the
top of the tent.
Also put the black
ventilation hood outside on the top
of the tent.
4
Bring the pole into a vertical
position and place the bottom of the
pole on the protection plate in the
centre of the oor. Now peg the oor
equally tensioned all around using pin
pegs.
Bring the A-frame pole inside the
tent, fasten its top at the top of
the door and put the legs in the
pockets provided at the tent oor.
5
Put the small plastic cap on the
tip of the A-frame.
Then peg down the guylines which
are attached to the drip edge
around the tent using the V-shape
pegs.
Now you could hang in the
optional inner tent or install a tent
stove.
Finally, check all guylines and
pegging loops for equal tension.
Please turn over for more tips and
information.
Check out www.robens.de/tv for
pitching lm and tips
GB DE DK FR NL
Wir beglückwünschen Sie zum
Kauf Ihres neuen Robens Zeltes
und wünschen Ihnen, dass Sie
hiermit viele schöne Touren
machen werden!
Merken Sie sich beim Önen
des Transportsacks und
Herausziehen des Zeltes wie
alles zusammengepackt ist. Das
wird Ihnen später das Verpacken
erleichtern. Bei der Auswahl des
Aufbauplatzes achten Sie bitte
darauf, dass er möglichst frei ist
von Steinen, Ästen oder anderen
scharfkantigen Objekten, und
vermeiden Sie, das Zelt unter
Bäumen aufzubauen.
Aufbau des Zeltes
Setzen Sie die Zeltgestänge
zusammen.
1
Breiten Sie den Boden und das
Zelt aus und suchen Sie am Boden
sowie am Überzelt die Anfangspunkte
des Verbindungs-Reißverschlusses,
und schließen Sie ihn rings herum.
2
Spannen Sie den Boden nach
allen Seiten und sichern Sie ihn mit
einigen Zeltnadeln provisorisch.
3
Falls Sie ein Innenzelt einbauen
möchten, schieben sie den,
dem Innenzelt beigepackten
Hakenadapter auf die lange Stange.
Stecken Sie auf das dünnere Ende
der Stange die obere Kunststo-
Schutzkappe und stecken Sie die
Stange dann innen in die Aufnahme
in der Spitze des Zeltes. Setzen
Sie dann auch außen die schwarze
Belüftungshaube auf die Zeltspitze.
4
Richten Sie die Stange auf, und
schieben Sie den Schutzteller unter
das Stangenende.
Spannen Sie
nun den Boden gleichmäßig und
befestigen Sie ihn mit Zeltnadeln.
Bringen Sie dann das Zirkelgestänge
in das Zelt, befestigen Sie es oben
an der Tür und stecken Sie die
beiden Enden in die unteren, dafür
vorgesehenen Taschen.
5
Stecken Sie die kleine
Dichtkappe auf die Spitze des
Zirkelgestänges und verankern
und spannen Sie nun die
Leinen, die an der umlaufenden
Traufkante befestigt sind mit den
V-förmigen Heringen.
Sie können nun das als Zubehör
erhältliche Innenzelt montieren
oder auch einen handelsüblichen
Zeltofen einsetzen.
Kontrollieren Sie abschließend die
gleichmäßige Spannung aller Leinen
und Gurte.
Für weitere Tipps und Informationen
wenden Sie bitte dieses Blatt.
Tipps und Videos zum Aufbau
nden Sie auf www.robens.de/tv
Tillykke med dit nye Robens
telt, som er designet og
udviklet til at følge dig på store
oplevelser ude i naturen!
Bemærk, hvordan alt er
pakket sammen, når du åbner
transportposen og tager teltet ud.
Det vil gøre det lettere at pakke
teltet sammen igen.
Den ideelle lejrplads er et område,
der er så jævnt som muligt og
uden skarpe genstande som f.eks.
sten og grene. Undgå at placere
teltet direkte under træer.
Samling og opsætning af teltet
Saml teltstængerne.
1
Bred gulvet og oversejlet ud og
lokaliser lynlåsens startpunkter og
lyn gulv og oversejl sammen.
2
Spænd gulvet ud hele vejen
rundt og fastgør provisorisk med
de tynde pløkker.
3
Hvis du vil anvende et indertelt,
skal du sætte krogadapteren, som
følger med inderteltet, på den
længste stang.
Sæt plastikbeskyttelseshætten på
den tynde ende af den lange stang,
og anbring stangen i lommen i
toppen af teltet.Monterer endvidere
den sorte ventilationshætte
udvendig på toppen af teltet.
4
Rejs stangen op inde i teltet, så
den står lodret og placerer stangen
på beskyttelsespladen i midten af
teltet.
Pløk nu teltbunden ud med de tynde
pløkker, så bunden er spændt jævnt
ud hele vejen rundt.
Tag den A-formede stang ind i
teltet. Fastgør stangen øverst
ved dørens front og placerer det
nederste af stangen i de lommer
som er på teltbunden.
5
Sæt den lille plastikhætte
ovenpå metalspidsen på den
A-formede stang.
Spænd derefter bardunerne fra
regnkanten ud hele vejen rundt
med de V-formede pløkker.
Nu kan du fastgøre et indertelt
(købes seperat) eller montere et
telt-komfur inde i teltet.
Kontrollere til sidst at alle barduner
og pløkstropper er spændt jævnt
ud.
Se næste side for ere tips og
oplysninger.
Se opstillingslm og tips på
www.robens.de/tv
Félicitations pour l’achat de votre
nouvelle tente Robens, conçue
et créée pour vous accompagner
dans vos excursions en pleine
nature.
Notez la façon dont les éléments
sont agencés dans le sac de
rangement, lorsque vous l’ouvrez
pour sortir la tente. Ceci vous
facilitera le rangement après
démontage.
Idéalement, l’aire de camping
sélectionnée devrait orir une
surface aussi plane et libre de
cailloux, de branches et d’objets
pointus que possible. Évitez aussi
d’installer la tente directement sous
un arbre.
Installation et montage de la tente
Assemblez les mâts.
1
Étalez le tapis de sol et le double-
toit par terre, repérez les points de
départ de la fermeture à glissière de
raccordement du tapis de sol et du
double toit et zippez l’ensemble sur
tout le pourtour.
2
Tendez le tapis de sol dans
toutes les directions et xez-le
provisoirement avec des piquets.
3
Au cas où vous souhaiteriez
installer une tente intérieure, placez
l’adaptateur de crochet, livré avec
la tente intérieure en option, sur
le mât long. Placez le capuchon
de protection en plastique sur
l’extrémité étroite du mât long et
insérez le mât dans la poche en
haut de la tente. Positionnez le
capuchon de ventilation noir à
l’extérieur au sommet de la tente.
4
Maintenez le mât en position
verticale et placez la partie inférieure
du mât sur la plaque de protection
située au centre du tapis de sol. Fixez
à présent le tapis au sol à l’aide des
piquets, en veillant à appliquer une
tension égale sur tous les côtés.
Placez le mât en A à l’intérieur de la
tente, attachez sa partie supérieure
au haut de la porte et insérez les
pieds dans les poches prévues à cet
eet au niveau du tapis de sol.
5
Enlez le capuchon
d’étanchéité en plastique sur
la pointe du mât d’entrée en
forme de A. Fixez ensuite les
haubans attachés à la gouttière
d’écoulement autour de la tente, à
l’aide de sardines.
Vous pouvez à présent suspendre la
tente intérieure en option ou installer
un réchaud de tente.
En dernier lieu, vériez que tous
les haubans et boucles d’ancrage
subissent une tension égale.
Consultez le verso de cette notice
pour plus d’informations et de
conseils.
Allez sur www.robens.de/tv
pour découvrir une vidéo et
des conseils de montage
Gefeliciteerd met uw nieuwe
Robens tent, ontworpen voor
jarenlange trouwe dienst in het
open veld!
Kijk goed hoe alles ingepakt is als u
de opbergzak openmaakt en de tent
eruit haalt. Dan is het gemakkelijk
om alles weer in te pakken.
Bij het kiezen van de kampeerplaats
is de beste plek een stuk grond dat
gelijkmatig is en waar zo weinig
mogelijk stenen, takken of andere
objecten liggen. Zet de tent niet
onder bomen op.
De tent in elkaar zetten en
opzetten
Plaats de tentstokken in elkaar.
1
Leg het grondzeil en de
buitentent open op de grond.
Zoek de beginpunten van de
verbindingsrits op het grondzeil en
de buitentent en rits ze rondom aan
elkaar.
2
Trek het grondzeil in alle
richtingen open en zet het voorlopig
vast met een paar penharingen.
3
Indien u een binnentent
wilt opzetten, bevestigt u de
haakadapter die bij de binnentent
zit op de lange tentstok. Plaats de
plastic beschermdop op het dunne
uiteinde van de lange stok en steek
de stok in het vak bovenaan de
tent. Zet ook de zwarte ventilatiekap
buiten bovenop de tent.
4
Zet de tentstok in verticale positie
en plaats de onderkant van de stok
op de beschermplaat in het midden
van het grondzeil. Zet het grondzeil
rondom vast met penharingen en
zorg voor een gelijke spanning.
Zet de A-frame tentstok in de tent.
Maak de bovenkant vast bovenaan
de deur en zet de uiteinden in de
hiervoor voorziene zakken op het
grondzeil.
5
Zet de Nokbeschermer op de
A-frame tentstok.
Zet de scheerlijnen die bevestigd
zijn aan de regenap van de tent
vervolgens vast met de V-vormige
haringen.
Nu zou u de optionele binnentent
kunnen ophangen of een tentkachel
kunnen installeren.
Controleer ten slotte alle scheerlijnen
en haringlussen op gelijke spanning.
Sla de bladzijde om voor meer tips
en informatie.
Ga naar www.robens.de/tv voor een
video en tips over het opzetten van
tenten
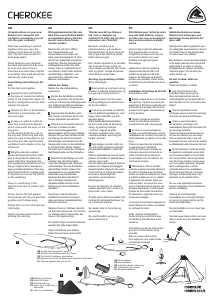
GB Locate starting points of zipper
DE Suchen Sie die Startpunkte der Zipper
DK Find frem til lynlåsens startpunkter
FR Repérez les points de départ de la fermeture à glissière
NL Zoek de beginpunten van de rits
GB Sleeve for chimney
DE Kanal für Kamin
DK Skorstensåbning
FR Gaine pour conduit de
cheminée
NL Hoes voor kachelpijp
1
3
3
4
5
5
© 09/2016 Oase Outdoors ApS

Join the conversation about this product
Here you can share what you think about the Robens Klondike Tent. If you have a question, first carefully read the manual. Requesting a manual can be done by using our contact form.