4
1
3
3
2
KITE
robens.de
robens.co.uk
Congratulation on your new
Robens tent designed and
created to accompany you out
into the great outdoors.
When selecting your campsite,
the ideal place would be an area
as even and clean of rocks,
branches and other sharp objects
as possible.
Spread out the tent and place it
with the door facing the desired
direction, avoid placing the tent
directly under trees, and position it
with the end facing the direction of
the wind, for best results in windy
conditions.
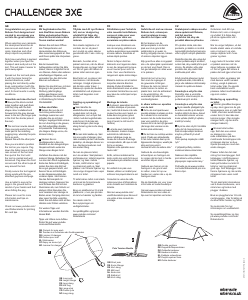
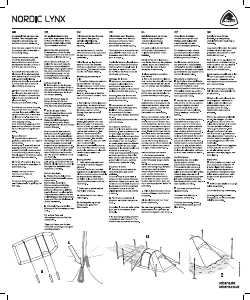
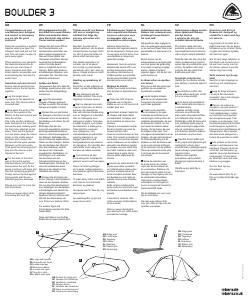
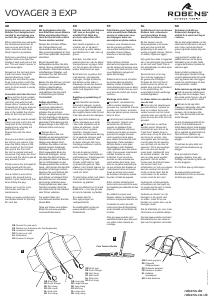
Assembling and setting up the
tent
Ensure that the entrance is closed.
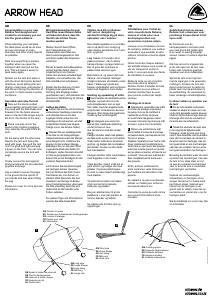
1
Put the long shock-corded main
pole together and gently push it
through the outside opening on
the ysheet until it comes to a stop
in the webbing pocket at the end
of the sleeve.
2
The tent can now be raised.
Place the front end of the pole
down into the corresponding
plastic cup applying pressure to
the pole forming an arch and then
pull on the strap with the buckle
near the opening of the sleeve to
adjust tension.
3
Repeat this with both of the
short poles at the ends of the tent.
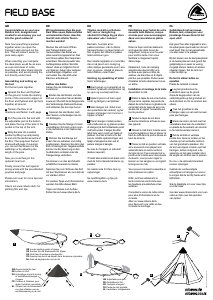
4
Lift up the arch and tension the
tent by pegging down the guylines
on the ends of the tent.
5
Then x the tent all around
with pegs and check again that all
points are evenly tensioned.
Finally, secure the tent against
strong winds with the pre-attached
guylines and pegs.
Please turn over for more tips and
information.
Check out www.robens.de/tv for
pitching lm and tips
GB DE DK FR NL
Wir beglückwünschen Sie zum
Kauf Ihres neuen Robens Zeltes
und wünschen Ihnen, dass Sie
hiermit viele schöne Touren
machen werden!
Merken Sie sich beim Önen
des Transportsacks und
Herausziehen des Zeltes wie alles
zusammengepackt ist. Das wird Ihnen
später das Verpacken erleichtern.
Bei der Auswahl des Aufbauplatzes
achten Sie bitte darauf, dass er
möglichst frei ist von Steinen,
Ästen oder anderen scharfkantigen
Objekten, und vermeiden Sie, das
Zelt unter Bäumen aufzubauen.
Breiten Sie das Zelt aus, mit dem
Eingang in der gewünschten
Richtung. Und platzieren Sie ein
Ende in Windrichtung für höhere
Windstabilität.
Aufbau des Zeltes
Vergewissern Sie sich, dass der
Eingang geschlossen ist.
1
Setzen Sie nun die lange mit
Gummizug verbundene Stange
zusammen und schieben Sie
sie in die außen am Überzelt
bendliche Önung des
Gestängekanals bis sich das Ende
in der Gurtbandtasche auf der
gegenüberliegenden Seite bendet.
2
Stecken Sie das vordere
Gestänge ende in den dazugehörigen
Kunststoköcher wobei die Stange
einen Bogen formt. Die Spannung
können Sie an den Einstellgurten
korrigieren.
3
Verfahren Sie ebenso mit den
beiden kurzen Stangen an den
Zeltenden.
4
Richten Sie den zentralen Bogen
auf und spannen sie das Zelt mit den
Leinen an den Enden ab.
5
Jetzt können Sie das Zelt komplett
mit Heringen sichern.
Kontrollieren
Sie nochmals, ob alle Punkte
gleichmäßig gespannt sind. Spannen
Sie zum Schluss das Zelt mit den
Sturmleinen ab, zum Schutz vor
starkem Wind.
Für weitere Tipps und Informationen
wenden Sie bitte dieses Blatt.
Tipps und Videos zum Aufbau nden
Sie auf www.robens.de/tv
Tillykke med dit nye Robens
telt, som er designet og
udviklet til at følge dig på store
oplevelser ude i naturen!
Bemærk, hvordan alt er
pakket sammen, når du åbner
transportposen og tager teltet ud.
Det vil gøre det lettere at pakke
teltet sammen igen.
Den ideelle lejrplads er et område,
der er så jævnt som muligt og
uden skarpe genstande som f.eks.
sten og grene. Undgå at placere
teltet direkte under træer.
Bred teltet ud med indgangen
i den ønskede retning. Placer
teltets ene ende mod vinden for at
opnå bedre stabilitet i blæsevejr.
Samling og opsætning af teltet
Kontroller, at indgangen er lukket.
1
Sæt den elastikforbundne
stang sammen. Skub nu forsigtigt
stangen gennem stangkanalen,
indtil den stopper i lommen for
enden af kanalen.
2
Nu kan teltet sættes op. Placer
stangens ene ende i “Fast-Foot”
plastikhylstret ved at trykke på
stangen, så der formes en bue,
og træk derefter i stroppen med
spændet ved kanalens åbning for
at spænde stangen godt fast.
3
Gentag proceduren med de to
korte stænger i hver ende af teltet.
4
Rejs buen op og stram teltet
ud ved at trække stropperne ved
teltets ender ud og pløk dem fast.
5
Spænd teltet jævnt ud og
fastgør det ved at sætte pløkker i
alle stropper hele vejen rundt om
teltet.
Til sidst sikres teltet mod stærk
vind med de formonterede
barduner og pløkker.
Se næste side for ere tips og
oplysninger.
Se opstillingslm og tips på
www.robens.de/tv
Félicitations pour l’achat de
votre nouvelle tente Robens,
conçue et créée pour vous
accompagner dans vos
excursions en pleine nature.
Notez la façon dont les éléments
sont agencés dans le sac de
rangement, lorsque vous l’ouvrez
pour sortir la tente. Ceci vous
facilitera le rangement après
démontage.
Idéalement, l’aire de camping
sélectionnée devrait orir une
surface aussi plane et libre de
cailloux, de branches et d’objets
pointus que possible. Évitez aussi
d’installer la tente directement
sous un arbre.
Installation et montage de la
tente
Vériez que toutes les entrées
sont fermées.
1
Assemblez les sections de mât
à cordon élastique et poussez
les doucement par l’ouverture
extérieure du double-toit jusqu’à
arriver en butée dans la poche de
sangles à l’extrémité de la gaine.
2
La tente peut maintenant
être dressée. Insérez l’extrémité
avant du mât dans le support
en plastique correspondant, en
exerçant une pression sur le mât
pour le plier en arceau, puis tirez
la sangle à boucle vers l’ouverture
de la gaine pour régler la tension.
3
Répétez cette opération avec les
deux mâts courts aux extrémités de
la tente.
4
Soulevez l’arceau et mettez
la tente en tension à l’aide
des sangles situées à chaque
extrémité.
5
Puis, xez la tente sur tout le
pourtour en enfonçant des piquets
et en vériant de nouveau que
tous les points de xation sont
tendus de manière équilibrée.
Enn, arrimez solidement la
tente contre les vents forts avec
les haubans pré-attachés et les
piquets.
Consultez le verso de cette notice
pour plus d’informations et de
conseils.
Allez sur www.robens.de/tv
pour découvrir une vidéo et des
conseils de montage
Gefeliciteerd met uw nieuwe
Robens tent, ontworpen voor
jarenlange trouwe dienst in het
open veld!
Kijk goed hoe alles ingepakt is
als u de opbergzak openmaakt
en de tent eruit haalt. Dan is het
gemakkelijk om alles weer in te
pakken.
Bij het kiezen van de
kampeerplaats is de beste plek
een stuk grond dat gelijkmatig
is en waar zo weinig mogelijk
stenen, takken of andere objecten
liggen. Zet de tent niet onder
bomen op.
Spreid de tent uit, met de ingang
in de gewenste richting. Plaats
één kant tegen de wind in voor
meer windstabiliteit.
De tent in elkaar zetten en
opzetten
Zorg ervoor dat de opening
gesloten zijn.
1
Zet de stokken met
amortiseurkoorden in elkaar
en duw ze voorzichtig door de
buitenopening van de buitentent,
totdat de stok niet meer verder
kan in de haringluszak aan het
eind van de hoes.
2
De tent kan nu rechtop
worden gezet. Steek het voorste
uiteinde van de stok in de
overeenkomstige plastic dop en
oefen druk uit op de stok door een
boog te vormen, trek vervolgens
aan het riempje met de gesp bij
de opening van de hoes om de
spanning te regelen.
3
Herhaal dit voor beide korte
stokken aan de uiteinden van de
tent.
4
Til de boog op en trek de tent
strak met de haringen aan de
uiteinden.
5
Zet de tent vervolgens rondom
vast met haringen en controleer
opnieuw of alle punten even strak
gespannen staan.
Gebruik de voorbevestigde
scheerlijnen en haringen om te
zorgen dat de tent in harde wind
kan blijven staan.
Sla de bladzijde om voor meer tips
en informatie.
Ga naar www.robens.de/tv
voor een video en tips over het
opzetten van tenten
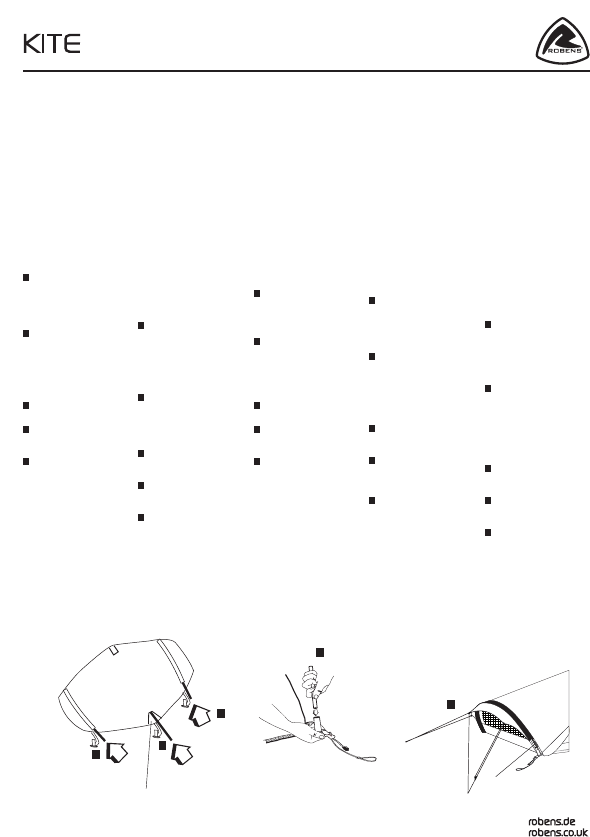
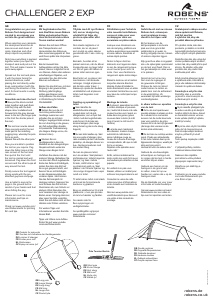
GB Put end of pole into plastic cup
DE Gestängeende in Kunststoköcher
DK Placer stangens ende i plastikhylstret
FR Glissez l’extrémité du mât dans le support
en plastique
NL Steek het stokuiteinde in de plastic dop
GB Short pole
DE Kurze Stange
DK Kort stang
FR Mât court
NL Korte stok
GB Longer pole
DE Lange Stange
DK Lang stang
FR Mât long
NL Langere stok
GB Short pole
DE Kurze Stange
DK Kort stang
FR Mât court
NL Korte stok
GB Pegging loops
DE Abspannschlaufen
DK Pløkstropper
FR Boucles d’ancrage
NL Haringlussen
GB Peg out the guylines
DE Leinen abspannen
DK Spænd bardunerne ud
FR Tendez les haubans
NL Maak de scheerlijnen
vast
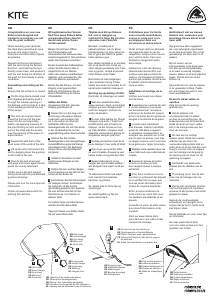
GB Opening of the inside pole sleeve
DE Önung des Gestängekanals
DK Åbning i den indvendige stangkanal
FR Ouverture sur les gaines de mât intérieures
NL Opening aan de binnenkant van de stokhoez
GB Adjust tension
DE Spannung einstellen
DK Justere spændingen
FR Régler la tension
NL Pas de spanning
© 09/2016 Oase Outdoors ApS

Join the conversation about this product
Here you can share what you think about the Robens Kite Tent. If you have a question, first carefully read the manual. Requesting a manual can be done by using our contact form.