GREEN CASTLE
robens.de
robens.co.uk
Congratulation on your new
Robens Tent designed and
created to accompany you out
into the great outdoors.
When selecting your campsite,
the ideal place would be an area
as even and clean of rocks,
branches and other sharp objects
as possible.
Spread out the tent and place it
with the doors facing the desired
directions, avoid placing the tent
directly under trees, and position it
with the end facing the direction of
the wind, for best results in windy
conditions.
Assemble and raise the tent
1
Assemble all of the poles by
interlocking shock-corded poles.
Now gently push the poles through
their pole sleeves (the longest
poles in the middle, the shorter
poles at the ends) until they come
to a stop in the webbing pockets at
the ends of the sleeves.
2
The tent can now be raised.
Place one end of a pole down into
its “Fast-Foot” plastic cup applying
pressure to the pole forming an
arch and then pull on the strap
with the buckle near the opening
of the sleeve to get the pole
properly tensioned. This is easier
if you bend the pole a little more.
Repeat this with the other poles.
3
Now you are able to position
the tent as you require. Peg down
the fabric loops at the rear corners
of the tent and then pull at the
front until the tent is erected and
well tensioned. Peg down the front
corners and the other loops all
way around the tent.
With both of the shortest poles you
can set up the door as a canopy.
Finally secure the tent against
strong winds with the pre-attached
guylines and pegs.
Use a mallet to secure the pegs
in the ground but be careful of
your hands and feet when hitting
the peg.
Please turn over for more
information and tips on
maintenance.
Check out www.robens.de/tv for
pitching lm and tips.
GB DE DK FR NL
Wir beglückwünschen Sie zum
Kauf Ihres neuen Robens Zeltes
und wünschen Ihnen, dass Sie
hiermit viele schöne Touren
machen werden!
Merken Sie sich beim Önen
des Transportsacks und
Herausziehen des Zeltes wie
alles zusammengepackt ist. Das
wird Ihnen später das Verpacken
erleichtern.
Bei der Auswahl des Aufbauplatzes
achten Sie bitte darauf, dass er
möglichst frei ist von Steinen,
Ästen oder anderen scharfkantigen
Objekten, und vermeiden Sie, das
Zelt unter Bäumen aufzubauen.
Breiten Sie das Zelt aus, mit dem
Eingang in der gewünschten
Richtung (alle Eingänge sollten
geschlossen sein).
Aufbau des Zeltes
1
Setzen Sie nun die mit Gummizug
verbundenen Gestänge zusammen
und schieben Sie sie bis zum
Anschlag in die schwarzen, am Zelt
aufgenähten Kanäle (die längeren
Stangen in der Mitte, die kürzeren
vorne und hinten).
2
Stecken Sie ein Gestängeende in
den dazugehörigen Kunststoköcher
wobei die Stange einen Bogen formt.
Verfahren Sie ebenso mit den
anderen Gestängen.
Gegebenenfalls können sie die
Spannung an den Gestängeköchern
einstellen.
3
Befestigen Sie nun das dem Wind
zugewandte Ende des Zeltes mit
Erdnägeln, ziehen Sie dann das Zelt
auf bis es gut gespannt steht, und
xieren Sie es mit Erdnägeln an den
Abspannpunkten der vorderen Apsis.
Jetzt können Sie das Zelt komplett
mit Heringen sichern.
Den Eingang können Sie mit den
beiden kürzesten Stangen aufstellen.
Spannen Sie zum Schluss das Zelt
mit den Sturmleinen ab, zum Schutz
vor starkem Wind. Benutzen Sie zum
Verankern der Heringe im Boden
einen Camping-Hammer, aber seien
Sie bitte vorsichtig, damit Sie sich
dabei nicht an den Händen oder
Füßen verletzen.
Für weitere Tipps und Informationen
wenden Sie bitte dieses Blatt.
Tipps und Videos zum Aufbau
nden Sie auf www.robens.de/tv
Tillykke med dit nye Robens
telt, som er designet og
udviklet til at følge dig på store
oplevelser ude i naturen.
Den ideelle lejrplads er et område,
der er så jævnt som muligt og
uden skarpe genstande som f.eks.
sten og grene.
Bred teltet ud, og placer det med
dørene i de ønskede retninger.
Undgå at placere det direkte under
træer. I blæsevejr opnås den
bedste vindstabilitet ved at placere
teltet med bagsiden mod vinden.
Samling og opsætning af teltet
1
Sæt alle de elastikforbundne
stænger sammen. Skub nu
forsigtigt stængerne gennem
kanalerne (de længste stænger
i midten og de korte stønger
yderst), indtil de stopper i
lommerne for enden af kanalerne.
2
Nu kan teltet sættes op. Placer
stangens ene ende i “Fast Foot”
plastikholderen ved at trykke på
stangen, så der formes en bue,
og træk derefter i stroppen med
spændet ved kanalens åbning
for at spænde stangen godt
fast. Det er nemmere, hvis du
bøjer stangen lidt mere. Gentag
proceduren med de andre
stænger.
3
Nu kan du placere teltet,
som du ønsker. Sæt pløkker i
stofstopperne i teltets bagerste
hjørner, og træk i teltets forende,
indtil teltet er rejst og strammet
godt op. Sæt pløkker i de forreste
hjørner og i de øvrige stropper
hele vejen rundt om teltet.
Til sidst sikres teltet mod stærk
vind med de formonterede
barduner og pløkker.
Ved hjælp af de to korteste
stænger kan døren bruges som
solsejl.
Brug en pløkhammer til at slå
pløkkerne i, men pas på ikke at
ramme hænder og fødder.
Se næste side for ere
oplysninger om vedligeholdelse.
Se opstillingslm og tips på
www.robens.de/tv
Félicitations pour l’achat de votre
nouvelle tente Robens, conçue
et créée pour vous accompagner
dans vos excursions en pleine
nature.
Lorsque vous choisissez une aire de
camping, préférez une surface aussi
plane que possible et sans cailloux,
branches et autres objets pointus.
Étalez la tente au sol et mettez les
portes dans la direction désirée.
Évitez d’installer la tente directement
sous un arbre et orientez l’arrière
face au vent, pour plus de confort
par temps venteux.
Montage de la tente
1
Assemblez tous les mâts en
emboîtant les sections à cordon
de serrage. Insérez ensuite
doucement les mâts dans les gaines
correspondantes (les mâts les plus
long au milieu, les plus courts aux
extrémités), en poussant jusqu’à
arriver en butée au niveau des
poches de sangle.
2
La tente peut maintenant être
dressée. Insérez une extrémité du
mât dans le support en plastique
Fast Foot, en mettant le mât sous
tension pour le plier en arceau,
puis tirez la sangle à boucle vers
l’ouverture de la gaine pour obtenir
la tension de mât appropriée. Cette
opération est plus facile si vous pliez
davantage le mât. Répétez cette
opération avec les autres mâts.
3
Vous pouvez maintenant installer
la tente où vous le désirez. Fixez au
sol les boucles en tissu situées aux
coins arrière de la tente, puis tirez
sur la partie avant jusqu’à ce que la
tente soit dressée et correctement
mise en tension. Fixez au sol les
coins avant de la tente et toutes les
autres boucles, à l’aide de piquets.
Enn, arrimez solidement la
tente contre les vents forts avec
les haubans pré-attachés et des
piquets.
Avec les deux mâts les plus petits
vous pouvez monter la porte
comme un auvent.
En veillant à ne pas vous blesser,
utilisez un maillet pour enfoncer les
piquets dans le sol.
Consultez le verso de cette notice
pour plus d’informations et de
conseils sur l’entretien de la tente.
Allez sur www.robens.de/tv pour
découvrir une vidéo et des conseils
de montage.
Gefeliciteerd met uw nieuwe
Robens tent, ontworpen voor
jarenlange trouwe dienst in het
open veld!
Bij het kiezen van de
kampeerplaats is de beste plek
een stuk grond dat gelijkmatig
is en waar zo weinig mogelijk
stenen, takken of andere objecten
liggen.
Spreid de tent uit en leg hem
met de ingangen in de gewenste
richtingen. Probeer de tent niet
direct onder bomen te zetten en
plaats hem met de achterkant in
de windrichting. Zo weerstaat hij
beter winderige omstandigheden.
In elkaar zetten en opzetten van
de tent
1
Zet alle stokken in elkaar door
de stokken met amortiseurkoorden
in elkaar te steken. Steek nu
voorzichtig de stokken door de
stokhoezen (de langste stokken
in het midden, de kortere stokken
aan de uiteinden) tot ze niet meer
verder kunnen (tegen het net aan
het eind van de hoezen).
2
De tent kan nu rechtop worden
gezet. Steek één uiteinde van
een stok in de “Fast-Foot” plastic
dop en oefen druk uit op de stok
door een boog te vormen, trek
vervolgens aan het riempje met
de gesp bij de opening van de
hoes om de stok te spannen. Dit
is eenvoudiger als u de stok een
beetje meer buigt. Herhaal dit voor
de andere stokken.
3
De tent kan nu naar wens
worden geplaatst. Zet de stoen
lussen aan de achterhoeken van
de tent vast met scharnieren en
trek vervolgens aan de voorkant
tot de tent recht en strak staat.
Zet de voorhoeken en de andere
lussen rond de tent vast.
Gebruik de voorbevestigde
scheerlijnen en haringen om te
zorgen dat de tent in harde wind
kan blijven staan.
Met allebei de kortste stokken kunt
u van de deur een luifel maken.
Gebruik een hamer om de
haringen in de grond vast te
zetten, maar let op uw handen en
voeten als u op de haringen slaat.
Sla de bladzijde om voor meer
informatie en onderhoudstips.
Ga naar www.robens.de/tv voor een
video en tips over het opzetten van
tenten.
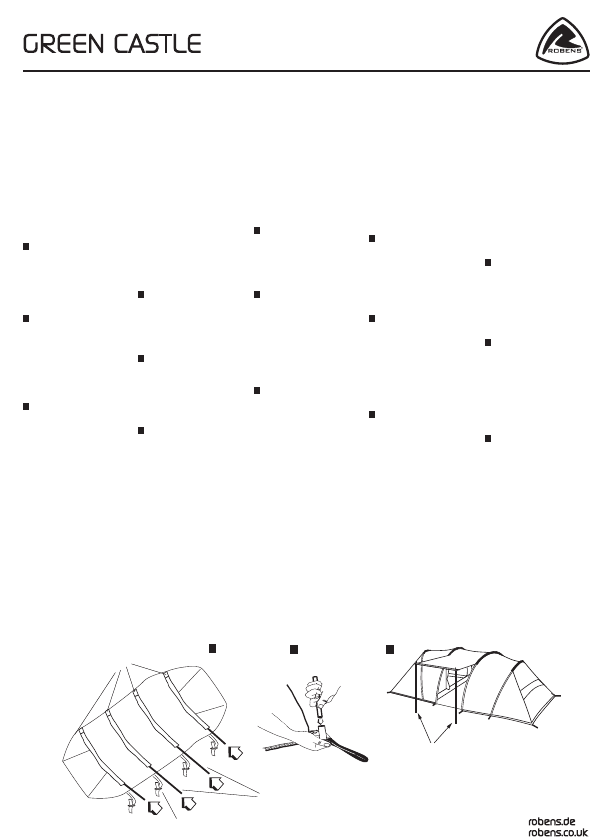
GB Pockets for poles
DE Taschen zur Aufnahme der Gestängeen
DK Lommer til stænger
FR Poches pour mât
NL Stokhoezen
GB “Fast-Foot” Plastic cups
DE Gestängeköcher
DK Fast-Foot plastikhylstre
FR Supports en plastique Fast Foot
NL “Fast-Foot” plastic dopjes
GB Long poles
DE Lange Stangen
DK Lange stænger
FR Mâts long
NL Lange stokken
GB Door can be set-up using the shortest poles
DE Tür kann mit den kürzesten Stangen aufgestellt werden
DK Døren kan bruges som solsejl vha. de koreste stænger
FR La porte peut être réglée à l’aide des mâts les plus courts
NL De deur kan worden opgezet met behulp van de kortste
stokken
1
3
2
© 09/2016 Oase Outdoors ApS

Join the conversation about this product
Here you can share what you think about the Robens Green Castle Tent. If you have a question, first carefully read the manual. Requesting a manual can be done by using our contact form.