Manual Pelgrim SKE905ALU Cooker Hood

Need a manual for your Pelgrim SKE905ALU Cooker Hood? Below you can view and download the PDF manual for free in English. This product currently has 2 frequently asked questions, 0 comments and has 0 votes. If this is not the manual you want, please contact us.

Is your product defective and the manual offers no solution? Go to a Repair Café for free repair services.

Manual

Loading…

11
10
INSTALLATION
If the recirculation system is to be applied,
mount the T-piece (G) instead of a duct.
Fix the short pipe (D) to the mounting
bracket (C) using 2 screws (B).
Place 2 cage nuts in the openings of the
duct (E), which can be found on the bottom
part of the duct.
Place duct (E) over the inner duct (D) by
pulling the two side pieces slightly apart.
Now screw 2 screws (Q) into the cage nuts
of the duct (E) from the inside of the
extractor hood.
Electrical connection
Make sure the supply voltage ratings
correspond with those stated on the
appliance data plate.
Attention: If you want to make a fixed
connection, ensure that a multi-pole switch
with a distance between contacts of 3 mm
is installed in the supply cable.
The appliance must be connected to a
system equipped with earth or ground
plate.
Colour of the wires:
- green/yellow = earth
- blue = phase N
- brown = phase L
Mounting the canopy hood above
an island
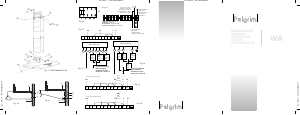
See fig. 8.
Make sure that the ceiling is suitable for the
suspension of the construction chimney.
First determine the position and distance
with regard to the chimney. Make a 140
mm hole in the ceiling for the duct.
If the opening for the flex (bottom of the
chimney construction 1) is pointed towards
you, then the control switches will be to
your right.
Drill 4 10 mm holes for the plugs and screw
the chimney against the ceiling.
Press the 2 flange halves (2) firmly
together, so that the snap connection is
made and then screw the assembled flange
(2) to the canopy hood.
Slide the inner cylinder (3) over the
chimney construction up to the ceiling and
fix it with 2 screws (4). Then slide the outer
cylinder (5) on.
Fix the canopy hood to the chimney
construction with the 4 M6 screws (6).
Make the electrical connection and
observe the flex opening (1).
Now fix the outer cylinder (5) to the cooker
hood with 2 screws, this is done from the
inside of the cooker hood.
Attach the protective strips over the edges
of the filter in the hood.
Remove the film from the filters.
INSTALLATION
General
This appliance should be connected to the
power supply by a recognized fitter who is
familiar with, and works according to the
correct safety regulations. This appliance
meets the European requirements CEE 89/336
EMC and CEE 73/23; 93/68 LVD.
Important that you know
If the cooker hood is to be fitted to an
existing duct no other appliances, such as
a geyser or heater, may be connected to
that same duct.
Consider local regulations with respect to
the ventilation of gas appliances!
The cooker hood should be mounted at
least 650 mm. above the hob.
The shorter the duct, and the fewer the
bends in it, the better the cooker hood will
work.
Before you start drilling check that there
are no installation cables present.
The diameter of the outlet flange is 125 mm,
a duct with the same diameter is best.
Mounting the canopy hood
See fig. 7.
A - Assembly screws for chimney.
B - Fixing bracket.
G - T-piece for recirculation model (in the
start set).
H - Duct flange.
L - Motor group.
First determine the position and distance
with regard to the canopy hood. Consider
the minimum distance of 650 mm between
the cooking area and the hood. Mark the
holes that must be drilled and drill the
4 holes.
Fix the hood to the wall with the 2 plugs
and screws (N) provided.
Mount the two flange halves (H) with the
2 screws (I) and then fix the flange (H) to
the upper part of the motor group (L) with
the
4 screws (I).
To install the extractor hood correctly, fix
the hood to the wall from the inside with
2 screws (O).
Now connect the extractor hood to the
electricity supply in your home.
Attach the protective strips over the edges
of the filter in the hood.
Remove the film from the filters.
Connect the duct
See fig. 7.
First determine the position and distance
with regard to the fixing bracket (B). Mark
the holes that must be drilled and drill the
2 holes.
Fix the bracket to the wall with the screws
(A) provided.
Technical specifications
Type LSK 945/975/986 SKE 905
Power 230 V - 50 Hz XX
Nominal capacity W 240 240
Motor W 200 200
Lighting W 2xhalo 20 4xhalo 10
Download manual in English (PDF, 0.1 MB)
(Consider the environment and only print this manual if it is really necessary)

Loading…

Rating

Let us know what you think about the Pelgrim SKE905ALU Cooker Hood by leaving a product rating. Want to share your experiences with this product or ask a question? Please leave a comment at the bottom of the page.
Are you satisfied with the Pelgrim SKE905ALU Cooker Hood?
Yes No
Be the first to rate this product
0 votes

Join the conversation about this product

Here you can share what you think about the Pelgrim SKE905ALU Cooker Hood. If you have a question, first carefully read the manual. Requesting a manual can be done by using our contact form.

More about this manual

We understand that it’s nice to have a paper manual for your Pelgrim SKE905ALU Cooker Hood. You can always download the manual from our website and print it yourself. If you would like to have an original manual, we recommend you contact Pelgrim. They might be able to provide an original manual. Are you looking for the manual of your Pelgrim SKE905ALU Cooker Hood in a different language? Choose your preferred language on our homepage and search for the model number to see if we have it available.

Specifications

Brand Pelgrim
Model SKE905ALU
Category Cooker Hoods
File type PDF
File size 0.1 MB

All manuals for Pelgrim Cooker Hoods
More manuals of Cooker Hoods

Frequently Asked Questions about Pelgrim SKE905ALU Cooker Hood

Our support team searches for useful product information and answers to frequently asked questions. If you find an inaccuracy in our frequently asked questions, please let us know by using our contact form.

How much distance should there be between my cooker hood and my hob? Verified

This can very a bit depending on the brand, but in general a cooker hood should be placed at least 65 centimeter above a gas hob and at least 50 centimeter above an electric or induction hob. This is to improve fire safety

This was helpful (1230) Read more

Do I need a cooker hood with or without motor? Verified

Cooker Hoods with motor are meant for when the air is moved directly outside. A cooker hood without motor is meant for when there is a central ventilation system. Never connect a cooker hood with motor to a central ventilation system!

This was helpful (657) Read more
Manual Pelgrim SKE905ALU Cooker Hood

Related products

Related categories