Garantiezeit und gesetzliche Mängelansprüche
Die Garantiezeit wird durch die Gewährleistung nicht verlängert. Dies gilt auch für ersetzte und reparierte Teile. Eventuell
schon beim Kauf vorhandene Schäden und Mängel müssen sofort nach dem Auspacken gemeldet werden. Nach
Ablauf der Garantiezeit anfallende Reparaturen sind kostenpflichtig.
Garantieumfang
Das Gerät wurde nach strengen Qualitätsrichtlinien sorgfältig produziert und vor Auslieferung gewissenhaft geprüft.
Die Garantieleistung gilt für Material- oder Fabrikationsfehler. Diese Garantie erstreckt sich nicht auf Produktteile, die
normaler Abnutzung ausgesetzt sind und daher als Verschleißteile angesehen werden können oder für Beschädigungen an
zerbrechlichen Teilen, z. B. Schalter, Akkus, Backformen oder Teile die aus Glas gefertigt sind. Diese Garantie verfällt, wenn
das Produkt beschädigt, nicht sachgemäß benutzt oder gewartet wurde. Für eine sachgemäße Benutzung des Produkts sind
alle in der Bedienungsanleitung aufgeführten Anweisungen genau einzuhalten. Verwendungszwecke und Handlungen, von
denen in der Bedienungsanleitung abgeraten oder vor denen gewarnt wird, sind unbedingt zu vermeiden. Das Produkt ist nur
für den privaten und nicht für den gewerblichen Gebrauch bestimmt. Bei missbräuchlicher und unsachgemäßer Behandlung,
Gewaltanwendung und bei Eingriffen, die nicht von unserer autorisierten Service-Niederlassung vorgenommen wurden,
erlischt die Garantie.
Abwicklung im Garantiefall
Um eine schnelle Bearbeitung ihres Anliegens zu gewährleisten, folgen Sie bitte den folgenden Hinweisen:
•
Bitte halten Sie für alle Anfragen den Kassenbon und die Artikelnummer (z. B. IAN 12345) als Nachweis für den Kauf bereit.
• Die Artikelnummer entnehmen Sie bitte dem Typenschild, einer Gravur, auf dem Titelblatt ihrer Anleitung (unten links)
oder als Aufkleber auf der Rück- oder Unterseite.
• Sollten Funktionsfehler oder sonstige Mängel auftreten kontaktieren Sie zunächst die nachfolgend benannte
Serviceabteilung telefonisch oder per E-Mail.
• Ein als defekt erfasstes Produkt können Sie dann unter Beifügung des Kaufbelegs (Kassenbon) und der Angabe, worin
der Mangel besteht und wann er aufgetreten ist, für Sie portofrei an die Ihnen mitgeteilte Service-Anschrift übersenden.
Auf www.lidl-service.com können Sie diese und viele weitere Handbücher, Produktvideos und Software
herunterladen. Mit diesem QR-Code gelangen sie direkt auf die Lidl-Service-Seite (www.lidl-service.com)
und können mittels der Eingabe der Artikelnummer (IAN) 321202 ihre Bedienungsanleitung öffnen.
Entsorgung des Elektrogeräts
Die durchgestrichene Mülltonne auf diesem Produkt weist Sie darauf hin, dass das Gerät am Ende seiner
Lebensdauer getrennt vom Hausmüll entsorgt werden muss. Bitte bringen Sie den Batterielötkolben zu den
eingerichteten kommunalen Sammelstellen in Ihrer Gemeinde.
Informationen zur Entsorgung und zur Lage des nächsten Recyclinghofes erhalten Sie z. B. bei Ihrer
Stadtreinigung oder in den Gelben Seiten.
Entsorgen Sie die Verpackung umweltgerecht. Beachten Sie die Kennzeichnung auf den verschiedenen
Verpackungsmaterialien und trennen Sie diese gegebenenfalls gesondert. Die Verpackungsmaterialien
sind gekennzeichnet mit Abkürzungen (a) und Ziffern (b) mit folgender Bedeutung: 1–7: Kunststoffe,
20–22: Papier und Pappe, 80–98: Verbundstoffe
Entsorgung der Batterien
Batterien dürfen nicht in den Hausmüll. Verbrauchte Batterien müssen sachgerecht entsorgt werden. Zu
diesem Zweck stehen im batterievertreibenden Handel sowie bei den kommunalen Sammelstellen
entsprechende Behälter zur Batterie-Entsorgung bereit. Batterien und Akkus, die mit den folgenden
Buchstaben versehen sind, beinhalten u. a. die Schadstoffe: Cd (Cadmium), Hg (Quecksilber), Pb (Blei).
Informationen zur Entsorgung und zur Lage des nächsten Recyclinghofes erhalten Sie z. B. bei Ihrer Stadtreinigung oder
in den Gelben Seiten.
Technische und optische Änderungen vorbehalten.
Congratulations on purchasing your new device.
You have decided to buy a high quality product. This instruction manual is an integral part of this product. It contains im-
portant information regarding safety, use and disposal. Be sure to familiarise yourself with all of the operating and safety
instructions before you use the product. The product should only be used as described here and only for the specified
applications. Hand over all documents together with the products when passing these on to third parties.
Intended Use
The battery-powered soldering iron is a portable multi-purpose appliance. It is intended for fine soldering in electronics,
model constructing and for hobby work. Any other use is not permitted as it can lead to injuries. In these cases, the
manufacturer carries no liability.
The battery-powered soldering iron is operated with 3 à 1.5V (type AA) batteries.
Scope of delivery and explanation of signs
A battery-powered soldering iron with a soldering tip and a protective cap as well as 3 batteries à 1.5V (type AA) and
a set of operating instructions are included in the delivery.
Please unpack the goods and check it for completeness.
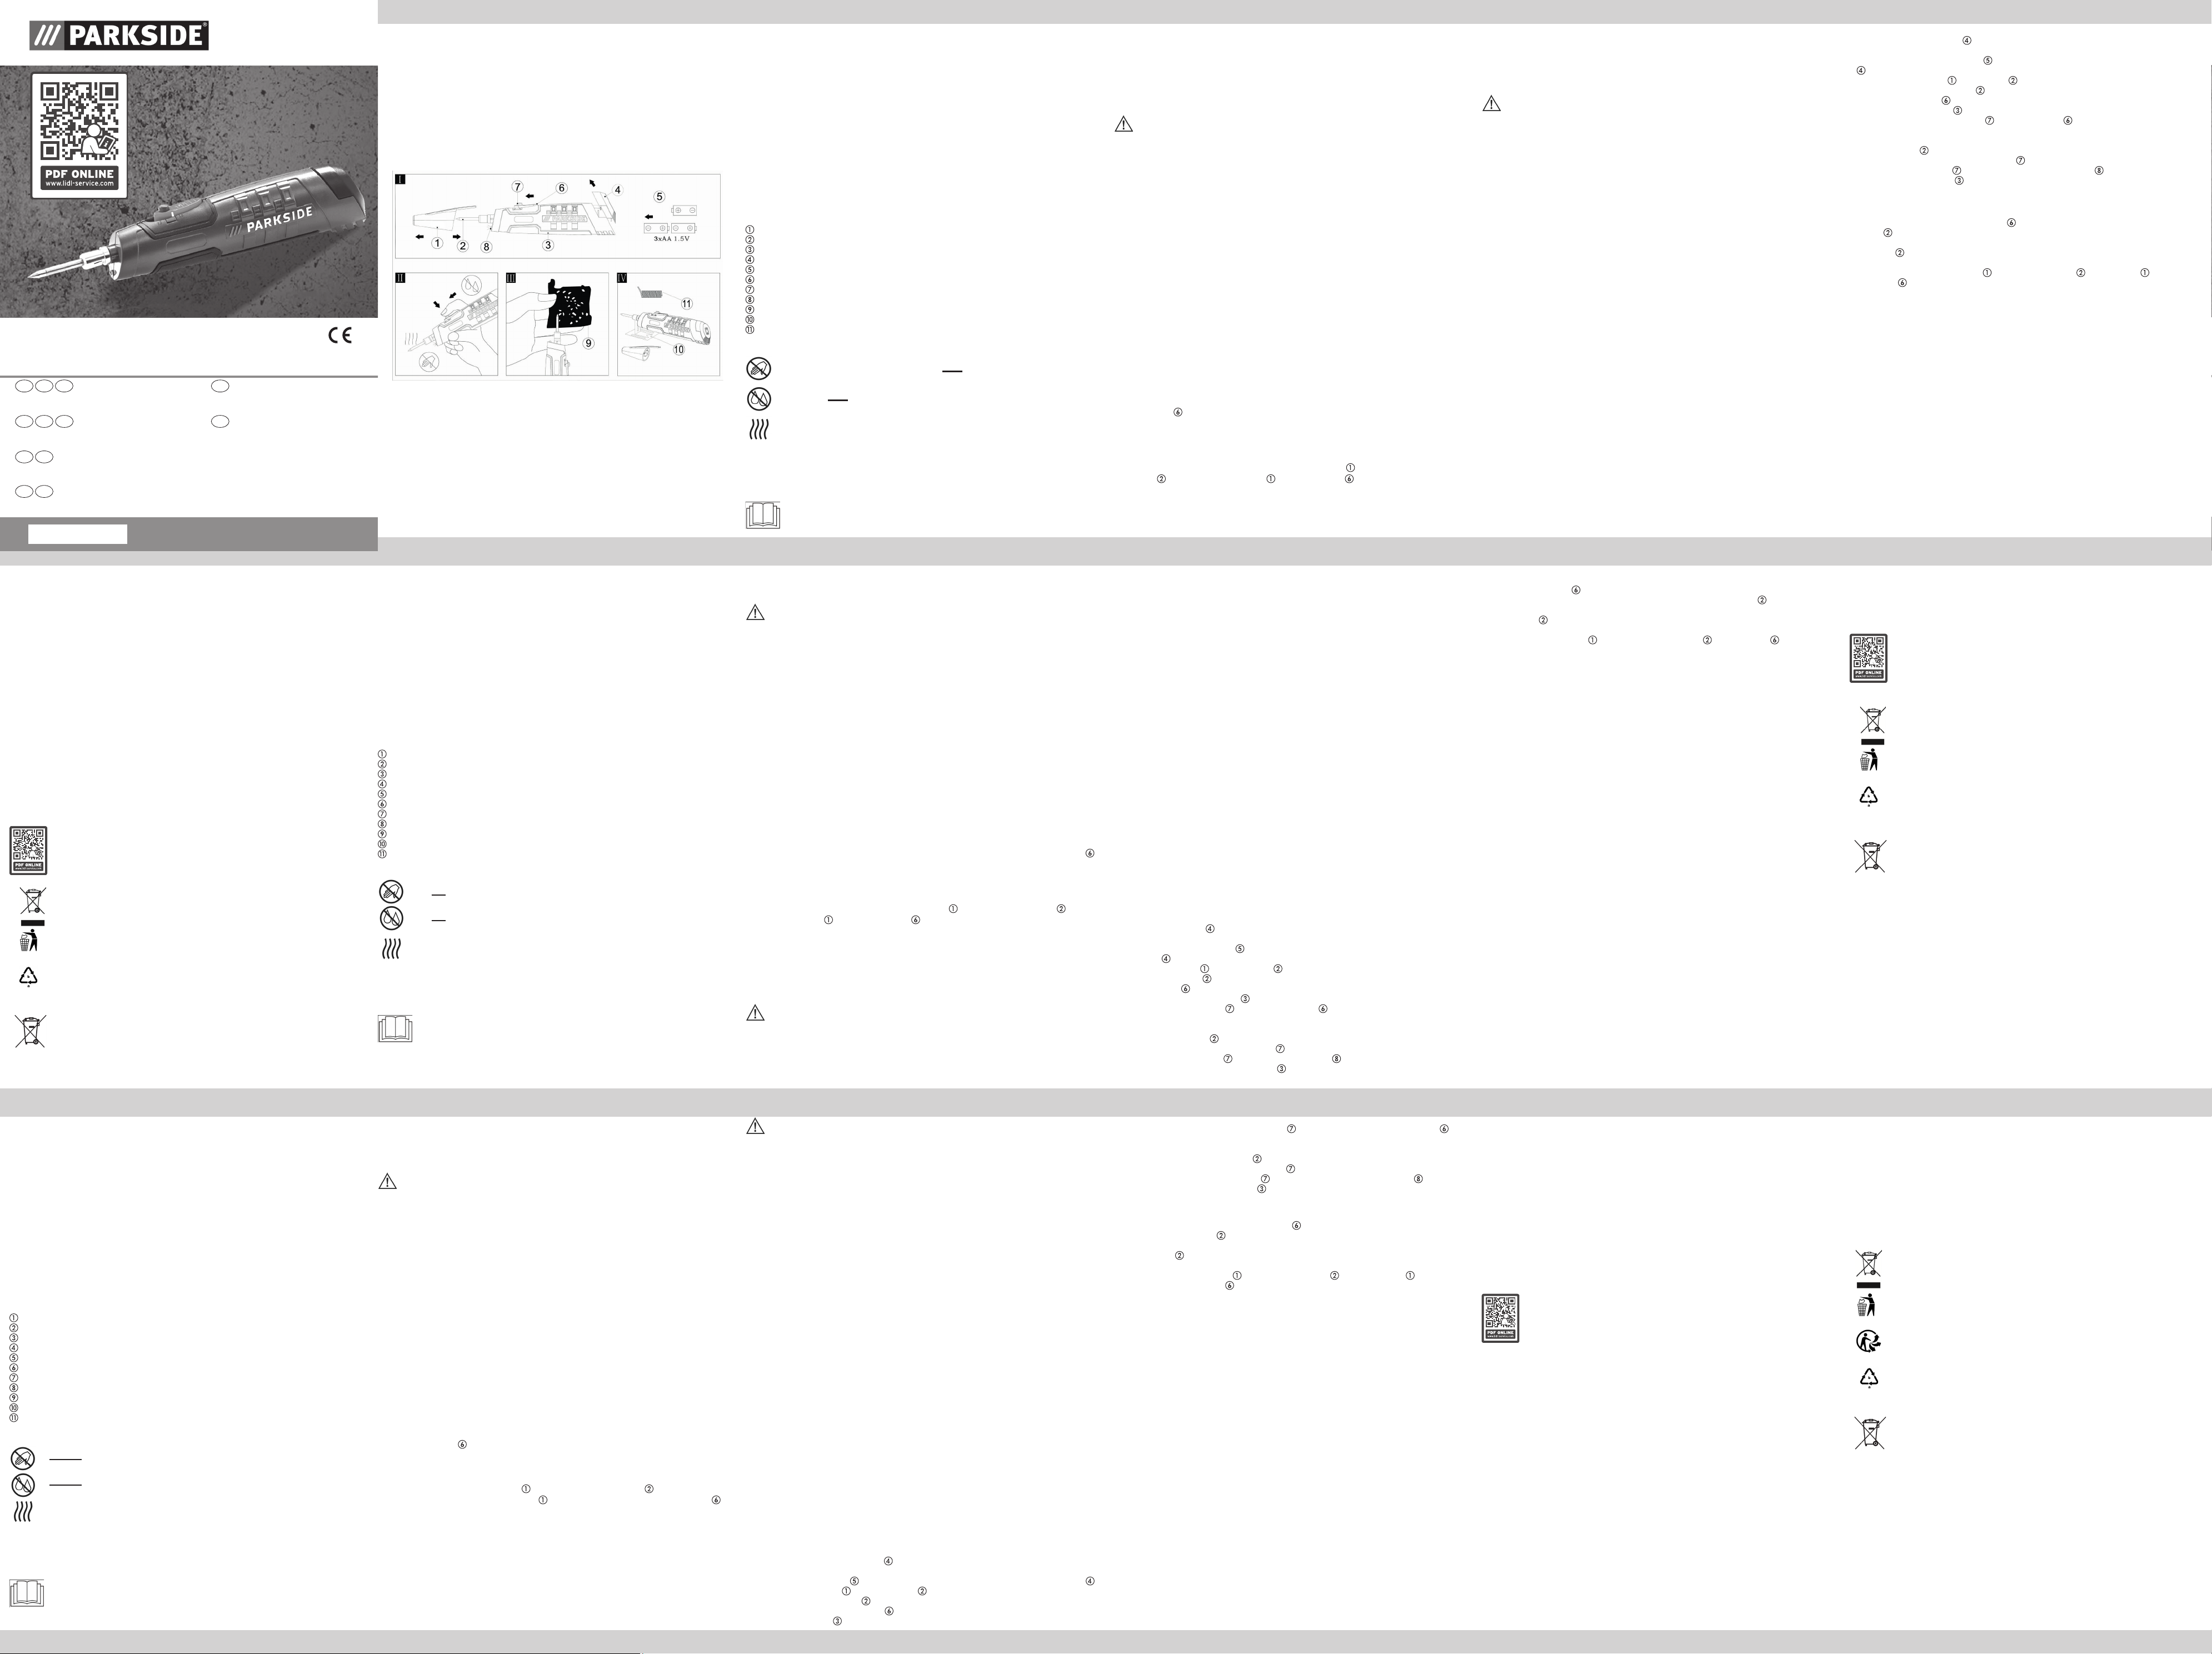
Protective cap
Soldering tip (tool tip)
Battery-powered soldering iron
Battery cover
Batteries (3 x 1.5V type AA)
I/O switch
Contact button
Function control lamp
Cleaning abrasive mat - is not included in the scope of delivery!
Stand
Solder, ø 1.0 mm, 10 g
Explanation of symbols
Do not touch the tip of the tool when the appliance is on!
The soldering tip is extremely hot! Risk of burns!
Do not emerge the appliance into water and do not expose it to moisture.
Moisture can damage the appliance!
The temperature on tool tip is very high during operation! Risk of burns!
Technical data
Output: 6 W
Power requirement: 4.5 V (3 batteries á 1.5V, type AA)
Max. working temperature: approx. 450 °C
Important information: Please read these instructions for use carefully and get to know the appliance first. Keep the
leaflet for further reference. Assembly and settings which were performed by the manufacturer should not be changed.
It is dangerous to change the structure of the appliance on your own authority, to remove parts or to use parts, which are
not approved by the manufacturer. (If you change the structure of the appliance on your own authority, you would risk
yourself to get burns, etc.)
This appliance is intended for use only in private households. Never use the appliance for commercial purposes.
Safety Instructions
• ATTENTION! When not in use, this appliance must be put down as shown in Illustr. IV.
• When the battery-powered soldering iron is in use or when it cools down, it must be
always put down on a firm, flat and heat resistant surface (see Illustr. IV).
•
This appliance may only be used by children with the age of 8 years or
more as well as by persons with reduced physical, sensory or mental
capabilities or lack of experience and knowledge, if they are supervised
or were instructed regarding the safe use of the appliance and
understand the risks resulting hereof. Children must not play with the
appliance. Cleaning and user experience must not be performed by
children without supervision.
• In order to avoid hazards, the appliance must be repaired by the manufacturer or his
customer service or a similarly qualified person.
• Fire can be caused if the appliance is not thoroughly handled.
• Before using the appliance, remove all ignitable objects, liquids and gases from the
working area of the appliance. Keep the working area clean in order to prevent accidents.
• Before use, check that the tool tip is correctly attached to the appliance. The hot tool tip
must not be brought into contact with skin, hair, etc. Risk of burns.
• Do not leave the appliance unattended while it is operating. Do not emerge the appliance
into water.
• After use always switch off the battery-powered soldering iron by sliding the I/O switch
to the position “O”.
• After use put the appliance down according to the Illustr. IV and let it cool down. Only
after that you can store it away.
• When the appliance is not in use, store it in a safe place protected from dust and moisture.
• When storing the appliance, put the protective cap
onto the cooled down tip , so that
the protective cap
shifts the I/O switch to the position “O”.
• Check the appliance for damage. Do not use if damaged!
• During use, ensure adequate ventilation. Make sure that you do not inhale any toxic
vapours or gases. Wear protective clothing (e.g. long sleeved clothing).
• Please remove the batteries from the battery-powered soldering iron, if it is not going to
be used for a longer period of time (the batteries can leak after some time and the
battery-powered soldering iron will be damaged).
• Observe national and international safety, health and work protection regulations.
Safety notes for batteries
• Keep the product away from heat sources and direct solar radiation, the batteries can
explode due to overheating. There is a risk of injury.
• Observe if the polarity when inserting the batteries.
• RISK OF EXPLOSION! Batteries must not be loaded or reactivated with other means,
disassembled, thrown into the fire or short-circuited.
• Always remove used batteries immediately from the appliance, since they can leak and
therefore cause damages.
•
Do not expose the batteries to any extreme conditions, do not put them on radiators and
do not expose them to direct solar radiation. Otherwise there is an increased risk of leakage.
• If battery acid has leaked, avoid contact with the skin, eyes and mucous membranes. In
case of contact, rinse the affected area immediately with abundant of clear water and
immediately consult a doctor.
• Do not keep batteries in the vicinity of children. Batteries can be life-threatening if
swallowed, therefore this item and the corresponding batteries need to be stored
inaccessible for infants.
• Only use batteries of the type AA of the same manufacturer.
• Insert the batteries according to their polarity into the provided battery compartment.
• Do not use a combination of used and new batteries.
• Store your batteries dry and cool, not humid.
• Disposable batteries will lose part of their energy when they are stored.
• Remove the batteries when the appliance is not stored.
• Store the disposable batteries separately from discharged batteries, in order to avoid
mistakes.
Important information before start up
• Before putting the appliance into operation read the operating instructions!
•
In order to achieve best working results use alkaline batteries. To use the battery-powered soldering iron, you will need
3 batteries à 1.5 V (type AA).
• Replace the batteries only in a dry working environment. Moisture has a negative influence on the durability of the
batteries.
NOTE
• A prerequisite for perfect soldering is the use of a suitable soldering tin. In addition, perfect solder joints can only be
achieved if the correct soldering temperature is achieved. If the soldering temperature is too low, the solder does not
flow sufficiently and causes dirty solder joints (so-called cold solder joints). Soldering temperatures that are too high
may cause the soldering agent to burn and the solder not to flow. This can also destroy the materials being soldered.
• Before starting up for the first time and also when using a new soldering tip, the soldering tip must first be tinned.
Start up
• Slide open the battery cover (see Illustr. I).
• Remove the protective strip between the batteries
• Insert the 3 batteries à 1,5V (type AA) , according to the polarity as illustrated, and put on the cover of the battery
compartment .
• Remove the protective cap from the soldering tip .
• Make sure the soldering tip is firmly fitted.
• Slide the I/O switch to the position “I”.
• Hold the battery-powered soldering iron like a pen (see Illustr. II).
• Press now the round contact button on the top of the I/O switch and hold it pressed continuously for
approximately 30 seconds (the current flows when the “I/O switch” is in the position “I” and the contact button is
pressed at the same time - see Illustr. /Fig./Pic. II).
• After this time the soldering tip has reached the working temperature and you can start working.
• In order to save power, only press the contact button when you are actually soldering.
• When you hold the contact button pressed the function control lamp is on.
• Always place the hot battery-powered soldering iron on a stable, level and heat-resistant surface when it is not
being used (see Fig. IV).
Shut down
• After use put the I/O switch into the position “O”.
• Put the battery-powered soldering iron down according to Illustr. IV and let the soldering tip cool down.
• To cool down always put the battery-powered soldering iron onto a firm, flat and heat resistant surface.
• The soldering tip cools down from the maximum temperature of 450°C to about 22° within approximately 10
minutes. (The ambient temperature also has an important influence on the cooling down time.)
• Afterwards put the protective cap onto the cooled down soldering tip . The protective cap slides the I/O
switch to the position “O”.
Repairs, maintenance and cleaning
• If it takes longer than 40 seconds to reach the working temperature, replace the batteries.
• The soldering tip is temporary iron-plated. Therefore please do not file the tip.
• Clean the device and the soldering tip with a dry cloth only after they have cooled-down (see Fig. III).
• In case of repair, please contact the manufacturer under the address stated below.
Warranty of CFH Löt- und Gasgeräte GmbH
Dear Customer,
This device has a warranty that runs for 3 years from the date of purchase. In the event of defects in this product, you
have legal rights against the seller of the product. These legal rights are not limited by the warranty below.
Terms of the warranty
The warranty period starts from the date of purchase. Please keep the original receipt in good condition. This document
is needed as proof of purchase.
If a material or manufacturing defect occurs within 3 years of the date this product was purchased, then the product will
be repaired or replaced free of charge by us, at our discretion. This warranty requires that the defective device, proof of
purchase (receipt) and a short written description of the defect, including when it occurred; are submitted to us within the
3-year period.
You will receive the repaired device or a new product if the defect is covered by our warranty. Repair or replacement of
the product will not constitute the start of a new warranty period.
Warranty claims and legal claims for defects
The warranty issues do not cause the warranty period to be extended. This also applies to replaced and repaired
parts. Any damage and defects existing at the time of purchase must be reported immediately after unpacking. Repairs
incurred outside the warranty period are chargeable.
Coverage of warranty
The device has been carefully produced according to strict quality guidelines and was thoroughly tested before delivery.
The warranty applies to material or manufacturing defects. This warranty does not cover product parts that are subject
to normal wear and tear and therefore may be considered wear parts or damage to fragile parts, such as switches,
batteries, baking tins or parts made of glass.
This warranty is void if the product is damaged, used incorrectly, or has been serviced. For proper use of the product,
all of the instructions outlined in this instruction manual must be followed. Uses and actions advised against or warned
against in the operating instructions must be avoided.
The product is only to be used for personal use, not for commercial use. Misuse and improper handling, the use of force
or interventions not carried out by our authorised service branch will invalidate the warranty.
Processing of warranty claims
Please follow the instructions below to ensure that your request is dealt with quickly:
• Please have the receipt and the article number (e.g. IAN 12345) ready as proof of purchase for all inquiries.
• The article number can be found engraved on the type plate, on the title page of the operating instructions (bottom
left) or as a sticker on the back or bottom of the device.
• If malfunctions or any other defects occur, first contact the service department identified below by phone or e-mail.
• A product recorded as defective can then be sent free of charge to the service address provided with the proof of
purchase (receipt) and the details of the defect and when it occurred.
You can download these and other manuals, product videos and software at www.lidl-service.com. With
this QR code, you can go directly to the Lidl service page (www.lidl-service.com) and open the operating
instructions by entering the article number (IAN) 321202.
Disposal of the electrical appliance
The crossed through dustbin on this product indicates that at the end of its service life the appliance has to
be disposed of separately and not together with household waste. Please bring the battery-powered
soldering iron to the established municipal collecting points in your local community.
Disposal information and the location of the nearest recycling centre can be obtained from your city
cleaning department or found in the yellow pages.
Dispose of the packing in an environmentally friendly way. Take note of the labelling on the different
packaging materials that were used and separate them into individual types whenever necessary. The
packaging materials are marked with abbreviations (a) and numerals (b) that have the following
meanings: 1–7: plastics, 20–22: paper and cardboard, 80–98: composites
Disposal of the batteries
Batteries must not be disposed of in the household waste. Used batteries must be properly disposed of. For
this purpose, corresponding containers for the disposal of batteries are available in the shops which sell
batteries as well as in the municipal container parks. Batteries and accumulators, which are provided with
the following letters, include among others the harmful substances: Cd (cadmium), Hg (mercury), Pb
(lead).
For disposal information and location of the nearest recycling park please contact Office for Municipal Sanitation or see
Yellow Pages.
Technical and optical parameters are subject to change.
Batterielötkolben PBLK 6 B2 /
Battery-powered soldering iron PBLK 6 B2 /
Fer à souder à piles PBLK 6 B2
Herzlichen Glückwunsch zum Kauf Ihres neuen Gerätes.
Sie haben sich damit für ein hochwertiges Produkt entschieden. Die Bedienungsanleitung ist
Bestandteil dieses Produkts. Sie enthält wichtige Hinweise für Sicherheit, Gebrauch und
Entsorgung. Machen Sie sich vor der Benutzung des Produkts mit allen Bedien- und
Sicherheitshinweisen vertraut. Benutzen Sie das Produkt nur wie beschrieben und für die
angegebenen Einsatzbereiche. Händigen Sie alle Unterlagen bei Weitergabe des Produkts an Dritte mit aus.
Bestimmungsgemäßer Gebrauch
Der Batterielötkolben ist ein mobiles und vielseitig einsetzbares Gerät. Er dient als Gerät für Feinlötarbeiten im Elektronik-,
Modellbau- und Hobbybereich. Eine abweichende Verwendung ist nicht zulässig und kann zu Verletzungen führen. In
diesen Fällen besteht keine Haftung des Herstellers.
Der Batterielötkolben wird mit 3 Batterien à 1,5V (Typ AA) betrieben.
Lieferumfang und Zeichenerklärung
Im Lieferumfang enthalten sind ein Batterielötkolben mit Lötspitze und Schutzkappe, sowie 3 Batterien à 1,5V (Typ AA)
und eine Bedienungsanleitung.
Bitte packen Sie die Ware aus und kontrollieren Sie diese auf Vollständigkeit.
Schutzkappe
Lötspitze (Werkzeugspitze)
Batterielötkolben
Batterieverschluss
Batterien (3 x 1,5V Typ AA)
I/O-Schalter
Kontaktknopf
Funktionskontrollleuchte
Reinigungsvlies - nicht im Lieferumfang enthalten!
Ablegeständer
Lötzinn, ø 1,0 mm, 10 g
Erklärung der Symbole
Während des Betriebes Werkzeugspitze nicht anfassen!
Lötspitze ist sehr heiß! Verbrennungsgefahr!
Das Gerät nicht ins Wasser tauchen und keiner Feuchtigkeit aussetzen.
Feuchtigkeit führt zur Beschädigung des Gerätes!
Während des Betriebes entwickelt die Werkzeugspitze sehr
hohe Temperaturen! Verbrennungsgefahr!
Technische Daten
Leistung: 6 W
Anschlusswert: 4,5 V (3 Batterien à 1,5V, Typ AA)
Max. Arbeitstemperatur: ca. 450 °C
Wichtiger Hinweis: Lesen Sie diese Gebrauchsanleitung aufmerksam durch, um sich mit dem Gerät vertraut zu ma-
chen. Bewahren Sie die Anweisung auf, um sie von neuem lesen zu können. Zusammenbau und Einstellungen, die vom
Hersteller vorgenommen wurden, sind nicht zu verändern. Es kann gefährlich sein, eigenmächtig am Gerät bauliche
Änderungen vorzunehmen, Teile zu entfernen oder andere Teile zu verwenden, die für das Gerät nicht vom Hersteller
zugelassen sind (bei eigenmächtig am Gerät vorgenommenen baulichen Änderungen besteht z.B. Verbrennungsge-
fahr).
Dieses Gerät ist ausschließlich für die Benutzung in privaten Haushalten bestimmt. Benutzen Sie das Gerät nicht
gewerblich.
Sicherheitshinweise
• ACHTUNG! Dieses Werkzeug muss, wie in Abb. IV gezeigt, abgelegt werden,
wenn es nicht in Gebrauch ist.
• Während der Arbeit und zum Abkühlen muss der Batterielötkolben immer auf einer
stabilen, ebenen und hitzebeständigen Fläche abgelegt werden. (siehe Abb. IV)
•
Dieses Gerät kann von Kindern ab 8 Jahren und darüber sowie von
Personen mit verringerten physischen, sensorischen oder mentalen
Fähigkeiten oder Mangel an Erfahrung und Wissen benutzt werden,
wenn sie beaufsichtigt oder bezüglich des sicheren Gebrauchs des
Gerätes unterwiesen wurden und die daraus resultierenden Gefahren
verstehen. Kinder dürfen nicht mit dem Gerät spielen. Reinigung und
Benutzerwartung dürfen nicht von Kindern ohne Beaufsichtigung
durchgeführt werden.
• Reparaturen müssen durch den Hersteller oder seinen Kundendienst oder einer
ähnlich qualifizierten Person durchgeführt werden, um Gefährdungen zu vermeiden.
• Ein Brand kann entstehen, wenn mit dem Gerät nicht sorgsam umgegangen wird.
• Entfernen Sie vor der Benutzung brennbare Gegenstände, Flüssigkeiten und Gase
aus dem Arbeitsbereich des Gerätes. Halten Sie Ihren Arbeitsbereich sauber, um
Unfällen vorzubeugen.
• Prüfen Sie vor der Benutzung, ob die Werkzeugspitze ordnungsgemäß am Gerät
angebracht ist. Die heiße Werkzeugspitze darf nicht mit Haut, Haaren etc. in Verbindung
gebracht werden. Verbrennungsgefahr.
•
Das Gerät nicht unbeaufsichtigt lassen, solange es in Betrieb ist. Nicht ins Wasser tauchen.
• Nach dem Gebrauch schalten Sie den Batterielötkolben immer aus, indem Sie den
I/O-Schalter
in die „O“-Position bringen.
• Nach Gebrauch das Gerät gemäß Abb. IV ablegen und abkühlen lassen, bevor
es weggepackt wird.
• Wenn das Gerät nicht benutzt wird, bewahren Sie es an einem sicheren Ort und
vor Staub und Feuchtigkeit geschützt auf.
• Bei der Lagerung des Gerätes setzen Sie die Schutzkappe
auf die abgekühlte
Lötspitze
, so dass die Schutzkappe den I/O-Schalter in die Position
„O“-Position schiebt.
• Das Gerät auf Beschädigungen überprüfen. Bei Beschädigungen nicht verwenden!
• Während des Betriebs für ausreichende Belüftung sorgen. Achten Sie darauf, dass
keine giftigen Dämpfe oder Gase eingeatmet werden. Schutzkleidung tragen
(z.B.: langarmige Kleidung).
• Falls Sie den Batterielötkolben längere Zeit nicht gebrauchen, nehmen Sie die
Batterien heraus (mit der Zeit können Batterien auslaufen und der Batterielötkolben
wird beschädigt).
• Nationale und internationale Sicherheits-, Gesundheits-, und
Arbeitsschutzvorschriften sind zu beachten.
Sicherheitshinweise Batterien
• Halten Sie das Produkt von Hitzequellen und direkter Sonneneinstrahlung fern, die
Batterien können durch Überhitzung explodieren. Es besteht Verletzungsgefahr.
• Beachten Sie beim Einlegen der Batterien die richtige Polarität.
• EXPLOSIONSGEFAHR! Batterien dürfen nicht geladen oder mit anderen Mitteln reakti-
viert, nicht auseinander genommen, ins Feuer geworfen oder kurzgeschlossen werden.
• Nehmen Sie verbrauchte Batterien immer sofort aus dem Gerät heraus, da diese
auslaufen und somit Schäden verursachen können.
• Setzen Sie Batterien keinen extremen Bedingungen aus, legen Sie sie nicht auf Heizkörpern
ab und setzen Sie sie nicht direkter Sonneneinstrahlung aus. Es besteht ansonsten erhöhte
Auslaufgefahr.
• Wenn Batteriesäure ausgelaufen ist, vermeiden Sie den Kontakt mit Haut, Augen und
Schleimhäuten. Spülen Sie bei Kontakt mit der Säure die betroffenen Stellen sofort mit
reichlich klarem Wasser und suchen Sie umgehend einen Arzt auf.
• Batterien sollten nicht in der Nähe von Kindern aufbewahrt werden. Batterien können
beim Verschlucken lebensgefährlich sein, daher muss dieser Artikel und die
dazugehörigen Batterien für Kleinkinder unzugänglich aufbewahrt werden.
• Verwenden Sie nur Batterien des Typs AA gleicher Hersteller.
• Setzen Sie Batterien Ihrer Polarität entsprechend in das dafür vorgesehene Batteriefach ein.
• Verwenden Sie keine Kombinationen aus alten und neuen Batterien.
• Lagern Sie Ihre Batterien trocken und kühl, nicht feucht.
• Einwegbatterien verlieren auch bei der Lagerung einen Teil ihrer Energie.
• Entnehmen Sie bei Nichtbenutzung des Gerätes die Batterien.
• Lagern Sie Einwegbatterien getrennt von entladenen Batterien, um Verwechslungen zu
vermeiden.
Wichtige Hinweise vor Inbetriebnahme
• Vor Inbetriebnahme Sicherheitshinweise lesen!
• Das beste Arbeitsergebnis erzielen Sie mit alkalischen Batterien. Für die Inbetriebnahme des
Batterielötkolbens benötigen Sie 3 Batterien à 1,5V (Typ AA).
• Wechseln Sie die Batterien nur in trockener Umgebung. Feuchtigkeit wirkt sich negativ auf die Lebensdauer der
Batterien aus.
HINWEIS
• Voraussetzung für einwandfreie Lötungen ist die Verwendung eines geeigneten Lötzinns. Zudem können perfekte Lötstellen
nur dann erreicht werden, wenn die richtige Löttemperatur erreicht wird. Bei zu niedriger Löttemperatur fließt das Lötzinn
nicht genügend und verursacht unsaubere Lötstellen (sog. kalte Lötstellen). Durch zu hohe Löttemperaturen verbrennt das
Lötmittel und das Lötzinn fließt nicht. Darüber hinaus können die zu bearbeitenden Materialien zerstört werden.
• V
or der ersten Inbetriebnahme und auch bei Verwendung jeder neuen Lötspitze muss die Lötspitze zunächst verzinnt werden.
Inbetriebnahme
• Nehmen Sie den Batterieverschluss ab (siehe Abb. I).
• Entfernen Sie den Schutzstreifen zwischen den Batterien.
• Legen Sie die 3 Batterien à 1,5V (Typ AA) , polrichtig wie abgebildet, hinein und setzen Sie den Batterieverschluss
wieder auf.
• Nehmen Sie die Schutzkappe von der Lötspitze ab.
• Vergewissern Sie sich, dass die Lötspitze fest angebracht ist.
• Stellen Sie den I/O-Schalter in die „I“-Position.
• Halten Sie den Batterielötkolben wie einen Stift (siehe Abb. II).
• Drücken Sie nun den runden Kontaktknopf oben am I/O-Schalter ununterbrochen für ca. 30 Sekunden. Der
Strom fließt, wenn sich der „I/O-Schalter“ in der „I“-Position befindet und gleichzeitig der Kontaktknopf gedrückt wird
siehe Abb. II.
• Jetzt hat die Lötspitze die Arbeitstemperatur erreicht und Sie können mit der Arbeit beginnen.
• Um Energie zu sparen, drücken Sie den Kontaktknopf nur dann, wenn Sie wirklich löten.
• Während Sie den Kontaktknopf drücken, leuchtet die Funktionskontrollleuchte .
• Wird der heiße Batterielötkolben nicht gebraucht, immer auf einer stabilen, ebenen und hitzebeständigen Fläche
ablegen (siehe Abb. IV).
Außerbetriebnahme
• Nach dem Gebrauch stellen Sie den I/O-Schalter in die „O“-Position.
• Lötspitze abkühlen lassen, indem Sie den Batterielötkolben gemäß Abb. IV ablegen.
• Zum Abkühlen den Batterielötkolben immer auf eine stabile, ebene und hitzebeständige Fläche ablegen.
• Die Lötspitze kühlt in ca. 10 Minuten von der maximalen Arbeitstemperatur von 450°C auf ca. 22°C ab. Die
Umgebungstemperatur spielt bei dem Abkühlvorgang ebenfalls eine wichtige Rolle.
• Setzen Sie abschließend die Schutzkappe auf die abgekühlte Lötspitze . Die Schutzkappe schiebt den
I/O-Schalter in die „O“-Position.
Wartung, Instandhaltung und Reinigung
• Falls es länger als 40 Sekunden dauert, bis die Arbeitstemperatur erreicht wird, tauschen Sie die Batterien aus.
• Die Lötspitze ist dauerhaft mit Eisen überzogen, deswegen feilen Sie die Spitze nicht.
• Reinigen Sie das Gerät und die Lötspitze ausschließlich in abgekühltem Zustand (siehe Abb. III) mit einem trockenen
Tuch.
• Im Reparaturfall Hersteller kontaktieren unter der unten angegebenen Serviceadresse.
Garantie der CFH Löt- und Gasgeräte GmbH
Sehr geehrte Kundin, sehr geehrter Kunde,
Sie erhalten auf dieses Gerät 3 Jahre Garantie ab Kaufdatum. Im Falle von Mängeln dieses Produkts stehen Ihnen
gegen den Verkäufer des Produkts gesetzliche Rechte zu. Diese gesetzlichen Rechte werden durch unsere im Folgenden
dargestellte Garantie nicht eingeschränkt.
Garantiebedingungen
Die Garantiefrist beginnt mit dem Kaufdatum. Bitte bewahren Sie den Original-Kassenbon gut auf. Diese Unterlage wird
als Nachweis für den Kauf benötigt.
Tritt innerhalb von drei Jahren ab dem Kaufdatum dieses Produkts ein Material- oder Fabrikationsfehler auf, wird das
Produkt von uns – nach unserer Wahl – für Sie kostenlos repariert oder ersetzt. Diese Garantieleistung setzt voraus,
dass innerhalb der Drei-Jahres- Frist das defekte Gerät und der Kaufbeleg (Kassenbon) vorgelegt und schriftlich kurz
beschrieben wird, worin der Mangel besteht und wann er aufgetreten ist.
Wenn der Defekt von unserer Garantie gedeckt ist, erhalten Sie das reparierte oder ein neues Produkt zurück. Mit
Reparatur oder Austausch des Produkts beginnt kein neuer Garantiezeitraum.
Félicitations pour l’achat de votre nouvel appareil.
Vous avez fait le choix d’acheter un produit de haute qualité. Ce mode d’emploi fait partie intégrante de ce produit. Il
contient des informations importantes concernant la sécurité, l’utilisation et la mise au rebut. Veillez à vous familiariser
avec l‘ensemble des instructions d’utilisation et de sécurité avant d’utiliser ce produit. Ce produit ne doit être utilisé que
comme décrit ici et uniquement pour les applications spécifiées. Si vous confiez ces produits à des tiers, remettez-leur
l‘ensemble des documents qui vont avec.
Utilisation conforme
Le fer à souder à piles est un appareil mobile et polyvalent. Il sert pour les travaux de soudure fins dans le domaine de
l’électronique, du modélisme et le hobby. Toute autre utilisation n’est pas permise et peut provoquer des blessures. Dans
ce cas, le fabricant décline toute responsabilité.
Le fer à souder fonctionne avec 3 piles de 1,5 V (type AA).
Volume de livraison et légende
Le volume de livraison comprend un fer à souder à piles avec panne en cuivre et capot de protection ainsi que 3 piles
de 1,5 V (type AA) et un mode d’emploi.
Veuillez déballer la marchandise et contrôler si elle est complète.
Capot de protection
Panne en cuivre (pointe de l’outil)
Fer à souder à piles
Fermeture du compartiment des piles
Piles (3 × 1,5 V type AA)
Interrupteur I/O
Bouton-poussoir
Voyant de contrôle de fonctionnement
Intissé de nettoyage - non compris dans le volume de livraison!
Support
Soudure, ø 1,0 mm, 10 g
Explication des symboles
Ne pas toucher la pointe de l’outil lors de l’utilisation!
Panne en cuivre très chaude! Risque de brûlure!
Ne pas immerger l’appareil dans un liquide ni l’exposer à l’humidité.
L’humidité provoque des dommages à l’appareil!
En cours d’utilisation, la pointe de l’outil monte à très haute température!
Risque de brûlure!
Données techniques
Puissance: 6 W
Valeur de connexion: 4,5 V (3 piles de 1,5 V, type AA)
Température de travail maxi: env. 450 °C
Note importante: Veuillez lire attentivement le mode d’emploi pour vous familiariser avec l’appareil. Veuillez le conser-
ver pour le consulter en cas de besoin. Il ne faut pas modifier l’assemblage et les réglages effectués par le fabricant.
Il peut être dangereux d’apporter soi-même une modification à la construction, d’enlever des pièces ou d’utiliser des
pièces qui ne sont pas agréées pour l’appareil par le fournisseur (En cas de modifications personnelles sur l’appareil, il y
a p.ex. des risques de brûlure).
Cet appareil n‘est prévu que pour une utilisation domestique privée. Ne pas utiliser l‘appareil professionnellement.
Avis de sécurité
• ATTENTION! Il faut poser cet outil comme montré sur l’illustr. IV quand il n’est pas utilisé.
• Au cours du travail et pour le laisser refroidir, il faut toujours poser le fer à souder à piles sur
une surface stable, plane et résistant à la chaleur. (voir l’illustr. IV)
•
Cet appareil peut être utilisé par des enfants à partir de 8 ans, des
personnes à capacités physiques, sensorielles ou mentales réduites ou
manquant d‘expérience et de connaissances s‘ils sont sous surveillance
ou ont été instruites sur l‘utilisation en toute sécurité de
l‘appareil et aptes à comprendre les risques qui en résultent. Ne laissez
pas les enfants jouer avec l‘appareil. Nettoyage et entretien de base ne
doivent pas être effectués sans surveillance par des enfants.
• Pour éviter tout risque, il faut faire exécuter les réparations par le fabricant ou son service
après-vente ou une personne qualifiée.
• Si l’appareil n’est pas utilisé soigneusement, il y a un risque d’incendie.
• Enlever les objets, liquides ou gaz combustibles de l’environnement de l’appareil avant de
l’utiliser. Maintenir l’environnement propre pour éviter des accidents.
• Avant d’utiliser l’appareil, contrôler si la pointe de l’outil est correctement fixée sur
l’appareil. Il ne faut pas que la pointe brûlante de l’outil soit en contact avec la peau, les
cheveux, etc. Risque de brûlure.
• Il ne faut pas laisser l’appareil sans surveillance en cours d’utilisation. Ne pas le plonger
dans l’eau.
• Après l’utilisation, toujours éteindre le fer à souder à piles en mettant l’interrupteur I/O
(allumer/éteindre)
sur la position «O» (éteint).
• Après l’utilisation, poser l’appareil selon l’illustr. IV et le laisser refroidir avant de le stocker.
• Stocker l’appareil dans un endroit sûr, à l‘abri de la poussière et de l’humidité quand il n’est
pas utilisé.
•
Veuillez mettre le capot de protection sur la panne en cuivre refroidie lors du stockage de
l’appareil pour que le capot de protection
pousse l’interrupteur I/O (allumer / éteindre)
sur la position «O» (éteint).
• Contrôler si l’appareil n’est pas endommagé. Ne pas l’utiliser en cas d’endommagement!
•
Il faut assurer une aération suffisante lors de l’utilisation. Ne pas respirer de vapeurs ou de
gaz toxiques. Porter des vêtements de protection (p.ex.: des vêtements à manches longues).
• Enlever les piles si vous n’utilisez pas le fer à souder à piles pendant une longue durée
(avec le temps, il peut arriver que les piles coulent et par conséquence le fer à souder à
piles serait endommagé).
• Il faut respecter les prescriptions nationales et internationales de sécurité, de santé et de
protection du travail.
Consignes de sécurité pour les piles
• Éloigner le produit des sources de chaleur et de rayonnement solaire, les piles peuvent
exploser à cause de la surchauffe. Il y a un risque de blessures.
• Assurez-vous de la bonne polarité en insérant les piles.
• RISQUE D’EXPLOSION! Il ne faut ni recharger les piles ni les réactiver avec d’autres
moyens, ne pas les démonter, les jeter au feu ou les court-circuiter.
• Toujours enlever les piles usées immédiatement de l’appareil, car elles coulent et peuvent
ainsi causer des dommages.
• Ne pas exposer les piles à des conditions extrêmes, ne pas les poser sur des radiateurs et
ne pas les exposer au rayonnement direct du soleil. Autrement, il y a un risque
accru qu’elle coulent.
• Si l’acide coule, éviter le contact avec la peau, les yeux et les muqueuses En cas de contact
avec l’acide, immédiatement rincer les zones affectées abondamment à l‘eau claire et
consulter immédiatement un médecin.
• Ne pas conserver les piles à la portée des enfants. Les piles peuvent être mortelles si elles
sont avalées, c’est pourquoi ce produit et les piles correspondantes doivent être conservés
hors de portée des enfants en bas âge.
• N’utiliser que des piles du type AA du même fabricant.
• Insérer les piles dans le compartement des piles prévu en respectant leur polarité.
• Ne pas combiner les vieilles et nouvelles piles.
• Stocker les piles au sec et au frais, à l‘abri de l‘humidité.
• Les piles jetables perdent une partie de leur énergie lors du stockage.
• Enlever les batteries si vous n‘utilisez pas l’appareil.
• Stocker les piles jetables séparément des piles déchargées pour éviter des confusion.
Notes importantes avant la mise en service
• Lire les consignes de sécurité avant la mise en service!
• Vous obtiendrez les meilleurs résultats en utilisant des piles alcalines. Il faut 3 piles de 1,5 V (type AA) pour la mise en
service du fer à souder à piles.
•
Remplacer les piles seulement dans un environnement sec. L’humidité a des effets négatifs sur la durée de vie des piles.
REMARQUE
• Une condition préalable à une soudure parfaite est l’utilisation d’un moule approprié. De plus, des joints de soudure
parfaits ne peuvent être obtenus que si la température de soudure correcte est atteinte. Si la température de soudure
est trop basse, la soudure ne coule pas bien, ce qui entraîne des joints de soudure sales (ce qu’on appelle des joints
de soudure froide). Des températures de soudure trop élevées peuvent provoquer la combustion de l‘agent de
soudure et empêcher la soudure de couler. Cela peut également endommager les matériaux à souder.
• Avant la première mise en service et également lors de l’utilisation d’une nouvelle pointe à souder, celle-ci doit
d’abord être étamée.
Mise en service
• Ôter la fermeture du compartiment des piles (voir l’illustr. I).
• Enlever la bande de protection entre les piles
•
Placer les 3 piles de 1,5V (type AA) , en respectant la polarité comme sur l’illustration et refermer le compartiment des piles .
• Enlever le capot de protection de la panne en cuivre .
• Assurez-vous que la panne en cuivre est correctement fixée.
• Mettre l’interrupteur I/O (allumer / éteindre) sur la position «I» (allumé).
• Tenir le fer à souder à piles comme un crayon (voir l’illustr. II).
• Appuyer maintenant en continu sur le bouton-poussoir rond au-dessus de l’interrupteur I/O (allumer / éteindre) en
continu pendant env. 30 secondes (le courant passe, si l’interrupteur I/O (allumer / éteindre) se trouve sur la position
«I» (allumé) et si on appuie simultanément sur le bouton-poussoir– voir l’illustr. II).
• Maintenant la panne en cuivre de fer à souder a atteint la température de travail et vous pouvez commencer le travail.
• Pour épargner de l’énergie, appuyer sur le bouton-poussoir seulement si vous soudez réellement.
• Pendant que vous appuyez sur le bouton-poussoir le voyant de contrôle de fonctionnement est allumé .
• Placez toujours le fer à souder à batterie chaude sur une surface stable, plane et résistante à la chaleur lorsque vous
ne l’utilisez pas (voir fig. IV).
Mise hors service
• Après l’utilisation mettre l’interrupteur I/O (allumer / éteindre) sur la position «O» (éteint).
• Laisser refroidir la panne en cuivre en déposant le fer à souder comme sur l’illustr. IV.
• Toujours poser le fer à souder à piles sur une surface stable, plane et résistant à la chaleur pour le laisser refroidir.
• La panne en cuivre met env. 10 minutes pour passer de la température de travail maxi de 450°C à env. 22°C. (La
température ambiante joue également un rôle important lors du processus de refroidissement.)
• Finalement poser le capot de protection sur la panne en cuivre refroidie . Le capot de protection pousse
l’interrupteur I/O (allumer / éteindre) sur la position « O ».
Maintenance, entretien et nettoyage
• Remplacer les piles s’il faut plus de 40 secondes pour atteindre la température de travail.
• La panne en cuivre est revêtue d’acier, ne pas limer la pointe.
• Nettoyer l’appareil et la panne en cuivre du fer à souder seulement quand elle a refroidi (voir l’illustr. III) et avec un
tissu sec ou un intissé de nettoyage (p.ex. CFH N° 52349). L’intissé de nettoyage est disponible dans beaucoup de
magasins de bricolage.
• En cas de réparation, contacter le constructeur via le service après-vente du vendeur.
Garantie de CFH Löt- und Gasgeräte GmbH
Cher client,
Cet appareil est couvert par une garantie de 3 ans à compter de la date d’achat. Dans le cas d’un défaut de ce pro-
duit, vous disposez de droits légaux contre le vendeur du produit. Ces droits légaux ne sont pas limités par la garantie
ci-dessous.
Termes de la garantie
La période de garantie commence à la date d’achat. Veuillez conserver le reçu de caisse original en bon état. Ce
document est nécessaire comme preuve d’achat.
Si un défaut matériel ou de fabrication se produit dans les 3 ans suivant la date d’achat de ce produit, le produit sera
réparé ou remplacé gratuitement par nous, à notre discrétion. Cette garantie nécessite que l’appareil défectueux,
accompagné de la preuve d’achat (reçu) et d’une courte description écrite du défaut avec mention de la date du
problème nous soit envoyé au cours de la période des 3 ans.
Vous recevrez l’appareil réparé ou un nouvel appareil dans le cas où le problème est couvert par notre garantie. La
réparation ou le remplacement de l‘appareil ne constituera pas le début d‘une nouvelle période de garantie.
Réclamations de garantie et réclamations légales pour défauts
La garantie n’implique pas l’extension de la durée de la garantie. Ceci s’applique également aux pièces remplacées et
réparées. Tous les dommages et défauts existants au moment de l’achat doivent être signalés immédiatement après le
déballage de l’appareil. Les réparations effectuées en dehors de la période de garantie sont facturables.
Couverture de garantie
L’appareil a été soigneusement conçu selon les directives strictes de qualité et a été entièrement testé avant expédition.
La garantie s’applique aux vices de fabrication ou de matériaux. Cette garantie ne couvre pas les pièces soumises
à l’usure normale et qui par conséquent peuvent être considérées comme des pièces d’usure ou les dommages des
pièces fragiles, tels que les commutateurs, batteries, moules ou pièces en verre.
Cette garantie est nulle si le produit est endommagé, utilisé de manière incorrecte, ou a fait l’objet d’un entretien. Pour
une utilisation correcte du produit, toutes les instructions contenues dans ce manuel doivent être observées. Les utilisations
et actions déconseillées dans le mode d‘emploi doivent être évitées.
Le produit peut uniquement être utilisé pour un usage personnel et non commercial. Une utilisation incorrecte ou une
mauvaise manipulation, l’utilisation de la force ou des interventions non effectuées par notre service après-vente agréé
annulent la garantie.
Traitement des réclamations de garantie
Veuillez suivre les instructions ci-dessous pour faire en sorte que votre demande soit traitée rapidement :
• Conservez le reçu et le numéro d’article (par ex. IAN 12345) comme preuve d’achat pour toute demande de
renseignements.
• Le numéro d’article est gravé sur la plaque signalétique, sur la page de titre de vos instructions (en bas à gauche) ou
sous la forme d’un autocollant à l’arrière ou à la base de l’appareil.
• Si des dysfonctionnements ou autres défauts se produisent, contactez d’abord le service après-vente indiqué
ci-dessous par téléphone ou e-mail.
• Un produit enregistré comme défectueux peut ensuite être envoyé gratuitement à l’adresse du service après-vente
accompagné de la preuve d’achat (reçu), des détails du défaut et de la date à laquelle le problème est survenu.
Vous pouvez télécharger ces manuels et bien d’autres, ainsi que des vidéos sur des produits et des logiciels sur
www.lidl-service.com. Avec ce code QR, vous pouvez accéder directement à la page de service Lidl
(www.lidl-service.com) et ouvrir votre mode d’emploi en saisissant le numéro d‘article (IAN) 321202.
Article L217-16 du Code de la consommation
Lorsque l‘acheteur demande au vendeur, pendant le cours de la garantie commerciale qui lui a été consentie lors de
l‘acquisition ou de la réparation d‘un bien meuble, une remise en état couverte par la garantie, toute période d‘immobi-
lisation d‘au moins sept jours vient s‘ajouter à la durée de la garantie qui restait à courir. Cette période court à compter
de la demande d‘intervention de l‘acheteur ou de la mise à disposition pour réparation du bien en cause, si cette mise à
disposition est postérieure à la demande d‘intervention.
Indépendamment de la garantie commerciale souscrite, le vendeur reste tenu des défauts de conformité du bien et des
vices rédhibitoires dans les conditions prévues aux articles L217-4 à L217-13 du Code de la consommation et aux
articles 1641 à
1648 et 2232 du Code Civil.
Article L217-4 du Code de la consommation
Le vendeur livre un bien conforme au contrat et répond des défauts de conformité existant lors de la délivrance.
Il répond également des défauts de conformité résultant de l‘emballage, des instructions de montage ou de l‘installation
lorsque celle-ci a été mise à sa charge par le contrat ou a été réalisée sous sa responsabilité.
Article L217-5 du Code de la consommation
Le bien est conforme au contrat :
1° S´il est propre à l‘usage habituellement attendu d‘un bien semblable et, le cas échéant :
- s‘il correspond à la description donnée par le vendeur et posséder les qualités que celui-ci a présentées à l‘acheteur
sous forme d‘échantillon ou de modèle ;
- s‘il présente les qualités qu‘un acheteur peut légitimement attendre eu égard aux déclarations publiques faites par le
vendeur, par le producteur ou par son représentant, notamment dans la publicité ou l‘étiquetage ;
2° Ou s‘il présente les caractéristiques définies d‘un commun accord par les parties ou être propre à tout usage spécial
recherché par l‘acheteur, porté à la connaissance du vendeur et que ce dernier a accepté.
Article L217-12 du Code de la consommation
L‘action résultant du défaut de conformité se prescrit par deux ans à compter de la délivrance du bien.
Article 1641 du Code civil
Le vendeur est tenu de la garantie à raison des défauts cachés de la chose vendue qui la rendent impropre à l‘usage
auquel on la destine, ou qui diminuent tellement cet usage que l‘acheteur ne l‘aurait pas acquise, ou n‘en aurait donné
qu‘un moindre prix, s‘il les avait connus.
Article 1648 1er alinéa du Code civil
L‘action résultant des vices rédhibitoires doit être intentée par l‘acquéreur dans un délai de deux ans à compter de la
découverte du vice.
Les pièces détachées indispensables à l’utilisation du produit sont disponibles pendant la durée de la garantie du
produit.
Élimination de l’appareil électrique
La poubelle barrée sur ce produit vous indique qu‘il ne faut pas évacuer l‘appareil inutilisable avec les
ordures ménagères. Veuillez rapporter le fer à souder à piles au centre de collecte de votre municipalité.
Les informations sur la mise au rebut et l’emplacement du centre de recyclage le plus proche peuvent être
obtenus auprès du service de nettoyage de votre municipalité ou encore trouvés dans les pages jaunes.
Le produit est recyclable, est soumis à une responsabilité élargie des producteurs et est collecté séparément.
Jetez l‘emballage dans le respect de l‘environnement. Tenez compte des marquages sur les différents
matériaux d’emballage qui ont été utilisés triez-les par catégories chaque fois que cela est nécessaire. Les
matériaux d’emballage sont signalés par des abréviations (a) et nombres (b) qui ont les significations
suivantes : 1–7 : plastiques, 20–22 : papier et carton, 80–98 : composites
Élimination des piles
Ne pas jeter les piles dans les ordures ménagères. Il faut éliminer correctement les piles usées. À cet effet, il
y a des conteneurs spécifiques dans les commerces vendant des piles ainsi qu’aux points de récupération
communaux.pour l’élimination des piles. Les piles et accumulateurs qui sont pourvus des lettres suivantes,
comprennent entre autres les polluants suivants: Cd (cadmium), Hg (mercure), Pb (plomb).
Vous trouverez des informations concernant l‘évacuation et la situation du centre de recyclage le plus proche p.ex.
auprès de la voierie municipale ou dans les Pages Jaunes.
Sous réserve de modifications techniques et du design.
IAN 321202
Batterielötkolben PBLK 6 B2
Parkside Gebrauchsanleitung
Battery-powered soldering iron PBLK 6 B2
Parkside Operating Instructions
DE
GB
PL
Lutownica na baterie PBLK 6 B2
Instrukcja użytkowania Parkside
IE NI
Fer à souder à piles PBLK 6 B2
Mode d‘emploi Parkside
FR BE
Batterijsoldeerbout PBLK 6 B2
Parkside Gebruiksaanwijzing
NL BE
AT
CZ
Bateriová páječka PBLK 6 B2
Parkside návod k použití
DE DE DE DE
DE GB GB GB GB GB
FR FR FR FR FR FR
BE


Join the conversation about this product
Here you can share what you think about the Parkside IAN 321202 Soldering Gun. If you have a question, first carefully read the manual. Requesting a manual can be done by using our contact form.