
Panasonic Warranty
If you require assistance regarding warranty condions or any other enquiries, please visit the Panasonic
Australia website
www.panasonic.com.au or contact by phone on 132 600
If phoning in, please ensure you have your operang instrucons available.
THIS WARRANTY CARD AND THE PURCHASE DOCKET (OR SIMILAR PROOF OF PURCHASE)
SHOULD BE RETAINED BY THE CUSTOMER AT ALL TIMES
Panasonic Australia Pty. Limited
ACN 001 592 187 ABN 83 001 592 187
1 Innovation Road, Macquarie Park NSW 2113
www.panasonic.com.au
PRO-031-F11 Issue: 5.0 23-01-2018
1.
Subject to the condions of this warranty Panasonic or its Authorised Service Centre will perform necessary service on the product,
without charge for parts or labour, if in the opinion of Panasonic the product is found to have a manufacturing defect within one
(1) year or (12 months) (the “warranty period”) from the date of purchase appearing on your purchase receipt.
This warranty only applies to Panasonic products purchased in Australia and sold by Panasonic Australia, it’s Authorised Distributors, or
Dealers, and only where the products are used and serviced within Australia or its territories. Warranty cover only applies to the services
that are carried out by a Panasonic Authorised Service Centre and only if valid proof of purchase is presented when the warranty service is
requested.
This warranty only applies if the product has been installed and/or used in accordance with the manufacturer’s recommendaons (as noted
in the operang instrucons) under normal use and reasonable care (in the opinion of Panasonic). The warranty does not cover damage,
malfuncon or failure resulng from use of incorrect voltages, incorrect installaon, accident, misuse, neglect, build-up of dirt or dust,
abuse, maladjustment of customer controls, mains supply problems, thunderstorm acvity, infestaon by insects or vermin, tampering or
repair by unauthorised persons (including unauthorised alteraons), exposure to abnormally corrosive condions, or any foreign object or
maer having entered the product.
This warranty does not cover the following items unless the fault or defect existed at the me of purchase:
(a) Consumable parts
(b) Cosmec parts
(c) Worn or damaged parts
(d) Informaon stored on Hard Disk Drives, Opcal Discs, USB Devices, SD Cards, Tapes
(e) DTV recepon issues caused by TV Aerial / Cabling / Wall socket(s)
Some products may be supplied with Ethernet connecon hardware. The warranty is limited on such products and will not cover:
(a) Internet and or DLNA connecon / setup related problems
(b) Access fees and or charges incurred for internet connecon
(c) Incompable soware or soware not specifically spulated in the product operaons manual; and
(d) Any indirect or consequenal costs associated with the incorrect use or misuse of the hardware, its connecon to the internet or any
other device.
To claim warranty service, when required, you should:
• Contact Panasonic’s Customer Care Centre on 132 600 for Service Centre informaon.
• Confirm the opening and acceptance mes with the Authorised Service centre that you choose.
• Then send or take the product to a Panasonic Authorised Service Centre together with your proof of purchase receipt.
• Any freight and insurance costs associated with the transport of the product to and/or from your nearest Authorised Service Centre must
be arranged and paid for by you.
The warranes hereby conferred do not extend to, and exclude, any costs associated with the installaon, de-installaon or re-installaon
of a product, including costs related to the mounng, de-mounng or remounng of any screen, (and any other ancillary acvies), delivery,
handling, freighng, transportaon or insurance of the product or any part thereof or replacement of and do not extend to, and exclude,
any damage or loss occurring by reason of, during, associated with, or related to such installaon, de-installaon, re-installaon or transit.
2.
3.
4.
5.
6.
7.
Panasonic Authorised Service Centres are located in major metropolitan areas and most regional centres of Australia, however, coverage will
vary dependant on product. For advice on exact Authorised Service Centre locaons for your product, please telephone our Customer Care
Centre on 132600 or visit our website and use the Service Centre Locator.
In addion to your rights under this warranty, Panasonic products come with consumer guarantees that cannot be excluded under the
Australian Consumer Law. If there is a major failure with the product, you can reject the product and elect to have a refund or to have the
product replaced or if you wish you may elect to keep the goods and be compensated for the drop in value of the goods. You are also entled to
have the product repaired or replaced if the product fails to be of acceptable quality and the failure does not amount to a major failure.
If there is a major failure in regard to the product which cannot be remedied then you must nofy us within a reasonable period by contacng
the Panasonic Customer Care Centre. If the failure in the product is not a major failure then Panasonic may choose to repair or replace the
product and will do so in a reasonable period of me from receiving noce from you.
[For_Australia]
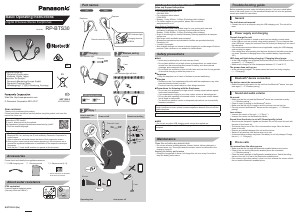
a Right earphone b Remote controller C Left earphone
1 Clip 2 USB lid 3 Earpiece 4 Blue edge LEDs*
1
5 Cord adjuster 6 Raised dot indicating the left side
7
Microphone
8
LED indicator light*
2
9
Charging terminal (DC IN)
: [+] button ; [ ] button < [–] button
*1 On: Connect the Bluetooth
®
device and the unit.
(
l
below, )
Press [+] and [–] simultaneously. When the blue edge LEDs are
turned on, the LED indicator light will be turned off.
Off: Press and hold [+] and [–] simultaneously for approximately
2 seconds.
*2 Hereafter referred to as “LED”
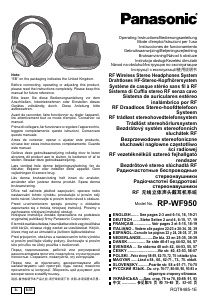
The rechargeable battery (installed in the unit) is not charged
initially. Charge the battery before using the unit.
Connect this unit to a computer (c) using the USB
charging cord (supplied) (b).
• Within approximately 3 seconds after the connection is established, the
LED on the right earphone will light in red.
• The LED (a) lights in red when charging is in progress. When charging
is completed, the LED will go out.
• Charging will take approximately 1.5 hours from empty state to fully charged.
(Quick charging time for 70 minutes operation: Approx. 15 minutes)
• The power cannot be turned on while charging.
• Do not use any other USB charging cords except the supplied one.
• When the battery level is low during use of the unit, the blue blinking
LED will change to red. A beep will sound every 1 minute. When the
battery runs out, the power will turn off.
Press and hold [ ] (b) of this unit for approx. 3 seconds
until the LED (blue) (a) blinks
.
• A beep will sound and the LED on the right earphone will blink.
To turn the power off
Press and hold [ ] for approximately 3 seconds. A beep will
sound and the power will be turned off.
• If the unit is not connected to a Bluetooth
®
device, the unit will beep and
turn off automatically approximately 5 minutes after you have stopped
using it. (Auto power off)
∫ Bluetooth
®
pairing
1 In the power-off state, press and hold [ ] of this unit until
the LED blinks in blue and red alternately.
2 Select “RP-BTS55” (a) from the Bluetooth
®
device’s menu.
• If prompted for a passkey, input the passkey “0000 (four zeros)” of this
unit.
• When the LED (blue) blinks twice every approx. 2 seconds, pairing
(registration) is completed. (Connection established)
∫ Connecting a paired Bluetooth
®
device
1 Turn on this unit.
2 Perform steps 2 of “Bluetooth
®
pairing”. (l above)
• When the LED (blue) blinks twice every approx. 2 seconds, pairing
(registration) is completed. (Connection established)
Connect the Bluetooth
®
device and the unit.
∫ Listening to music
Select and play the music on the Bluetooth
®
device.
• The selected music is output to the earphones of the unit.
∫ Remote controlling (Available only if your Bluetooth
®
device supports “AVRCP”)
(Operation example)
∫ Making a phone call
1 Press [ ] on the unit and answer the incoming call.
2 Start talking.
3 Press [ ] to end the phone call.
•(HFP only)
Reject a call / Change the call device:
Press [ ] twice quickly.
• You can have the Bluetooth
®
enabled phone make phone calls by using
the microphone of the unit and an app of the Bluetooth
®
enabled phone.
(l below, “Activating voice functions”)
∫ Activating voice functions
Press [ ] twice quickly.
• The voice function may not work depending on the smartphone
specifications and the app version.
∫ Restoring to the factory settings
1 While the unit is turned off, press and hold [ ] for at least
5 seconds until the LED starts blinking alternately in blue and red.
2 While the LED is blinking alternately in blue and red, press
and hold [+] and [–] at the same time for at least 5 seconds.
• The LED will blink fast in blue. The unit will restore to the factory settings.
∫ Danger
As the rechargeable battery is specifically for this product, do not
use it for any other device.
Do not charge the removed battery.
• Do not heat or expose to flame.
• Do not leave the battery(ies) in a car exposed to direct sunlight for a
long period of time with doors and windows closed.
• Do not pierce the battery with a nail, subject it to an impact, or dismantle
or modify it.
• Do not let the wires touch any other metal or each other.
• Do not carry or store the battery with a necklace, hair pin, or the like.
Doing so may cause the battery to generate heat, ignite, or rupture.
∫ Warning
Do not place the removed battery, and other items within reach of
infants.
Accidental swallowing of such an item may have an adverse effect on the body.
• In the event that you think such an item has been swallowed, consult a
doctor immediately.
In the event of fluid leaking from the battery, take the following
measure, and do not touch the fluid with bare hands.
Fluid entering into an eye may cause loss of eyesight.
• Wash the eye with water immediately without rubbing it, and then
consult a doctor.
Fluid getting on your body or clothes may cause inflammation of the skin
or injury.
• Sufficiently rinse with clean water, and then consult a doctor.
A lithium-ion polymer rechargeable battery is built in to the left earphone.
Please discard according to local regulations. When disposing this
product, disassemble properly by following the procedure, and remove
the internal rechargeable battery.
• Disassemble after the battery runs out.
• When disposing of the battery, please contact your local authorities or
dealer and ask for the correct method of disposal.
1 Hold the top of the left earphone (L), and put a straight-slot
screwdriver (commercially available) under the upper cover a.
• Make sure to keep fingers away from the tip of the screwdriver.
• Select a screwdriver to be large enough for a space under the upper
cover.
2 Use the screwdriver for leverage, and push the upper cover
a
upward.
• Be careful not to touch the battery with the screwdriver.
3 Hold the battery b, and remove it.
4 Pull off the battery b and separate it from the left earphone by
cutting off the wires, one by one, with scissors.
• Insulate the wire parts of the removed battery with cellophane tape.
• Do not damage or dismantle the battery.
B
12
34
G
Bluetooth
Bluetooth ON
RP-BTS55
D
E
English
A Part names
B Charging
C Turning the power on/off
D Connecting a Bluetooth
®
device
E How to wear the earphones
F Using the earphones
Play / Pause: Press [ ].
Increase the volume: Press [+].
Decrease the volume: Press [–].
Forward to the start of next track:
Press and hold [+] for approximately 2 seconds.
Return to the start of current track:
Press and hold [–] for approximately 2 seconds.
G To remove the battery when disposing of
this unit
The following instructions are not intended for repairing purposes
but for the disposal of this unit. This unit is not restorable once
disassembled.
• When disposing of this unit, take out the battery installed in this unit and
recycle it.
a Écouteur droit b Télécommande C Écouteur gauche
1
Contour d'oreille
2
Cache USB
3
Oreillette
4
Bordure de diodes bleues*
1
5
Dispositif de réglage du cordon
6
Pointe saillante signalant le côté gauche
7
Microphone
8
Voyant lumineux*
2
9
Borne de charge (DC IN)
: Touche [+] ; Touche [ ] < Touche [–]
*1 Marche: Connectez le dispositif Bluetooth
®
et l’appareil.
(
l ci-dessous
, )
Appuyer simultanément sur [+] et [–]. Lorsque
la bordure de diodes bleues est allumée, le voyant s'éteint.
Arrêt: Appuyez simultanément sur [+] et [–] pendant environ 2 secondes.
*2 Ci-après dénommé “voyant”
La batterie rechargeable (installée dans l’appareil) n’est pas
chargée au départ. Chargez la batterie avant d’utiliser l’appareil.
Raccordez cet appareil à un ordinateur (c) en utilisant le
câble de recharge USB (fourni) (b).
• Dans les 3 secondes qui suivent l'établissement de la connexion, la
voyant de l'écouteur droit devient rouge.
• Le voyant (a) s’allume en rouge pour indiquer que la charge est en
cours. Une fois la charge terminée, le voyant s’éteint.
• Le chargement complet prend environ 1,5 heures une batterie
complètement déchargée. (Durée de chargement rapide pour une
utilisation de 70 minutes : Environ 15 minutes)
• L’appareil ne peut pas être mis sous tension pendant la charge.
• N’utilisez aucun autre câble de recharge USB à l’exception de celui fourni.
• Lorsque le niveau de la batterie est faible pendant l’utilisation de l’appareil, le
voyant clignotant en bleu passe au rouge. Un signal sonore retentit chaque
minute. Lorsque la batterie est épuisée, l’appareil est mis hors tension.
Appuyez sur la touche
[ ] (b)
de cet appareil pendant environ 3
secondes jusqu’à ce que le voyant (bleu) (
a
) clignote.
• Un signal sonore retentit et le voyant sur l’écouteur droit clignote.
Mise hors tension
Appuyez sur [ ] pendant environ 3 secondes. Un signal
sonore retentit et l’appareil est mis hors tension.
• Si l'appareil n'est connecté à aucun dispositif Bluetooth
®
, il émettra un
signal sonore et se mettra automatiquement hors tension environ 5 minutes
après que vous ayez cessé de l'utiliser. (Mise hors tension automatique)
∫ Appairage Bluetooth
®
1 Lorsqu’il est éteint, appuyez sur la touche [ ] de cet appareil
jusqu’à ce que le voyant clignote alternativement en bleu et rouge.
2 Sélectionnez “RP-BTS55” (a) à partir du menu du dispositif
Bluetooth
®
.
• Si vous êtes invité à saisir un mot de passe, saisissez le mot de passe
“0000 (quatre zéros)” de cet appareil.
• Lorsque le voyant (bleu) clignote deux fois, environ toutes les 2 secondes,
l’appairage (l’enregistrement) est terminé. (Connexion établie)
∫ Connexion à un dispositif Bluetooth
®
appairé
1 Mettez cet appareil sous tension.
2 Effectuez l'étape 2 de la section “Appairage Bluetooth
®
”.
(
l ci-dessus)
• Lorsque le voyant (bleu) clignote deux fois, environ toutes les 2 secondes,
l’appairage (l’enregistrement) est terminé. (Connexion établie)
Connectez le dispositif Bluetooth
®
et l’appareil.
∫ Écoute de la musique
Sélectionnez et lisez la musique sur le dispositif Bluetooth
®
.
• La musique sélectionnée est transmise aux écouteurs de l’appareil.
∫ Contrôle à distance (Disponible uniquement si votre
dispositif
Bluetooth
®
prend en charge le "AVRCP")
(Exemple d’opération)
∫ Passage d’un appel téléphonique
1 Appuyez sur [ ] de l’appareil et répondez à l’appel entrant.
2 Démarrez la conversion.
3 Appuyez sur
[]
pour mettre fin à l’appel téléphonique.
•
(HFP uniquement)
Refuser un appel/changer le dispositif d’appel:
Appuyez sur [ ] deux fois rapidement.
• Il est possible avec le téléphone compatible Bluetooth
®
d'effectuer des
appels téléphoniques à l’aide du microphone de l’appareil et d’une
application du téléphone compatible Bluetooth
®
.
(l ci-dessous, “Activation des fonctions vocales”)
∫ Activation des fonctions vocales
Appuyez sur [ ] deux fois rapidement.
• La fonction vocale peut ne pas fonctionner selon les caractéristiques du
téléphone intelligent et la version de l'appli.
∫ Retour aux réglages d’usine par défaut
1 Lorsque l’appareil est éteint, appuyez et maintenez enfoncée la
touche
[ ]
pendant au moins 5 secondes jusqu’à ce que le voyant
se mette à clignoter alternativement en bleu et en rouge.
2 Pendant que le voyant clignote alternativement en bleu et
rouge, appuyez et maintenez enfoncé [+] et [–] en même
temps pendant au moins 5 secondes.
• Le voyant va clignoter rapidement en bleu. L’appareil sera réinitialisé
aux réglages d’usine.
∫ Danger
Dans la mesure où la batterie rechargeable appartient
spécifiquement à ce produit, ne l'utilisez pas avec un autre dispositif.
Ne chargez pas la batterie une fois retirée.
• Ne les chauffez pas et ne les exposez pas à une flamme.
• Ne laissez pas la (les) batterie(s) dans un véhicule exposé directement aux
rayons du soleil pendant un long moment avec les vitres et portières fermées.
• Ne percez pas la batterie avec un clou, ne lui faites pas subir d'impact,
ne la démontez pas et ne la modifiez pas.
• Ne laissez pas les fils toucher une autre partie métallique ou se toucher mutuellement.
• Ne transportez pas et ne rangez pas la batterie avec un collier, une
épingle à cheveux ou objets similaires.
Ceci pourrait permettre à la batterie de générer de la chaleur, de
s'enflammer ou d'éclater.
∫ Avertissement
Ne placez pas la batterie retirée ainsi que les autres éléments à la
portée des enfants.
Avaler accidentellement ce genre d'élément peut avoir des effets néfastes
sur le corps.
• Si vous pensez qu'un tel élément a été avalé, consultez immédiatement
un médecin.
Si un liquide s'écoule de la batterie, prenez les mesures suivantes et
ne touchez pas celui-ci à mains nues.
Le contact de ce liquide avec les yeux peut causer la cécité.
• Rincez immédiatement les yeux à grande eau sans frotter et consultez un médecin.
Le contact de ce liquide avec le corps et les vêtements peut causer une
inflammation de la peau ou des blessures.
• Rincez abondamment avec de l'eau claire et consultez un médecin.
Une batterie rechargeable au lithium-ion polymère est intégrée à
l'écouteur gauche. Veuillez la jeter en suivant la règlementation locale.
Pour mettre au rebut ce produit, démontez-le correctement en suivant la
procédure, puis retirez la batterie interne rechargeable.
• Démontez une fois la batterie épuisée.
• Pour jeter la batterie usagée, veuillez contacter les autorités
compétentes locales ou votre revendeur afin de connaître la procédure
de mise au rebut à suivre.
1 Tenez le haut de l'écouteur gauche (L) et insérez un tournevis plat
(disponible dans le commerce) sous le boitier supérieur a.
• Assurez-vous d'éloigner vos doigts de l'extrémité du tournevis.
• Choisissez un tournevis assez large pour l'espace situé sous le boitier supérieur.
2 Utilisez le tournevis comme levier et poussez le boitier supérieur
a vers le haut.
• Faites attention de ne pas toucher la batterie avec le tournevis.
3 Prenez la batterie b et sortez-la.
4 Retirez la batterie b et détachez-la de l'écouteur gauche en
coupant les fils, l'un après l'autre, à l'aide d'une paire de ciseaux.
• Protégez le bout des fils de la batterie retirée avec du ruban adhésif.
• N'endommagez pas et ne démontez pas la batterie.
a Rechtes Ohrstück b Fernbedienung C Linkes Ohrstück
1
Bügel
2
USB-Abdeckung
3
Ohrstöpsel
4
LEDs mit blauem Rand*
1
5
Kabelverstellung
6
Punktförmige Erhebung kennzeichnet die linke Seite
7 Mikrofon 8 LED-Kontrollleuchte*
2
9 Ladeanschluss (DC IN)
: [+]-Taste ; [ ]-Taste < [–]-Taste
*1 Ein: Verbinden Sie das Bluetooth
®
-Gerät mit diesem Gerät.
(
l unten
,
)
Drücken Sie [+] und [–] gleichzeitig. Werden die LEDs mit blauem
Rand eingeschaltet, so wird die LED-Anzeige ausgeschaltet.
Aus: Halten Sie ca. 2 Sekunden lang [+] und [–] zugleich gedrückt.
*2 Im Folgenden als “LED” bezeichnet
Der im Gerät installierte wiederaufladbare Akku ist bei der Auslieferung
nicht geladen. Laden Sie den Akku vor dem Gebrauch des Gerätes auf.
Um dieses Gerät an einen Computer (c) anzuschließen,
verwenden Sie das mitgelieferte USB-Ladekabel (b).
• Innerhalb von ca. 3 Sekunden nach dem Verbindungsaufbau leuchtet
die LED am rechten Ohrstück rot auf.
• Während des Ladens leuchtet die LED (a) rot. Nach Abschluss des
Ladevorgangs erlischt die LED.
• Das vollständige Aufladen eines leeren Akkus dauert ca. 1,5 Stunden.
(Schnellladedauer für 70 Minuten Betrieb: Ca. 15 Minuten)
• Während des Ladevorgangs kann das Gerät nicht eingeschaltet werden.
• Verwenden Sie ausschließlich das mitgelieferte USB-Ladekabel.
• Wenn während der Verwendung des Geräts der Akku leer wird, wechselt
die Farbe der blinkenden LED von blau zu rot. Im Abstand von 1 Minute
ertönt ein Signalton. Wenn der Akku leer ist, wird das Gerät ausgeschaltet.
Halten Sie ca. 3 Sekunden lang die Taste [ ] (b) gedrückt,
bis die LED (a) blau blinkt.
• Es wird ein Signalton ausgegeben, und die LED auf dem rechten Ohrhörer blinkt.
Zum Ausschalten
Halten Sie [ ] mindestens 3 Sekunden lang gedrückt. Ein
Signalton ertönt, und das Gerät wird ausgeschaltet.
• Wenn das Gerät nicht mit einem Bluetooth
®
-Gerät verbunden ist, ertönt
ca. 5 Minuten nach der letzten Verwendung ein Piep-Signal, und das
Gerät wird automatisch ausgeschaltet. (Automatische Abschaltung)
∫ Bluetooth
®
-Kopplung
1 Wenn das Gerät ausgeschaltet ist, halten Sie [ ] an diesem Gerät
gedrückt, bis die LED abwechselnd blau und rot blinkt.
2Wählen Sie "
RP-BTS55
" (
a
) im Menü des Bluetooth
®
-Geräts aus.
• Wenn ein Passcode angefordert wird, geben Sie “0000 (vier Nullen)”
ein; dies ist der Passcode dieses Geräts.
• Wenn die LED ca. alle 2 Sekunden zweimal blau blinkt, ist die
Kopplung (Registrierung) abgeschlossen. (Verbindung hergestellt)
∫ Anschluss eines gekoppelten Bluetooth
®
-Geräts
1 Schalten Sie dieses Gerät ein.
2 Führen Sie Schritt 2 des Abschnitts "Bluetooth
®
-Kopplung"
aus. (
l oben)
• Wenn die LED ca. alle 2 Sekunden zweimal blau blinkt, ist die
Kopplung (Registrierung) abgeschlossen. (Verbindung hergestellt)
Verbinden Sie das Bluetooth
®
-Gerät mit diesem Gerät.
∫ Musik hören
Wählen Sie Musik auf dem Bluetooth
®
-Gerät aus und
starten Sie die Wiedergabe.
• Die ausgewählte Musik wird über die Ohrstücke des Geräts wiedergegeben.
∫
Fernbedienung (nur verfügbar, wenn Ihr Bluetooth
®
-Gerät
"AVRCP" unterstützt)
(Beispielhafte Bedienvorgänge)
∫ Einen Anruf tätigen
1 Drücken Sie [ ] am Gerät, um den eingehenden Anruf anzunehmen.
2 Sprechen Sie.
3 Drücken Sie [ ], um den Anruf zu beenden.
• (Nur bei HFP) Einen Anruf abweisen/das Telefoniegerät wechseln:
Drücken Sie [ ] zweimal schnell hintereinander.
• Sie können das Bluetooth
®
-fähige Gerät zum Tätigen von
Telefonanrufen verwenden, indem Sie das Mikrofon des Geräts und eine
App des Bluetooth
®
-fähigen Telefons verwenden.
(l unten, “Aktivieren der Sprachfunktionen”)
∫ Aktivieren der Sprachfunktionen
Drücken Sie
[]
zweimal schnell hintereinander.
• Je nach Spezifikationen des Smartphones und Version der App ist die
Sprachfunktion möglicherweise nicht verfügbar.
∫ Rücksetzen auf die Werkseinstellungen
1 Halten Sie bei ausgeschaltetem Gerät die Taste [ ]
mindestens 5 Sekunden lang gedrückt, bis die LED
abwechselnd in blau und rot blinkt.
2 Wenn die LED abwechselnd in blau und rot blinkt, halten Sie die
Tasten [+] und [–] gleichzeitig mindestens 5 Sekunden lang gedrückt.
• Die LED wird schnell im Blau blinken. Der Kopfhörer wird auf die
Werkseinstellungen zurückgesetzt.
∫ Gefahr
Da der wiederaufladbare Akku speziell für dieses Produkt
vorgesehen ist, darf er nicht in anderen Geräten verwendet werden.
Der Akku darf nicht im ausgebauten Zustand geladen werden.
• Setzen Sie die Batterien niemals großer Hitze oder offenem Feuer aus.
• Lassen Sie die Batterien niemals über längere Zeit in einem Auto mit geschlossenen
Türen und Fenstern zurück, das direkter Sonneneinstrahlung ausgesetzt ist.
• Der Akku darf nicht mit einem Nagel durchbohrt, Stößen ausgesetzt,
zerlegt oder modifiziert werden.
• Die Drähte dürfen weder andere Metallteile noch einander berühren.
• Der Akku darf nicht zusammen mit Halsketten, Haarnadeln oder
ähnlichen Gegenständen aufbewahrt oder transportiert werden.
Andernfalls kann es zum Überhitzen, Entzünden oder Platzen des Akkus kommen.
∫ Warnung
Legen Sie den ausgebauten Akku oder andere Teile nicht in der
Reichweite von Kleinkindern ab.
Ein versehentliches Verschlucken solcher Gegenstände kann die
Gesundheit beeinträchtigen.
• Falls Sie Anlass zur Annahme haben, dass ein solcher Gegenstand
verschluckt wurde, wenden Sie sich sofort an einen Arzt.
Wenn Flüssigkeit aus dem Akku austritt, treffen Sie folgende
Maßnahmen und berühren Sie die Flüssigkeit nicht mit bloßen Händen.
Bei Augenkontakt kann die Flüssigkeit einen Verlust des Sehvermögens verursachen.
• Spülen Sie das Auge sofort mit Wasser aus, ohne zu reiben, und suchen
Sie dann einen Arzt auf.
Kommt die Flüssigkeit mit dem Körper oder der Kleidung in Kontakt, kann
dies zu Hautverletzungen oder -entzündungen führen.
• Spülen Sie die Flüssigkeit mit reichlich klarem Wasser ab und suchen
Sie dann einen Arzt auf.
Ein Lithium-Ionen-Polymer-Akku ist im linken Ohrstück eingebaut. Bitte beachten
Sie bei der Entsorgung die örtlichen Bestimmungen. Vor der Entsorgung zerlegen
Sie das Produkt gemäß der Anleitung und entnehmen Sie den internen Akku.
• Zerlegen Sie das Gerät, nachdem der Akku das Ende seiner
Lebensdauer erreicht hat.
• Wenden Sie sich zur Entsorgung des Akkus an die lokalen Behörden oder
Ihren Händler und erfragen Sie die richtige Vorgehensweise zur Entsorgung.
1 Halten Sie die Oberseite des linken Ohrstücks (L) fest und führen
Sie unterhalb der oberen Abdeckung a einen handelsüblichen
Schlitzschraubendreher ein.
• Achten Sie darauf, die Finger von der Spitze des Schraubendrehers fernzuhalten.
• Wählen Sie einen Schraubendreher aus, der für den Spalt unterhalb
der oberen Abdeckung groß genug ist.
2 Hebeln Sie mit dem Schraubendreher die obere Abdeckung
a
auf.
• Achten Sie darauf, den Akku nicht mit dem Schraubendreher zu berühren.
3 Entnehmen Sie den Akku b.
4 Ziehen Sie den Akku
b
ab und trennen Sie es vom linken Ohrstück, indem
Sie die Drähte einzeln nacheinander mit einer Schere abschneiden.
• Isolieren Sie die Drähte des entfernten Akkus mit Klebeband.
• Beschädigen oder zerlegen Sie den Akku nicht.
Français
A Noms de pièces
B Chargement
C Mise sous tension/hors tension
D Connexion à un dispositif Bluetooth
®
E Comment porter les écouteurs
F Utilisation des écouteurs
Lecture / Pause : Appuyez sur [ ].
Augmentez le volume :
Appuyez sur [+].
Diminuez le volume : Appuyez sur [–].
Avance au début de la piste suivante :
Appuyez sur [+] pendant environ 2 secondes.
Retourne au début de la piste suivante :
Appuyez sur [–] pendant environ 2 secondes.
G Pour retirer la batterie lors de la mise au
rebut de cet appareil
Les instructions suivantes ne sont pas destinées à des fins
de réparation mais pour la mise au rebut de cet appareil. Cet
appareil n’est pas récupérable une fois désassemblé.
• Lors de la mise au rebut de cet appareil, retirez la batterie
installée dans ce dernier et recyclez-la.
Deutsch
A Teilebezeichnungen
B Wird aufgeladen
C Ein-/Ausschalten
D Verbinden eines Bluetooth
®
-Geräts
E Tragen des Ohrhörers
F Gebrauch der Ohrhörer
Wiedergabe / Pause: Drücken Sie [ ].
Lautstärke erhöhen: Drücken Sie [+].
Lautstärke verringern: Drücken Sie [–].
Zum Anfang des nächsten Titels springen:
Halten Sie [+] mindestens 2 Sekunden lang gedrückt.
Zum Anfang des aktuellen Titels springen:
Halten Sie [–] mindestens 2 Sekunden lang gedrückt.
G
Entfernen des Akkus zur Entsorgung dieses Geräts
Die folgenden Anweisungen sind nicht für Reparaturzwecke
vorgesehen, sondern für die Entsorgung dieses Geräts. Dieses
Gerät ist nicht wiederherstellbar, sobald es einmal zerlegt wurde.
• Entnehmen Sie für die Entsorgung dieses Geräts den in
diesem Gerät installierten Akku und recyclen Sie ihn.
a Auricular derecho b Mando a distancia C Auricular izquierdo
1 Pinza 2 Tapa del USB 3 Auricular 4 LED blue edge
*
1
5
Regulador del cable
6
Punto elevado indicando el lado izquierdo
7
Micrófono
8
Luz indicadora LED*
2
9
Terminal de carga (DC IN)
: Botón [+] ; Botón [ ] < Botón [–]
*1 On: Conecte el dispositivo Bluetooth
®
y el aparato.
(
l abajo
, )
Pulse [+] y [–] simultáneamente. Cuando estén encendidos los LED blue
edge, la luz del indicador LED estará apagada.
Off: Mantenga pulsado [+] y [–] simultáneamente durante aproximadamente 2 segundos.
*2 En lo sucesivo denominada “LED”
La batería recargable (instalada en el aparato) no está cargada
inicialmente. Cargue la batería antes de utilizar este aparato.
Conecte este aparato a un ordenador (c) usando el cable
de carga USB (suministrado) (b).
• Aproximadamente 3 segundos después de que se haya establecido la
conexión, el LED del auricular derecho se iluminará en rojo.
• El LED (a) se ilumina cuando la carga está en curso. Cuando se ha
completado la carga, el LED se apaga.
• La carga tarda aproximadamente 1,5 horas de vacía hasta totalmente
cargada. (Tiempo de carga rápida para funcionamiento de 70 minutos:
Aprox. 15 minutos)
• No se puede encender mientras se carga.
• No use ningún otro cable de carga USB que no sea el suministrado.
• Cuando el nivel de la batería sea bajo mientras se usa el aparato, el
LED que parpadea en azul cambiará a rojo. Sonará un pitido cada
minuto. Cuando la batería se agote, el aparato se apagará.
Mantenga pulsado [ ] (b) en este aparato durante aprox.
3 segundos hasta que parpadee el LED (azul) (a).
• Sonará un pitido y el LED del auricular derecho parpadeará.
Para apagar el aparato
Mantenga pulsado [ ] durante 3 segundos aproximadamente.
Sonará un pitido y el aparato se apagará.
• Si el aparato no está conectado a un dispositivo
Bluetooth
®
, este emitirá
un pitido y se apagará automáticamente aproximadamente 5 minutos
después de que haya dejado de usarlo. (Apagado automático)
∫ Sincronización Bluetooth
®
1 Mientras está apagado, mantenga pulsado [ ] en este aparato
hasta que el LED parpadee en azul y rojo alternativamente.
2 Seleccione “RP-BTS55” (
a
) desde el menú del dispositivo Bluetooth
®
.
• Si se le solicita una contraseña, introduzca la contraseña “0000
(cuatro ceros)” de este aparato.
• Cuando el LED (azul) parpadee dos veces cada aprox. 2 segundos, el
emparejamiento (registro) se habrá completado. (Conexión
establecida)
∫ Conexión a un dispositivo Bluetooth
®
emparejado
1 Encienda este aparato.
2 Realice el paso 2 de “Sincronización Bluetooth
®
”. (l arriba)
• Cuando el LED (azul) parpadee dos veces cada aprox. 2 segundos, el
emparejamiento (registro) se habrá completado. (Conexión establecida)
Conecte el dispositivo Bluetooth
®
y el aparato.
∫ Escuchar música
Seleccione y reproduzca la música en el dispositivo Bluetooth
®
.
• La música seleccionada se transmite a los audífonos del aparato.
∫
Control remoto (Disponible solo si su dispositivo Bluetooth
®
es compatible con “AVRCP”)
(Ejemplo de funcionamiento)
∫ Realizar una llamada telefónica
1 Pulse
[]
en el aparato y responda la llamada entrante.
2 Comience a hablar.
3 Pulse
[]
para finalizar la llamada telefónica.
•(Solo HFP) Rechazar una llamada/cambiar el dispositivo de
llamada: Pulse [ ] dos veces rápidamente.
• Puede hacer que el teléfono habilitado con Bluetooth
®
realice llamadas
telefónicas usando el micrófono del aparato y una aplicación del teléfono
habilitado con Bluetooth
®
.
(l abajo, “Activación de las funciones por voz”)
∫ Activación de las funciones por voz
Pulse [ ] dos veces rápidamente.
• Es posible que la función por voz no funcione dependiendo de las
especificaciones del teléfono inteligente y de la versión de la aplicación.
∫ Restauración de los ajustes de fábrica
1 Mientras el aparato está apagado, mantenga pulsado
[]
durante al menos 5 segundos hasta que el LED comience a
parpadear alternativamente en azul y rojo.
2 Mientras el LED está parpadeando alternativamente en azul y rojo,
mantenga pulsados [+] y [–] a la vez durante al menos 5 segundos.
• El LED parpadeará en azul rápidamente. La unidad se restaurará a los
ajustes de fábrica.
∫ Peligro
Puesto que la batería recargable es específicamente para este
producto, no la utilice para ningún otro dispositivo.
No cargue la batería sacada.
• No caliente ni exponga las pilas a las llamas.
• No deje la(s) batería(s) en un automóvil expuesto a la luz solar directa por
un período prolongado de tiempo con las puertas y ventanas cerradas.
• No perfore la batería con un clavo, la someta a impactos, la desarme ni la modifique.
• No permita que los cables toquen ningún otro metal o se toquen entre sí.
• No transporte o guarde la batería con un collar, horquilla u objeto similar.
Hacerlo podría provocar que la batería genere calor, se prenda o se rompa.
∫ Advertencia
No deje la batería sacada y otros elementos al alcance de los niños.
Ingerir accidentalmente un elemento de ese tipo podría tener un efecto
adverso en el cuerpo.
• En el caso de que crea que un elemento de ese tipo ha sido ingerido,
consulte con un médico inmediatamente.
En caso de que la batería pierda un fluido, adopte la siguiente
medida y no toque el fluido con las manos desprotegidas.
Si el fluido entra en los ojos, podría provocar la pérdida de la visión.
• Lave los ojos con agua inmediatamente sin frotarlos y después consulte
con un médico.
Si el fluido entra en su cuerpo o en la ropa, este podría provocar
inflamación o lesiones en la piel.
• Aclare suficientemente con agua limpia y consulte con un médico.
El auricular izquierdo tiene incorporada una batería recargable de
polímero de ion de litio. Deséchela en conformidad con las normativas
locales. Cuando deseche el producto, desármelo adecuadamente
siguiendo el procedimiento y retire la batería recargable interna.
• Desmóntelo después de que la batería se haya agotado.
• Al desechar las baterías, comuníquese con sus autoridades locales o
distribuidores y pregunte por el método de eliminación correcto.
1 Sujete la parte superior del auricular izquierdo (L) y ponga un
destornillador de punta plana (disponible en comercios) bajo la
cubierta superior a.
• Asegúrese de mantener los dedos alejados de la punta del destornillador.
• Elija un destornillador que sea lo suficientemente grande para el
espacio bajo la cubierta superior.
2 Utilice el destornillador para hacer palanca y empujar la cubierta
superior a hacia arriba.
• Tenga cuidado de no tocar la batería con el destornillador.
3 Coja la batería b y quítela.
4 Arranque la batería b y sepárela del auricular izquierdo cortando
los cables, uno a uno, con unas tijeras.
• Aísle las partes de los cables de la batería quitada con cinta de celofán.
• No dañe ni desarme la batería.
a Auricular direito b Telecomando C Auricular esquerdo
1 Clipe 2 Tampa USB 3 Auricular 4 LEDs Blue Edge
*
1
5 Ajuste do fio 6 Ponto saliente a indicar o lado esquerdo
7
Microfone
8
Indicador LED*
2
9
Terminal de carregamento (DC IN)
: Botão [+] ; Botão [ ] < Botão [–]
*1 Ligar: Ligue o dispositivo Bluetooth
®
e a unidade.
(
l
em baixo
, )
Prima [+] e [
–
] em simultâneo. Quando os LEDs Blue Edge são ligados, o
indicador luminoso LED desliga-se.
Desligar: Prima e mantenha premido [+] e [–] em simultâneo durante cerca de 2 segundos.
*2 Daqui por diante chamados de "LED"
A bateria recarregável (instalada na unidade) não vem
carregada. Carregue a bateria antes de utilizar a unidade.
Ligue esta unidade a um computador (c) com o cabo de
carregamento USB (fornecido) (b).
• No espaço de cerca de 3 segundos após a ligação ser estabelecida, o
LED do auricular direito acende a vermelho.
• O LED (
a
) acende a vermelho quando estiver a efetuar o carregamento.
Quando o carregamento estiver terminado, o LED desliga-se.
• O carregamento leva cerca de 1,5 horas desde o estado de vazio até ao
carregamento completo. (Tempo de carregamento rápido para um
funcionamento de 70 minutos: Cerca de 15 minutos)
• Não pode ligar a unidade durante o carregamento.
• Não use quaisquer outros cabos de carregamento USB, exceto o fornecido.
• Quando o nível da bateria estiver baixo durante a utilização da unidade,
o LED azul a piscar passa para vermelho. Ouvirá um "beep" a cada
minuto. Quando a bateria se esgotar, a unidade desliga-se.
Prima e mantenha premido [ ] (
b
) desta unidade durante cerca
de 3 segundos, até que o LED (azul) (
a
) comece a piscar
.
• Soa um bip e pisca o LED no auricular direito.
Para desligar a unidade
Prima e mantenha premido [ ] durante cerca de 3 segundos.
Ouvirá um "beep" e a energia é desligada.
• Se a unidade não estiver ligada a um dispositivo Bluetooth
®
, a unidade
emite um "beep" e desliga-se automaticamente passados cerca de 5
minutos após ter parado de a usar. (Desligar automático)
∫ Bluetooth
®
Emparelhar
1 No estado desligado, prima e mantenha premido [ ] desta unidade,
até que o LED comece a piscar alternadamente a azul e vermelho.
2 Escolha “RP-BTS55” (
a
) a partir do menu do dispositivo Bluetooth
®
.
• Se lhe for pedida uma palavra-passe, insira "0000 (quatro zeros)" para
esta unidade.
• Quando o LED (azul) piscar duas vezes a cada cerca de 2 segundos,
o emparelhamento (registo) está terminado (ligação estabelecida).
∫ Ligar um dispositivo Bluetooth
®
emparelhado
1 Ligue a unidade.
2 Efetue o passo 2 de “Bluetooth
®
Emparelhar”. (
l
acima)
• Quando o LED (azul) piscar duas vezes a cada cerca de 2 segundos,
o emparelhamento (registo) foi terminado (ligação estabelecida).
Ligue o dispositivo Bluetooth
®
e a unidade.
∫ Ouvir música
Selecione e reproduza a música no dispositivo Bluetooth
®
.
• A música selecionada é transmitida através dos auriculares da unidade.
∫ Controlo à distância (Disponível apenas se o seu
Bluetooth
®
dispositivo suportar "AVRCP")
(exemplo de funcionamento)
∫ Fazer uma chamada telefónica
1 Prima [ ] na unidade e atenda a chamada recebida.
2 Comece a falar.
3 Prima [ ] para terminar a chamada telefónica.
• (apenas HFP) Rejeitar uma chamada / Alterar o dispositivo de
chamada: Prima duas vezes [ ] rapidamente.
• Pode fazer chamadas telefónicas com o telemóvel Bluetooth
®
usando o
microfone da unidade e uma aplicação do telemóvel Bluetooth
®
.
(l em baixo, “Ativar funções por voz”)
∫ Ativar funções por voz
Prima duas vezes [ ] rapidamente.
• A função por voz pode não funcionar, dependendo das especificações
do Smartphone e da versão da aplicação.
∫ Restaurar as predefinições de fábrica
1 Enquanto a unidade estiver desligada, prima e mantenha
premido [ ] durante, pelo menos, 5 segundos, até que o
LED comece a piscar alternadamente a azul e vermelho.
2 Enquanto o LED estiver a piscar alternadamente a azul e
vermelho, prima e mantenha premido [+] e [–] em simultâneo
durante, pelo menos, 5 segundos.
• O LED pisca de forma rápida na cor azul. A unidade é reposta para as
definições de fábrica.
∫ Perigo
A bateria recarregável foi desenvolvida especificamente para este
produto. Não a utilize com qualquer outro dispositivo.
Não recarregue a bateria retirada.
• Não aqueça nem exponha a chamas.
• Não deixe baterias dentro de um carro exposto à luz direta do sol
durante um longo período de tempo com as portas e janelas fechadas.
• Não perfure a bateria com um prego, não a exponha a impactos, não a
desmonte nem a modifique.
• Não permita que os fios toquem noutros metais ou toquem um no outro.
• Não transporte nem guarde a bateria com um colar, molas para o cabelo
ou acessórios parecidos.
Se o fizer, a bateria pode aquecer, rebentar ou incendiar-se.
∫ Aviso
Não coloque a bateria retirada nem outros artigo ao alcance das crianças.
A ingestão acidental de tais artigos pode ter efeitos adversos no corpo.
• Caso ache que tais artigos foram engolidos, consulte imediatamente um médico.
No caso de derrames da bateria, tome as seguintes medidas e não
toque nos derrames com as mãos.
Se os derrames entrarem em contacto com os olhos, podem dar origem à perda de visão.
• Lave os olhos imediatamente com água sem os esfregar, depois consulte um médico.
Se os derrames entrarem em contacto com o seu corpo ou roupa, isso
pode causar inflamação da pele ou lesões.
• Lave bem com água limpa e depois consulte um médico.
Uma bateria recarregável de polímero de ião e lítio encontra-se incorporada
no auricular esquerdo. Elimine-a de acordo com as normas locais. Quando
eliminar este produto, desmonte-o corretamente através do procedimento
apresentado a seguir, e retire a bateria recarregável interna.
• Desmonte após a bateria ficar completamente gasta.
• Quando eliminar a bateria, contacte as autoridades locais ou o
revendedor para se informar quanto ao método correto de eliminação.
1 Segure a parte superior do auricular esquerdo (L) e insira uma
chave de fendas para ranhuras (disponível comercialmente) por
baixo da cobertura superior a.
• Certifique-se de que mantém os dedos afastados da ponta da chave de fendas.
• Selecione uma chave de fendas suficientemente larga para um
espaço por baixo da cobertura superior.
2 Use a chave de fendas para levantar e empurrar a cobertura
superior a para cima.
• Tenha cuidado para não tocar na bateria com a chave de fendas.
3 Segure a bateria b e retire-a.
4Retire a bateria b e separe-a do auricular esquerdo, cortando os
fios, um a um, com uma tesoura.
• Isole as partes do fio da bateria retirada com fita de celofane.
• Não danifique nem desmonte a bateria.
Español
A Nombres de las partes
B Cargándose
C Cómo apagar/encender el aparato
D Conexión de un dispositivo Bluetooth
®
E Cómo ponerse los auriculares
F Usar los auriculares
Reproducir / Pausa: Pulse [ ].
Aumentar el volumen: Pulse [+].
Reducir el volumen: Pulse [–].
Avanzar al inicio de la siguiente pista:
Mantenga pulsado [+] durante 2 segundos aproximadamente.
Volver al inicio de la pista actual:
Mantenga pulsado [–] durante 2 segundos aproximadamente.
G
Para retirar la batería al desechar este aparato
Las siguientes instrucciones no están previstas para la
reparación de este aparato si no para su eliminación. Este
aparato no se puede restituir una vez desmontado.
• Al desechar este aparato, retire la batería instalada en este
aparato para su reciclaje.
Português
A Nomes das peças
B Carregar
C Ligar/desligar a unidade
D Ligar a um dispositivo Bluetooth
®
E Como usar os auriculares
F Usar os auscultadores
Reprodução/Pausa: Prima [ ].
Aumenta o volume: Prima [+].
Diminui o volume: Prima [–].
Passa para a faixa seguinte:
Prima e mantenha premido [+] durante cerca de 2 segundos.
Volta ao início da faixa atual:
Prima e mantenha premido [–] durante cerca de 2 segundos.
G
Retirar a bateria quando eliminar esta unidade
As instruções seguintes não foram criadas com o intuito de
reparações, mas para a eliminação desta unidade. Esta unidade
não pode ser restaurada uma vez desmontada.
• Quando eliminar esta unidade, retire a bateria instalada nesta unidade e recicle-a.
Suomi
English
∫ Close the charging terminal cover securely.
∫ Do not touch the charging terminal with wet hand.
• If sweat or liquid is attached to the charging terminal, malfunction
may occur.
Français
∫ Fermez correctement le cache de la borne de
chargement.
∫ Ne touchez pas la borne de chargement avec les mains
mouillées.
• Si de la sueur ou un liquide entre en contact avec la borne de
chargement, cela pourrait provoquer un dysfonctionnement.
Deutsch
∫ Schließen Sie fest die Abdeckung des
Ladeanschlusses.
∫ Berühren Sie den Ladeanschluss nicht mit nassen
Händen.
• Wenn Schweiß oder Flüssigkeiten am Ladeanschluss anhaften,
kann es zu Fehlfunktionen kommen.
Español
∫ Cierre la cubierta del terminal de carga firmemente.
∫ No toque el terminal de carga con las manos mojadas.
• Si sudor o líquidos entran en contacto con el terminal de carga,
podría producirse un mal funcionamiento.
Português
∫ Feche bem a tampa do terminal de carregamento.
∫ Não toque no terminal de carregamento com as mãos
molhadas.
• Se o terminal de carregamento entrar em contacto com o suor
ou algum líquido, pode ocorrer um mau funcionamento.
Varotoimet turvallisuuden takaamiseksi
VAROITUS:
Jotta vähennetään tulipalon, sähköiskun tai tuotteen
vahingoittumisen vaaraa,
• Älä anna veden tai muiden nesteiden tippua tai roiskua laitteen sisälle.
• Älä altista lisävarusteita (USB-latausjohto) sateelle, kosteudelle, tipoille
tai roiskeille.
• Älä laita varusteiden päälle mitään nesteitä sisältäviä esineitä kuten
maljakoita.
• Käytä suositeltuja varusteita.
• Älä poista suojia.
• Älä korjaa tätä laitetta itse. Anna huolto tehtäväksi pätevälle
huoltohenkilöstölle.
Tämä laite on tarkoitettu käytettäväksi leudoissa ja trooppisissa
ilmastoissa.
English
The Bluetooth
®
word mark and logos are registered trademarks owned by
the Bluetooth SIG, Inc. and any use of such marks by Panasonic
Corporation is under license.
Other trademarks and trade names are those of their respective owners.
QR Code is a registered trademark of DENSO WAVE INCORPORATED.
Other system names and product names appearing in this document are
in general the registered trademarks or trademarks of the respective
developer companies.
Note that the
TM
mark and
®
mark do not appear in this document.
Français
Le nom de la marque Bluetooth
®
ainsi que les logos sont des marques
déposées appartenant à Bluetooth SIG, Inc. et toute utilisation de ces
marques par Panasonic Corporation est effectuée sous licence. Les
autres marques et noms commerciaux appartiennent à leurs propriétaires
respectifs.
QR Code est une marque déposée de DENSO WAVE INCORPORATED.
Les autres noms de systèmes et de produits figurant dans le présent
document sont en général les marques déposées ou les marques
commerciales des sociétés respectives qui les ont développés.
Notez que les marques
TM
et
®
n’apparaissent pas dans ce document.
Deutsch
Die Bluetooth
®
-Wortmarke und -Logos sind eingetragene Markenzeichen
von Bluetooth SIG, Inc. und jede Verwendung dieser Marken durch
Panasonic Corporation erfolgt unter Lizenz. Andere Warenzeichen und
Handelsnamen sind Eigentum der jeweiligen Inhaber.
QR Code ist eine eingetragene Handelsmarke von DENSO WAVE
INCORPORATED.
Andere System- und Produktnamen in diesem Dokument sind im
Allgemeinen Marken oder eingetragene Marken der jeweiligen
Entwicklerunternehmen.
Beachten Sie, dass die Symbole
TM
und
®
in diesem Dokument nicht
verwendet werden.
Español
La marca denominativa Bluetooth
®
y sus logos son marcas comerciales
registradas de Bluetooth SIG, Inc. y cualquier uso de dichas marcas por
parte de Panasonic Corporation se realiza bajo licencia. Otros nombres
de marcas y marcas comerciales son propiedad de sus respectivos
propietarios.
QR Code es una marca registrada de DENSO WAVE INCORPORATED.
Otros nombres de sistemas y nombres de productos que aparecen en
este documento son en general las marcas comerciales registradas y
marcas comerciales de las respectivas compañías desarrolladoras.
Tenga en cuenta que la marca
TM
y la marca
®
no aparecen en este
documento.
Português
A palavra Bluetooth
®
e logótipos são marcas registadas pertencentes à
Bluetooth SIG, Inc. e qualquer uso de tais marcas por parte da Panasonic
Corporation é efetuado sob licença.
Outras marcas registadas e nomes comerciais pertencem aos respetivos
proprietários.
QR Code é uma marca registada da DENSO WAVE INCORPORATED.
Outros nomes do sistema e nomes do produto que apareçam neste
documento são, de modo geral, marcas registadas ou marcas comerciais
das respetivas empresas.
Tenha em conta que a marca
TM
e a marca
®
não aparecem neste
documento.

Join the conversation about this product
Here you can share what you think about the Panasonic RP-BTS55 Headphone. If you have a question, first carefully read the manual. Requesting a manual can be done by using our contact form.