
404077_BDA_tint-Pendula_Solar_002
Consignes de sécurité
AVERTISSEMENT!
DANGER pour les enfants
• Les enfants ne peuvent pas jouer avec l‘article.
• Gardez le matériau d‘emballage hors de portée des enfants. Risque d‘étouffe
-
ment en cas d‘ingestion ou de strangulation.
Risque de choc électrique et de court-circuit !
• Ne branchez qu‘un chargeur compatible et correctement installé.
Branchez le chargeur. Respectez la tension de charge (5 V).
• N‘utilisez pas l‘article s‘il est endommagé
• Il est interdit de modifier la conception mécanique ou électrique des luminai
-
res.
• Assurez-vous que le couvercle du port USB est bien fermé après le charge
-
ment. Toute infiltration d‘eau peut endommager définitivement l‘appareil.
• Débranchez la fiche après le chargement. Pendant. Pendant le chargement,
la lampe n‘a aucune fonction !
• En cas de détériorations dues au non respect des consignes de sécurité et de
montage, le droit de garantie s‘annule.
AVIS !
La source lumineuse de ce luminaire n‘est pas remplaçable. Lorsque la source
lumineuse atteint la fin de sa durée de vie, l‘ensemble du luminaire doit être
remplacé.
• Ne pas regarder les LED allumées à courte distance.
• Ne pas regarder les LED en fonctionnement avec une loupe.
• Nettoyez régulièrement le couvercle transparent du panneau solaire. Une
surface sale réduit l‘efficacité du panneau solaire
• Veillez à ce que l‘emplacement soit le plus ensoleillé possible. L‘ombre des
arbres, etc. peut réduire considérablement l‘autonomie de la batterie.
• Veillez à ce que le luminaire soit bien fixé. En cas de tempête, retirez le lumi
-
naire afin d‘éviter tout dommage.
Mise en service
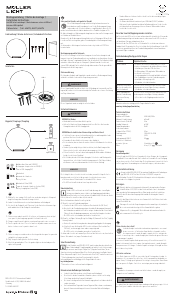
Afin de raccorder l’éclairage à LED avec une télécommande tint ou un
Zigbee Gateway, il doit se trouver en mode de couplage (lors de la mise en
marche, un clignotement bref apparaît).
Si ce n’est pas le cas, effectuez une réinitialisation (voir ci-dessous).
Vous trouverez des informations complémentaires à l’adresse : hey-tint.de
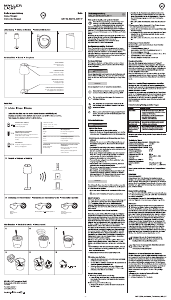
A) Si vous avez une télécommande tint :
a. Allumez le luminaire (pression courte sur la touche On/Off).
b. Préparez la télécommande au raccordement selon le mode d’emploi et tenez
la télécommande à proximité de l’éclairage à LED.
c. L‘éclairage LED est connecté lorsqu‘il s‘allume 3x.
B) Si vous disposez d’un Zigbee Gateway (ex. Hue Bridge V2, Amazon Echo Plus*,
Lightify Gateway) :
a. Lancez la recherche sur le Gateway ou l’App correspondante.
b. Activez ensuite l’éclairage à LED (même en cas d’affichage différente le cas
échéant)
c. L‘éclairage LED est connecté lorsqu‘il s‘allume 3x.
Vous pouvez également allumer/éteindre la lampe manuellement à l‘aide du bouton
situé sur la partie inférieure (pression courte sur le bouton : activé, pression longue sur le
bouton : désactivé).
Smarthome Ready:
Les produits tint de MÜLLER-LICHT peuvent être commandés au moyen
de la dernière norme radio Zigbee 3.0 et sont compatibles avec de
nombreux systèmes de commande de l‘éclairage, par exemple Philips
Hue*, Magenta Smarthome*, l‘assistant linguistique d‘Amazon (avec les appareils
Amazon Echo avec Hub Zigbee Smarthome intégré. )**, etc.
* Certains services peuvent être soumis à des restrictions. Pour connaître les
toutes dernières informations et les réponses aux questions fréquentes, consultez
la page : hey-tint.de/partner
** Si ce service est disponible dans votre pays.
Indications pour le chargement par cellule solaire
• Chargez complètement la batterie avant la première utilisation.
• Lors du choix de l‘emplacement, veillez à ce que la lampe soit exposée le plus
longtemps possible à la lumière directe du soleil.
• Si le lieu d‘installation est à l‘ombre, la durée d‘éclairage indiquée peut être
nettement réduite.
• Lorsqu‘il est utilisé comme lampe de table (panneau solaire en bas), le
panneau solaire ne reçoit pas suffisamment de lumière du soleil. Dans ce
cas, rechargez la lampe via le port USB ou tournez-la vers le soleil pour la
recharger.
• De même, les jours nuageux ou les journées courtes en hiver, il peut arriver
que le rayonnement solaire ne suffise pas à charger complètement la batte
-
rie.
• Pour protéger la batterie, la lampe s‘éteint automatiquement lorsque la
tension est trop faible.
• Il est également possible de recharger la batterie via un câble USB (USB-C).
Retirez le câble de recharge après la recharge et ne laissez pas la lampe
branchée en permanence. Remarque : la lampe ne s‘allume pas pendant le
chargement !
Réglage de la réinitialisation de l‘éclairage pour/du mode de
couplage
Une réinitialisation de l‘éclairage encastrés LED n‘est nécessaire que dans des cas
exceptionnels, par exemple, si la télécommande a dû être réinitialisée ou si vous
souhaitez raccorder l’éclairage à LED dans un Smarthome Gateway.
Appuyez sur le bouton on/off pendant environ 5 secondes. Un clignotement bref
apparaît ensuite. La réinitialisation souhaitée a lieu. Vous pouvez intégrer le l‘éc
-
lairage, comme d’habitude, dans votre télécommande tint et/ou un Smarthome
System avec Zigbee.
Dépannage/Questions fréquentes
Problème Cause possible
Sans fonction • La batterie n‘est pas suffisamment chargée. La lampe
s‘éteint automatiquement afin d‘économiser la batterie.
> Recharge par énergie solaire ou par connexion USB.
• La batterie est rechargée via USB. Pendant ce temps, la
lampe ne s‘allume pas.
> Terminer le chargement et retirer le câble de charge-
ment.
• Aucune connexion établie à une télécommande tint ou un
Zigbee Gateway. > Branchement, voir Mise en service
Lors de l’activation, cligno-
te et s’allume en blanc
• L‘éclairage encastrés LED ne sont pas encore connectés à
une télécommande tint ou un Zigbee Gateway.
> Branchement, voir Mise en service
Aucune connexion possible
avec une télécommande
tint ou un Gateway
• L‘éclairage encastrés LED sont encore connecté à une
autre télécommande tint ou un Zigbee Gateway
> Réglage de la réinitialisation de l‘éclairage encastrés
LED/du mode de couplage
Vous trouverez les réponses à d’autres questions fréquentes à l’adresse
www.hey-tint.de/pages/kontakt-faq
Caractéristiques techniques
Bande de fréquence du module RF sans fil : 2405-2480,0 MHz
Puissance de transmission maximale : <20 mW
Portée de radio (champ libre) : 30 m
Consommation en veille: <0,5 W
Indice de rendu des couleurs : Ra 80
Intensité lumineuse
(source lumineuse à 2700 K) : 20 lm
Température de couleur : 1800–6500 K + RGB
Puissance : 0,5 W
Tension de charge (USB) : 5 V
Classe de protection électrique
Du système complet : Classe de protection III
Batterie : Li-Ion, 3,7 V , 1500 mAh
Nettoyage
Nettoyez régulièrement le couvercle transparent du panneau solaire.
Risque de courts-circuits !
Avant le nettoyage, le cas échéant, débranchez la prise USB et laissez-le refroidir.
N’utilisez aucun produit de nettoyage contenant des solvants et/ou des substan
-
ces abrasives/irritantes. Pour nettoyer, utilisez un chiffon doux et sec. Les taches
tenaces peuvent être éliminées au moyen d’un chiffon légèrement humide, si
nécessaire avec un produit de nettoyage neutre.
Déclaration de conformité
La société MÜLLER-LICHT International GmbH déclare par la présente que le
type d‘installation radio « MÜLLER-LICHT tint » est conforme à la directive
2014/53/UE.
Le texte complet de la déclaration de conformité UE est disponible à l’adresse
Internet suivante : hey-tint.de
Élimination
Les appareils usagés ne peuvent pas être éliminés avec les ordures ména-
gères. Selon la directive 2012/19/UE, l‘appareil en fin de durée de vie doit
être soumis à une élimination contrôlée. Les matériaux contenus dans l‘appareil
sont soumis à un recyclage et l‘environnement n‘est pas pollué.
Déposez l‘ancien appareil sans frais auprès d‘un point de collecte pour déchets
électroniques ou d‘un centre de recyclage.
Éliminez également les matériaux d‘emballage de façon conforme à l‘envi
-
ronnement en les déposant par type dans les conteneurs mis à disposition.
Symbole de recyclage général. Vous trouverez des informations complé
-
mentaires à l’adresse : www.mueller-licht.de/recycle
Dear customer,
These operating instructions include important information on initial
installation and use. Read the operating instructions, the safety notes
in particular, carefully before installing the product. Non-compliance
with these operating instructions may result in severe injuries and damage to the
product.
Store the operating instructions for future use. If you give the product to a third
party, it is critical that you provide these operating instructions as well.
You can also download these instructions as a PDF file from our website
hey-tint.de.
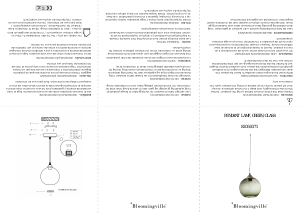
Intended use
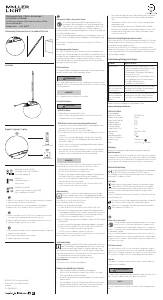
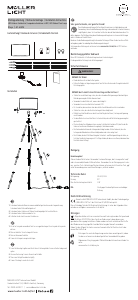
The LED light ball is intended for illumination purposes in the garden.
The item is not suitable for commercial use.
The light was designed to be operated with an optionally available tint remote con-
trol. Alternatively, the light can also be incorporated into a Smart Home system
with Zigbee gateway.
Explanation of symbols
The following symbols and signal words are used in this user manual, on the lamp
or on the packaging.
WARNING!
This signal symbol/word designates a hazard with moderate degree of risk which
may lead to death or severe injury if not avoided.
ATTENTION!
This signal symbol/word designates a hazard with low degree of risk which may
severe a moderate injury if not avoided.
NOTICE!
This signal word warns against potential damages to property.
Safety Instructions
WARNING!
DANGER for children
• Children must not play with the item.
• Keep children away from packaging material. There is a risk of suffocation if
swallowed or if strangled with the material.
DANGER of electric shock and danger of short circuit
• Connect only a properly installed and compatible USB charger. Observe the
charging voltage (5 V).
• Do not use the item if it is damaged.
• It is forbidden to modify the mechanical or electrical of the lamp.
• Make sure that the USB port cover is securely closed after charging. Water
penetration can permanently damage the device.
• Disconnect the plug after charging. During charging, the light has no function!
• In the event of damage caused by failure to observe the safety and assembly
instructions, the warranty will expire. The manufacture accepts no liability for
consequential damages resulting from this.
NOTICE!
The light source of this luminaire is not replaceable, when the light source rea-
ches its end of life, the entire luminaire unit must be replaced.
• Do not look into the illuminated LEDs from a short distance.
• Do not look at the LEDs with a magnifying glass during operation.
• Clean the transparent cover of the solar panel regularly. A dirty surface redu
-
ces the efficiency of the solar panel.
• Make sure the device is placed in a sunny location. Shade from trees etc. can
significantly reduce the battery life.
• Ensure that the luminaire is held securely. In the event of a storm, remove the
luminaire to avoid damage.
Initial Installation
In order to connect the luminaire with a remote control or with a Zigbee
gateway, it must be in coupling mode (circle through the colors appears
when switched on). If this is not the case, perform a reset (see below).
For more information, visit www.mueller-light.de/tint
A) If you have a tint remote control:
a. Turn on the light by pushing the on/off button on the bottom.
b. Prepare the remote control for connecting as described in the operating inst
-
ructions and accordingly, hold it close to the control unit.
c. The luminaire is connected once it has flashed three times.
B) If you have a Zigbee gateway (for example Hue Bridge V2, Amazon Echo Plus*,
Lightify Gateway):
a. Start the search process on the gateway or the corresponding app.
b. Then switch on the LED luminaire by pushing the on/off button (even if somet
-
hing otherwise may be indicated)
c. The luminaire is connected once it has flashed three times.
You can also turn on/off the light manually by on/off button on the bottom (short
press: on, long press: off).
Notes on charging by solar cell
• Fully charge the battery before using it for the first time.
• When choosing a location, make sure that the lamp is in direct sunlight for as
long as possible.
• If the luminaire is placed in the shade, the specified lighting time can be
significantly reduced.
• When used as a table lamp (solar panel down), the sunlight is not sufficient to
charge the battery. In this case, charge the light via USB port or turn it into the
sunlight for charging.
• On cloudy days or short days in winter, it may be sunlight is not sufficient to
fully charge the battery.
• In order to protect the battery, the lamp switches off automatically if the
voltage is too low.
• Alternatively, you can also charge the battery via a USB cable (USB-C).
Remove the charging cable after charging and do not leave the light perman-
ently connected to the power supply. Note: The light does not light up during
charging!
Resetting the LED luminaire/Setting Coupling Mode
Resetting the tint LED luminaire is only necessary in exceptional cases, for example
if the remote control was reset or if you want to incorporate the LED luminaire into a
smarthome gateway.
Press the On/Off key for approx. 5 seconds. A short color cycle now appears. The de
-
sired reset has been performed. Afterwards you can connect the LED light as usual
with your tint remote control and/or a smarthome system with Zigbee.
Troubleshooting/Frequently Asked Questions
Problem Possible cause
Not working • The battery is not sufficiently charged. The light switches off
automatically to save the battery.
> Charging via solar or USB connection.
• The battery is being charged via USB. The lamp does not
light up during this process.
> Complete the charging process and remove the charging
cable. No connection established to a tint remote control or
a Zigbee gateway.
> Connect, see Initial Installation
When switched on, it
flashes and then it lights
up white.
• The LED luminaire has not yet been connected with a tint
remote control or with a Zigbee gateway.
> Connect, see Initial Installation
No connection possible to
a tint remote control or a
Zigbee gateway
• The LED luminaire are still connected to another tint remote
control or to a Zigbee gateway.
> Reset the LED luminaire/set coupling mode
For more answers to frequently asked questions, visit
www.hey-tint.de/pages/kontakt-faq
Technical data
Frequency band of the wireless
RF mode: 2405-2480.0 MHz
Maximum transmission power: <20 mW
Wireless range (free field): 30 m
Standby consumption: <0.5 W
Color rendering index: Ra 80
Luminous flux (integrated light source at 2700 K): 20 lm
Color temperature: 1800–6500 K + RGB
Output: 0,5 W
Charging voltage: 5 V
Electrical protection class
entire system: Protection class III
Battery: Li-Ion, 3,7 V , 1500 mAh
Smarthome Ready:
The tint products from MÜLLER-LICHT can be controlled using the latest
Zigbee 3.0 wireless standard and is compatible with numerous lighting
control systems such as Philips Hue*, Magenta Smarthome*, Amazon voice
assistant (using Amazon Echo devices with integrated Zigbee Smart home hub)**
and many more.
* Restrictions are possible for several services. For updated information and ans
-
wers to frequently asked questions, visit hey-tint.de/partner
** If this service is available in your country.
Cleaning
Clean the transparent cover of the solar panel regularly.
Short-circuit hazard!
• Pull the USB plug from the power outlet before cleaning and let it cool down.
Do not use a cleaner that contains solvents and/or abrasive / corrosive ingre-
dients. Use a dry, soft cloth for cleaning. Stubborn spots can be removed with a
slightly moistened cloth, if necessary using a neutral cleaner.
Declaration of Conformity
MÜLLER-LICHT International GmbH hereby declares that the wireless system
type “MÜLLER-LICHT tint” complies with Directive 2014/53/EU.
The complete text of the EU Declaration of Conformity is available online at the
following web address: hey-tint.de
Disposal
Old devices must not be disposed of with household waste. According to
Directive 2012/19/EU, the device must be disposed of at a proper waste dis-
posal facility at the end of its service life. Here, the reusable material is recycled,
preventing pollution to the environment.
Deliver the old unit to a collection point for electronic waste or to a reusable
materials depot free of charge.
You can also dispose of the packaging material in an environmentally re
-
sponsible manner by disposing of it by material type in the proper collection
containers provided.
General recycling symbol. For more information, visit:
www.mueller-licht.de/recycle


Join the conversation about this product
Here you can share what you think about the Müller Licht 404077 Pendula Solar Lamp. If you have a question, first carefully read the manual. Requesting a manual can be done by using our contact form.