DE/AT/CH DE/AT/CH DE/AT/CH DE/AT/CH DE/AT/CH DE/AT/CH
NL/BE
kinderen te worden
gehouden om stran-
gulatie en verstrik-
king te vermijden.
De hals van een kind
kan in de koorden
verstrikt raken.
Bedden, kinderbed-
den en meubels die-
nen uit de buurt van
koorden voor raam-
bekleding geplaatst
te worden.
Koorden mogen niet
aan elkaar worden
vastgeknoopt. Men
dient ervoor te zor-
gen, dat de koorden
zich niet opdraaien
en een lus vormen.
WAAR-
SCHU-
WING!
LEVENSGEVAAR!
Houd kinderen al-
tijd uit de buurt van
het product (gevaar
op strangulatie,
GB/IE
strangulation and
entanglement. A
child‘s neck may be
tangled in ropes.
Position beds, cots
and furniture away
from ropes for win-
dow coverings.
Do not knot ropes.
Ensure the ropes do
not tangle, forming
a loop.
WARN-
ING!
DANGER TO LIFE
!
Always keep chil-
dren away from the
product (strangula-
tion hazard, small
parts which could
be swallowed).
This product is not
a toy!
CAUTION! RISK
OF INJURY! Please
ensure that all parts
are intact and as-
sembled correctly.
Incorrect assembly
Beschrijving van de onderdelen
1
Koordaandrijving
2
Veiligheidsclip voor het koord
3
Klemhaak
4
Klem-bevestigingsplaat
5
Bevestigingsplaat (reeds gemonteerd)
6
Fixeerclip (reeds gemonteerd)
7
Rolgordijnbevestiging
8
Eindpen
Omvang van de levering
1 eindpen
1 koordaandrijving
2 rolgordijnbevestigingen
2 fixeerclips (reeds gemonteerd)
2 bevestigingsplaten (reeds gemonteerd)
2 klem-bevestigingsplaten
2 klemhaken
1 veiligheidsclip voor het koord
5 pluggen
5 schroeven
1 montagehandleiding
Veiligheid
Bij beschadigingen die worden veroorzaakt door
het niet in acht nemen van deze gebruiksaanwijzing
vervalt de garantie! Wij zijn niet aansprakelijk voor
gevolgschade! Wij zijn niet aansprakelijk in geval
van materiële schade of persoonlijk letsel als ge-
volg van ondeskundig gebruik of het negeren van
de veiligheidsinstructies!
ATTENTIE
STRANGU-
LATIEGE-
VAAR!
Kleine kinderen zich
kunnen door de lus-
sen in de koorden,
kettingen, riemen en
binnenin bevindende
koorden voor het
gebruik van het pro-
duct stranguleren.
Koorden dienen
buiten het bereik van
Legenda van de gebruikte pictogrammen
Waarschuwingen en veiligheidsin-
structies in acht nemen!
Strangulatiegevaar!
Niet wassen
Niet bleken
Niet in de wasdroger drogen
Niet strijken
Niet chemisch reinigen
Voer de verpakking en het product af
op milieuvriendelijke wijze!
Geen boren
Geen schroeven
Thermo-verduisteringsrolgordijn
Inleiding
Hartelijk gefeliciteerd! Met uw aankoop heeft u
voor een hoogwaardig product gekozen. Maak u
voor de eerste ingebruikname vertrouwd met het
product. Lees hiervoor aandachtig de volgende
montage-instructies. Gebruik het product alleen
zoals beschreven en voor de aangegeven ge-
bruiksdoeleinden. Bewaar deze gebruiksaanwij-
zing zorgvuldig. Overhandig alle documenten bij
doorgifte van het product aan derden.
Correct gebruik
Het product zorgt voor een prettig klimaat binnens-
huis en is bedoeld als decoratie voor ramen. Het
meegeleverde wandbevestigingsmateriaal is alleen
geschikt voor beton, bakstenen of houten wanden.
Een ander gebruik als eerder beschreven of een
verandering van het product is niet toegestaan en
kan tot letsel en / of beschadiging van het product
voeren. De fabrikant is niet aansprakelijk voor
schade die terug te voeren is op ondoelmatig ge-
bruik. Het product is niet geschikt voor commerci-
ele doeleinden.
Technische gegevens
Stof: 100 % polyester
Afmetingen raam: 60, 70, 80, 90 of 100 cm x
150 cm (B x H)
Afmetingen deur: 80 x 200 cm (B x H)
NL/BENL/BEFR/BEFR/BEFR/BE FR/BEFR/BE
le bas (v. fig. E). Pressez fermement et simul-
tanément les patins adhésifs. Fixez ensuite les
supports de fixation (v. fig. F).
Étape 4 : Montez le clip de sécurité de la
traction par chaîne
2
au moyen d‘une vis
dans le mur (v. fig. G). Le clip de sécurité de la
traction par chaîne
2
doit être monté du même
côté que l‘entraînement latéral à cordon
1
.
Accrochez la chaîne au clip de sécurité de la
traction par chaîne
2
. Le cordon doit être fixé
de manière serrée au mur, au moyen du clip
de sécurité de la traction par chaîne
2
.
Étape 5 : Montage mural ou au plafond :
Percez les trous de fixation. Insérez les che-
villes dans les trous percés et fixez les supports
du store
7
. Retirez le clip de fixation
6
du
support du store
7
ainsi que les plaques de
réception
5
prévues pour l‘embout-tube
8
et l‘entraînement à cordon
1
(v. fig. H). En-
clenchez le store en enfichant les plaques de
réception
5
dans les supports du store
7
(v. fig. I) et fixez de nouveau le clip de fixa-
tion
6
sur le support du store
7
(v. fig. J).
Remarque : Afin que le tissu s‘ajuste direc-
tement à la zone supérieure du cadre de la
fenêtre, enroulez le store dans le sens opposé,
en utilisant la traction par chaîne.
Nettoyage
Non lavable.
Dépoussiérer le produit avec un plumeau ou
un aspirateur réglé faiblement.
Service après-vente
Pour toute question ou réclamation, veuillez nous
envoyer un courrier électronique à l‘adresse e-mail
indiquée ci-dessous :
IAN 298032
IAN 291968
Veuillez indiquer le numéro IAN.
Mise au rebut
Ne jetez pas le produit avec les déchets ménagers.
Informez-vous auprès de votre commune ou de
votre municipalité des possibilités de mise au re-
but correctes et respectueuses de l‘environnement.
Le matériel d‘emballage peut être jeté dans les
conteneurs de recyclage locaux.
Informations
Distributeur
Goldner GmbH
Ringstraße 24
AT-6830 Rankweil
AUTRICHE
strangulation, d‘in-
gestion de petits
éléments).
Le produit n‘est pas
un jouet !
ATTENTION !
RISQUE DE BLES-
SURE ! Vérifiez que
toutes les pièces
sont en parfait état
et correctement
montées. Il existe un
risque de blessures
en cas de montage
incorrect. Les pièces
endommagées
peuvent affecter la
sécurité de l‘utilisa-
teur et le fonction-
nement de l‘article.
Montage
Étape 1 : Au choix, vous pouvez monter
l‘entraînement latéral à cordon
1
à gauche
ou à droite (v. fig. A). Si votre fenêtre s‘ouvre
à gauche, montez l‘entraînement latéral à
cordon
1
à droite. Si votre fenêtre s‘ouvre à
droite, montez l‘entraînement latéral à cor-
don
1
à gauche.
Étape 2 : Montez le support de fixation en
connectant ensemble les plaques de support de
fixation
4
et le support du store
7
(v. fig. B).
Introduisez les crochets de fixation
3
sur
2 mm max. dans les plaques de support de
fixation
4
(v. fig. C). Retirez le film de protec-
tion des patins adhésifs situés sur les plaques
de support de fixation
4
.
Étape 3 : Placez ensuite les supports de fixa-
tion dans l‘entraînement latéral à cordon
1
et l‘embout-tige, puis suspendez le store au
battant de la fenêtre dans la position voulue
(v. fig. D). Veillez à ce que la chaîne de l‘en-
traînement latéral à cordon
1
soit dirigée vers
Les cordelettes doivent
rester hors de portée
des enfants pour éviter
qu‘ils ne s‘étranglent
ou s‘empêtrent. Les
cordelettes peuvent
s‘enrouler autour
du cou d‘enfants en
bas-âge.
Les lits, lits pour
enfants et meubles
doivent être placés
à l’écart des corde-
lettes pour stores,
rideaux, etc.
Les cordelettes ne
doivent pas être re-
liées entre elles. Il
est nécessaire de
vérifier que les cor-
delettes ne forment
pas de boucle.
ATTEN-
TION !
DANGER DE
MORT! Toujours
garder le produit à
l‘écart des enfants
(risque de
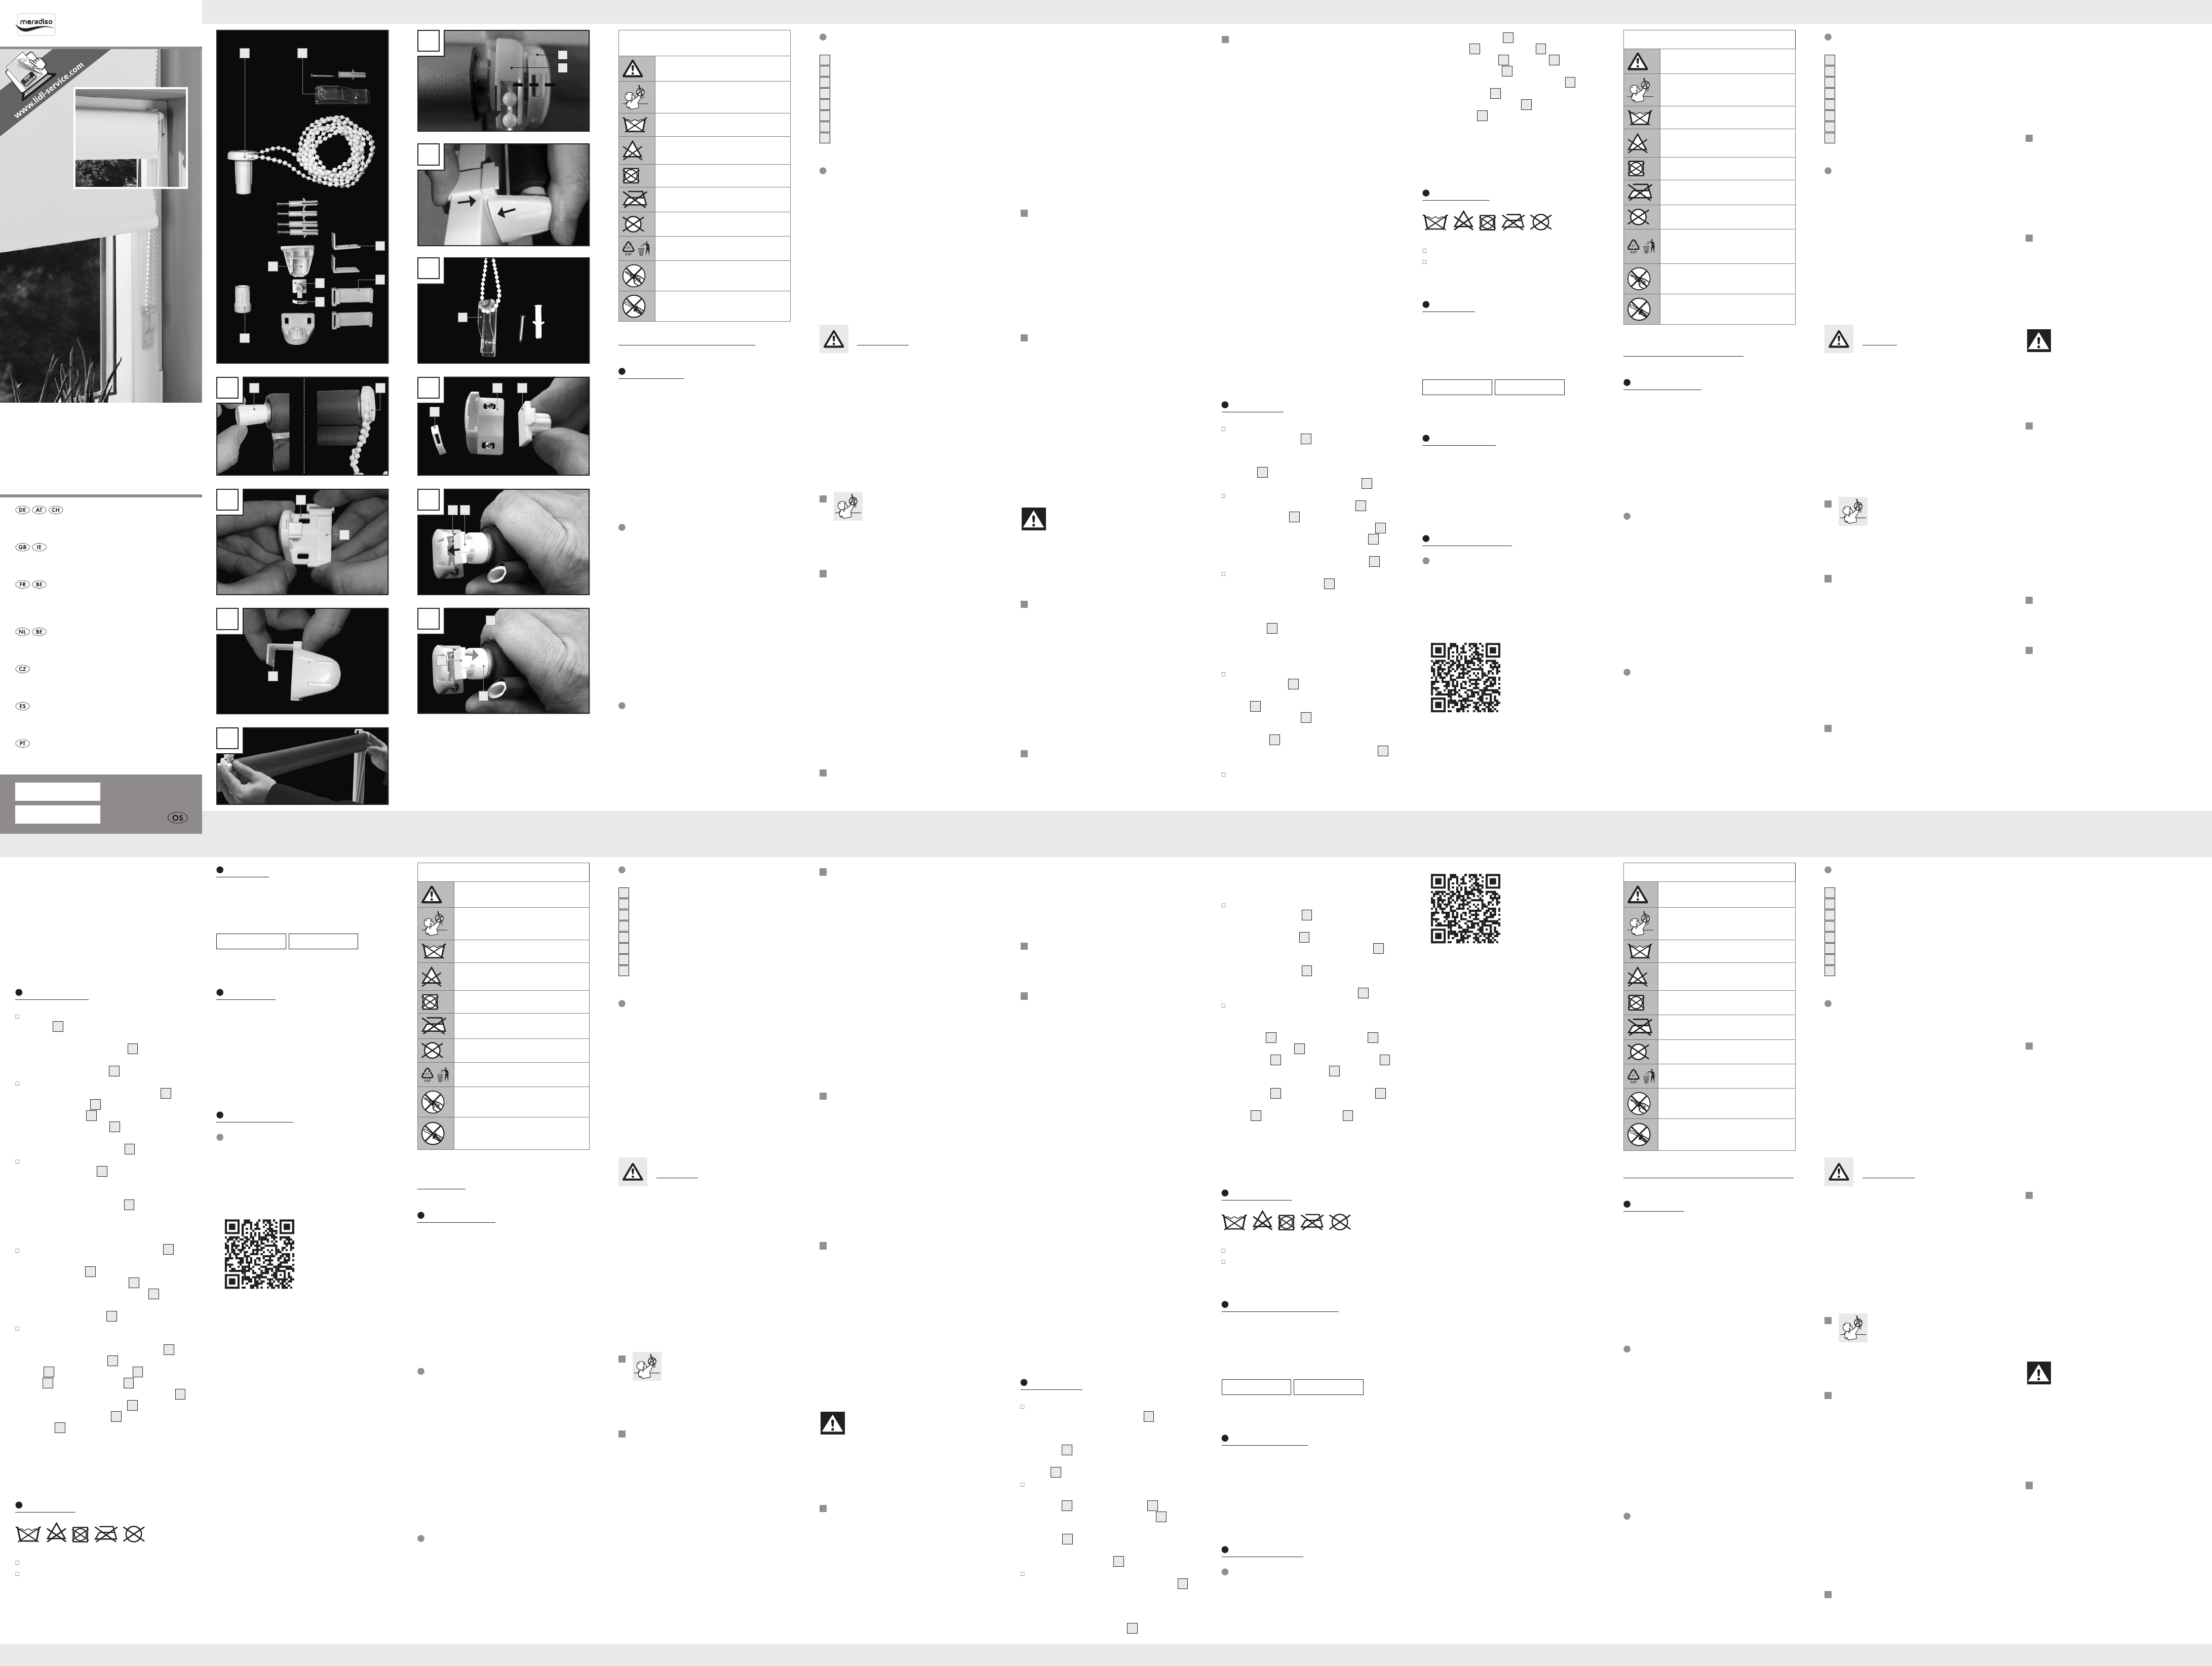
Descriptif des pièces
1
Entraînement latéral à cordon
2
Clip de sécurité de la traction par chaîne
3
Crochet de fixation
4
Plaques de support de fixation
5
Plaque de réception (déjà prémontée)
6
Clip de fixation (déjà prémonté)
7
Support de store
8
Embout-tige
Contenu de la livraison
1 Embout-tige
1 Entraînement latéral à cordon
2 Supports de store
2 Clips de fixation (déjà prémontés)
2 Plaques de réception (déjà prémontées)
2 Plaques de support de fixation
2 Crochets de fixation
1 Clip de sécurité de la traction par chaîne
5 Chevilles
5 Vis
1 Notice de montage
Sécurité
Les droits de recours en garantie sont annulés en
cas de dommages résultant du non-respect du pré-
sent mode d’emploi ! Il n‘est assumé ni garantie
ni responsabilité pour les dommages consécutifs à
une utilisation inappropriée ! Il n’est assumé ni ga-
rantie ni responsabilité pour les dommages matériels
ou corporels causés par une manipulation erronée
ou le non respect des instructions de sécurité !
ATTEN-
TION
RISQUE
D‘ÉTRAN-
GLEMENT !
Les enfants en bas-
âge peuvent s‘étran-
gler avec les boucles
formées par les cor-
delettes de traction,
chaînes, sangles et
cordelettes internes
actionnant le produit.
FR/BEGB/IEGB/IE
GB/IEGB/IE
Légende des pictogrammes utilisés
Respecter les avertissements et
consignes de sécurité !
Risque d'étranglement !
Ne pas laver
Ne pas blanchir
Ne pas sécher au sèche-linge !
Ne pas repasser
Ne pas nettoyer à sec
Assurer une mise au rebut écolo-
gique de l’emballage et du produit !
Ne pas percer
Ne pas visser
Store enrouleur occultant
et isolant
Introduction
Félicitations ! En achetant cet article, vous avez
acquis un produit de qualité supérieure. Avant de
l‘utiliser pour la première fois, familiarisez-vous
avec son fonctionnement. À cet effet, lisez attenti-
vement la notice de montage suivante. N‘utilisez
l‘appareil que pour l‘usage décrit et que pour les
domaines d‘application cités. Veuillez conserver
soigneusement cette notice. Lorsque vous remettez
l‘appareil à d‘autres utilisateurs, veuillez également
leur transmettre tous les documents liés à celui-ci.
Utilisation conforme
Ce produit s‘assure d‘apporter un climat agréable
dans une pièce, et a été conçu afin de décorer
les fenêtres. Le matériel de fixation murale fourni
est uniquement conçu pour le béton, les tuiles ou
les parois en bois. Toute autre utilisation que celle
décrite ci-dessus ou toute modification du produit
est interdite et peut mener à des blessures et / ou
à un endommagement du produit. Le fabricant
décline toute responsabilité pour les dommages
résultant d’une utilisation non conforme. Le produit
n’est pas destiné à une utilisation commerciale.
Caractéristiques techniques
Tissu : 100 % Polyester
Dimensions fenêtre : 60, 70, 80, 90 ou
100 cm x 150 cm (l x h)
Dimensions porte : 80 x 200 cm (l x h)
Service
If you have any questions or complains please
write to us at the following e-mail address:
IAN 298032
IAN 291968
Please quote your IAN number.
Disposal
Do not dispose of the product with the household
waste.
Contact your local or municipal administration to
find out how to dispose of the product in an envi-
ronmentally friendly and appropriate manner. The
packaging material can be disposed of through
local recycling.
Information
Distributor
Goldner GmbH
Ringstrasse 24
AT-6830 Rankweil
AUSTRIA
could result in injury.
Damaged parts
could impact safety
and function.
Installation
Step 1: You can choose to fix the side
pulley
1
on either the left or right side
(see ill. A). If your window opens on the left
side, then fix the side pulley
1
on the right
side. If your window opens on the right side,
then fix the side pulley
1
on the left side.
Step 2: Assemble the clamping carriers by
connecting the clamping carrier plates
4
and
the blinds carrier
7
by insertion (see ill. B).
Insert the hooks
3
max. 2 mm into the
clamping carrier plates
4
(see ill. C). Remove
the protection foil from the adhesive pads on
the clamping carrier plates
4
.
Step 3: Now insert the clamping carriers
into the side pulley
1
and end piece and
install the blinds on the casement window in
the desired position (see ill. D). Make sure
the chain in the side pulley
1
faces down-
ward (see ill. E). Simultaneously apply pres-
sure to the adhesive pads. Subsequently fix
the clamping carriers (see ill. F).
Step 4: Fix the chain hoist safety clip
2
to
the wall using a screw (see ill. G). The chain
hoist safety clip
2
must be fixed on the
same side as the side pulley
1
. Place the
chain in the chain hoist safety clip
2
. The
cord must be firmly fixed to the wall with the
chain hoist safety clip
2
.
Step 5: Fixture to wall or ceiling: Drill the
holes for fixture. Insert the wall plugs to the
drilled holes and fix the blinds carriers
7
.
Remove the fixing clip
6
on the blinds car-
rier
7
and the carrier plates
5
for the end
pin
8
and the side pulley
1
(see ill. H). Let
the blinds, together with the carrier plates
5
,
snap into the blinds carriers
7
(see ill. I) and
again fix the fixing clip
6
to the blinds
carrier
7
(see ill. J).
Note: To ensure the material fits closely to
the upper area of the window frame simply
pull the blinds in the opposite direction using
the chain hoist.
Cleaning
Not washable.
Dust this product with a duster or a vacuum
cleaner set to a low level.
Parts description
1
Side pulley
2
Chain hoist safety clip
3
Hooks
4
Clamping carrier plates
5
Carrier plate (preinstalled)
6
Fixing clip (preinstalled)
7
Blinds carrier
8
End pin
Delivery contents
1 End pin
1 Side pulley
2 Blinds carrier
2 Fixing clips (preinstalled)
2 Carrier plates (preinstalled)
2 Clamping carrier plates
2 Hooks
1 Chain hoist safety clip
5 Wall plugs
5 Screws
1 Installation instructions
Safety
Damage due to failure to comply with these oper-
ating instructions will invalidate the warranty! No
liability is accepted for consequential damage! In
the case of material damage or personal injury
caused by incorrect handling or non-compliance
with the safety instructions, no liability is accepted!
ATTEN-
TION
RISK OF
STRANGU-
LATION!
Small children could
be strangled by
loops in pull cords,
chains, straps and
inner cords for op-
erating the product.
Keep ropes out of
the reach of children
to prevent
List of pictograms used
Observe the warnings and safety
notices!
Risk of strangulation!
Not washable
Do not use bleach
Do not tumble dry
Do not iron
Do not dry clean
Dispose of the packaging and
product in an environmentally-
friendly manner!
No drilling
No screws
Thermal Blackout Blind
Introduction
Congratulations! With this purchase you have
chosen a high-quality product. Familiarise yourself
with the product before first usage. Carefully read
the following assembly instructions for this purpose.
The product must only be used as described and
for the specified fields of application. Keep these
instructions in a safe place. If passing this product
on to a third party also include all documents.
Intended use
The product creates a pleasant room temperature
and is intended for the decoration of windows.
The included material for fixture to the wall is only
suitable for concrete, brick or wooden walls. Any
use other than previously mentioned or any prod-
uct modification is prohibited and can lead to in-
juries and / or product damage. The manufacturer
is not liable for any damages caused by any use
other than its intended purpose. This product is
not intended for commercial use.
Technical Data
Material: 100 % Polyester
Measurements window: 60, 70, 80, 90 or
100 cm x 150 cm
(W x H)
Measurements door: 80 x 200 cm (W x H)
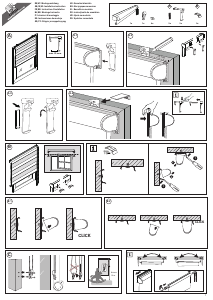
Sie die Rolloträger
7
. Entfernen Sie den
Fixierclip
6
am Rolloträger
7
sowie die
Aufnahmeplatten
5
für Endstift
8
und
Seitenzuggetriebe
1
(s. Abb. H). Das Rollo
zusammen mit den Aufnahmeplatten
5
in
die Rolloträger
7
einrasten (s. Abb. I) und fi-
xieren Sie den Fixierclip
6
wieder am
Rolloträger
7
(s. Abb. J).
Hinweis: Damit der Stoff direkt am oberen
Bereich des Fensterrahmens anliegt, rollen Sie
das Rollo mittels Kettenzug einfach in die ent-
gegensetzte Richtung auf.
Reinigung
Nicht waschbar.
Produkt mit einem Staubwedel oder schwach
eingestelltem Staubsauger entstauben.
Service
Bei Fragen oder Reklamationen schreiben Sie uns
bitte eine E-Mail an die unten angegebene E-Mail-
adresse:
IAN 298032
IAN 291968
Bitte geben Sie Ihre IAN-Nummer an.
Entsorgung
Werfen Sie das Produkt nicht in den Hausmüll.
Erkundigen Sie sich in Ihrer Stadt oder Gemeinde
nach einer entsprechend umwelt- und sachgerech-
ten Entsorgung. Das Verpackungsmaterial kann in
den örtlichen Recyclingbehälter gegeben werden.
Informationen
Inverkehrbringer
Goldner GmbH
Ringstrasse 24
AT-6830 Rankweil
ÖSTERREICH
VORSICHT! VER-
LETZUNGSGE-
FAHR! Stellen Sie
sicher, dass alle
Teile unbeschädigt
und sachgerecht
montiert sind. Bei
unsachgemäßer
Montage besteht
Verletzungsgefahr.
Beschädigte Teile
können die Sicher-
heit und Funktion
beeinflussen.
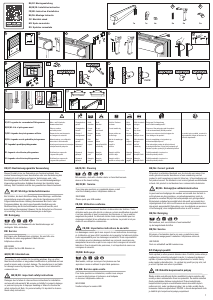
Montage
Schritt 1: Wahlweise können Sie das
Seitenzuggetriebe
1
links oder rechts
montieren (s. Abb. A). Wenn sich Ihr Fenster
links öffnet, montieren Sie das Seitenzugge-
triebe
1
rechts. Öffnet sich Ihr Fenster rechts,
montieren Sie das Seitenzuggetriebe
1
links.
Schritt 2: Montieren Sie die Klemmträger,
indem Sie die Klemmträgerplatten
4
und
die Rolloträger
7
zusammen stecken
(s. Abb. B). Führen Sie die Klemmhaken
3
max. 2 mm in die Klemmträgerplatten
4
ein
(s. Abb. C). Ziehen Sie die Schutzfolie der
Klebepads auf den Klemmträgerplatten
4
ab.
Schritt 3: Setzen Sie nun die Klemmträger
in das Seitenzuggetriebe
1
und Endstück
ein und hängen Sie das Rollo am Fensterflügel
an gewünschter Position ein (s. Abb. D). Ach-
ten Sie darauf, dass die Kette im Seitenzug-
getriebe
1
nach unten zeigt (s. Abb. E).
Drücken Sie gleichzeitig die Klebepads fest.
Fixieren Sie anschließend die Klemmträger
(s. Abb. F).
Schritt 4: Montieren Sie den Kettenzug-
Sicherungsclip
2
mittels Schraube an der
Wand (s. Abb. G). Der Kettenzug-Sicherungs-
clip
2
muss auf der gleichen Seite wie das
Seitenzuggetriebe
1
montiert werden. Hän-
gen Sie die Kette in den Kettenzug-Siche-
rungsclip
2
ein. Die Schnur muss straff zur
Wand mit dem Kettenzug-Sicherungsclip
2
befestigt werden.
Schritt 5: Wand oder Deckenmontage:
Bohren Sie die Befestigungslöcher. Führen Sie
Dübel in die Bohrlöcher ein und befestigen
Kindern zu halten,
um Strangulierung
und Verwicklung zu
vermeiden. Der
Hals eines Kindes
kann in Schnüre ver-
wickelt werden.
Betten, Kinderbetten
und Möbel sind ent-
fernt von Schnüren
für Fensterabdeckun-
gen aufzustellen.
Schnüre dürfen nicht
miteinander verknüpft
werden. Es ist sicher-
zustellen, dass sich
Schnüre nicht
verwickeln und eine
Schlinge bilden.
WAR-
NUNG!
LEBENSGEFAHR!
Halten Sie Kinder
stets vom Produkt
fern (Strangulations-
gefahr, verschluck-
bare Kleinteile).
Das Produkt ist kein
Spielgerät!
Teilebeschreibung
1
Seitenzuggetriebe
2
Kettenzug-Sicherungsclip
3
Klemmhaken
4
Klemmträgerplatten
5
Aufnahmeplatte (bereits vormontiert)
6
Fixierclip (bereits vormontiert)
7
Rolloträger
8
Endstift
Lieferumfang
1 Endstift
1 Seitenzuggetriebe
2 Rolloträger
2 Fixierclips (bereits vormontiert)
2 Aufnahmeplatten (bereits vormontiert)
2 Klemmträgerplatten
2 Klemmhaken
1 Kettenzug-Sicherungsclip
5 Dübel
5 Schrauben
1 Montageanleitung
Sicherheit
Bei Schäden, die durch Nichtbeachtung dieser
Bedienungsanleitung verursacht werden, erlischt
der Garantieanspruch! Für Folgeschäden wird
keine Haftung übernommen! Bei Sach- oder
Personenschäden, die durch unsachgemäße
Handhabung oder Nichtbeachtung der Sicher-
heitshinweise verursacht werden, wird keine Haf-
tung übernommen!
ACHTUNG
STRANGULA-
TIONSGE-
FAHR!
Kleine Kinder können
durch Schlingen in
Zugschnüren, Ketten,
Gurten und innen
befindlichen Schnüren
zum Betätigen des
Produktes stranguliert
werden.
Schnüre sind aus der
Reichweite von
Legende der verwendeten
Piktogramme
Warn- und Sicherheitshinweise
beachten!
Strangulationsgefahr!
Nicht waschen
Nicht bleichen
Nicht im Tumbler trocknen
Nicht bügeln
Nicht chemisch reinigen
Entsorgen Sie Verpackung und
Produkt umweltgerecht!
Kein Bohren
Kein Schrauben
Thermo-Abdunklungsrollo
Einleitung
Herzlichen Glückwunsch! Mit Ihrem Kauf haben
Sie sich für ein hochwertiges Produkt entschieden.
Machen Sie sich vor der ersten Inbetriebnahme
mit dem Produkt vertraut. Lesen Sie hierzu auf-
merksam die nachfolgende Montageanleitung.
Benutzen Sie das Produkt nur wie beschrieben
und für die angegebenen Einsatzbereiche. Be-
wahren Sie diese Anleitung gut auf. Händigen
Sie alle Unterlagen bei Weitergabe des Produk-
tes an Dritte ebenfalls mit aus.
Bestimmungsgemäße
Verwendung
Das Produkt sorgt für ein angenehmes Raumklima
und ist zur Dekoration von Fenstern bestimmt. Das
beiliegende Wandbefestigungsmaterial ist nur für
Beton, Ziegel oder Holzwände geeignet. Eine an-
dere Verwendung als zuvor beschrieben oder
eine Veränderung des Produkts ist nicht zulässig
und kann zu Verletzungen und / oder Beschädigun-
gen des Produkts führen. Für aus bestimmungswid-
riger Verwendung entstandene Schäden übernimmt
der Hersteller keine Haftung. Das Produkt ist nicht
für den gewerblichen Einsatz bestimmt.
Technische Daten
Stoff: 100 % Polyester
Maße Fenster: 60, 70, 80, 90 oder 100 cm x
150 cm (B x H)
Maße Tür: 80 x 200 cm (B x H)
THERMO- ABDUNK-
LUNGSROLLO / THERMAL
BLACKOUT BLIND / STORE
ENROULEUR OCCULTANT
ET ISOLANT
THERMO-VERDUISTERINGSROLGORDIJN
Montage- en veiligheidsinstructies
ESTOR OPACO TÉRMICO
Instrucciones de montaje y de advertencias de seguridad
ESTORE TÉRMICO DE ESCURECIMENTO
Indicações de montagem e segurança
THERMAL BLACKOUT BLIND
Assembly and safety advice
THERMO-ABDUNKLUNGSROLLO
Montage- und Sicherheitshinweise
STORE ENROULEUR OCCULTANT
ET ISOLANT
Instructions de montage et consignes de sécurité
ROLETA
Pokyny k montáži a bezpečnostní pokyny
D
I
7 5
H
7 5
6
A
8 1
B
7
4
E
7
1
G
2
J
7
5
6
C
3
1
8
3
5
6
7
4
2
F
IAN 291968
IAN 298032
298032_291968_mer_Thermo-Abdunklungsrollo_770 x 580mm_OS.indd 1 20.11.17 12:57


Join the conversation about this product
Here you can share what you think about the Meradiso IAN 291968 Roller Blind. If you have a question, first carefully read the manual. Requesting a manual can be done by using our contact form.