
DE/AT/CH DE/AT/CH DE/AT/CH DE/AT/CH DE/AT/CH DE/AT/CH DE/AT/CH
NL/BE NL/BE
het gebruik van
het product
stranguleren.
Koorden die-
nen buiten het
bereik van kin-
deren te wor-
den gehouden
om strangulatie
en verwarring
te vermijden.
De hals van
een kind kan
in de koorden
verstrikt raken.
Bedden, kin-
derbedden en
meubelen die-
nen buiten het
bereik van de
koorden voor
de raamafdek-
king te wor-
den geplaatst.
Koorden mo-
gen niet aan
elkaar worden
vastgeknoopt.
Men dient
ervoor te zor-
gen, dat de
koorden zich
niet opdraaien
Beschrijving van de
onderdelen
1
Klembevestiging
1 a
Wieltje (klembevestiging)
1 b
Hendel (klembevestiging)
2
Spankoord
3
Plissé rolgordijn
4
Profiellijst
5
Afsluitdop
Omvang van de
levering
4 klembevestigingen
2 profiellijsten
4 afsluitdoppen
4 remmen
2 spankoorden
1 montagehandleiding
Veiligheid
Bij beschadigingen die worden ver-
oorzaakt door het niet in acht nemen
van deze gebruiksaanwijzing vervalt
de garantie! Wij zijn niet aansprakelijk
voor gevolgschade! Bij materiële
schade of persoonlijk letsel die worden
veroorzaakt door onjuist gebruik of het
niet in acht nemen van de veiligheidsin-
structies zijn wij niet aansprakelijk!
ATTEN-
TIE
GEVAAR
VOOR
STRANGU-
LATIE!
Kleine kinderen
zich kunnen
door de lussen
in de koorden,
kettingen,
riemen en
binnenin be-
vindende
koorden voor
Service après-vente
Pour toute question ou réclamation,
veuillez nous envoyer un e-mail à
l‘adresse e-mail indiquée ci-dessous :
IAN 309642
Veuillez indiquer le numéro IAN.
Mise au rebut
Ne jetez pas le produit avec les
déchets ménagers. Informez-vous au-
près de votre commune ou de votre
municipalité des possibilités de mise
au rebut correcte et respectueuses de
l‘environnement. Le matériel d‘embal-
lage peut être jeté dans les poubelles
locales de recyclage.
Informations
Distributeur
Goldner GmbH
Ringstrasse 24
AT-6830 Rankweil, AUTRICHE
GB/IEGB/IE
IAN 309642
Bitte geben Sie Ihre IAN-Nummer an.
Entsorgung
Werfen Sie das Produkt nicht in den
Hausmüll. Erkundigen Sie sich in Ihrer
Stadt oder Gemeinde nach einer ent-
sprechend umwelt- und sachgerechten
Entsorgung. Das Verpackungsmaterial
kann in den örtlichen Recyclingbehälter
gegeben werden.
Informationen
Inverkehrbringer
Goldner GmbH
Ringstrasse 24
AT-6830 Rankweil, ÖSTERREICH
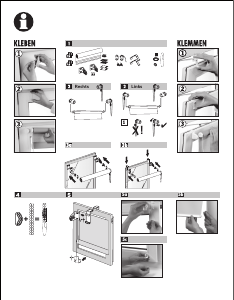
Schritt 8: Alle vier Endkappen
5
von den Profilleisten
4
ab-
nehmen (s. Abb. I).
Schritt 9: Spannseile
2
an al-
len vier Stellen jeweils ca. 30 cm
aus dem Profil
4
/ Bremse‚
ziehen. Es entsteht eine Schlaufe.
Spannseile
2
nicht vollständig
aus den Bremsen und den Profi-
len
4
ziehen (s. Abb. J).
Schritt 10: Ziehen Sie nun
langsam und vorsichtig die Profil-
leisten
4
seitlich soweit aus dem
Stoff, dass die markierte Stelle
am Profil frei liegt. Seien Sie vor-
sichtig, dass Sie dabei den Stoff
nicht beschädigen (s. Abb. K).
Schritt 11: Untere und obere
Profilleisten
4
an den zuvor mar-
kierten Stellen absägen (s. Abb. L).
Schritt 12: Ziehen Sie langsam
und vorsichtig den Stoff von den
Profilleisten
4
ab. Seien Sie vor-
sichtig, dass Sie dabei den Stoff
nicht beschädigen (s. Abb. M).
Schritt 13: Kürzen Sie den
Stoff an der markierten Stelle
idealerweise mit einem Teppich-
messer. Dabei das ganze Stoff-
paket durchschneiden (s. Abb. N).
Schritt 14: Schieben Sie lang-
sam und vorsichtig den Stoff wie-
der in die Profile
4
. Seien Sie
vorsichtig, dass Sie dabei den Stoff
nicht beschädigen (s. Abb. O).
Schritt 15: Um die gegenüber-
liegende Seite zu kürzen, wieder-
holen Sie Schritt 10 bis 14
(s. Abb. P).
Schritt 16: Alle vier Endkappen
5
wieder auf den Profilen
4
an-
bringen. Achten Sie dabei darauf,
dass Sie den Stoff in die dafür vor-
gesehenen Schlitze der Endkap-
pen
5
einfädeln (s. Abb. Q).
Das Plissee-Rollo
3
ist nun
ge-
kürzt. Zur Montage gehen Sie
vor, wie im Kapitel „Montage“
beschreiben (ab Schritt 2).
Reinigung
Nicht waschbar.
Produkt mit einem Staubwedel
oder schwach eingestelltem
Staubsauger entstauben.
Service
Bei Fragen oder Reklamationen
schreiben Sie uns bitte eine E-Mail an
die unten angegebene E-Mailadresse:
FR/BE NL/BE
Legenda van de gebruikte
pictogrammen
Waarschuwingen en
veiligheidsinstructies in
acht nemen!
Strangulatiegevaar!
Niet wassen
Niet bleken
Niet in de wasdroger
drogen
Niet strijken
Niet chemisch reinigen
Voer de verpakking en
het product af op mili-
euvriendelijke wijze!
Geen boren
Geen schroeven
Plissé rolgordijn
Inleiding
Hartelijk gefeliciteerd!
Met uw aankoop hebt u voor een
hoogwaardig product gekozen. Maak
u voor de eerste ingebruikname ver-
trouwd met het product. Lees hiervoor
aandachtig de volgende montage-in-
structies. Gebruik het product alleen
zoals beschreven en voor het aange-
geven gebruiksdoeleinde. Bewaar
deze gebruiksaanwijzing zorgvuldig.
Overhandig alle documenten bij door-
gifte van het product aan derden.
Correct gebruik
Dit product is uitsluitend bestemd
voor de decoratie van ramen. Een
ander gebruik als eerder beschreven
of een verandering van het product is
niet toegestaan en kan tot letsel en / of
beschadiging van het product voeren.
De fabrikant is niet aansprakelijk voor
uit niet correct gebruik voortvloeiende
schade. Het product is niet bestemd
voor commerciële doeleinden.
Technische gegevens
Stof: 100 % polyester
Afmetingen: 90 x 130 cm
Breedte kan individueel op maat wor-
den gemaakt (van 90 tot op ca. 50 cm)
FR/BEFR/BEFR/BEFR/BEFR/BEFR/BE
serrage soient symétriques à
gauche et à droite.) (cf. fig. H)
Étape 8 : retirez les quatre em-
bouts
5
des baguettes profilées
4
(cf. fig. I).
Étape 9 : tirez du profilé
4
/
frein les cordons de serrage
2
aux quatre endroits d‘env. 30 cm.
Une boucle se forme. Ne pas re-
tirer complètement les cordons
de serrage
2
des freins et des
profilés
4
(cf. fig. J).
Étape 10 : lentement et avec
précaution, faites glisser latérale-
ment du tissu les baguettes
profilées
4
jusqu‘à ce que les
marquages sur le profilé soient
accessibles. Prenez garde à ce
que le tissu ne soit pas endom-
magé lors de cette opération
(cf. fig. K).
Étape 11 : sciez les baguettes
profilées supérieure et inférieure
4
aux endroits marqués précé-
demment (cf. fig. L).
Étape 12 : lentement et avec
précaution, retirez le tissu des
baguettes profilées
4
. Prenez
garde à ce que le tissu ne soit
pas endommagé lors de cette
opération (cf. fig. M).
Étape 13 : coupez le tissu aux
endroits marqués, idéalement
avec un cutter. Pour ce faire,
coupez l‘ensemble du paquet de
tissu (cf. fig. N).
Étape 14 : lentement et avec
précaution, repositionnez le tissu
dans les baguettes profilées
4
.
Prenez garde à ce que le tissu ne
soit pas endommagé lors de
cette opération (cf. fig. O).
Étape 15 : pour raccourcir le
bord situé de l‘autre côté,
renou-
velez les étapes 10 à 14 (cf. fig. P).
Étape 16 : remettez en place
les quatre embouts
5
sur les
profilés
4
. Ce faisant, veillez à
enfiler le tissu dans les encoches
des embouts
5
prévues à cet
effet (cf. fig. Q).
Le store plissé
3
est maintenant
raccourci. Pour le montage,
veuillez procéder comme indi-
qué dans le chapitre „Mon-
tage“ (à partir de l‘étape 2).
Nettoyage
Non lavable.
Dépoussiérer le produit avec un
plumeau ou avec l’aspirateur
réglé sur une faible puissance.
Montage
Étape 1 : contrôlez si le store
plissé
3
convient à la largeur
de la fenêtre (cf. fig. A).
Indication : si le store plissé
3
ne correspond pas, reportez-vous
au chapitre „Adapter la largeur“
(à partir de l‘étape 7).
Étape 2 : ouvrez le mécanisme
du cordon de serrage en tournant
la roulette
1a
de chacun des
quatre supports de serrage
1
(cf. fig. B).
Étape 3 : introduisez le cordon
de serrage
2
par le trou jusqu‘au
bord inférieur de la roulette
1a
(voir marquages) (valable pour
les deux supports de serrage
supérieurs) (cf. fig. C).
Étape 4 : en tournant la roulette
1a
, vous serrez fermement le
cordon de serrage
2
(cf. fig. D).
Étape 5 : ouvrez la fenêtre,
accrochez les deux supports de
serrage supérieurs
1
au cadre
de fenêtre et pressez les fortement.
En tournant le levier
1b
dans le
sens des aiguilles d‘une montre,
fixez les supports de serrage
1
(cf. fig. E).
Étape 6 : accrochez les supports
de serrage inférieurs
1
, pres-
sez-les et fixez les. Vous détermi-
nez la longueur optimale du
cordon de serrage
2
en le posi-
tionnant sur le bord inférieur de
la roulette
1a
et en le raccourcis-
sant le cas échéant à l‘aide d‘une
pince. Introduisez le cordon de
serrage
2
dans le trou jusqu‘au
bord inférieur de la roulette
1a
.
Tenez le cordon de serrage
2
tendu, faites tourner la roulette
1a
pour fixer la tension du cor-
don de serrage
2
(cf. fig. F).
Le montage du store plissé
3
est maintenant terminé. Vous
pouvez l‘utiliser comme le
montre la figure G.
Adapter la largeur
Indication : une modification de
largeur est possible jusqu‘à 50 cm.
Étape 7 : mesurez la largeur de
la fenêtre. Décidez si vous sou-
haitez que le store plissé
3
soit
monté au ras bord de la vitre ou
bien s‘il doit recouvrir la moitié
du cadre de fenêtre (prenez
compte de la poignée de la
fenêtre). Marquez la nouvelle
largeur souhaitée à gauche et à
droite sur les baguettes profilées
4
et sur le tissu. (Marquez le
store plissé
3
de telle manière
que les trous pour le cordon de
AVERTIS-
SEMENT!
DANGER
DE
MORT! Tou-
jours tenir
l’appareil à
l’écart des en-
fants (risque de
strangulation,
d’ingestion de
petits éléments).
Ce store n‘est
pas un jouet !
ATTENTION !
RISQUE DE
BLESSURE
!
Vérifiez que
toutes les pièces
sont en parfait
état et correc-
tement mon-
tées. Risque de
blessures en
cas de mon-
tage incorrect.
Les pièces en-
dommagées
peuvent affec-
ter la sécurité
et le fonction-
nement.
Les cordelettes
doivent rester
hors d‘accès
des enfants
pour éviter qu‘ils
s‘étranglent ou
s‘empêtrent. Le
cou d‘un petit
enfant peut
s‘empêtrer dan
s
des cordelettes.
Les lits, lits pour
enfants et
meubles doivent
être placés à
l’écart des cor-
delettes pour
stores de
fenêtres.
Les cordelettes
ne doivent pas
être reliées entre
elles. Il est né-
cessaire de
vérifier que les
cordons ne
forment pas un
nœud coulant.
Descriptif des pièces
1
Support de serrage
1 a
Roulette (support de serrage)
1 b
Levier (support de serrage)
2
Cordon de serrage
3
Store plissé
4
Baguettes profilées
5
Embout
Contenu de la
livraison
4 supports de serrage
2 baguettes profilées
4 embouts
4 freins
2 cordons de serrage
1 notice de montage
Sécurité
Les droits de recours en garantie sont
annulés en cas de dommages résul-
tant du non-respect du présent mode
d’emploi! Le fabricant décline toute
responsabilité pour les dommages
indirects! De même, toute responsa-
bilité est déclinée pour les dommages
matériels ou corporels causés par
une manipulation incorrecte ou le
non respect des consignes de sécurité!
ATTEN-
TION
DANGER
D‘ÉTRAN-
GLEMENT !
Les petits en-
fants peuvent
s‘étrangler ave
c
les cordons de
serrage, chaînes,
ceintures et cor-
delettes internes
qui actionnent
le produit.
Légende des pictogrammes
utilisés
Respecter les avertisse-
ments et consignes de
sécurité !
Risque d'étranglement !
Ne pas laver
Ne pas blanchir
Ne pas sécher au
sèche-linge !
Ne pas repasser
Ne pas nettoyer à sec
Assurer une mise au
rebut écologique de
l’emballage et du
produit !
Ne pas percer
Ne pas visser
Store plissé
Introduction
Félicitations ! Vous avez opté pour un
produit de grande qualité. Avant la
première mise en service, vous devez
vous familiariser avec toutes les
fonctions du produit. Lisez pour cela
attentivement la notice de montage
suivante. Utilisez ce produit unique-
ment conformément aux instructions
et dans les domaines d’application
spécifiés. Veuillez conserver soigneu-
sement ces instructions. Remettez
tous les documents lors de la cession
du produit à une tierce personne.
Utilisation conforme
Ce produit est exclusivement destiné
à la décoration des fenêtres. Une autre
utilisation que celle décrite ci-dessus
ou une modification du produit n’est
pas permise et peut mener à des
blessures et / ou à un endommagement
du produit. Le fabricant décline toute
responsabilité pour les dommages
résultant d‘une utilisation non conforme.
Le produit n’est pas destiné à une
utilisation commerciale.
Caractéristiques
techniques
Tissu : 100 % Polyester
Dimensions : 90 x 130 cm
La largeur peut être raccourcie indivi-
duellement (de 90 à env. 50 cm)
GB/IEDE/AT/CH
GB/IEGB/IEGB/IE
Service
If you have any questions or complains
please write to us at the following
e-mail address:
IAN 309642
Please quote your IAN number.
Disposal
Do not dispose of the product with
the household rubbish. Contact your
local authorities or municipality to
find out how to dispose of the products
in an environmentally friendly and
proper manner. The packaging can
be disposed of at your local recycling
centre.
Information
Distributor
Goldner GmbH
Ringstrasse 24
AT-6830 Rankweil, AUSTRIA
Adjusting the width
Note: It is possible to adjust the
width to 50 cm.
Step 7: Measure the width of
the window. Decide whether you
want the pleated blind
3
to be
flush against the glass or in the
middle of the frame (be aware of
handles). Mark the new width
left and right on the profile strips
4
and on the fabric. (Mark the
pleated blind
3
so that the
holes left and right for the tether
are symmetrical.) (see fig. H)
Step 8: Remove all four end
caps
5
from the profile strips
4
(see fig. I).
Step 9: Pull the tether
2
from
all four places approx. 30 cm
out of the profile
4
/ brake. A
loop is formed. Do not pull the
tether
2
completely out of the
brakes and profiles
4
(see fig. J).
Step 10: slowly and carefully
pull the profile strips
4
sideways
off the fabric so that the marked
area of the profile is exposed. Be
sure not the damage the fabric
(see fig. K).
Step 11: Cut of the upper and
lower profile strips
4
at the
marked place (see fig. L).
Step 12: Slowly and carefully
remove the fabric from the profile
strips
4
. Be sure not the dam-
age the fabric (see fig. M).
Step 13: Shorten the fabric at
the marked place, ideally with a
box cutter. Therefore cutting through
all of the fabric (see fig. N).
Step 14: Slowly and carefully
push the fabric back into the pro-
file
4
. Be sure not the damage
the fabric (see fig. O).
Step 15: To shorten the oppo-
site side repeat steps 10 to 14
(see fig. P).
Step 16: Put all the end caps
5
back on the profiles
4
. Ensure
that you thread the fabric through
the slits in the end caps
5
pro-
vided (see fig. Q).
The pleated blind
3
has now
been shortened. To mount,
proceed as described in the
chapter „Installation“ (from
step 2).
Cleaning
Not washable.
Dust this product with a duster or
a vacuum cleaner set to a low
level.
ensure that no
parts are dam-
aged and that
all parts are
correctly
assembled. In-
correct assem-
bly could lead
to injury. Dam-
aged parts
could impact
safety and
function.
Installation
Step 1: Check whether the
pleated bind
3
fits the width of
the window (see fig. A).
Note: If the pleated blind
3
does not fit see chapter „Adjust-
ing the width“ (from step 7).
Step 2: Open the tether mecha-
nism by turning the cog
1a
on all
f
our top fix brackets
1
(see fig. B).
Step 3: Lead the tether
2
through the hole to the underside
of the cog
1a
(see markings)
(applicable for the top two top
fix brackets) (see fig. C).
Step 4: Clamp the tether
2
fast
by turning the cog
1a
(see fig. D).
Step 5: Open the window and
hang the top two top fix clamps
1
on the window and push
them down securely. Secure the
top fix brackets
1
by turning the
lever
1b
clockwise (see fig. E).
Step 6: Hang the lower top fix
brackets
1
, push them down
and secure them. Determine the
ideal length of the tether
2
by
applying it to the underside of
the cog
1a
and shortening it
with pliers if necessary. Lead the
tether
2
through the hole to the
underside of the cog
1a
. Hold
the tether
2
taut, stretch it
2
by turning the cog
1a
(see fig. F).
The pleated blind
3
is now
fully assembled. You can use
it as shown in image G.
4
Profile strip
5
End cap
Scope of delivery
4 top fix brackets
2 profile strips
4 end caps
4 brakes
2 tethers
1 set of installation instructions
Safety
Damage due to failure to comply
with these operating instructions will
invalidate the guarantee! We assume
no liability for consequential damage!
We assume no liability for material
damage or personal injury due to im-
proper handling or failure to comply
with the safety instructions!
ATTEN-
TION
RISK OF
STRANGU-
LATION!
Small children
could be stran-
gled by loops
in pull cords,
chains, straps
and inner cords
for operating
the product.
Keep ropes out
of the reach of
children to
prevent stran-
gulation and
entanglement.
A child‘s neck
may be tan-
gled in ropes.
Position beds,
cots and furni-
ture away from
ropes for win-
dow coverings.
Do not knot
ropes. Ensure
the ropes do
not tangle,
forming a loop
.
WAR-
NING!
DANGER
TO LIFE!
Always keep
children away
from the prod-
uct (strangula-
tion hazard,
small parts
which could
be swallowed).
The pleated
blind is not
a toy!
CAUTION!
RISK OF IN-
JURY! Please
List of pictograms used
Observe the warnings
and safety notices!
Risk of strangulation!
Not washable
Do not use bleach
Do not tumble dry
Do not iron
Do not dry clean
Dispose of the packa-
ging and product in an
environmentally-friendly
manner!
No drilling
No screws
Pleated blind
Introduction
Congratulations! You have purchased
a high-quality product. Familiarise
yourself with the product before us-
ing it for the first time. Carefully read
the following assembly instructions.
Only use the product as described
and for the indicated purpose. Keep
these instructions in a safe place. If
passing this product on to a third
party also include all documents.
Intended use
This product is only suitable for deco-
rating windows. Any use other than
previously described or any product
modification is prohibited and can
result in injuries and / or product
damage. The manufacturer is not liable
for damage caused by improper use.
The product is not intended for
commercial use.
Technical Data
Material: 100 % polyester
Size: 90 x 130 cm
Width can be shortened individually
(from 90 to approx. 50 cm)
Parts description
1
Top fix bracket
1a
Cog (top fix bracket)
1b
Lever (Top fix bracket)
2
Tether
3
Pleated blind
Funktion be-
einflussen.
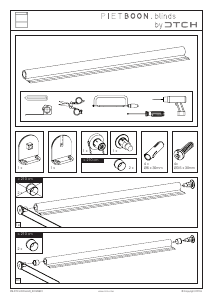
Montage
Schritt 1: Kontrollieren Sie, ob
das Plissee-Rollo
3
in der Breite
auf das Fenster passt (s. Abb. A).
Hinweis: Sollte das Plissee-Rollo
3
nicht passen, siehe Kapitel
„Breite anpassen“ (ab Schritt 7).
Schritt 2: Öffnen Sie den Seil-
spannmechanismus durch Drehen
des Rädchens
1a
an allen vier
Klemmträgern
1
(s. Abb. B).
Schritt 3: Führen Sie das Spann-
seil
2
durch das Loch bis zur Un-
terkante des Rädchens
1a
(siehe
Markierung) ein (gilt für die zwei
oberen Klemmträger) (s. Abb. C).
Schritt 4: Durch Drehen am
Rädchen
1a
klemmen Sie das
Spannseil
2
fest (s. Abb. D).
Schritt 5: Fenster öffnen und die
beiden oberen Klemmträger
1
am Fensterrahmen einhängen und
festdrücken. Durch Drehen des
Hebels
1b
im Uhrzeigersinn den
Klemmträger
1
fixieren (s. Abb. E).
Schritt 6: Untere Klemmträger
1
einhängen, festdrücken und
fixieren. Die optimale Länge des
Spannseils
2
ermitteln Sie, in
dem Sie dieses an der Unterkante
des Rädchens
1a
anlegen und
gegebenenfalls mittels Zange
kürzen. Spannseil
2
durch das
Loch bis zur Unterkante des Räd-
chens
1a
einführen. Spannseil
2
unter Spannung halten, durch
Drehen des Rädchens
1a
das
Spannseil
2
spannen (s. Abb. F).
Das Plissee-Rollo
3
ist nun
fertig montiert. Sie können es
verwenden, wie in Abbildung
G dargestellt.
Breite anpassen
Hinweis: Es ist eine Breitenanpas-
sung bis 50 cm möglich.
Schritt 7: Fensterbreite ausmes-
sen. Entscheiden Sie sich, ob Sie
das Plissee-Rollo
3
bündig auf
der Glasfläche oder mittig am
Rahmen montieren wollen (auf den
Fenstergriff achten). Neue ge-
wünschte Breite links und rechts
auf den Profilleisten
4
und am
Stoff markieren. (Plissee-Rollo
3
so kennzeichnen, dass die Seil-
führungslöcher rechts und links
symmetrisch sind.) (s. Abb. H)
WAR-
NUNG!
LEBENSGE-
FAHR! Halten
Sie Kinder stets
vom Produkt
fern (Strangu-
lationsgefahr,
verschluckbare
Kleinteile).
Das Plissee
Rollo ist kein
Spielgerät!
VORSICHT!
VERLET-
ZUNGSGE-
FAHR! Stellen
Sie sicher, dass
alle Teile un-
beschädigt und
sachgerecht
montiert sind.
Bei unsachge-
mäßer Mon-
tage besteht
Verletzungsge-
fahr. Beschä-
digte Teile
können die
Sicherheit und
Betätigen des
Produktes
stranguliert
werden.
Schnüre sind
aus der Reich-
weite von Kin-
dern zu halten,
um Strangulie-
rung und Ver-
wicklung zu
vermeiden.
Der Hals eines
Kindes kann in
Schnüre verwi-
ckelt werden.
Betten, Kinder-
betten und Mö-
bel sind entfernt
von Schnüren
für Fensterab-
deckungen
aufzustellen.
Schnüre dürfen
nicht miteinan-
der verknüpft
werden. Es ist
sicherzustellen,
dass sich
Schnüre nicht
verwickeln und
eine Schlinge
bilden.
Technische Daten
Stoff: 100 % Ployester
Maße: 90 x 130 cm
Breite individuell kürzbar
(von 90 bis auf ca. 50 cm)
Teilebeschreibung
1
Klemmträger
1 a
Rädchen (Klemmträger)
1 b
Hebel (Klemmträger)
2
Spannseil
3
Plissee-Rollo
4
Profilleiste
5
Endkappe
Lieferumfang
4 Klemmträger
2 Profilleisten
4 Endkappen
4 Bremsen
2 Spannseile
1 Montageanleitung
Sicherheit
Bei Schäden, die durch Nichtbeachtung
dieser Bedienungsanleitung verursacht
w
erden, erlischt der Garantieanspruch!
Für Folgeschäden wird keine Haftung
übernommen! Bei Sach- oder Perso-
nenschäden, die durch unsachgemäße
Handhabung oder Nichtbeachtung
der
Sicherheitshinweise verursacht werden,
wird keine Haftung übernommen!
ACH-
TUNG
STRANGU-
LATIONS-
GEFAHR!
Kleine Kinder
können durch
Schlingen in
Zugschnüren,
Ketten, Gurten
und innen
befindlichen
Schnüren zum
A H
KC
B
I
ME
O
F
LD
J
N
P
G
1
2
3
1 a 2
1 a
1 a
1
2
2
4
4
4
4
4
5
1
1 1 a1 b
3
1
2
1 a
1 a
PLISSEE-ROLLO / PLEATED
BLIND / STORE PLISSÉ
IAN 309642
Q
Legende der verwendeten
Piktogramme
Warn- und Sicherheits-
hinweise beachten!
Strangulationsgefahr!
Nicht waschen
Nicht bleichen
Nicht im Tumbler
trocknen
Nicht bügeln
Nicht chemisch reinigen
Entsorgen Sie Verpa-
ckung und Produkt
umweltgerecht!
Kein Bohren
Kein Schrauben
Plissee-Rollo
Einleitung
Herzlichen Glückwunsch!
Mit Ihrem Kauf haben Sie sich für ein
hochwertiges Produkt entschieden.
Machen Sie sich vor der ersten Inbe-
triebnahme mit dem Produkt vertraut.
Lesen Sie hierzu aufmerksam die nach-
folgende Montageanleitung. Benutzen
Sie das Produkt nur wie beschrieben
und für die angegebenen Einsatzbe-
reiche. Bewahren Sie diese Anleitung
gut auf. Händigen Sie alle Unterlagen
bei Weitergabe des Produktes an
Dritte
ebenfalls mit aus.
Bestimmungsgemäße
Verwendung
Dieses Produkt ist nur zur Dekoration
von Fenstern bestimmt. Eine andere
Verwendung als zuvor beschrieben
oder eine Veränderung des Produkts ist
nicht zulässig und kann zu Verletzun-
gen und / oder Beschädigungen des
Produkts führen. Für aus bestimmungs-
widriger Verwendung entstandene
Schäden übernimmt der Hersteller
keine Haftung. Das Produkt ist nicht für
den gewerblichen Einsatz bestimmt.
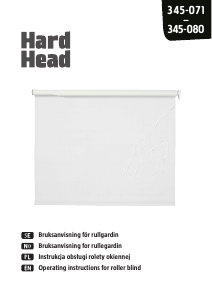
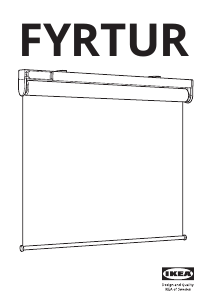
PLISSEE-ROLLO
Montage- und Sicherheitshinweise
PLEATED BLIND
Assembly and safety advice
STORE PLISSÉ
Instructions de montage et
consignes de sécurité
PLISSÉ ROLGORDIJN
Montage- en veiligheidsinstructies
ROLETA
Pokyny k montáži a bezpečnostní pokyny
ESTOR PLISADO
Instrucciones de montaje y de
advertencias de seguridad
ESTORE PLISSADO
Indicações de montagem e segurança
309642_Plisseerollo_OS.indd 1 26.07.18 16:20


Join the conversation about this product
Here you can share what you think about the Meradiso IAN 309642 Roller Blind. If you have a question, first carefully read the manual. Requesting a manual can be done by using our contact form.