Assembly Instructions: Victory Art. 776
Mantua Model Group August 2001 Page 6
STEP 6: Fitting the Upper Gun Deck
Figure 6: This shows a front, perspective view of the complete built-up skeleton of the ship. Trial-fit
deck n.32 onto the frames ensuring the deck is the right way round so that the mast holes are aligned.
Note that the deck has to be curved from side to side to fit between the frames’s ribs. The tops of the
frames are also curved to achieve the deck ‘sheer’ required. Wet the underside of the deck and with a
finger inserted into a deck hole, gently push the sides of the deck down with the other hand to curve the
deck until it can slide between the ribs. Repeat this along the deck wherever it needs to be curved,
gently easing the deck down onto the frames. Make adjustments as necessary to the slots in the deck
so that the deck will fit tightly against the tops of the frames. Remove the deck, apply glue to the tops of
the frames and fit the deck in place, holding the deck firmly down on the frames with clamps or pins until
set.
Deck Planking. The deck n.32 is now to be planked. Draw a centre-line down the deck using a pencil
and a straightedge. Coat the deck to one side of the centre-line with a 10mm strip of glue using a
brush, and place the first 0.5x3 Walnut planks along the centre-line, followed by two more planks
alongside. Leave tiny gaps between the planks to simulate caulked joints. Continue across the deck
from the centre to the sides laying about three planks at a time. Trim the planking around the holes in
the deck, and fit shaped pieces of planking in the corners as necessary so as to cover the entire deck
surface flush with the outside edges of the frames. When the deck covering is finished and dry, scrape
the surface of the deck to remove excess glue and then smooth carefully with fine grade sandpaper.
Score in the joins between sections of plank with a pencil and straightedge using the full-sized drawing
of the deck on Plan 2 as a guide. Varnish the deck with sanding sealer (such as Mantua Model
Art.4401714, not supplied in the kit).
STEP 7: Fitting the Quarterdeck and Forecastle Deck
The quarterdeck and the forecastle deck come as one part n.33 as shown in figure 6. Trial-fit deck
n.33 onto the frames ensuring the deck is the right way round so that the mast holes are aligned. Note
that the deck has to be curved from side to side to fit between the ribs of frame n.4. The tops of the
frames are also curved to achieve the deck ‘sheer’ required. Wet the underside of the deck and with a
finger inserted into a deck hole, gently push the sides of the deck down with the other hand to curve the
deck until it can slide between the ribs of frame n.4. After making any necessary modifications, remove
the deck, apply glue to the tops of the frames and fit the deck in place aligning the deck with the frame
n.18, and holding the deck firmly down on the frames with clamps or pins until set. Plank the deck with
0.5x3 Walnut planks using the method described previously, and varnish over.
STEP 8: Preparing the Bright-work
Cut the parts from the two photo-etched brass plates supplied with tin shears or strong scissors and
finish the edges carefully with a file. Working on a flat work surface, and paint the incised areas of the
pieces with matt acrylic enamel paints in accordance with the Painting Plan on the last page of this
booklet. Do not worry about getting paint on the raised areas, as this will be removed later. When the
paint is dry, lightly sand the surface of each piece with fine (600-grain) paper until the raised details
become paint-free and polished, the paint remaining only in the incised portions. Varnish the brass to
keep it bright. Put the parts in a storage box for safekeeping.
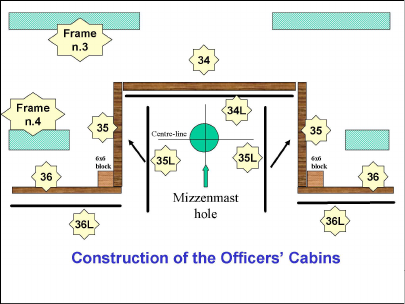
STEP 9: Building the Officers’ Cabins
Figure 7: Build and glue the cabin structure on the rear
of deck n.33 as shown in figure 7 on Plan 4, lining the
centre-lines of sides n.35 and n.34 with the mizzenmast
hole, and noting that the deck slopes towards the bow.
Fix 6x6 walnut bracing blocks in the inside of the joints
between n35 and n36. Trim plate n.34L to length so
that it fits snugly between the sides n.35 and fix with
instant glue. Fit n.35L onto the sides after trimming the
front edges flush with the front faces of n.36. Fit n.36L
onto n.36 lining up the metal edges and trimming any
excess overhanging the outside edge of the deck.
Figure 8: Fit the poop deck n.37 in place as shown,
and plank with 0.5x3 Walnut planks. Varnish over.
34
35
36L
36
35
36
36L
34L
35L
35L
Frame
n.3
Frame
n.4
Construction of the Officers’ Cabins
6x6
block
6x6
block
Mizzenmast
hole
Centre-line


Join the conversation about this product
Here you can share what you think about the Mantua set 776 Boatkits HMS Victory. If you have a question, first carefully read the manual. Requesting a manual can be done by using our contact form.
reply | This was helpful (0)