
A
B
C
B
C
D
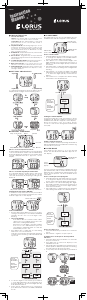
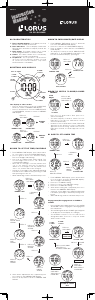
1. Press “A” three times to show the REGULAR
ALARM mode.
2. Press and hold “A” for 2 to 3 seconds to show
the REGULAR ALARM SETTING display.
The hour digits start flashing.
3. Press “B” to select the item to be adjusted
(flashing).
4. Press “C” or “D” to set the flashing digits.
The flashing digits move quickly if “C” or “D”
is kept pressed.
5. Press “A” to confirm the alarm setting.
The regular alarm mark will be automatically
displayed indicating that the regular alarm
is engaged.
NOTES
✥ If the watch is left untouched in the REGULAR
ALARM SETTING display with the digits flashing,
it will automatically return to the REGULAR
ALARM mode in 1 to 2 minutes.
✥ When the 24-hour indication is selected in the
TIME/CALENDAR mode, the regular alarm is
also displayed in the 24-hour indication.
✥ When setting the hour digits in the 12-hour
indication, check that AM/PM is properly set.
Engagement/disengagement of the regular
alarm
With each press of “C” in the REGULAR ALARM
mode, the regular alarm will be alternately
engaged or disengaged. Accordingly, the regular
alarm mode mark will appear or disappear
indicating whether the alarm is ON or OFF.
How to stop the regular alarm manually while
sounding
The regular alarm sounds for 20 seconds at the
designated time and automatically stops. To stop
the regular alarm manually while sounding, press
any of “A”, “B”, “C” or “D.”
Doing this in any display can stop the alarm.
Sound Demonstration Function (Alarm sound
preview)
To preview the alarm sound, press “C” for 2 to 3
seconds in the REGULAR ALARM mode. The alarm
sound can be heard while the button is kept
pressed.
Using this function will reverse the regular
alarm setting. Reset the alarm by pressing “C”.
*1
*2
*3
City code
UTC
LON
CAS
BCN
MAD
PAR
AMS
FRA
MUC
BER
ZRH
MIL
ROM
CPH
STO
VIE
PRG
ATH
IST
CAI
TLV
MOW
RUH
BGW
THR
DXB
KBL
KHI
DEL
DAC
RGN
BKK
SGN
JKT
KUL
SIN
HKG
PEK
SHA
TPE
MNL
PER
FNK
SEL
SPK
SDJ
KIJ
TYO
NGO
OSA
FUK
OKA
ADL
SYD
NOU
WLG
HNL
ANC
YVR
SEA
SFO
LAX
LAS
DEN
DFW
CHI
YMQ
DTT
ATL
MIA
NYC
YTO
CCS
BUE
SAO
RIO
PDL
City name
UTC
London
Casablanca
Barcelona
Madrid
Paris
Amsterdam
Frankfurt
Munich
Berlin
Zurich
Milan
Rome
Copenhagen
Stockholm
Vienna
Prague
Athens
Istanbul
Cairo
Tel Aviv
Moscow
Riyadh
Baghdad
Teheran
Dubai
Kabul
Karachi
Delhi
Dacca
Yangon
Bangkok
Ho Chi Minh City
Jakarta
Kuala Lumpur
Singapore
Hong Kong
Beijing
Shanghai
Taipei
Manila
Perth
Pyongyang
Seoul
Sapporo
Sendai
Niigata
Tokyo
Nagoya
Osaka
Fukuoka
Okinawa
Adelaide
Sydney
Noumea
Wellington
Honolulu
Anchorage
Vancouver
Seattle
San Francisco
Los Angeles
Las Vegas
Denver
Dallas
Chicago
Montreal
Detroit
Atlanta
Miami
New York
Toronto
Caracas
Buenos Aires
São Paulo
Rio de Janeiro
Azores
Country or region
Universal Coordinated Time
The United Kingdom
Morocco
Spain
Spain
France
The Netherlands
Germany
Germany
Germany
Switzerland
Italy
Italy
Denmark
Sweden
Austria
Czech
Greece
Turkey
Egypt
Israel
Russia
Saudi Arabia
Iraq
Iran
The United Arab Emirates (UAE)
Afghanistan
Pakistan
India
Bangladesh
Myanmar
Thailand
Vietnam
Indonesia
Malaysia
Singapore
China
China
China
Taiwan
Philippines
Australia
North Korea
South Korea
Japan
Japan
Japan
Japan
Japan
Japan
Japan
Japan
Australia
Australia
New Caledonia
New Zeeland
The United States
The United States
Canada
The United States
The United States
The United States
The United States
The United States
The United States
The United States
Canada
The United States
The United States
The United States
The United States
Canada
Venezuela
Argentina
Brazil
Brazil
Azores
0
0
+1
+1
+1
+1
+1
+1
+1
+1
+1
+1
+1
+1
+1
+1
+2
+2
+2
+2
+3
+3
+3
+3.5
+4
+4.5
+5
+5.5
+6
+6.5
+7
+7
+7
+8
+8
+8
+8
+8
+8
+8
+8
+9
+9
+9
+9
+9
+9
+9
+9
+9
+9
+9.5
+10
+11
+12
–10
–9
–8
–8
–8
–8
–8
–7
–6
–6
–5
–5
–5
–5
–5
–5
–4
–3
–3
–3
–1
PST
PST
PST
PST
PST
MST
CST
CST
EST
EST
EST
EST
EST
EST
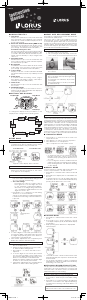
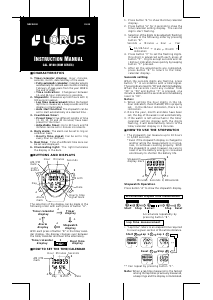
TIMER OPERATION
1. Press “C” to start or stop the timer.
Pressing “C” will alternately start or stop the
timer.
2. Press “D” to reset.
Remember to reset the timer time by pressing
“D” for next use.
NOTES
✥ Starting from 3 seconds before the set time is
up, the timer beeps for 10 seconds. To stop
the beep manually while sounding, press any
of the buttons.
✥ Before start using the timer, reset the timer time
by pressing “D.”
✥ Restart and stop of the timer can be repeated
by pressing “C.”
✥ Even if the TIMER mode is changed to a
different mode while the measurement is in
progress, it continues counting properly. After
the timer is used, however, be sure to stop it
as the battery energy is consumed enormously
to shorten the battery life.
■ HOW TO USE THE REGULAR ALARM
How to stop the single-time alarm manually
while sounding
The single-time alarm sounds for 20 seconds at
the designated time and automatically stops. To
stop the single-time alarm manually while
sounding, press any of “A”, “B”, “C” or “D.”
Doing this in any display can stop the alarm.
The single-time alarm will be automatically
cancelled once it sounds at the designated time.
Hour
Minute
● How to engage or disengage the hourly
time signal
1. Press “A” three times to show the REGULAR
ALARM mode.
2. Press “D” to activate the hourly time signal.
Pressing “D” will alternately engage or
disengage the hourly time signal. The hourly
time signal mark will appear indicating
whether the hourly time signal is ON or OFF.
■ HOW TO USE THE SINGLE-TIME ALARM
• When “B” is pressed in the calendar or blank
display of the TIME/CALENDAR mode, the
time/calendar display is shown while the
display is illuminated.
• The electroluminescent panel loses its
luminance as the battery voltage gets
lowered. Also, its luminance level decreases
gradually with use.
•
When the illuminating light becomes dim,
replace the batteries with new ones. If the light
remains dim after the batteries are replaced,
have the electroluminescent panel replaced
with a new one by the retailer from whom the
watch was purchased. It will be replaced at cost.
• While the illuminating light is used, the watch
gives out a slight noise. However, this is not a
malfunction.
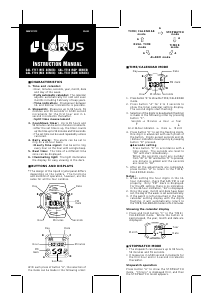
■ CITIES AND TIME DIFFERNCES
• The use of daylight saving time or a time
different from UTC may change in some
regions or countries as determined by each
country.
•The time zone abbreviations in the United
States (PST, MST, CST and EST) are also
displayed for applicable cities.
1. Press “B” in any mode to turn the illuminating
light on.
■ ILLUMINATING LIGHT (Electroluminescent panel)
Reglar
Alarm Mark
REGULAR ALARM mode mark
Hourly time
signal mark
D
*1 UTC: universal coordinated time
*2 Time difference from UTC (hour)
*3 Daylight saving time/US time zone abbr.
Hour « Minute
● Necessary procedure after battery change
After the batteries are replaced with new ones,
or when an abnormal display (failing digits, etc.)
appears, follow the procedures below to reset the
built-in IC. The watch will resume its normal
operation.
Press and hold buttons A, B, C and D at the same
time for 2 to 3 seconds until the display becomes
blank, then release all the buttons. The watch
returns to its default setting, which is “12:00'00"
a.m., Jan. 1st, 2005, SAT” with “UTC” selected as
"Home City" and contrast level 5. Before start
using the watch, set the time, calendar including
"Home City", and alarm.
■ BATTERY CHANGE
■ CARE OF YOUR LORUS WATCH
This watch contains precise electronic
components. Never attempt to open the case or
remove the back cover.
• BATTERY
CAUTION
Do not expose the old battery to fire or
recharge it. Keep it at a place beyond
the reach of children. If a child swallows
it, consult a doctor immediately.
WARNING
● Do not remove the battery from the
watch.
● If it is necessary to take out the battery,
keep it out of the reach of children. If a
child swallows it, consult a doctor
immediately.
● Never short-circuit, tamper with or heat
the battery, and never expose it to fire.
The battery may burst, become very hot
or catch fire.
● The battery is not rechargeable. Never
attempt to recharge it, as this may cause
battery leakage or damage to the
battery.
• WATER RESISTANT
* If your watch is 200 M/20 BAR, 100 M/10 BAR
or 50 M/5 BAR water resistant, it is so
indicated on the dial/case back.
• Do not operate the buttons when the
watch is wet.
• If the watch is exposed to salt water, rinse
it in fresh water and then wipe it thoroughly
dry.
• Should you find any water or condensation
inside the watch, immediately have it
checked. Water can corrode electric parts
inside the case.
NO NO NO
YES
YES
YES NO NO
YES YES NO
Condition
of use
Accidental
contact
with water,
such as
splashes
and rain
Swimming
and taking
a shower
Skin
diving
Scuba
diving
Indication
on the dial/
case back
No
Indication
NO
NO
NO
YES
WATER
RESISTANT
WATER
RESISTANT
(50M/5 BAR
)
WATER
RESISTANT
100M/10 BAR
or above
(
NO
(
Caution:
Leather straps are not water resistant except
so indicated, even if the watch head is water
resistant.
• ALLERGIC REACTION
Because the case and band touch the skin
directly, it is important to clean them regularly.
If not, shirt sleeves may be stained and those
with delicate skin may develop a rash. Please
wear the watch with some play to avoid any
possible allergic reaction. If you develop a rash
on your wrist, stop wearing and consult a
physician.
• MAGNETISM/STATIC ELECTRICITY
Your watch will not be affected by magnetism
generated by household electric appliances
but keep your watch away from a place where
the watch is subject to strong electric field and
static electricity.
• SHOCKS AND VIBRATIONS
Your watch may be worn for normal sports
activities, However, be careful not to drop it or
hit it on hard surfaces and avoid any severe
impacts.
• TEMPERATURE
Your watch works with stable accuracy within
a temperature range between 0˚C and 50 ˚C.
Do not expose the watch to a place exceeding
this temperature range.
• CLEANING
Use only a soft cloth and clean water for
cleaning your watch. Never use chemicals,
especially soap.
■ SERVICE
When your LORUS watch requires repair or
sevicing, please see the enclosed WARRANTY/
GUARANTEE.
Printed in China
The battery SEIKO SR626SW (for analogue display)
and SEIKO SR41W (for digital display), which
power your watch, should last approximately 2
years. However, because they are inserted at the
factory, the actual life of the batteries once in
your possession may be less than 2 years.
Be sure to replace the batteries to prevent any
possible malfunction as soon as either of them
runs down. To replace the batteries, we
recommend taking the watch to a local watch
repair shop.
Note:
1. If the alarm is used for longer than 10 seconds
a day and/or the illuminating light is used more
than once for longer than 3 seconds a day,
the battery life may be shorter than the above
specified period.
2. Even if either of the two batteries has run
down, replace both of them with new ones.
3. After the batteries are replaced with new
ones, set the time/calendar and alarm and
adjust the stopwatch hand position.
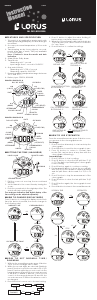
1. Press “A” four times to show the SINGLE-TIME
ALARM mode.
2. Press “C” once. The time one minute ahead
of the current time will be displayed.
3. Press “C” or “D” to set the alarm time.
The flashing digits move quickly if “C” or “D”
is kept pressed.
4. Press “A” to confirm the alarm setting and
return to the TIME/CALENDAR mode.
When the single-time alarm time is set, the
single-time alarm mark “1-AL” appears to
indicate that the single-time alarm is
engaged.
How to cancel the single-time alarm
1. Press “A” four times to show the SINGLE-TIME
ALARM mode.
2. Press “C” and “D” at the same time.
The display shows “ - : - “ indicating that the
single-time alarm has been cancelled.
D
A
SINGLE-TIME ALARM mode mark
A
D
C
Hour
Minute
Single-time
alarm mark
LORUSNX11 06.1.16, 3:37 PMPage 2 AdobePageMaker6.5J/PPC


Join the conversation about this product
Here you can share what you think about the Lorus NX11 Movement. If you have a question, first carefully read the manual. Requesting a manual can be done by using our contact form.