Date Issued: 9/23/11 IS-9568-US
Assembly and Installation Instructions - Important! General Instructions - Read this page rst.
1) Read and understand all instructions completely, both front and back before proceeding with assembly and installation of this xture.
2) If you have doubts about how to install a lighting xture or if xture fails to operate correctly, please contact a local qualied licensed electrical contractor.
3) Before you start:
a) NEVER attempt to do any work without shutting off the electricity until the work is complete. Go to the main fuse box in your home. Place main
power switch to “off” position.
b) Unscrew the fuse or fuses that control the power to the xture or room that you are working on.
c) Turn xture to be replaced off. Place wall switch in off position. If xture to be replaced has built in switch or pull chain, place those in off position.
4) All parts must be used as indicated in the assembly/installation instructions. Do not substitute any other parts, leave any parts out, or use any parts which
are worn out or broken. Failure to obey this instruction could invalidate the U.L. listing and/or C.S.A. certication of this xture.
5) Be sure to use light bulbs with wattage no greater than specied on this xture. Be certain electric current is turned off before changing bulb.
6) If a green insulated wire or bare copper or silver wire is included with this xture be certain never to attach this wire to the “hot” current carrying supply
wire.
7) If parts need to be replace use only authorized replacement parts. Write to Authorized Replacement Parts Distribution Dept., P.O. Box 318010, Cleveland,
Ohio 44131-8010
8) Be sure xture is supported only by chain.(if xture hangs by chain) and not by wire.
9) Keep this sheet in a safe place and review it before doing any work on this xture.
The hand-crafted beauty of this xture is the result of tasteful design, experienced engineering, careful craftsmanship and a dedication to customer satisfaction.
You will be assured years of service and enjoyment if you read and observe the following list of product care suggestions:
• Be certain electric current is turned off before cleaning.
• Clean metal components with a soft cloth, moistened with a mild liquid soap solution. Wipe clean and buff with a soft dry cloth. Under no circumstances
should any metal polish be used, as its abrasive nature could damage the protective nish placed on the metal parts.
• Wood components may be polished with a ne furniture polish, taking care to avoid getting the polish on the metal surfaces.
• Never wash glass shades in an automatic dishwasher. To wash glass shades, line a sink with a towel and ll with warm water and a mild liquid
soap. Wash glass with a soft cloth, rinse and wipe dry.
Instrucciones de montaje e instalación - Instrucciones generales importantes - Lea esta página primero.
1) Lea y entienda completamente todas las instrucciones, tanto del frente como del dorso antes de proseguir con el montaje e instalación de este artefacto.
2) Si tuviera alguna duda acerca de cómo instalar un artefacto luminoso o si el artefacto fallara en funcionar correctamente, por favor comuníquese con un
contratista eléctrico licenciado calicado local.
3) Antes de comenzar:
a) NUNCA intente hacer un trabajo antes de apagar la alimentación eléctrica hasta que el trabajo esté terminado. Vaya a la caja principal de sibles
de la casa. Ponga el interruptor principal de corriente en posición “apagado”.
b) Destornille el fusible o fusibles que controlen la alimentación eléctrica al artefacto o al cuarto donde está trabajando usted.
c) Apague el artefacto que va a reemplazar. Ponga el interruptor de pared en posición apagado. Si el artefacto que va a reemplazar tiene incorporado
un interruptor o cadenilla de tiro, póngalos en posición apagado.
4) Todas las piezas se deben usar como se indica en las instrucciones de instalación / montaje. No substituya ninguna de las otras piezas, ni deje afuera
las piezas o use piezas que estén desgastadas o rotas. La falla de obedecer esta instrucción podría invalidar el listado de UL y/o la certicación C.S.A.
de este artefacto.
5) Asegúrese de usar las bombillas con el vatiaje no mayor que el especicado en este artefacto. Asegúrese de que la corriente eléctrica está apagada antes
de cambiar la bombilla.
6) Si un cable aislado verde o cable de cobre desnudo o cable de plata se incluye con este artefacto, asegúrese de que nunca se acople este alambre al
cable de alimentación eléctrica “vivo” que trae corriente.
7) Si es necesario cambiar piezas, use solamente piezas de reemplazo autorizadas. Escriba al Departamento de distribución de piezas de reemplazo autorizadas,
P.O. Box 318010, Cleveland, Ohio 44131-8010.
8) Asegúrese de que el artefacto esté soportado solamente por la cadena (si el artefacto cuelga de la cadena) y no del cable.
9) Guarde esta hoja en un lugar seguro y examínela antes de hacer ningún trabajo en este artefacto.
La belleza de la artesanía manual de este artefacto es el resultado de un diseño de buen gusto, ingeniería experimentada, artesanía cuidadosa y la dedicación
de satisfacción al cliente. Usted tendrá años de servicio y de gozo si lee y observa la lista siguiente con las sugerencias de cuidado del producto.
• Asegúrese de que la alimentación de corriente eléctrica esté apagada antes de limpiar.
• Limpie los componentes metálicos con una tela suave, humedecida en una solución de jabón líquido suave. Limpie y lustre con una tela seca y
suave. Las partes metálicas no deben pulirse con pasta para pulir metales bajo ninguna circunstancia puesto que la naturaleza abrasiva de la
pasta podría dañar el acabado protector de las partes metálicas.
• Los componentes de madera se pueden pulir con un compuesto no de pulir muebles, teniendo cuidado de evitar pulir las supercies metálicas.
• Nunca lave las pantallas de vidrio en un lavaplatos automático. Para lavar las pantallas de vidrio, ponga una toalla como revestimiento de la pileta
y llene de agua tibia y un jabón líquido suave. Lave el vidrio con una tela suave, enjuague y seque bien.
Instructions pour le montage et l’installation - Important - Instructions générales - Lisez d’abord cette page
1) Lisez attentivement et complètement toutes les directives qui gurent devant et derrière avant de procéder au montage et à l’installation de ce luminaire.
2) En cas d’hésitation sur la manière d’installer un luminaire ou si le luminaire ne fonctionne pas correctement, veuillez vous adresser à un électricien quali
é et agréé local.
3) Avant de commencer l’installation :
a) N’entreprenez JAMAIS l’installation avant d’avoir coupé le courant électrique et ce jusqu’à ce que l’installation soit terminée. Pour ce faire, mettez
l’interrupteur principal de la boîte de fusibles sur la position « Arrêt ».
b) Dévissez le ou les fusibles qui contrôlent l’alimentation du luminaire ou celle de la pièce dans laquelle vous travaillez.
c) Éteignez le luminaire qui doit être remplacé. Mettez l’interrupteur mural sur la position « Arrêt ». Si le luminaire devant être remplacé est muni d’un
interrupteur intégré ou à chaînette, mettez-les sur la position « Arrêt ».
4) Toutes les pièces doivent être utilisées comme indiqué dans les instructions de montage ou d’installation. Aucune pièce ne doit être remplacée ou inutilisée
et aucune pièce endommagée ou usée ne doit être utilisée. Ne pas se conformer à cette directive peut annuler l’homologation UL et/ou la certication
ACNOR du luminaire.
5) Veillez à utiliser des ampoules dont la puissance en watts n’est pas supérieure à celle indiquée sur le luminaire. Vériez que le courant électrique est
coupé avant de changer une ampoule.
6) Si le l vert isolé ou le conducteur en cuivre nu ou le l argent sont inclus dans ce luminaire, veillez à ne jamais xer ce l au l d’alimentation sous tension.
7) Pour obtenir des pièces de remplacement, adressez-vous à Authorized Replacement Parts Distribution Dept., P.O. Box 318010, Cleveland, Ohio 44131-8010.
8) Assurez-vous que le luminaire est supporté uniquement par une chaîne (si le luminaire est suspendu à une chaîne) et non par un l électrique.
9) Conserver ce feuillet et lisez-le avant d’entreprendre tout travail sur ce luminaire.
Ce très beau luminaire, fabriqué à la main, est le résultat du bon goût, du savoir-faire, du travail soigné et de la recherche de la satisfaction de la clientèle. Il
vous assurera des années de service et de plaisir si vous suivez les conseils d’entretien suivants :
• Assurez-vous que le courant électrique est coupé avant de le nettoyer.
• Nettoyez les éléments en métal avec un chiffon doux imprégné d’une solution à base de savon liquide doux. Faites briller avec un chiffon sec et
doux. N’utilisez jamais de produits pour polir les métaux. Abrasifs, ils risqueraient d’endommager le ni protecteur des pièces métallique
• Les éléments en bois doivent être lustrés avec de la cire pour meubles de bonne qualité. Ne mettez pas de cire sur les surfaces métalliques.
• Ne mettez jamais les abat-jour en verre dans un lave-vaisselle. Pour les laver, recouvrez le fond de l’évier avec une serviette. Remplissez l’évier
d’eau chaude et ajoutez un savon liquide doux. Utilisez un chiffon doux, rincez et essuyez.
MEANS OF SUPPORT MUST BE ERECTED ABOVE OUTLET BOX. BELOW IS ONE SUGGESTED
METHOD FOR JOIST 16” ON CENTER WITH FIXTURE CENTERED BETWEEN JOISTS, AS SHOWN
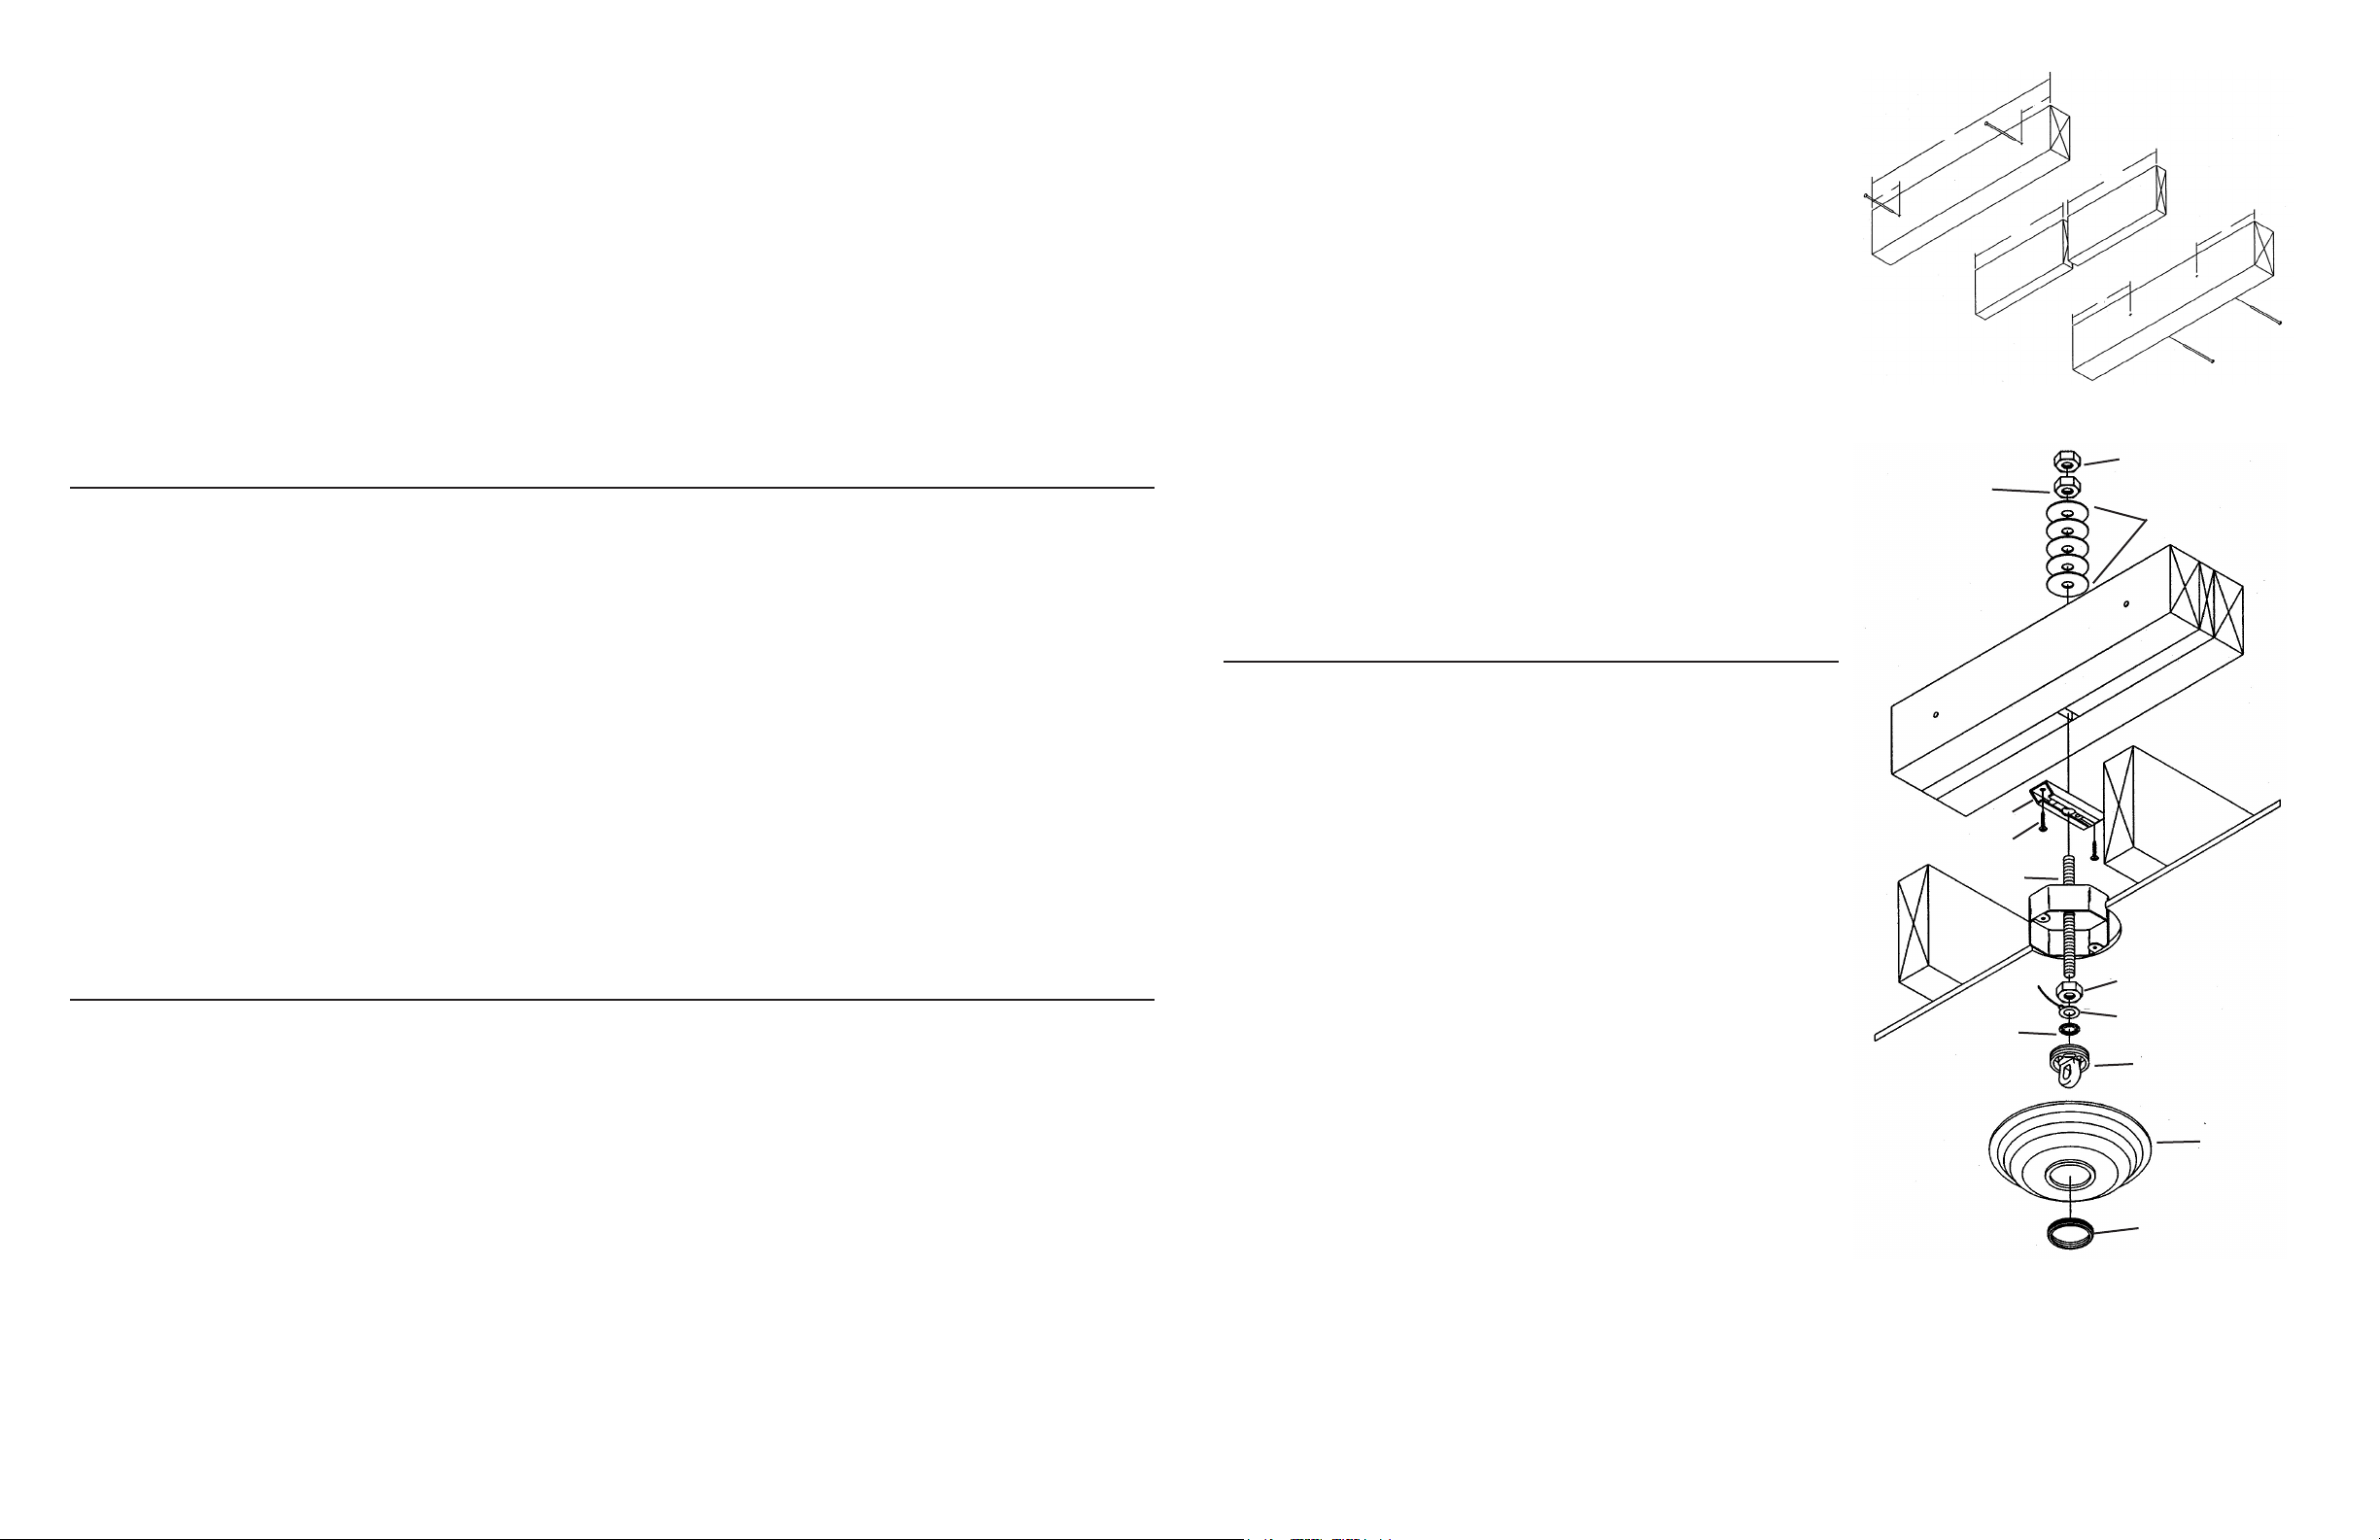
1) To erect means of support four pieces of lumber will be required (not included). Two 2x4’s at min.
of 19” long. Two 1x4’s at min.9 1/4” long.
2) Lay one 2x4 on at surface suitable and stable for nailing.
3) Lay the two 1x4’s on 2x4 allowing 1/2” gap between ends of 1x4’s at center.
4) Lay remaining 2x4 on top of 1x4’s and nail pieces together using 3 1/8” long12d nails
(not included) on center at approximately 3” from each end.
5) Turn assembled lumber over and nail two more nails in at approximately
6” from each end.
6) Turn off power.
7) If xture is provided with a safety cable it must pass through outlet box.
Drill 3/16” diameter hole in outlet box if no other holes are available.
8) Remove knockout in top of outlet box.
9) Align hole in mounting strap (D) with gap between 1x4’s and secure to 2x4’s
using provided #10 sheet metal screws (Z).
10) In area above outlet box lay assembled lumber from steps 1-5 over ceiling joist
(with mounting strap down) aligning gap between 1x4’s with knockout removed in outlet box.
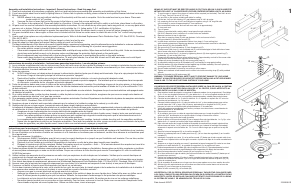
11) Screw hexnut (H) onto threaded rod (P).
12) Slip ground lug (F) and lockwasher (J) onto threaded rod (P).
13) Thread screw collar loop (L) onto threaded rod (P) until threaded pipe is ush with hole on lower
side of screw collar loop or threaded rod bottoms out.
14) Secure screw collar loop (L) in place by tightening hexnut (H) down against ground lug (F),
lockwasher (J) and screw collar loop.
15) Temporarily slip canopy (M) over screw collar loop (L). Approximately one half of the screw collar
loop exterior threads should be exposed below canopy.
16) Temporarily screw threaded ring (N) onto screw collar loop (L).
17) In area above outlet box pull up on threaded rod (P) until canopy is snug against ceiling.
18) Slide at washers (X) down threaded rod and against top of lumber assembly. Secure in place by
running jam nuts (Q & R) down against at washer.
19) Secure lumber assembly in place by toe-nailing or other means.
20) Tighten anti-rotational screw located next to center hole inside mounting strap (D) with provided
wrench.
21) Remove threaded ring (N) and canopy (M).
WARNING: TO ENSURE PERSONAL SAFETY AND TO PREVENT DAMAGE TO YOUR HOME
CONSULT A QUALIFIED BUILDER OR ARCHITECT BEFORE INSTALLING A FIXTURE HEAVIER
THAN 50 LBS. TO THE JOIST OR TRUSS SYSTEM OF YOUR HOME.
LOS MEDIOS DE SOPORTE DEBERÁN INSTALARSE SOBRE LA CAJA DE SALIDA. A CONTINU-
ACIÓN SE SUGIERE UN MÉTODO PARA VIGAS DE 16” AL CENTRO, CON EL ARTEFACTO AL
CENTRO ENTRE LAS VIGAS, COMO SE MUESTRA.
1) Para instalar el medio de soporte, se requieren 4 tablas de madera (no se proporcionan). Dos tablas
de 2 x 4’ con una longitud mínima de 19” y dos tablas de 1 x 4’ con una longitud mínima de 9-1/4”.
2) Coloque una tabla de 2 x 4 en una supercie plana adecuada y estable para poderla clavar.
3) Coloque las dos tablas de 1 x 4’ sobre la tabla de 2 x 4’ dejando un espacio de 1/2” entre los
extremos de las tablas de 1 x 4’ al centro.
4) Coloque la tabla restante de 2 x 4’ sobre las tablas de 1x 4’ y clave ambas piezas para unirlas
usando clavos de 3 1/8” y largo 12d (12-penny, equivalente a un longitud de 3-1/8”) (no se
incluyen) al centro a una distancia de aproximadamente 3” de cada lado.
5) Voltee las maderas ensambladas hacia arriba y coloque otros dos clavos a una distancia de
aproximadamente 6” de cada lado.
6) Desconecte la corriente.
7) Si el artefacto viene con un cable de seguridad, debe pasar por la caja de salida. Perfore un
oricio de 3/16” de diámetro en la caja de salida si la caja no tiene otros oricios.
8) Quite el oricio ciego arriba de la caja de salida.
9) Alinee el oricio en la barra de montaje (D) con el espacio libre entre las tablas de 1 x 4’ y je a las
tablas de 2 x 4’ usando los tornillos para chapa metálica del #10 (Z).
10) Deje colocado arriba de la caja de salida el ensamble de maderas que preparó siguiendo las
instrucciones del inciso 1 al 5 y sobre la viga del techo (con la barra de montaje hacia abajo)
alineando el espacio entre las tablas de 1 x 4’ con el oricio ciego que se quitó en la caja de
salida.
11) Atornille la tuerca hexagonal (H) en la varilla roscada (P).
12) Deslice la rondana plana con el cable para tierra (F) y la ron dana de seguridad (J) en la varilla
roscada (P)
13) Introduzca la argolla con rosca (L) en la varilla roscada (P) hasta que el tubo roscado esté al ras
del oricio en la parte inferior de la argolla roscada o la parte más baja de la varilla roscada hacia
afuera.
14) Asegure en su lugar la argolla con rosca (L) apretando la tuerca hexagonal (H) contra la ron dana
plana con el cable de tierra (F), la rondana de seguridad (J) y la argolla con rosca.
15) Deslice temporalmente el escudete (M) sobre la argolla con rosca (L). Aproximadamente la mitad
de las roscas exteriores de la argolla deberán estar expuestas por debajo del escudete.
16) Atornille temporalmente el anillo roscado (N) en la argolla con rosca (L).
17) En el área arriba de la caja de salida, jale hacia arriba sobre la varilla roscada (P) hasta que el
escudete tope contra el techo..
18) Deslice las rondanas planas (X) sobre la varilla roscada hasta que bajen y topen con la parte
superior del ensamble de madera. Fije en su lugar atornillando las tuercas de presión (Q y R)
contra la rondana plana.
19) Fije el ensamble de maderas en su lugar con clavos para madera o con otros medios de unión.
20) Apriete el tornillo antirotacional que se localiza cerca del oricio central dentro de la barra de
montaje (D) con la llave que se proporciona.
21) Retire el anillo roscado (N) y el escudete (M).
ADVERTENCIA: POR SU PROPIA SEGURIDAD PERSONAL Y PARA EVITAR CUALQUIER DAÑO
A SU CASA, CONSULTE A UNA PERSONA CALIFICADA EN EL ÁREA DE LA CONSTRUCCIÓN O
ARQUITECTO, ANTES DE INSTALAR CUALQUIER ARTEFACTO QUE PESE MÁS DE 50 LIBRAS
AL SISTEMA DE VIGAS O DE ARMADURA DEL TECHO DE SU CASA.
R
X
Q
F
L
M
N
1
19”
3”
3”
9-1/4”
9-1/4”
6”
6”
J
D
Z
P
H

Join the conversation about this product
Here you can share what you think about the Kichler 9568LD Tournai Lamp. If you have a question, first carefully read the manual. Requesting a manual can be done by using our contact form.