Manual Kichler 49583OZ Pallerton Lamp

Need a manual for your Kichler 49583OZ Pallerton Lamp? Below you can view and download the PDF manual for free in English. This product currently has 7 frequently asked questions, 0 comments and has 0 votes. If this is not the manual you want, please contact us.

Is your product defective and the manual offers no solution? Go to a Repair Café for free repair services.

Manual

Loading…

7) Connecter les fils (connecteurs non fournis). Se porter au
tableau ci-dessous pour faire les connexions.
8) Faire glisser le luminaire sur le support et fixer à l’aide des vis.
Les vis doivent s’ajuster correctement dans les trous du
support.
9) Introduire l’ampoule recommandée.
10) Abaisser la cage sur la partie supérieure de la base du luminaire.
Passer les goujons filetés le long de la cage par les trous dans
la base du luminaire.
11) Visser les bouchons filetés le long de l partie inférieure sur les
bouchons filetés. Resserrer les capuchons filetés pour fixer la cage.
12) Visser le tube fileté dans l’accouplement en haut du toit.
13) Passer le trou dans la garniture supérieure sur l’extrémité du
tube fileté. Poser la garniture supérieure en haut du toit.
14) Visser une boucle dans le tube fileté au-dessus de la cage.
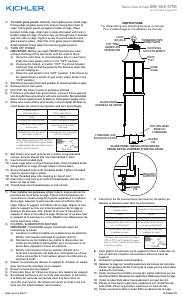
1) To install glass panels: Carefully insert glass panel inside cage.
Fit top edge of glass panel into channel along top inside of
cage. Press glass panel up against inside of cage. Place
bracket inside cage. Align hole in step of bracket with hole in
bottom edge of cage. Thread screw up through hole in bracket
and into hole in cage. Tighten screw to secure bracket and
glass panel in place. (See FIG. 2 for glass panel installation
detail.) Repeat these steps for remaining glass panels.
2) TURN OFF POWER.
IMPORTANT: Before you start, NEVER attempt any work
without shutting off the electricity until the work is done.
a) Go to the main fuse, or circuit breaker, box in your home.
Place the main power switch in the “OFF” position.
b) Unscrew the fuse(s), or switch “OFF” the circuit breaker
switch(s), that control the power to the fixture or room that
you are working on.
c) Place the wall switch in the “OFF” position. If the fixture to
be replaced has a switch or pull chain, place those in the
“OFF” position.
3) Slip fixture over post and mark position of mounting holes in post.
4) Remove fixture from post.
5) Drill 3/16” dia holes in post at positions marked .
6) If fixture is provided with ground wire, connect fixture ground
wire to outlet box ground wire with wire connector. (Not provided).
Never connect ground wire to black or white power supply wires.
7) Make wire connections (connectors not provided). Reference
chart below for correct connections and wire accordingly.
8) Slip fixture over post and secure in place using provided
screws. Screws should slip into holes drilled in post.
9) Insert recommended bulb
10) Lower cage down on top of fixture base. Pass threaded studs
along bottom of cage through holes in fixture base.
11) Screw threaded caps onto threaded studs. Tighten threaded
caps to secure cage in place.
12) Screw threaded pipe into coupling on top of roof.
13) Pass hole in top trim over end of threaded pipe. Set top trim
down on top of roof.
14) Thread loop onto threaded pipe on top of roof.
1) Pour installer les panneaux vitrés: Insérer soigneusement le
panneau de verre dans la cage. Placer le bord supérieur du
verre dans le canal le long de la partie supérieure à l’intérieur
de la cage. Appuyer le panneau de verre à l’intérieur de la
cage. Placer le support à l’intérieur de la cage. Aligner le trou
dans le support au trou sur le bord supérieur de la cage en
dessous du panneau vitré. Passer la vis par le trou dans le
support et dans le trou dans la cage. Resserrer la vis pour fixer
le support et le panneau en verre. Répéter ces étapes pour les
autres panneaux vitrés.
2) COUPER L’ALIMENTATION SECTEUR.
IMPORTANT: TOUJOURS couper l’électricité avant de
commencer le travail.
a) Localiser le coffret à fusibles ou le disjoncteur du domicile.
Mettre l’interrupteur principal en position d’Arrêt.
b) Dévisser le ou les fusibles (ou mettre le disjoncteur sur
Arrêt) qui contrôlent l’alimentation vers le luminaire ou la
pièce dans laquelle le travail est effectué.
c) Mettre l’interrupteur mural en position d’Arrêt. Si le
luminaire à remplacer est doté d’un interrupteur ou d’une
chaîne connectée à l‘interrupteur, placer ces éléments en
position d’Arrêt.
3) Passer le luminaire par dessus le support et marquer un repère
pour les trous de montage sur le support.
4) Enlever le luminaire du support.
5) Percer des trous de 1/8 po sur chacun des repères du support.
6) Si luminaire est fourni a vec un fil de mise à la terre, le connecter
à la boîte de sortie de courant de mise à la terre avec un
serre-fils (non fourni). Ne jamais connecter un fil de mise à la
terre aux fils d’alimentation noir ou blanc.
Date Issued: 9/5/14
IS-49583-CB
Connect Black or
Red Supply Wire to:
Connect
White Supply Wire to:
Black White
*Parallel cord (round & smooth) *Parallel cord (square & ridged)
Clear, Brown, Gold or Black
without tracer
Clear, Brown, Gold or Black
with tracer
Insulated wire (other than green)
with copper conductor
Insulated wire (other than green)
with silver conductor
*Note: When parallel wires (SPT I & SPT II)
are used. The neutral wire is square shaped
or ridged and the other wire will be round in
shape or smooth (see illus.)
Neutral Wire
Connecter le fil noir ou
rouge de la boite
Connecter le fil blanc de la boîte
A Noir A Blanc
*Au cordon parallèle (rond et lisse)
*Au cordon parallele (à angles droits el strié)
Au bransparent, doré, marron, ou
noir sans fil distinctif
Au transparent, doré, marron, ou
noir avec un til distinctif
Fil isolé (sauf fil vert) avec
conducteur en cuivre
Fil isolé (sauf fil vert) avec
conducteur en argent
*Remarque: Avec emploi d’un fil paralléle
(SPT I et SPT II). Le fil neutre est á angles
droits ou strié et l’autre fil doit étre rond ou
lisse (Voir le schéma).
Fil Neutre
INSTRUCTIONS
For Assembling and Installing Fixtures in Canada
Pour L’assemblage et L’installation Au Canada
Were here to help 866-558-5706
Hrs: M-F 9am to 5pm EST
LOOP
BOUCLE
CAGE
CAGE
GLASS PANEL
PANNEAU DE VERRE
ROOF
TOIT
GLASS PANEL INSTALLATION DETAIL
VERRE DETAIL PANNEAU D’INSTALLATION
BRACKET
SUPPORT
SCREW
VIS
THREADED PIPE
TUBE FILETÉ
TOP TRIM
GARNITURE
INFÉRIEURE
COUPLING
ACCOUPLEMENT
SCREW
VIS
FIXTURE BASE
BASE DU
LUMINAIRE
THREADED CAP
BOUCHON FILETÉ
Download manual in English (PDF, 0.11 MB)
(Consider the environment and only print this manual if it is really necessary)

Loading…

Rating

Let us know what you think about the Kichler 49583OZ Pallerton Lamp by leaving a product rating. Want to share your experiences with this product or ask a question? Please leave a comment at the bottom of the page.
Are you satisfied with the Kichler 49583OZ Pallerton Lamp?
Yes No
Be the first to rate this product
0 votes

Join the conversation about this product

Here you can share what you think about the Kichler 49583OZ Pallerton Lamp. If you have a question, first carefully read the manual. Requesting a manual can be done by using our contact form.

More about this manual

We understand that it’s nice to have a paper manual for your Kichler 49583OZ Pallerton Lamp. You can always download the manual from our website and print it yourself. If you would like to have an original manual, we recommend you contact Kichler. They might be able to provide an original manual. Are you looking for the manual of your Kichler 49583OZ Pallerton Lamp in a different language? Choose your preferred language on our homepage and search for the model number to see if we have it available.

Specifications

Brand Kichler
Model 49583OZ Pallerton
Category Lamps
File type PDF
File size 0.11 MB

All manuals for Kichler Lamps
More manuals of Lamps

Frequently Asked Questions about Kichler 49583OZ Pallerton Lamp

Our support team searches for useful product information and answers to frequently asked questions. If you find an inaccuracy in our frequently asked questions, please let us know by using our contact form.

Is all LED lighting dimmable? Verified

No, not all LED lights are dimmable. This is indicated on the packaging or the light itself.

This was helpful (462) Read more

I put a new light in my lamp but it won't turn on, why is that? Verified

Some lamps are made for light sources of a specific wattage. When a light source is inserted that requires a higher wattage than the lamp can provide, the light may not turn on. If the lamp delivers a much higher wattage than what the light source is made for, the light source can burn out.

This was helpful (315) Read more

Why is the colour of light important? Verified

There generally are two kinds of light, warm light and cold light. Cold light keeps you sharp and awake. Warm light has a relaxing effect. The warmth of the light is measured in Kelvin and is indicated on the packaging of the lamp itself.

This was helpful (255) Read more

What is lumen? Verified

Lumen is a measuring unit for the total amount of visible light emitted by a source.

This was helpful (190) Read more

What screw bases exist? Verified

Worldwide there many types of sockets, but most used are those based on the Edison screw, indicated with the letter E. In most countries screw bases E27 and E14 are standard. In the United States E26, E17, E12 and E10 are standard.

This was helpful (142) Read more

What do watts say about my lamp? Verified

Watt is a measuring unit for electricity consumption. Lamps that produce more light, generally use more Watt, but for comparing light output you should always use lumen.

This was helpful (113) Read more

What is LED? Verified

LED stands for Light-Emitting Diode. By running power through a semiconductor in the right direction, light is emitted.

This was helpful (98) Read more
Manual Kichler 49583OZ Pallerton Lamp