Manual Kichler 45152AP Tully Lamp

Need a manual for your Kichler 45152AP Tully Lamp? Below you can view and download the PDF manual for free in English. This product currently has 7 frequently asked questions, 0 comments and has 0 votes. If this is not the manual you want, please contact us.

Is your product defective and the manual offers no solution? Go to a Repair Café for free repair services.

Manual

Loading…

1) TURN OFF POWER.
IMPORTANT: Before you start, NEVER attempt any work without
shutting off the electricity until the work is done.
a) Go to the main fuse, or circuit breaker, box in your home. Place the
main power switch in the “OFF” position.
b) Unscrew the fuse(s), or switch “OFF” the circuit breaker switch(s),
that control the power to the fixture or room that you are working on.
c) Place the wall switch in the “OFF” position. If the fixture to be
replaced has a switch or pull chain, place those in the “OFF”
position.
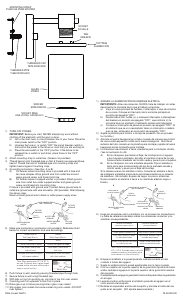
2) Attach mounting strap to outlet box. (Screws not provided)
3) Thread hexnut onto threaded pipe so that 5 threads are exposed above
hexnut. Thread that end of threaded pipe into mounting strap and
tighten hexnut against mounting strap.
4) Grounding instructions: (See Illus. A or B).
A) On fixtures where mounting strap is provided with a hole and
two raise dimples. Wrap ground wire from outlet box around
green ground screw, and thread into hole.
B) On fixtures where a cupped washer is provided. Attach ground
wire from outlet box under cupped washer and green ground
screw, and thread into mounting strap.
If fixture is provided with ground wire. Connect fixture ground wire to
outlet box ground wire with wire connector. (Not provided.) After following
the above steps.
Never connect ground wire to black or white power supply wires.
5) Make wire connections (connectors not provided.) Reference chart
below for correct connections and wire accordingly.
6) Push fixture to wall, carefully passing threaded pipe through hole.
7) Secure fixture to wall using threaded cap.
8) With tabs on top trim pointing up, slip hole in top trim over socket.
9) Carefully push trim upwards to lock trim in place.
10) Raise glass up to fixture passing hole in glass over socket.
11) Slip spacer over socket and screw socket ring onto socket. (DO NOT
over tighten.)
GREEN GROUND
SCREW
CUPPED
WASHER
A
B
OUTLET BOX
GROUND
FIXTURE
GROUND
DIMPLES
WIRE CONNECTOR
(NOT PROVIDED)
OUTLET BOX
GROUND
GREEN GROUND
SCREW
FIXTURE
GROUND
Connect Black or
Red Supply Wire to:
Connect
White Supply Wire to:
Black White
*Parallel cord (round & smooth) *Parallel cord (square & ridged)
Clear, Brown, Gold or Black
without tracer
Clear, Brown, Gold or Black
with tracer
Insulated wire (other than green)
with copper conductor
Insulated wire (other than green)
with silver conductor
*Note: When parallel wires (SPT I & SPT II)
are used. The neutral wire is square shaped
or ridged and the other wire will be round in
shape or smooth (see illus.)
Neutral Wire
Date Issued: 8/6/10 IS-45149-US
THREADED CAP
TAPA ROSCADA
1) APAGAR LA ALIMENTACIÓN DE ENERGIE ELÈTRICA.
IMPORTANTE: Antes de comenzar, NUNCA trate de trabajar sin antes
desconectar la corriente hasta que el trabajo se termine.
a) Vaya a la caja principal de fusibles, o interruptor o caja de circuitos
de su casa. Coloque el interruptor de la corriente principal en
posición de apagado “OFF”.
b) Desatornille el (los) fusible (s), o coloque el interruptor o interruptores
del breaker en posición de apagado “OFF”, que controla (n) la
corriente hacia el artefacto o habitación donde está trabajando.
c) Coloque el interruptor de pared en posición de apagado “OFF”. Si
el artefacto que se va a reemplazar tiene un interruptor o cadena
que se jala, colóquelos en la posición de apagado “OFF”.
2) Sujete la plancha para montar a la caja de conexión. (No se proveen
los tornillos.)
3) Atornille la tuerca hexagonal en el tubo roscado de manera que 5 hilos
de rosca estén expuestos arriba de la tuerca hexagonal. Atornille el
extremo del tubo roscado en la plancha para montaje y apriete la tuerca
hexagonal contra la plancha para montaje.
4) Instrucciones de conexión a tierra solamente para los Estados Unidos.
(Vea la ilustracion A o B).
A) En las lámparas que tienen el fleje, de montaje con un agujero
y dos hoyuelos realzados. Enrollar el alambre a tierra de la caja
tomacorriente alrededor del tornillo verde y pasarlo por el aquiero.
B) En las lámparas con una arandela acopada. Fijar el alambre a
tierra de la caja tomacorriente del ajo de la arandela acoada y
tornillo verde, y paser por el fleje de montaje.
Si la lámpara viene con alambre a tierra. Conecter el alambre a tierra
de la lámpara al alambre a tierra de la caja tomacorriente con un conector
de alambres. (No incluido) Espués de seguir los pasos anteriores.
Nunca conectar el alambra a tierra a los alambres eléctros negro o
blanco.
5) Haga les conexiones de los alambres (no se proveen los connectores.)
La tabla de referencia de abajo indica las conexiones correctas y los
alambres correspondientes.
6) Empuje el artefacto a la pared pasando cuidadosamente el tubo
roscado a través del agujero.
7) Sujete la unidad contra la pared apretándola con la tapa roscada.
8) Con las orejetas en la parte superior de la guarnición apuntando hacia
arriba, resbale el agujero en la parte superior de la guarnición encima
del casquillo.
9) Cuidadosamente empuje la guarnicn hacia arriba para trabar la guarnición
en el lugar.
10) Levante el vidrio arriba hasta el artefacto pasando el agujero en el
vidrio encima del casquillo.
11) Resbale el espaciador encima del casquillo y atornille el anillo del cas
quillo en el casquillo. (NO apriete excesivamente.)
Conectar el alambre de
suministro negro o rojo al
Conectar el alambre de
suministro blanco al
Negro Blanco
*Cordon paralelo (redondo y liso)
*Cordon paralelo (cuadrado y estriado)
Claro, marrón, amarillio o negro
sin hebra identificadora
Claro, marrón, amarillio o negro
con hebra identificadora
Alambre aislado (diferente del verde)
con conductor de cobre
Alambre aislado (diferente del
verde) con conductor de plata
*Nota: Cuando se utiliza alambre paralelo
(SPT I y SPT II). El alambre neutro es de forma
cuadrada o estriada y el otro alambre será de
forma redonda o lisa. (Vea la ilustracíón).
Hilo Neutral
THREADED PIPE
TUBO ROSCADO
MOUNTING STRAP
PLANCHA PARA MONTAR
ARANDELA
CONCAVA
A
B
TIERRA DE LA
CAJA DE SALIDA
TORNILLO DE TIERRA,
VERDE
DEPRESIONES
TIERRA
ARTEFACTO
CONECTOR DE ALAMBRE
(NO SE PROVEE)
TIERRA DE LA
CAJA DE SALIDA
TORNILLO DE TIERRA,
VERDE
TIERRA
ARTEFACTO
GLASS
VIDRIO
SPACER
ESPACIADOR
SOCKET RING
ANILLO DEL CASQUILLO
TOP TRIM
GUARNICIÓN
TAB
OREJETA
SOCKET
DOUILLE
Download manual in English (PDF, 0.11 MB)
(Consider the environment and only print this manual if it is really necessary)

Loading…

Rating

Let us know what you think about the Kichler 45152AP Tully Lamp by leaving a product rating. Want to share your experiences with this product or ask a question? Please leave a comment at the bottom of the page.
Are you satisfied with the Kichler 45152AP Tully Lamp?
Yes No
Be the first to rate this product
0 votes

Join the conversation about this product

Here you can share what you think about the Kichler 45152AP Tully Lamp. If you have a question, first carefully read the manual. Requesting a manual can be done by using our contact form.

More about this manual

We understand that it’s nice to have a paper manual for your Kichler 45152AP Tully Lamp. You can always download the manual from our website and print it yourself. If you would like to have an original manual, we recommend you contact Kichler. They might be able to provide an original manual. Are you looking for the manual of your Kichler 45152AP Tully Lamp in a different language? Choose your preferred language on our homepage and search for the model number to see if we have it available.

Specifications

Brand Kichler
Model 45152AP Tully
Category Lamps
File type PDF
File size 0.11 MB

All manuals for Kichler Lamps
More manuals of Lamps

Frequently Asked Questions about Kichler 45152AP Tully Lamp

Our support team searches for useful product information and answers to frequently asked questions. If you find an inaccuracy in our frequently asked questions, please let us know by using our contact form.

Is all LED lighting dimmable? Verified

No, not all LED lights are dimmable. This is indicated on the packaging or the light itself.

This was helpful (462) Read more

I put a new light in my lamp but it won't turn on, why is that? Verified

Some lamps are made for light sources of a specific wattage. When a light source is inserted that requires a higher wattage than the lamp can provide, the light may not turn on. If the lamp delivers a much higher wattage than what the light source is made for, the light source can burn out.

This was helpful (315) Read more

Why is the colour of light important? Verified

There generally are two kinds of light, warm light and cold light. Cold light keeps you sharp and awake. Warm light has a relaxing effect. The warmth of the light is measured in Kelvin and is indicated on the packaging of the lamp itself.

This was helpful (255) Read more

What is lumen? Verified

Lumen is a measuring unit for the total amount of visible light emitted by a source.

This was helpful (190) Read more

What screw bases exist? Verified

Worldwide there many types of sockets, but most used are those based on the Edison screw, indicated with the letter E. In most countries screw bases E27 and E14 are standard. In the United States E26, E17, E12 and E10 are standard.

This was helpful (142) Read more

What do watts say about my lamp? Verified

Watt is a measuring unit for electricity consumption. Lamps that produce more light, generally use more Watt, but for comparing light output you should always use lumen.

This was helpful (113) Read more

What is LED? Verified

LED stands for Light-Emitting Diode. By running power through a semiconductor in the right direction, light is emitted.

This was helpful (98) Read more
Manual Kichler 45152AP Tully Lamp