Manual Kichler 2641NI Galaxie Lamp

Need a manual for your Kichler 2641NI Galaxie Lamp? Below you can view and download the PDF manual for free in English. This product currently has 7 frequently asked questions, 0 comments and has 0 votes. If this is not the manual you want, please contact us.

Is your product defective and the manual offers no solution? Go to a Repair Café for free repair services.

Manual

Loading…

1) Monte la bombilla al portalámparas, adentro del cuerpo del artefacto.
(Precaución: No toque la bombilla con las manos sin guantes. En caso de que la
toque, limpie la bombilla con alcohol desnaturalizado y una tela sin pelusas.)
2) Cuidadosamente deslice el vidrio sobre los espárragos roscados en el cuerpo del
artefacto.
3) Alinee los agujeros en la tela metálica con los espárragos roscados en el cuerpo
del artefacto y deslice hacia arriba contra el vidrio. Asegure en el lugar con las per-
illas moleteadas.
NOTA: PARA EVITAR ACCIDENTES SE DEBE USAR LA PANTALLA.
4) Apague la alimentación de potencia.
5) Determine la altura del cielorraso a la que le gustaria colgar el artefacto. Se
proveen tres (3) tubos de 11-1/2” de largo con el artefacto, los que se pueden usar
u omitir para alcanzar la altura deseada.
6) Monte el vástago al artefacto - lea primero y entienda las direcciones en la cáp-
sula de Loctite
®
. Siga las instrucciones cuidadosamente. (Cuando termine de usar
la cápsula, deséchela de manera segura.) Las áreas que necesitan Loctite
®
están
marcadas en la ilustracion.
7) Note la dirección de tubo de rosca expuesta en la ilustración. Los dos tubos inferi-
ores tendrán roscas expuestas en la parte superior. El tubo superior no tendrán
roscas expuestas en la parte superior. El tubo superior no tendrá la rosca expues-
ta.
8) Instalar los tornillos de montaje del escudete, apretando con los dedos.
9) Aplicar Loctite
®
al tubo roscado de la bolsa de piezas, aproximadamente 1/2” en
el vástago.
10) Deslizar el escudete y luego la abrazadera de montaje sobre el (los) vástago(s)
montados al artefacto.
11) Aplicar Loctite
®
al pivote a rótula y al tubo roscado. (Roscar el pivote en el tubo
hasta que esté apretado contra el våastago.)
Asegurar en el lugar el pivote à rótula roscando a la tuerca hexagonal en el tubo
roscado, adentro de la rótula.
12) Levantar la abrazadera de montaje contra el pivote a rótula, alineando la muesca
en la rítula con la orejeta en la abrazadera. Instalar rápido el retenedor redondo en
su lugar. Se sugiere colocar un lado del retenedor redondo en el lugar ye luego
enganchar el otro.
13) Acoplar la abrazadera de montaje/artefacto enxamblados a la caja de
salida.Montar la abrtazadera de montaje al cielorraso con la muesca y orejeta
hacia la porción más baja de la inclinación del cielorraso. (Ref: Ilustracion A)
14) Acoplar el alambre de tierra de la caja de salida entre la arandela cóncava y el
tornillo de tierra verde, y roscar el tornillo de tierra en la abrazadera de montaje.
Si el artefacto está provisto con un alambre de tierra, conectar el alambre de tier-
ra del artefacto al alambre de tierra de la caja de salida, con los conectores de
alambre (no se proveen). Nunca se debe conectar el alambre de tierra al alambre
de alimentación negro o blanco.
15) Hacer las conexiones de los alambres (conectores no incluidos.) Ver el cuadro más
abajo para las conexiones correctas y alambrar de acuerdo a esto.
16) Cuidadosamente deslizar el escudete arriba en el vástago y asegurar al cielorraso
usando.
NOTE: Se debe aplicar Loctite
®
a todas las roscas de los vástagos como se notó, para
impdir la rotación accidental del artefacto durante la limpieza, el cambio de bomilla,
etc.
— Indican las áreas donde es necesaria la aplicación de Loctite
®
.
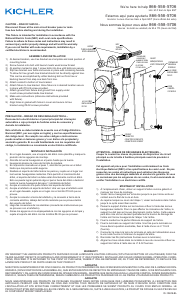
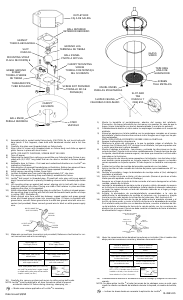
1) Assemble bulb to socket inside fixture body. (CAUTION: Do not touch bulb with
bare hands. If this happens, clean bulb with denatured alcohol and a lint free
cloth.)
2) Carefully slip glass over threaded studs on fixture body.
3) Align holes in screen with threaded studs on fixture body and slide up against
glass. Secure in place with knurl knobs.
NOTE: FOR SAFETY PURPOSES, SCREEN MUST BE USED.
4) Turn off power.
5) Determine the height from ceiling you would like your fixture to hang. Fixture is pro-
vided with (3) 11-1/2” long tubes that can be used or omitted to achieve desired
height.
6) Assemble stem to fixture - First read and understand directions on Loctite
®
are
marked on illustration.
7) Note direction of exposed threaded pipe on illustration. Bottom two pipes will have
exposed thread at top. Top pipe will not have exposed threaded pipe.
8) Install canopy mounting screws, finger tight.
9) Loctite
®
threaded pipe from parts bag approximately 1/2” into stem.
10) Slip canopy then mounting strap over stem(s) assembled to fixture.
11) Loctite
®
ball swivel to threaded pipe. (Thread ball onto pipe until snug against
stem) Secure ball swivel in place by threading a hexnut onto threaded pipe inside
ball.
12) Lift mounting strap up against ball swivel, aligning slot in ball with tab in strap.
Snap ball retainer into place. Placing one side of ball retainer in place and then
snapping the other in is suggested.
13) Attach assembled fixture/mounting strap to outlet box. If ceiling is sloped assem-
ble mounting strap to ceiling with ball slot and tab towards lower portion of slope
in ceiling. (REF: Illustration A)
14) Attach ground wire from outlet box between cupped washer and green ground
screw and thread ground screw into mounting strap. If fixture is provided with
ground wire, connect fixture ground wire to outlet box ground wire with wire con-
nectors (not provided). Never connect ground wire to black or white power supply
wire.
15) Make wire connections (connectors not provided.) Reference chart below for cor-
rect connections and wire accordingly.
16) Carefully slip canopy up stem and secure to ceiling using ball knobs.
NOTE: Loctite
®
must be applied to all stem threads as noted to prevent
accidental rotation of fixture during cleaning, relamping, etc. ...
— Marks areas where application of Loctite
®
is necessary.
GREEN GROUND
SCREW
WIRE CONNECTOR
(NOT PROVIDED)
OUTLET BOX
GROUND
CUPPED
WASHER
FIXTURE
GROUND
TORNILLO DE TIERRA
VERDE
CONECTOR DE ALAMBRE
(NO SE PROVEE)
TIERRA DE LA
CAJA DE SALIDA
ARANDELA
CONCAVA
TIERRA
ARTEFACTO
Connect Black or
Red Supply Wire to:
Connect
White Supply Wire to:
Black White
*Parallel cord (round & smooth) *Parallel cord (square & ridged)
Clear, Brown, Gold or Black
without tracer
Clear, Brown, Gold or Black
with tracer
Insulated wire (other than green)
with copper conductor
Insulated wire (other than green)
with silver conductor
*Note: When parallel wires (SPT I & SPT II)
are used. The neutral wire is square shaped
or ridged and the other wire will be round in
shape or smooth (see illus.)
Neutral Wire
Conectar el alambre de
suministro negro o rojo al
Conectar el alambre de
suministro blanco al
Negro Blanco
*Cordon paralelo (redondo y liso)
*Cordon paralelo (cuadrado y estriado)
Claro, marrón, amarillio o negro
sin hebra identificadora
Claro, marrón, amarillio o negro
con hebra identificadora
Alambre aislado (diferente del verde)
con conductor de cobre
Alambre aislado (diferente del
verde) con conductor de plata
*Nota: Cuando se utiliza alambre paralelo
(SPT I y SPT II). El alambre neutro es de forma
cuadrada o estriada y el otro alambre será de
forma redonda o lisa. (Vea la ilustracíón).
Hilo Neutral
Date Issued 9/8/95
IS-2641-US
OUTLET BOX
CAJA DE SALIDA
MOUNTING STRAP
PLACA DE MONTAJE
HEXNUT
TUERCA HEXAGONAL
CANOPY
ESCUDETE
GROUND LUG
TERMINAL DE TIERRA
THREADED PIPE
TUBO ROSCADO
GLASS
VIDRIO
SLOT
MUESCA
SCREW NOT PROVIDED
TORNILLO NO SE
PROVEE(N)
BALL SWIVEL
PIVOTE A ROTULA
TRIM RING
ANILO DE
GUARNICION
KNURL KNOBS
PERILLAS MOLETEADAS
SCREEN
TELA METALICA
BALL KNOB
PERILLA REDONDA
CANOPY MOUNTING
SCREW
TORNILLO DE MONTAJE
DEL SCUDENTE
GREEN GROUND
SCREW
TORNILLO VERDE
DE TIERRA
BALL RETAINER
RETENDOR REDONDO
STEM
VASTAGO
SLOT AND
TAB
MUESCA Y
OREJETA
SLOPED CEILING
CIELORRASO INCLINADO
Download manual in English (PDF, 0.3 MB)
(Consider the environment and only print this manual if it is really necessary)

Loading…

Rating

Let us know what you think about the Kichler 2641NI Galaxie Lamp by leaving a product rating. Want to share your experiences with this product or ask a question? Please leave a comment at the bottom of the page.
Are you satisfied with the Kichler 2641NI Galaxie Lamp?
Yes No
Be the first to rate this product
0 votes

Join the conversation about this product

Here you can share what you think about the Kichler 2641NI Galaxie Lamp. If you have a question, first carefully read the manual. Requesting a manual can be done by using our contact form.

More about this manual

We understand that it’s nice to have a paper manual for your Kichler 2641NI Galaxie Lamp. You can always download the manual from our website and print it yourself. If you would like to have an original manual, we recommend you contact Kichler. They might be able to provide an original manual. Are you looking for the manual of your Kichler 2641NI Galaxie Lamp in a different language? Choose your preferred language on our homepage and search for the model number to see if we have it available.

Specifications

Brand Kichler
Model 2641NI Galaxie
Category Lamps
File type PDF
File size 0.3 MB

All manuals for Kichler Lamps
More manuals of Lamps

Frequently Asked Questions about Kichler 2641NI Galaxie Lamp

Our support team searches for useful product information and answers to frequently asked questions. If you find an inaccuracy in our frequently asked questions, please let us know by using our contact form.

Is all LED lighting dimmable? Verified

No, not all LED lights are dimmable. This is indicated on the packaging or the light itself.

This was helpful (462) Read more

I put a new light in my lamp but it won't turn on, why is that? Verified

Some lamps are made for light sources of a specific wattage. When a light source is inserted that requires a higher wattage than the lamp can provide, the light may not turn on. If the lamp delivers a much higher wattage than what the light source is made for, the light source can burn out.

This was helpful (315) Read more

Why is the colour of light important? Verified

There generally are two kinds of light, warm light and cold light. Cold light keeps you sharp and awake. Warm light has a relaxing effect. The warmth of the light is measured in Kelvin and is indicated on the packaging of the lamp itself.

This was helpful (255) Read more

What is lumen? Verified

Lumen is a measuring unit for the total amount of visible light emitted by a source.

This was helpful (190) Read more

What screw bases exist? Verified

Worldwide there many types of sockets, but most used are those based on the Edison screw, indicated with the letter E. In most countries screw bases E27 and E14 are standard. In the United States E26, E17, E12 and E10 are standard.

This was helpful (142) Read more

What do watts say about my lamp? Verified

Watt is a measuring unit for electricity consumption. Lamps that produce more light, generally use more Watt, but for comparing light output you should always use lumen.

This was helpful (113) Read more

What is LED? Verified

LED stands for Light-Emitting Diode. By running power through a semiconductor in the right direction, light is emitted.

This was helpful (98) Read more
Manual Kichler 2641NI Galaxie Lamp

Related products

Related categories