Manual Kichler 2347NI Circolo Lamp

Need a manual for your Kichler 2347NI Circolo Lamp? Below you can view and download the PDF manual for free in English. This product currently has 7 frequently asked questions, 0 comments and has 0 votes. If this is not the manual you want, please contact us.

Is your product defective and the manual offers no solution? Go to a Repair Café for free repair services.

Manual

Loading…

Date Issued: 11/21/17
IS-2347-CB
We’re here to help 866-558-5706
Hrs: M-F 9am to 5pm EST
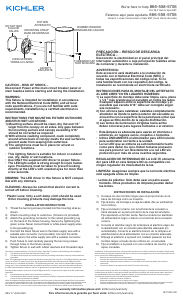
CAUTION – RISK OF SHOCK –
Disconnect Power at the main circuit breaker panel or main fuse
box before starting and during the installation.
INSTRUCTIONS
For Assembling and Installing Fixtures in Canada
Pour L’assemblage et L’installation Au Canada
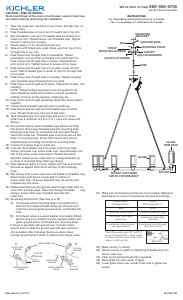
1) Take one loose arm, slip hook at end of arm through loop on
fixture body.
2) Pass threaded pipe on top of arm through hole in top trim.
3) Slip lockwasher over end of threaded pipe protruding from
inside top trim. Thread hexnut onto threaded pipe. Tighten
hexnut to secure arm in place.
4) Repeat steps 1-4 for remaining loose arm.
5) Take arm with fixture wire, pass fixture wire from top of arm
through hole in top trim.
6) Pass fixture wire through hole in lockwasher. Thread
lockwasher onto end arm protruding from inside top trim.
Pass fixture wire through hole in hexnut. Thread henxut
onto end of arm. Tighten hexnut to secure arm in place.
7) Pass fixture wire through hole in top plate. Lower top trim
down. Pass threaded pipe in center of top trim through hole
in top plate.
8) Pass fixture wire through hole in coupling. Thread coupling
onto threaded pipe protruding from top plate.
9) Pass fixture wire through end of stem. Thread end of stem into
coupling.
NOTE: Thread locking compound must be applied to all
stem threads as noted with symbol to prevent accidental
rotation of fixture during cleaning, relamping, etc.
10) Pass fixture wire through remaining stems and screw stems
together.
11) Thread small threaded pipe into end of small loop.
12) Pass fixture wire through end of threaded pipe on small
loop. Thread small loop onto end of last stem.
13) Take threaded pipe from parts bag and screw in screw
collar loop a minimum of 6 mm (1/4”). Lock into place with
hexnut.
14) Run another hexnut down threaded pipe almost touching
first hexnut. Now screw threaded pipe into mounting strap.
Mounting strap must be positioned with extruded thread
faced into outlet box. Threaded pipe must protrude out the
back of mounting strap. Screw third hexnut onto end of
threaded pipe protruding from back of mounting strap.
15) Connect mounting strap to outlet box.
16) Unscrew the threaded ring from screw collar loop. Take
canopy and pass over screw collar loop. Approximately one
half of the screw collar loop exterior threads should be
exposed. Adjust screw collar loop by turning assembly up
or down in mounting strap. Remove canopy.
17) After desired position is found, tighten both top and bottom
hexnuts up against the bottom and top of the mounting
strap.
18) Slip canopy over screw collar loop and thread on threaded ring.
Attach chain (with fixture connected) to bottom of
screw collar loop. Unscrew threaded ring, let canopy and
threaded ring slip down.
19) Weave electrical wire and ground wire through chain links no
more than 3 inches apart. Pass wire through threaded ring,
canopy, screw collar loop, threaded pipe and into
outlet box.
20) Grounding instructions: (See Illus. A or B).
A) On fixtures where mounting strap is provided with a
hole and two raised dimples. Wrap ground wire from
outlet box around green ground screw, and thread into
hole.
B) On fixtures where a cupped washer is provided. Attach
ground wire from outlet box under cupped washer and
green ground screw, and thread into mounting strap.
If fixture is provided with ground wire. Connect fixture
ground wire to outlet box ground wire with wire connector
(not provided.) after following the above steps. Never
connect ground wire to black or white power supply wires.
GREEN GROUND
SCREW
CUPPED
WASHER
OUTLET BOX
GROUND
FIXTURE
GROUND
DIMPLES
WIRE CONNECTOR
OUTLET BOX
GROUND
GREEN GROUND
SCREW
FIXTURE
GROUND
A
B
MOUNTING
BRACKET
GROUND WIRE
BALL
MOUNTING STRAP
STRAP
MOUNTING SCREWS
CANOPY
(2)LOCKWASHERS
(2)LOCK-UP KNOBS
TUBE
GLASS
TRIM PACK
GLASS
SOCKET
SOCKET CUP FINISH
MATCH FIXTURE BODY
21) Make wire connections (connectors not provided). Reference
chart below for correct connections and wire accordingly.
22) Raise canopy to ceiling.
23) Secure canopy in place by tightening threaded ring onto
screw collar loop.
24) Insert recommended bulbs (Not supplied).
25) Place glass trim into center of glass.
26) Lower glass down over socket. Pass hole in glass over
socket.
Connect Black or
Red Supply Wire to:
Connect
White Supply Wire to:
Black White
*Parallel cord (round & smooth)
*Parallel cord (square & ridged)
Clear, Brown, Gold or Black
without tracer
Clear, Brown, Gold or Black
with tracer
Insulated wire (other than green)
with copper conductor
Insulated wire (other than green)
with silver conductor
*Note: When parallel wires (SPT I & SPT II)
are used. The neutral wire is square shaped
or ridged and the other wire will be round in
shape or smooth (see illus.)
Neutral Wire
Download manual in English (PDF, 0.18 MB)
(Consider the environment and only print this manual if it is really necessary)

Loading…

Rating

Let us know what you think about the Kichler 2347NI Circolo Lamp by leaving a product rating. Want to share your experiences with this product or ask a question? Please leave a comment at the bottom of the page.
Are you satisfied with the Kichler 2347NI Circolo Lamp?
Yes No
Be the first to rate this product
0 votes

Join the conversation about this product

Here you can share what you think about the Kichler 2347NI Circolo Lamp. If you have a question, first carefully read the manual. Requesting a manual can be done by using our contact form.

More about this manual

We understand that it’s nice to have a paper manual for your Kichler 2347NI Circolo Lamp. You can always download the manual from our website and print it yourself. If you would like to have an original manual, we recommend you contact Kichler. They might be able to provide an original manual. Are you looking for the manual of your Kichler 2347NI Circolo Lamp in a different language? Choose your preferred language on our homepage and search for the model number to see if we have it available.

Specifications

Brand Kichler
Model 2347NI Circolo
Category Lamps
File type PDF
File size 0.18 MB

All manuals for Kichler Lamps
More manuals of Lamps

Frequently Asked Questions about Kichler 2347NI Circolo Lamp

Our support team searches for useful product information and answers to frequently asked questions. If you find an inaccuracy in our frequently asked questions, please let us know by using our contact form.

Is all LED lighting dimmable? Verified

No, not all LED lights are dimmable. This is indicated on the packaging or the light itself.

This was helpful (462) Read more

I put a new light in my lamp but it won't turn on, why is that? Verified

Some lamps are made for light sources of a specific wattage. When a light source is inserted that requires a higher wattage than the lamp can provide, the light may not turn on. If the lamp delivers a much higher wattage than what the light source is made for, the light source can burn out.

This was helpful (315) Read more

Why is the colour of light important? Verified

There generally are two kinds of light, warm light and cold light. Cold light keeps you sharp and awake. Warm light has a relaxing effect. The warmth of the light is measured in Kelvin and is indicated on the packaging of the lamp itself.

This was helpful (255) Read more

What is lumen? Verified

Lumen is a measuring unit for the total amount of visible light emitted by a source.

This was helpful (190) Read more

What screw bases exist? Verified

Worldwide there many types of sockets, but most used are those based on the Edison screw, indicated with the letter E. In most countries screw bases E27 and E14 are standard. In the United States E26, E17, E12 and E10 are standard.

This was helpful (142) Read more

What do watts say about my lamp? Verified

Watt is a measuring unit for electricity consumption. Lamps that produce more light, generally use more Watt, but for comparing light output you should always use lumen.

This was helpful (113) Read more

What is LED? Verified

LED stands for Light-Emitting Diode. By running power through a semiconductor in the right direction, light is emitted.

This was helpful (98) Read more
Manual Kichler 2347NI Circolo Lamp

Related products

Related categories