
For warranty information please visit: http://www.landscapelighting.com/portal/warranty_page
Para informacion de la garantia por favor visite: www.landscapelighting.com/portal/warranty_page
This instruction sheet covers the installation of the following Kichler
®
Transformers: 15CS75SS. Read these instructions carefully before installing
this unit.
• This power supply is for use with landscape lighting systems only.
• Do not submerge transformer.
• This device is accepted as a component of a landscape lighting system
where the suitability of the combination shall be determined by National
Electric Code or local authorities having jurisdiction.
• WARNING: Risk of electric shock, use only with low voltage landscape
fixtures and accessories. DO not use with swimming pool or spa lighting
fixtures.
• Do not connect two or more power supplies in parallel.
• Suitable for indoor or outdoor use.
• For use in dwellings only with provided conduit adapter plate.
• National Electrical Code requires that wiring where concealed or
extended through a building wall must be enclosed in conduit.
• Transformer should be mounted close to power source. Extension cords
should not be used with this unit.
• WARNING: (for Power Supply Cord connected POWER UNIT)
RISK OF ELECTRIC SHOCK. Install power unit 5 feet (1.5m) or more
from the pool, spa, or fountain where the power unit is installed (a)
indoor within 10 feet (3.0m) of a pool, spa, or fountain, or (b) outdoor,
connect power to unit to a receptacle protected by a GFCI.
• This outdoor power unit shall be connected to a 115/120 volt covered
GFCI receptacle marked “Wet Location” while in use.
• Mount the rain-tight transformer at least one foot above ground level with
the wire terminals facing down. NOTE: Do not energize transformer until
installation of system is complete.
• Direct burial rated wire is to be buried a minimum of 6” (152mm) beneath
the surface of the ground.
NOTE: If additional Direct Burial wire is needed, contact your local
Kichler
®
landscape distributor.
• 8 GA wire can be purchased in length of 250’ (76 M), 15503-BK.
• 10 GA wire can be purchased in length of 250’ (76 M), 15504-BK.
• 12 GA wire can be purchased in lengths of 100’ (30 M), 15501-BK;
250’ (76 M), 15502-BK; 500’ (152M), 15505-BK; and 1000’ (304 M),
15506-BK.
• Finding Transformer Load: Low voltage systems require the use of a
transformer to reduce standard 120-VOLT power from your home to
12-VOLTS. To determine the transformer size you will need, add up the
wattages of all lamps you plan to use. Select a transformer that matches
as closely as possible to the total lamp wattage. For example, if you
have 11 fixtures all rated at 24.4 watts, you will need a 300 watt
(VA) transformer (11 x 24.4 = 268.4 watts). Generally, the total lamp load
should not be less than one-third the transformers wattage rating, nor
exceed its maximum wattage capacity. If your total wattage is too high,
either divide the load between two transformers, or use a more powerful
transformer.
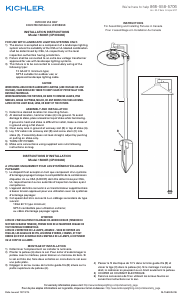
INSTALLATION INSTRUCTIONS
1) Determine desired location for mounting transformer. NOTE: When
deciding location for mounting consideration should be taken for the
requirements listed above.
2) Mark position of top portion of the keyhole slot location at top of
transformer and the slot located at bottom.
3) If mounting to a solid surface such as wood, siding, etc;
A) Drill 1/8” diameter pilot holes at positions marked in Step 2.
B) Drive screws approximately half way into holes.
If mounting to drywall:
A) Drill 1/4” diameter holes at positions marked in Step 2.
B) Push plastic anchors into holes and tap until flush.
C) Drive screws approximately half-way into plastic anchors.
4) Slip large portion of keyhole over head of top screw and allow transformer
to slide down, making sure bottom slot is behind head of bottom screw.
5) Tighten screws until transformer is secure.
6) Split 12/2. 10/2, or 8/2 cable approximately 3”, and strip 1/2” insulation
off each wire. 12/2. 10/2, and 8/2 cable is the heavy black cable which
all Kichler
®
12-volt low voltage lighting fixtures will be connected.
(Reference above for description and part numbers).
7) On the bottom of the terminal block push one bare wire into the hole
marked “COM” and tighten the corresponding screw on terminal block
face until wire is secure. See chart for terminal screw torque specification.
See chart for maximum wire sizes and counts.
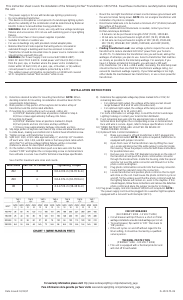
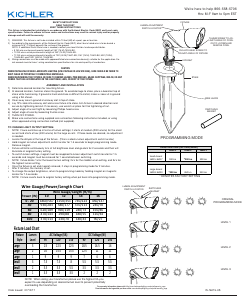
Wire Sizes Max. no. of conductors
Tightening Torque
#12 8 3.6-4.0 N-m (32-35 lb-in)
#10 4 3.6-4.0 N-m (32-35 lb-in)
#8 1 4.1-4.5 N-m (36-40 lb-in)
8) Determine the appropriate voltage tap (holes marked 12V or 15V) for
remaining bare wire.
• For optimum light output, the voltage at the lamp socket should
range between 10.8 and 12 volts (incandescent).
• For optimum light output, the voltage at the lamp socket should
range between 12 to 15 volts (LED).
For more information on voltage drop, consult the Kichler Landscape
Lighting Catalog or contact your local Kichler distributor.
9) Push remaining bare wire into the appropriate hole on bottom of
terminal block and tighten the corresponding screw on terminal block
face until wire is secure. Again, refer to torque specifications in chart.
10) TIMER INSTRUCTIONS ARE LOCATED ON INSIDE OF
TRANSFORMER COVER.
11) Optional Photo Control Installations:
A) Make sure power is off and transformer is NOT plugged into
an electrical outlet. NOTE: No splice is required, transformer is
equipped with jumper connector.
B) Open front cover of the transformer case by lifting the cover
up. Locate and disconnect the white jumper connector inside
the housing. *Save the jumper connector with these instructions
for possible future use.
C) Remove one (1) of the 7/8” diameter knockouts on the side of
the transformer and push the photo control white connector
through the knockout hole. Inside the housing, slide the spacer
and star nut over the white connector and thread it on to the
photo control and tighten.
D) Plug photo control white connector into the housing connector.
Insure that the side latch locks the connectors.
E) Locate transformer and position photo control so that no light
will shine on the cell. It will cause the photo control to cycle on
and off. *In the unlikely event that the photo control should fail,
the lighting fixtures will remain on, even in the daytime. If this
should happen, follow these instructions and remove the defective
photo control and place the jumper connector in its place.
12) Plug power supply cord into standard 115/120 volt receptacle. NOTE:
The power supply cord must be plugged into a weather tight receptacle
equipped with a Ground Fault Interrupter (GFCI).
CIRCUIT BREAKER
(SECONDARY SIDE - 12 VOLT SIDE)
• Circuit breaker will trip if there is a short or if total
wattage installed exceeds rated wattage per circuit.
• To reset breaker, flip switch to ‘OFF’ then back to
‘ON’ position.
• If the unit cycles on and off without regard to the
timer setting, it should be checked by a qualified
service person.
THERMAL PROTECTION
(PRIMARY SIDE - 120 VOLT SIDE)
• This unit is equipped with a thermal protector and
will shut off if overheated.


Join the conversation about this product
Here you can share what you think about the Kichler 15CS75SS Contractor Lamp. If you have a question, first carefully read the manual. Requesting a manual can be done by using our contact form.