Manual Kichler 15671ST Bollard Lamp

Need a manual for your Kichler 15671ST Bollard Lamp? Below you can view and download the PDF manual for free in English. This product currently has 7 frequently asked questions, 0 comments and has 0 votes. If this is not the manual you want, please contact us.

Is your product defective and the manual offers no solution? Go to a Repair Café for free repair services.

Manual

Loading…

Date Issued 10/23/98
IS-15671-US
INSTALLATION
1) Atornille una tuerca hexagonal en cada perno en "J" hasta que la
tuerca hexagonal llegue al extremo de las roscas.
2) Resbale los pernos en "J" a través de los agujeros pequeños en la
plantilla y asegure en su lugar utilizando arandelas y tuercas hexag-
onales.
3) Resbale el conjunto de plantilla/perno en "J" sobre el cable/conduc-
to a través de los agujeros grandes en la plantilla para asegurar la
colocación y la alineación. Quite el conjunto de la plantilla/perno en
"J".
4) Vacíe concreto en el agujero. NOTA: Asegúrese de que las longi-
tudes del alambre/conducto sean como se especifica.
5) Embeber los pernos en "J" en el concreto hasta que la parte inferior
de la plantilla siente en la parte superior del concreto y el cable/con-
ducto pase a través de los agujeros grandes en la plantilla.
120V Systems: All 120V installations should comply with local electrical
codes for fixture mounting and wiring methods. If you have any doubts con-
cerning installation contact a qualified licensed electrician.
12V Systems: Fixture is not to be installed within 10 feet (3m) of a pool, spa
or fountain.
Before starting: The following items should be completed before proceeding.
A) All holes should be dug. Holes should be at least 18” (457 mm)
deep by 8” (203 mm) diameter or to local code specifications.
B) All trenches should be dug for power supply.
120V: Reference local code specification
12V: Low voltage wiring is intended for shallow burial.
Do not bury deeper than 6” (152 mm) below surface.
C) Run Power supply conduit or cable.
120V: Conduit should protrude 2” (51mm) above top of
concrete and 6” (152 mm) of wire should protrude
from conduit.
12V: Cable should extend 7” (178 mm) above top of
concrete, and can be looped back down to run to
next fixture.
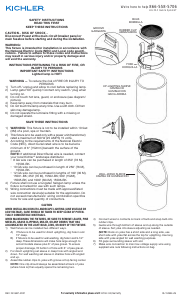
INSTALLATION
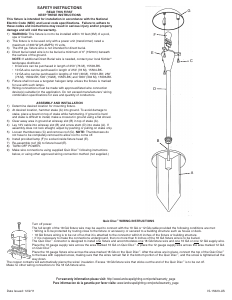
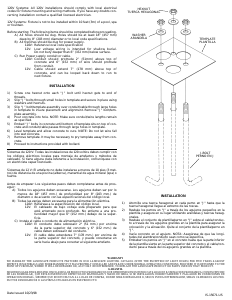
1) Screw one hexnut onto each “J” bolt until hexnut gets to end of
threads.
2) Slip “J” bolts through small holes in template and secure in place using
washers and hexnuts.
3) Slip “J” bolt/template assembly over conduit/cable through large holes
in template to insure placement and alignment. Remove “J” bolt/tem-
plate assembly.
4) Pour concrete into hole. NOTE: Make sure conduit/wire lengths remain
as specified.
5) Embed “J” bolts in concrete until bottom of template sits on top of con-
crete and conduit/cable passes through large holes in template.
6) Level template and allow concrete to cure. NOTE: Do not let wire fall
into wet concrete.
7) Remove template. It may be necessary to pry template away from con-
crete.
8) Proceed to instructions provided with bollard.
HEXNUT
TUERCA HEXAGONAL
J-BOLT
PERNO EN J
TEMPLATE
PLANTILLA
WASHER
ARANDELA
Sistemas de 120 V: Todas las instalaciones de 120 voltios deben cumplir con
los códigos eléctricos locales para montaje de artefactos y métodos de
cableado. Si tiene alguna duda referente a la instalación, comuníquese con
un electricista capaz licenciado.
Sistemas de 12 V: El artefacto no debe instalarse a menos de 10 pies (3 met-
ros) de distancia de una piscina (alberca), manantial de agua mineral (spa) o
fuente.
Antes de empezar: Los siguientes pasos deben completarse antes de pros-
eguir:
A) Todos los agujeros deben excavarse. Los agujeros deben ser por lo
menos de 18" (457 mm.) de profundidad por 8" (203 mm.) de
diámetro o de acuerdo con las especificaciones del código local.
B) Todas las zanjas deben excavarse para la alimentación eléctrica.
120V: Refiérase a la especificación del código local.
12V: El cableado de bajo voltaje está preparado para que
esté enterrado poco profundo. No entierre a una pro-
fundidad mayor que 6" (152 mm.) debajo de la super-
ficie.
C) Instale el cable o conducto de alimentación eléctrica.
120V: El conducto debe sobresalir 2" (51 mm.) por encima
de la parte superior del concreto y 6" (152 mm.) de
cable deben sobresalir del conducto.
12V: El cable debe extenderse 7" (178 mm.) por encima de
la parte superior del concreto, y puede conectarse en
serie hacia abajo para conectar al siguiente artefacto.
WARRANTY
WE WARRANT THE LANDSCAPE PRODUCTS FEATURED IN OUR LANDSCAPE LIGHTING CATALOG (WITH THE EXCEPTION OF LIGHT BULBS) FOR FIVE YEARS AGAINST
DEFECTS IN MATERIALS AND WORKMANSHIP IF IT WAS PROPERLY INSTALLED AND FAILED UNDER NORMAL OPERATING CONDITIONS, PROVIDED IT IS RETURNED TO THE
POINT OF PURCHASE, WHERE IT WILL BE REPAIRED OR, AS IT MAY BE DETERMINED, TO REPLACE THE LANDSCAPE PRODUCT OR PARTS USED ON THAT PRODUCT.
GARANTIA
NOSOTROS GARANTIZAMOS POR CINCO ANOS LOS PRODUCTOS PANORAMICOS QUE OFRECEMOS EN NUESTRO CATALOGO DE ILUMINACION PANORAMICA (CON EXCEPCION
DE LAS BOMBILLAS), QUE ESTAN EXENTOS DE DEFECTOS DE MATERIALES Y MANO DE OBRA, SI SE INSTALARON CORRECTAMIENTE Y FALLARON EN CONDICIONES DE
OPERACION NORMAL, SIEMPRE QUE SE DEVUELVAN AL LUGAR DE COMPRA, DONDE SERAN REPARADOS O, SEGUN PUEDA DETERMINARSE, SERAN CAMBIADOS LOS PRO-
DUCTOS PANORAMICOS O LAS PIEZAS UTILIZADAS EN ESE PRODUCTO
Download manual in English (PDF, 0.12 MB)
(Consider the environment and only print this manual if it is really necessary)

Loading…

Rating

Let us know what you think about the Kichler 15671ST Bollard Lamp by leaving a product rating. Want to share your experiences with this product or ask a question? Please leave a comment at the bottom of the page.
Are you satisfied with the Kichler 15671ST Bollard Lamp?
Yes No
Be the first to rate this product
0 votes

Join the conversation about this product

Here you can share what you think about the Kichler 15671ST Bollard Lamp. If you have a question, first carefully read the manual. Requesting a manual can be done by using our contact form.

More about this manual

We understand that it’s nice to have a paper manual for your Kichler 15671ST Bollard Lamp. You can always download the manual from our website and print it yourself. If you would like to have an original manual, we recommend you contact Kichler. They might be able to provide an original manual. Are you looking for the manual of your Kichler 15671ST Bollard Lamp in a different language? Choose your preferred language on our homepage and search for the model number to see if we have it available.

Specifications

Brand Kichler
Model 15671ST Bollard
Category Lamps
File type PDF
File size 0.12 MB

All manuals for Kichler Lamps
More manuals of Lamps

Frequently Asked Questions about Kichler 15671ST Bollard Lamp

Our support team searches for useful product information and answers to frequently asked questions. If you find an inaccuracy in our frequently asked questions, please let us know by using our contact form.

Is all LED lighting dimmable? Verified

No, not all LED lights are dimmable. This is indicated on the packaging or the light itself.

This was helpful (495) Read more

I put a new light in my lamp but it won't turn on, why is that? Verified

Some lamps are made for light sources of a specific wattage. When a light source is inserted that requires a higher wattage than the lamp can provide, the light may not turn on. If the lamp delivers a much higher wattage than what the light source is made for, the light source can burn out.

This was helpful (355) Read more

Why is the colour of light important? Verified

There generally are two kinds of light, warm light and cold light. Cold light keeps you sharp and awake. Warm light has a relaxing effect. The warmth of the light is measured in Kelvin and is indicated on the packaging of the lamp itself.

This was helpful (287) Read more

What is lumen? Verified

Lumen is a measuring unit for the total amount of visible light emitted by a source.

This was helpful (228) Read more

What screw bases exist? Verified

Worldwide there many types of sockets, but most used are those based on the Edison screw, indicated with the letter E. In most countries screw bases E27 and E14 are standard. In the United States E26, E17, E12 and E10 are standard.

This was helpful (172) Read more

What do watts say about my lamp? Verified

Watt is a measuring unit for electricity consumption. Lamps that produce more light, generally use more Watt, but for comparing light output you should always use lumen.

This was helpful (149) Read more

What is LED? Verified

LED stands for Light-Emitting Diode. By running power through a semiconductor in the right direction, light is emitted.

This was helpful (130) Read more
Manual Kichler 15671ST Bollard Lamp

Related products

Related categories