
For warranty informaon please visit: kichler.com/warranty
CAUTION – RISK OF SHOCK –
Disconnect Power at the main circuit breaker panel or
main fusebox before starting and during the installation.
WARNING:
This xture is intended for installation in accordance
with the National Electrical Code (NEC) and all local
code specications. If you are not familiar with code
requirements, installation by a certied electrician is
recommended.
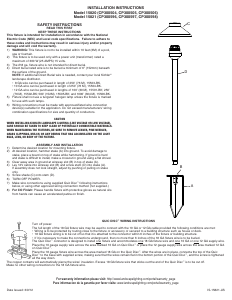
INSTRUCTIONS FOR MOUNTING FIXTURE OUTDOORS
AND/OR IN WET LOCATIONS:
1) Mounting surface should be clean, dry, flat and 1/4”
larger than the canopy on all sides. Any gaps between
the mounting surface and canopy exceeding 3/16”
should be corrected as required.
2) With silicone caulking compound, caulk completely
around where back of canopy meets the wall surface to
prevent water from seeping into outlet box.
• This lighting xture is suitable for indoor or outdoor
use, dry, damp or wet locations.
• Use ONLY the supplied LED driver to power xture.
• The LED light output is strong enough to injure human
eyes. Precautions must be taken to prevent looking
directly at the LED’s with unaided eyes for more than
a few seconds.
DIMMING: The LED driver in this xture is NOT compat-
ible with any dimmers.
CLEANING: Always be certain that electric current is
turned off before cleaning.
• Plastic Lens: Only a soft damp cloth should be used.
Other cleaning products may damage the lens.
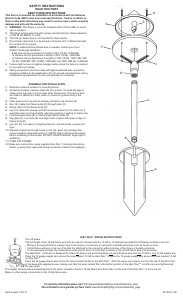
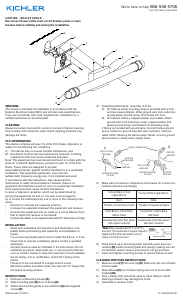
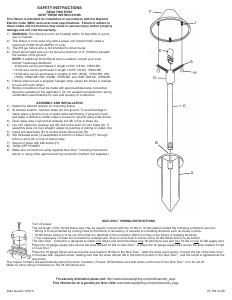
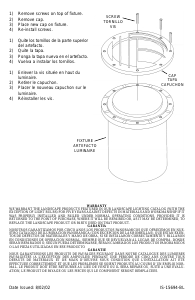
INSTALLATION INSTRUCTIONS
1) Thread the two long screws provided into the mounting strap as
shown.
2) Attach mounting strap to outlet box. (Screws not provided).
3) Attach the grounding conductor to the raised grounding lug
onthebackofthexturehousing.Securebytighteningthe
greenscrew.Neverconnectblackorwhitepowersupplywires
to the grounding lug.
4) Connecttheblackxturewiretotheblacksupplywirewitha
suitable wire connector (not provided). Connect the white
xturewiretothewhitesupplywirewithasuitableconnector.
5) Pushxturetowallcarefullypassingthetwolongscrews
throughholesinthexturecanopy.
6) Tightenxturetowallwithrubberwashersandthreadedcaps.
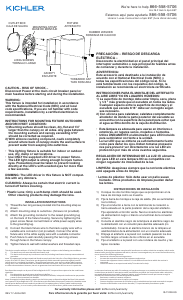
OUTLET BOX
CAJA DE SALIDA
MOUNTING STRAP
BASE DE MONTAJE
LONG SCREWS
TORNILLO LARGO
CANOPY
ESCUDETE
FIXTURE
ARTEFACTO
RUBBER WASHER
RONDANA DE CAUCHO
THREADED CAP
TAPA ROSCADA
IS-11250-US
PRECAUCIÓN – RIESGO DE DESCARGA
ELÉCTRICA –
Desconecte la electricidad en el panel principal del
interruptor automático o caja principal de fusibles antes
de comenzar y durante la instalación.
ADVERTENCIA:
Este accesorio está destinado a la instalación de
acuerdo con el National Electrical Code (NEC) y
todas las especicaciones del código local. Si no
está familiarizado con los requisitos del código, la
instalación se recomienda un electricista certicado.
INSTRUCCIONES PARA EL MONTAJE DEL ARTEFACTO
AL AIRE LIBRE Y/O EN LUGARES HÚMEDOS:
1) La supercie de montaje debe estar limpia, seca, plana
y 1/4 “ más grande que el escudete en todos los lados.
Cualquier espacio entre la supercie de montaje y el
escudete que exceda 3/16” debe ser corregido según
sea necesario.
2) Con silicona para calafatear, calafatee completamente
alrededor de donde la parte posterior del escudete se
encuentra con la supercie de la pared para evitar que
el agua se ltre dentro de la caja de distribución.
• Esta lámpara es adecuada para usarse en interiores o
exteriores, en lugares secos, mojados o húmedos.
• Utilice ÚNICAMENTE el alimentador para LED incluido
para suministrar corriente a la unidad.
• La luz LED que se obtiene es sucientemente fuerte
como para dañar los ojos. Deben tomarse precaucio
nes para prevenir ver directamente a la luz LED sin
protección por más de unos cuantos segundos.
REGULACIÓN DE INTENSIDAD DE LA LUZ: El alimenta-
dor para LED en esta lámpara NO es compatible con
ningún regulador de intensidad de la luz.
LIMPIEZA: Asegúrese siempre que la corriente eléctrica
esté apagada antes de limpiar.
• Lentes de plástico: Sólo debe usar un paño suave
húmedo. Otros productos de limpieza pueden dañar
las lentes.
INSTRUCCIONES DE INSTALACIÓN
1) Coloque los dos tornillos largos que se proporcionan en la
base de montaje como se muestra.
2) Fije la barra de montaje a la caja de salida. (No se suministran
los tornillos).
3) Fije el conductor a tierra con la terminal de la conexión a
tierra elevada en la parte posterior de la caja del artefacto.
Fije apretando el tornillo verde. Nunca conecte los alambres
de alimentación negro o blanco a la terminal de la conexión
a tierra.
4) Conecte el alambre negro de la lámpara al alambre negro de
la alimentación con un conector para alambre adecuado (no
suministrado). Conecte el alambre blanco de la lámpara al
alambre blanco de la alimentación con un conector adecuado.
5) Empuje el artefacto a la pared con cuidado pasando los dos
tornilloslargosatravésdelosoriciosenelescudete.
6) Fijeelartefactoalaparedconunarondanadecauchoylas
tapas roscadas.
We’reheretohelp866-558-5706
Hrs: M-F 9am to 5pm EST
Estamos aquí para ayudarle 866-558-5706
Horario: Lunes-Viernes 9am a 5pm EST (hora ocial del este)
REV 17-AUG-2020
Para informacion de la garana por favor visite: kichler.com/warranty
Este disposivo cumple con la parte 15 de las Reglas de la FCC. La operación es sujeto a las dos condiciones
siguientes:
1) Este disposivo no puede causar interferencia dañina, y
2) Este disposivo debe aceptar cualquier interferencia recibida, incluyendo interferencias que puedan
causar un funcionamiento no deseado.
Nota: Este equipo ha sido probado y cumple con los límites para un disposivo digital de Clase B, de acuerdo
con la parte 15 de las Reglas de la FCC. Estos límites están diseñados para proveer protección razonable contra
interferencias dañinas en una instalación residencial. Este equipo genera, uliza y puede irradiar energía
de radiofrecuencia y, si no se instala y uliza de acuerdo con las instrucciones, puede causar interferencias
en las comunicaciones por radio. Sin embargo, no hay garanzar que no se produzcan interferencias en una
instalación en parcular. Si este equipo causa interferencia perjudicial a la recepción de radio o televisión,
que puede determinarse encender y apagar el equipo, se recomienda al usuario que intente corregir la
interferencia mediante una o más de las siguientes medidas:
• Reorientar o reubicar la antena receptora.
• Aumente la separación entre el equipo y el receptor.
• Conecte el equipo a una toma de corriente en un circuito disnto al que está conectado el receptor.
• Consulte al distribuidor oa un técnico de radio / TV experimentado para obtener ayuda.
This device complies with part 15 of the FCC Rules. Operaon is subject to the following two condions:
1) This device may not cause harmful interference, and
2) This device must accept any interference received, including interference that may cause undesired
operaon.
Note: This equipment has been tested and found to comply with the limits for a Class B digital device, pursuant
to part 15 of the FCC Rules. These limits are designed to provide reasonable protecon against harmful
interference in a residenal installaon. This equipment generates, uses and can radiate radio frequency
energy and, if not installed and used in accordance with the instrucons, may cause harmful interference
to radio communicaons. However, there is no guarantee that interference will not occur in a parcular
installaon. If this equipment does cause harmful interference to radio or television recepon, which can be
determined by turning the equipment o and on, the user is encouraged to try to correct the interference by
one or more of the following measures:
• Reorient or relocate the receiving antenna.
• Increase the separaon between the equipment and receiver.
• Connect the equipment into an outlet on a circuit dierent from that to which the receiver is
connected.
• Consult the dealer or an experienced radio/TV technician for help.


Join the conversation about this product
Here you can share what you think about the Kichler 11250AZT30 Cylinder Lamp. If you have a question, first carefully read the manual. Requesting a manual can be done by using our contact form.