Manual Hoover HOC709/6BX Oven

Need a manual for your Hoover HOC709/6BX Oven? Below you can view and download the PDF manual for free in English. This product currently has 5 frequently asked questions, 0 comments and has 0 votes. If this is not the manual you want, please contact us.

Is your product defective and the manual offers no solution? Go to a Repair Café for free repair services.

Manual

Loading…
05 GB
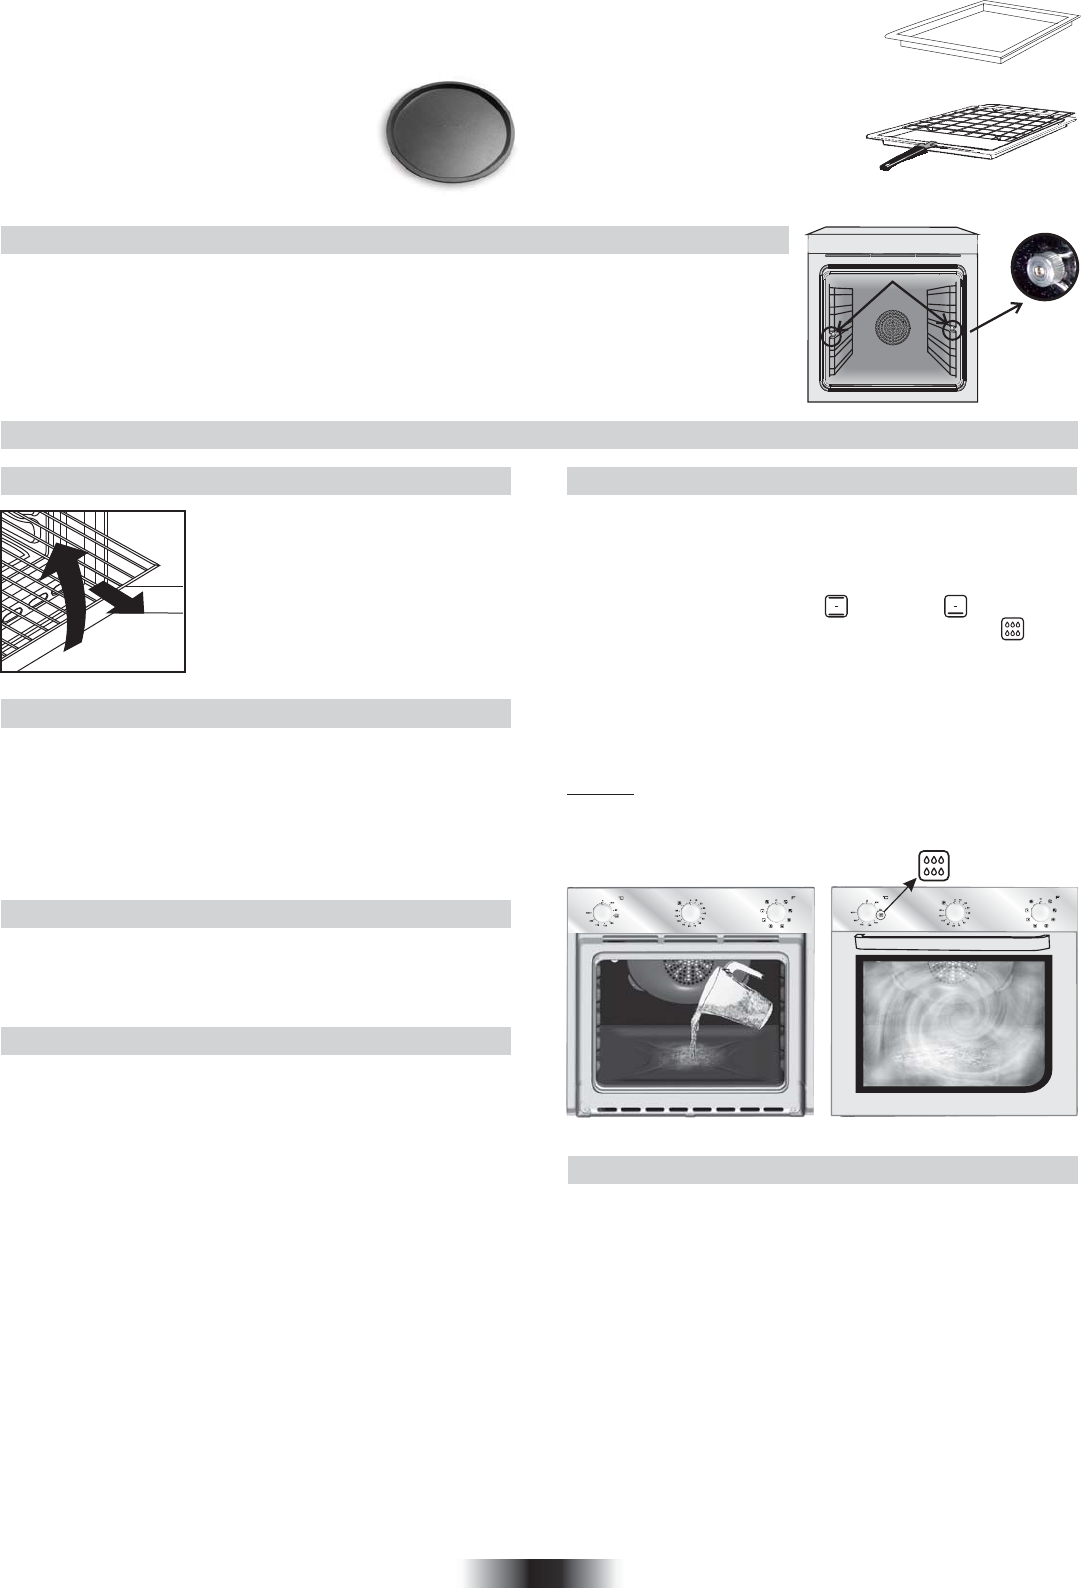
The drip tray catches the juices from grilled foods. It is only used with the Grill, Rotisserie, or Fan Assisted Grill ;
remove it from the oven for other cooking methods.
Never use the drip tray as a roasting tray as this creates smoke and fat will spatter your oven making it dirty.
The pizza set is designed for pizza cooking. In
order to obtain the best results the set must be
used together with Pizza function.
The tray holder
The tray holder shelf is ideal for grilling.
Use it in conjunction with the drip tray. A
handle is included to assist in moving
the both accessories safely. Do no
leave the handle inside the oven.
2. USEFUL TIPS
2.1 SHELF SAFETY SYSTEM
The oven features a new shelf safety
system.
This allows you to pull out the oven shelves
when inspecting the food without danger of
food spillages or shelves falling
accidentally out of the oven.
To remove the shelves pull out and lift.
2.2 GRILLING
Grilling makes it possible to give food a rich brown colour quickly. For
browning we recommend that you insert the grill onto the fourth level,
depending on the proportions of the food (see fig. page 08).
Almost all food can be cooked under the grill except for very lean game
and meat rolls.
Meat and fish that are going to be grilled should first be lightly doused
with oil.
For recommended cooking times and temperatures the first time you
use the oven, refer to the tables on pages 08, 09. You may then wish to
vary these times and settings in the light of your own experience.
2.3 COOKING TIME
2.5 HYDRO EASY CLEAN FUNCTION
The HYDRO EASY CLEAN procedure uses steam to help remove
remaining fat and food particles from the oven.
1. Pour 300 ml of water into the HYDRO EASY CLEAN container at
the bottom of the oven.
2. Set the oven function to Static ( )or Bottom ( )heater
3. Set the temperature to the HYDRO EASY CLEAN icon
4. Allow the program to operate for 30 minutes.
5. After 30 minutes switch off the program and allow the oven to
cool down.
6. When the appliance is cool, clean the inner surfaces of the oven
with a cloth.
Warning
Make sure that the appliance is cool before you touch it.
Care must be taken with all hot surfaces as there is a risk of burns.
Use distilled or drinkable water.
2.4 CLEANING AND MAINTENANCE
Clean the stainless steel and enamelled surfaces with warm, soapy
water or with suitable brand products. On no account use abrasive
powders that may damage surfaces and ruin the oven’s appearance.
It is very important to clean the oven each time that it is used. Melted
fat is deposited on the sides of the oven during cooking. The next time
the oven is used this fat could cause unpleasant odours and might
even jeopardise the success of the cooking. Use hot water and
detergent to clean; rinse out thoroughly.
To make this chore unnecessary all models can be lined with catalytic
self-cleaning panels: these are supplied as an optional extra (see the
section SELF-CLEANING OVEN WITH CATALYTIC LINING).
Use detergents and abrasive metal pads like «brillo pads» for the
stainless steel grills.
The glass surfaces as the top, oven door and warming compartment
door must be cleaned when they are cold. Damage that occurs to
them because this rule was not adhered to are not covered by the
guarantee.
To replace the interior light:
. switch off the mains power supply and unscrew bulb. Replace with an
identical bulb that can withstand very high temperatures
2.6 SERVICE CENTRE
Before calling the Service Centre
If the oven is not working, we recommend that:
you check that the oven is properly plugged into the power supply.
If the cause of the fault cannot be detected:
disconnect the oven from the mains, do not touch the oven and call the
after sales service.
Before calling the Service Centre remember to make a note of the
serial number on the specifications plate (see fig. On last page).
The oven is supplied with a guarantee certificate that ensures that it
will be repaired free of charge by the Service Centre
300 ml
1.8 Removing and cleaning wiıre racks
1- Remove the knurled nuts by turning them counter clockwise.
2- Remove the wire racks by pulling them towards yourself.
3- To clean the wire racks either put them in the dishwasher or use a wet sponge, ensuring that they are
dried afterwards.
4- After the cleaning process install the wire racks in reverse
order.
5- Replace the knurled nuts.
A
Download manual in English (PDF, 1.27 MB)
(Consider the environment and only print this manual if it is really necessary)

Loading…

Rating

Let us know what you think about the Hoover HOC709/6BX Oven by leaving a product rating. Want to share your experiences with this product or ask a question? Please leave a comment at the bottom of the page.
Are you satisfied with the Hoover HOC709/6BX Oven?
Yes No
Be the first to rate this product
0 votes

Join the conversation about this product

Here you can share what you think about the Hoover HOC709/6BX Oven. If you have a question, first carefully read the manual. Requesting a manual can be done by using our contact form.

More about this manual

We understand that it’s nice to have a paper manual for your Hoover HOC709/6BX Oven. You can always download the manual from our website and print it yourself. If you would like to have an original manual, we recommend you contact Hoover. They might be able to provide an original manual. Are you looking for the manual of your Hoover HOC709/6BX Oven in a different language? Choose your preferred language on our homepage and search for the model number to see if we have it available.

Specifications

Brand Hoover
Model HOC709/6BX
Category Ovens
File type PDF
File size 1.27 MB

All manuals for Hoover Ovens
More manuals of Ovens

Frequently Asked Questions about Hoover HOC709/6BX Oven

Our support team searches for useful product information and answers to frequently asked questions. If you find an inaccuracy in our frequently asked questions, please let us know by using our contact form.

My oven does not get warm enough, what should I do? Verified

The thermostat makes sure the ovens heats up to the designated temperature. It is likely that the thermostat is defective. Have it replaced. When in doubt, contact the manufacturer.

This was helpful (3194) Read more

What is pyrolysis? Verified

Some ovens are equipped with a pyrolysis function. This is a cleaning system that burns dirt and fat in the oven by using very high temperatures. After pyrolysis, all the dirt will have turned to ash and can be easily removed. If the oven has a pyrolysis function, it is advisable to use it 3 to 4 times a year to keep the oven clean.

This was helpful (3188) Read more

When I use the oven there often food remains that fall on the bottom, causing smoke. How can I prevent this? Verified

Many ovens come with both a grid and a baking tray. When food is prepared on the grid, the baking tray can be placed on the bottom to prevent food remains from burning and causing smoke.

This was helpful (815) Read more

Smoke is accumulating in the oven when warming up, why is that? Verified

Probably there are food remains from previous use left in the oven. Especially greasy food remains can generate smoke when heated. Clean the oven thoroughly.

This was helpful (807) Read more

Can I prepare several items simultaneously by using more grill trays? Verified

Technically this is possible. However, it depends on the type of food if you need to adjust the preparation time or swap the trays halfway during the preparation.

This was helpful (804) Read more
Manual Hoover HOC709/6BX Oven

Related products

Related categories

×
Download