
w WARNING
Fire Hazard.
• If contents ignite, do not open oven door. Unplug oven and allow contents to stop burning and
cool before opening door.
• Do not operate oven unattended.
• Do not use with oven cooking bags.
• Do not heat foods in plastic containers.
• Do not heat taco shells in toaster oven. Always use full-size conventional oven.
• Always allow at least 1 inch (2.5 cm) between food and heating element.
• Follow food manufacturer’s instructions.
• Always unplug oven when not in use.
• Regular cleaning reduces risk of fire hazard.
IMPORTANT SAFEGUARDS
When using electrical appliances, basic safety precautions should always be followed to reduce the risk of fire, electric
shock, and/or injury to persons, including the following:
1.
Read all instructions.
2.
This appliance is not intended for use by persons
(including children) with reduced physical, sensory,
or mental capabilities, or lack of experience and
knowledge, unless they are closely supervised and
instructed concerning use of the appliance by a person
responsible for their safety.
3.
Close supervision is necessary when any appliance
is used by or near children. Cleaning and user
maintenance shall not be made by children unless
they are supervised. Children should be supervised to
ensure that they do not play with the appliance.
4.
Do not touch hot surfaces. Use handles or knobs.
5.
To protect against electrical shock, do not immerse
cord, plug, or oven in water or other liquid.
6.
Unplug from outlet when not in use and before
cleaning. Allow to cool before cleaning appliance and
putting on or taking off parts.
7.
Do not operate any appliance with a damaged supply
cord or plug, or after the appliance malfunctions or
has been dropped or damaged in any manner. Supply
cord replacement and repairs must be conducted
by the manufacturer, its service agent, or similarly
qualified persons in order to avoid a hazard. Call the
provided customer service number for information on
examination, repair, or adjustment.
8.
The use of accessory attachments not recommended
by the appliance manufacturer may cause injuries.
9.
Do not use outdoors.
10.
Do not let cord hang over edge of table or counter or
touch hot surfaces.
11.
Do not place on or near a hot gas or electric burner or
in a heated oven.
12.
Extreme caution must be used when moving an
appliance containing hot oil or other hot liquids.
13.
To disconnect, turn all controls to OFF ( ); then
remove plug from wall outlet.
14.
Use extreme caution when removing pan or disposing
of hot grease.
15.
Do not clean with metal scouring pads. Pieces can
break off the pad and touch electrical parts, creating a
risk of electrical shock.
16.
Oversize foods or metal utensils must not be inserted
in an oven as they may create a fire or risk of electric
shock.
17.
The bread may burn. A fire may occur if toaster oven
is covered or touching flammable material, including
curtains, draperies, walls, overhead cabinets, paper
or plastic products, cloth towels, and the like, when
in operation. Do not store any item on top of the
appliance when in operation.
18.
Extreme caution should be exercised when using
containers constructed of materials other than metal
or glass.
19.
Do not store any materials, other than manufacturer-
recommended accessories, in this oven when not in
use.
20.
Do not place any of the following materials in the oven:
paper, cardboard, plastic, and the like.
21.
Do not cover crumb tray or any part of the oven with
metal foil. This will cause overheating of the oven.
22.
To turn oven off, turn Timer to OFF ( ) position. See
“Parts and Features” section.
23.
Do not place eyes or face in close proximity with
tempered safety glass door, in the event that the safety
glass breaks.
24.
Always use appliance with crumb tray securely in
place.
25.
Do not use appliance for other than intended use.
26.
Clean oven interior carefully. Do not scratch or damage
heating element tube.
27.
Do not operate unattended.
28.
Do not operate the appliance by means of an external
timer or separate remote-control system.
29.
CAUTION: HOT SURFACE :The temperature
of accessible surfaces may be high when
the appliance is operating.
SAVE THESE INSTRUCTIONS
Other Consumer Safety Information
This appliance is intended for household use only.
w WARNING
Electrical Shock Hazard: This appliance
is provided with a polarized plug (one wide blade) to reduce
the risk of electric shock. The plug fits only one way into a
polarized outlet. Do not defeat the safety purpose of the plug
by modifying the plug in any way or by using an adapter. If
the plug does not fit fully into the outlet, reverse the plug. If it
still does not fit, have an electrician replace the outlet.
The length of the cord used on this appliance was selected
to reduce the hazards of becoming tangled in or tripping over
a longer cord. If a longer cord is necessary, an approved
extension cord may be used. The electrical rating of the
extension cord must be equal to or greater than the rating of
the appliance. Care must be taken to arrange the extension
cord so that it will not drape over the countertop or tabletop
where it can be pulled on by children or accidentally tripped
over.
This appliance is equipped with a fully tempered safety
glass door. The tempered glass is four times stronger than
ordinary glass and more resistant to breakage. Tempered
glass can break; however, it breaks into pieces with no
sharp edges. Care must be taken to avoid scratching door
surface or nicking edges. If the door has a scratch or nick,
call our customer service number.
Always unplug your toaster oven from the outlet when not
in use.
How to Use
w WARNING
Fire Hazard.
• If contents ignite, do not open oven door. Unplug toaster oven and allow contents to stop
burning and cool before opening door.
• Do not use oven cooking bags.
• Always allow at least 1 inch (2.5 cm) between food and heating element.
• Always unplug toaster oven when not in use.
Before first use: Most heating appliances produce an odor and/or smoke when used the first
time. Plug Oven into an outlet. Turn Temperature Dial to 450°F (230°C). Heat at this temperature
for 10 minutes. Odor should not be present after this initial preheating. Wash Air Frying Basket,
Baking/Broiling Pan, and Oven Rack before using.
Air Fry Mode ( )
Use Air Fry mode to crisp foods using little added oil. Foods may need to be flipped, stirred, or
rotated halfway during cooking. Air Fry Mode cooks and browns evenly by circulating forced hot
air which crisps food with little to no added oil. Check food for doneness before recommended
packaging cook time. For faster cooking, preheat Oven to reduce cooking time. Rack position used
to air fry depends on the size of the food to be cooked. Keep at least 1 inch (2.5 cm) between food
and heating elements. Place larger food in the middle rack position.
1. Plug into outlet. Rotate Function Dial to Air Fry
( ).
2. Add food to Air Frying Basket. Place Basket
into Baking/Broiling Pan on Oven Rack. Insert
Oven Rack so food is at least 1 inch (2.5 cm)
from heating element.
3. Turn Temperature Dial to 450/230/Air Fry
position.
4. Rotate Timer clockwise past 10, then to the
desired cooking time. Or, rotate to Stay On
while pressing and holding buttons on side of
Dial.
5. If time is selected, Timer will sound when
selected time is complete. If Stay On is
selected, rotate Timer to OFF
( )
to end cycle
at any time.
6. Unplug.
Bake Mode ( )
Use Bake mode for cakes, casseroles, cookies and roasting meats, poultry or vegetables. Place Oven
Rack in top, middle, or bottom position. Preheating Oven for 5 minutes is necessary for Bake mode.
1. Plug into outlet. Turn Temperature Dial to
desired temperature, then rotate Function Dial
to Bake
( )
.
2. Rotate Timer clockwise past 10, then back to
“dark toast” to preheat Oven for 5 minutes
before beginning to bake.
3. After Oven is preheated, set Timer to desired
time by rotating clockwise past 10, then to the
desired baking time. Or, rotate to Stay On while
pressing and holding buttons on side of Dial.
4. Rotate Timer to OFF ( ) to end cycle at any
time.
5. Unplug.
Stay On Function
The Oven can be set to stay on by turning Timer to Stay On while pressing and holding buttons on side
of Dial.
Broil Mode ( )
Place Oven Rack in Oven. High rack position for faster broiling times. Middle Rack Position for browning
casserole tops, toasting sandwiches, or melting cheese on bread. Low Rack Position for foods needing
longer broiling times, like chicken and thick cuts of meat. Place Broiling/Baking Pan on Oven Rack. Place
in Oven. DO NOT PREHEAT OVEN. Food must be a minimum of 1 inch (2.5 cm) from heating elements.
1. Plug into outlet. Turn Temperature Dial to Air
Fry/Toast/Broil and Function Dial to Broil
( )
.
2. Rotate Timer clockwise past 10, then to the
desired broiling time. Or, rotate Timer to Stay
On while pressing and holding buttons on side
of Dial. Turn foods when browned or halfway
through cooking time. Oven broils on high
temperature and may not be adjusted.
3. Rotate Timer to OFF ( ) to end cycle at any
time.
4. Unplug.
Toast Mode ( )
Use for browning and toasting breads, bagels, and English muffins. Place food cut/split side facing up.
This will toast cut/split side more than outside of food. Rack should be in middle position.
1. Plug into outlet. Turn Temperature Dial to
Air
Fry/Toast/Broil
and then rotate Function Dial to
Toast
( )
.
2. Select shade of browning by turning Timer
clockwise past 10, then back to desired toast
color. A bell will sound when Toast cycle is
complete.
3. Rotate Timer to OFF ( ) to end cycle at any time.
4. Unplug.
TIP: The number of slices of bread and bread
freshness will affect toast color. For example,
toasting 4 slices of bread will require a darker
toast color setting than 2 slices of bread. Adjust
Toast based on desired color and number of
slices.
Care and Cleaning
w WARNING
E
lectrical Shock Hazard. Do not clean with metal scouring pads. Pieces can break off
pad and touch electrical parts.
Oven should be cleaned regularly for best performance and long life. Regular cleaning will also reduce the
risk of fire hazard.
1. Unplug and allow to cool completely.
2. To clean inside of Oven, wipe Oven walls,
bottom of Oven, and glass door with a damp,
soapy cloth. Repeat with a damp, clean cloth.
For stubborn stains, use a plastic scouring pad.
3. Wipe outside of Oven with a damp cloth. Do not
use abrasive cleansers or metal scouring pads.
4. Wash Slide-Out Crumb Tray, Baking/Broiling
Pan, Air Frying Basket, and Oven Rack in hot,
soapy water. Rinse and dry.
Troubleshooting
Oven will not heat.
• Check to make sure electrical outlet is working
and Oven is plugged in. Turn Temperature Dial
to 350°F (177°C). Turn Function Dial to Bake;
then turn
Timer counterclockwise to Stay On
while pressing and holding buttons on side
of Dial.
Moisture forms on inside of Oven door when
toasting.
• This is normal when toasting in an Oven.
Moisture is slower to escape from an Oven
than from a toaster. The amount of moisture
will differ between fresh bread, bagels, and
frozen pastries.
An odor and smoke come from Oven.
• Smoke and odor are normal during first use
of most heating appliances. These will not be
present after initial heating period.
Oven will not toast.
• Check to make sure outlet is working and Oven
is plugged in. Turn Temperature Dial to Air Fry/
Toast/Broil. Turn Function Dial to Toast; then
rotate Timer clockwise past 10 and then back
to the desired toast color.
Some foods burn and some are not done.
• Adjust Oven Rack position to center food in
Oven.
• Adjust Oven temperature or cooking time for
best results with your recipes.
Limited Warranty
This warranty applies to products purchased and used in
the U.S. and Canada. This is the only express warranty
for this product and is in lieu of any other warranty or
condition.
This product is warranted to be free from defects in
material and workmanship for a period of five (5) years
from the date of original purchase in Canada and one
(1) year from the date of original purchase in the U.S.
During this period, your exclusive remedy is repair or
replacement of this product or any component found to
be defective, at our option; however, you are responsible
for all costs associated with returning the product to
us and our returning a product or component under
this warranty to you. If the product or component is no
longer available, we will replace with a similar one of
equal or greater value.
This warranty does not cover glass, filters, wear from
normal use, use not in conformity with the printed
directions, or damage to the product resulting from
accident, alteration, abuse, or misuse. This warranty
extends only to the original consumer purchaser or gift
recipient. Keep the original sales receipt, as proof of
purchase is required to make a warranty claim. This
warranty is void if the product is used for other than
single-family household use or subjected to any voltage
and waveform other than as specified on the rating label
(e.g., 120 V ~ 60 Hz).
We exclude all claims for special, incidental, and
consequential damages caused by breach of express
or implied warranty. All liability is limited to the amount
of the purchase price. Every implied warranty,
including any statutory warranty or condition of
merchantability or fitness for a particular purpose, is
disclaimed except to the extent prohibited by law, in
which case such warranty or condition is limited to
the duration of this written warranty. This warranty
gives you specific legal rights. You may have other legal
rights that vary depending on where you live. Some
states or provinces do not allow limitations on implied
warranties or special, incidental, or consequential
damages, so the foregoing limitations may not apply to
you.
To make a warranty claim, do not return this appliance
to the store. Please call 1.800.851.8900 in the U.S. or
1.800.267.2826 in Canada or visit hamiltonbeach.com
in the U.S. or hamiltonbeach.ca in Canada. For faster
service, locate the model, type, and series numbers on
your appliance.
To order parts:
hamiltonbeach.com
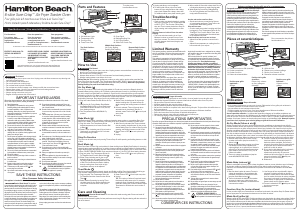
1. ON Indicator Light
2. Temperature Dial
3. Function Dial
4. Toast/Timer Dial
5. Oven Rack
6. Baking/Broiling Pan
7. Air Frying Basket
8. Slide-Out Crumb Tray
Top Rack Position:
Broiling
Bottom Rack Position:
Baking and Broiling
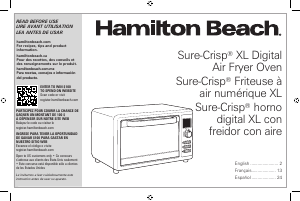
Read before use | Lire avant utilisation | Lea antes de usar.
For Questions:
For recipes, tips,
product information and
registration:
hamiltonbeach.com
Pour des questions :
Pour des recettes,
des conseils, des
renseignements sur le
produit et l’enregistrement :
hamiltonbeach.ca
Para preguntas:
Para recetas, consejos,
información del producto
y registro:
hamiltonbeach.com.mx
Le invitamos a leer cuidadosamente este instructivo antes de usar su aparato.
6-slice Sure-Crisp™ Air Fryer Toaster Oven
Four grille pain à 6 tranches avec friture à air Sure-Crisp™
Horno tostador para 6 rebanadas y freidora de aire Sure-Crisp™
Parts and Features
Middle Rack Position:
Air Frying, Baking,
Broiling and Toasting
ENTER TO WIN $100 TO
SPEND ON WEBSITE
Visit
register.hamiltonbeach.com
PARTICIPEZ POUR COURIR
LA CHANCE DE GAGNER
UN MONTANT DE 100 $
À DÉPENSER SUR NOTRE
SITE WEB
Visitez le
register.hamiltonbeach.com
INGRESE PARA TENER LA
OPORTUNIDAD DE GANAR
$100 PARA GASTAR EN
NUESTRO SITIO WEB
Visite
register.hamiltonbeach.com
Open to US customers only • Ce concours s’adresse aux clients des États-Unis
seulement • Este concurso está disponible solo a clientes de los Estados Unidos
w AVERTISSEMENT
Danger d’incendie.
• Si le contenu de votre grille-pain se met à brûler, n’ouvrez jamais la porte du grille-pain.
Débranchez l’appareil et laisser le contenu s’éteindre et refroidir avant d’ouvrir la porte.
• Ne pas utiliser l’appareil sans surveillance.
• N’utilisez jamais avec des sacs de cuisson au four.
• Ne pas chauffer d’aliments dans des plats de plastique.
• Ne pas faire chauffer les coquilles à taco dans le four grille-pain. Toujours faire réchauffer dans un
four conventionnel.
• Toujours laisser un espace de 2,5 cm (1 po) entre les aliments et l’élément chauffant.
• Suivre les instructions du fournisseur de produits alimentaires.
• Débranchez toujours votre grille-pain quand vous ne l’utilisez pas.
• Un nettoyage régulier réduit le danger d’incendie.
PRÉCAUTIONS IMPORTANTES
Pour utiliser un appareil électroménager, vous devez toujours prendre des mesures élémentaires de sécurité pour réduire le risque
d’incendie, d’électrocution et/ou de blessure corporelle, en particulier les mesures suivantes :
1.
Lire toutes les instructions.
2.
Cet appareil n’est pas destiné à être utilisé par des
personnes (y compris les enfants) dont les capacités
physiques, sensorielles ou mentales sont réduites, ou
manquant d’expérience et de connaissance, sauf si elles
sont étroitement surveillées et instruites sur l’utilisation de
l’appareil par une personne responsable de leur sécurité.
3.
Une surveillance étroite est requise pour tout appareil
utilisé par ou près des enfants. Le nettoyage et l’entretien
ne doit pas fait par des enfants à moins d’être sous
supervision. Surveiller que les enfants ne jouent pas avec
l’appareil.
4.
Ne pas toucher les surfaces chaudes. Utiliser les poignées
ou boutons.
5.
Pour protéger contre le risque de choc électrique, ne pas
immerger le cordon, la fiche ou le four grille-pain dans
l’eau ou autre liquide.
6.
Débrancher l’appareil de la prise de courant électrique
lorsqu’il n’est pas utilisé et avant un nettoyage. Le laisser
refroidir avant le nettoyage et avant d’y placer ou d’y
enlever des pièces.
7.
Ne pas faire fonctionner un appareil électroménager
avec un cordon ou une fiche endommagée, ou lorsque
l’appareil ne fonctionne pas bien ou a été échappé ou
endommagé d’une manière quelconque. Le remplacement
et la réparation du cordon d’alimentation doivent être faits
par le fabricant, son agent de service ou toute personne
qualifiée de façon à éviter tout danger. Appeler le numéro
de service à la clientèle fourni pour des renseignements
concernant l’examen, la réparation ou l’ajustement.
8.
L’utilisation d’accessoires non recommandés par le
fabricante d’appareil peut causer des blessures.
9.
Ne pas utiliser à l’extérieur.
10.
Ne pas laisser le cordon pendre du bord d’une table ou
d’un comptoir, ou toucher des surfaces chaudes.
11.
Ne pas placer l’appareil sur ou près d’un brûleur chaud à
gaz ou d’un élément électrique, ou dans un four chauffé.
12.
Une précaution extrême doit être employée lors du
déplacement d’un appareil électroménager contenant de
l’huile chaude ou autre liquide chaud.
13.
Pour débrancher l’appareil, tourner la minuterie à OFF
( /arrêt), ensuite retirer la fiche de la prise de courant
murale.
14.
Une prudence extrême s’impose lors de l’enlèvement du
plateau ou de la vidange de graisse chaude.
15.
Ne pas nettoyer avec des tampons à récurer en métal.
Des particules peuvent se détacher du tampon et
toucher les pièces électriques, créant un risque de choc
électrique.
16.
Des aliments de grosseur excessive ou des ustensiles de
métal ne doivent pas être insérés dans un four grille-pain,
car ils peuvent créer un incendie ou un risque de choc
électrique.
17.
Le pain peut brûler. Un incendie peut survenir si le four
grille-pain est recouvert ou en contact avec un matériau
inflammable, y compris rideaux, tentures, murs, armoires
en surplomb, produits en papier ou en plastique,
serviettes en tissu et autres articles semblables, lorsqu’il
fonctionne. Ne rangez aucun article sur le dessus de
l’appareil lorsqu’il fonctionne.
18.
Une grande précaution doit être prise lors de l’utilisation
de contenants construits en matériaux autre que le métal
ou le verre.
19.
Ne pas remiser des matériaux autres que les accessoires
recommandés par le fabricant dans cet appareil lorsqu’il
n’est pas utilisé.
20.
Ne pas placer l’un des matériaux suivants dans le four :
papier, carton, plastique et articles semblables.
21.
Ne pas couvrir le plateau ramasse-miettes amovible
ou toute pièce du four avec du papier métallique. Ceci
causera un surchauffe du four.
22.
Pour éteindre le four, tourner la minuterie à OFF ( /arrêt).
Voir la section « Pièces et caractéristiques ».
23.
Ne pas placer les yeux ou le visage près de la porte en
verre renforcé de sécurité, au cas où le verre de sécurité
se briserait.
24.
Toujours utiliser cet appareil avec le ramasse-miettes
amovible bien en place.
25.
Ne pas utiliser cet appareil pour tout autre usage que celui
recommandé.
26.
Nettoyer l’intérieur du four avec précaution. Ne pas
égratigner ou endommager le tube de l’élément chauffant.
27.
Ne pas faire fonctionner le four sans supervision.
28.
Ne pas faire fonctionner cet appareil avec une minuterie
externe ou un système de télécommande distinct.
29.
ATTENTION : SURFACE CHAUDE : La
température des surfaces extérieures sera plus
élevée pendant le fonctionnement de l’appareil.
CONSERVER CES INSTRUCTIONS
Autres consignes de sécurité pour le consommateur
Cet appareil est destiné à un usage domestique uniquement.
w AVERTISSEMENT
Risque de choc électrique :
Cet appareil est fourni avec une fiche polarisée (une broche
large) pour réduire le risque d’électrocution. Cette fiche
n’entre que dans un seul sens dans une prise polarisée. Ne
contrecarrez pas l’objectif sécuritaire de cette fiche en la
modifiant de quelque manière que ce soit ou en utilisant un
adaptateur. Si vous ne pouvez pas insérer complètement la
fiche dans la prise, inversez la fiche. Si elle refuse toujours de
s’insérer, faire remplacer la prise par un électricien.
La longueur du cordon installé sur cet appareil a été
sélectionnée afin de réduire les risques d’enchevêtrement
ou de faux pas causés par un fil trop long. L’utilisation d’une
rallonge approuvée est permise si le cordon est trop court.
Les caractéristiques électriques de la rallonge doivent
être équivalentes ou supérieures aux caractéristiques de
l’appareil. Prendre toutes les précautions nécessaires pour
installer la rallonge de manière à ne pas la faire courir sur le
comptoir ou sur une table pour éviter qu’un enfant ne tire sur
le cordon ou trébuche accidentellement.
Cet appareil est doté d’une porte en verre renforcé de
sécurité. Le verre renforcé est quatre fois plus fort que le
verre ordinaire et plus résistant aux bris. Le verre renforcé
peut se briser, mais il se brise en pièces sans bords
coupants. Il faut prendre soin d’éviter d’égratigner la surface
de la porte ou d’endommager le contour. Si la porte a une
égratignure ou un bris, composer notre numéro d’assistance
à la clientèle.
Pour éviter la surcharge du circuit électrique, ne pas utiliser
un autre appareil à haute puissance sur le même circuit que
cet appareil.
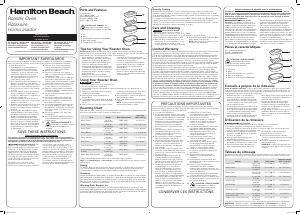
Pour commander des pièces :
hamiltonbeach.ca
1. Témoins lumineux ON (marche)
2. Cadran températur
3. Cadran fonction
4. Cadran de minuterie/rôties
5. Grille du four
6. Plateau pour cuisson/grillage
7. Panier pour friture à air
8. Ramasse-miettes amovible
Position pour grille
supérieure :
Grillage
Position pour grille
inférieure :
Cuisson au four,
grillage
Pièces et caractéristiques
Position de la grille
du milieu :
Friture à air, cuisson
au four, grillage et
rôtissage
Utilisation
w AVERTISSEMENT
Risque d’incendie.
• Si le contenu s’enflamme, ne pas ouvrir la porte. Débrancher le four grille-pain et laisser le
contenu s’éteindre et refroidir avant d’ouvrir la porte.
• Ne pas utiliser de sac brunisseur dans le four.
• Toujours garder au moins 2,5 cm (1 po) entre les aliments et l’élément chauffant.
• Toujours débrancher le four lorsqu’il n’est pas utilisé.
Avant la première utilisation : La plupart des appareils ménagers qui chauffent produisent une
odeur et/ou une fumée lors de l’utilisation pour la première fois. Brancher le four grille-pain dans une
prise de courant. Tourner le cadran de température à 230 °C (450 °F). Chauffer à cette température
pendant 10 minutes. L’odeur ne devrait pas survenir après ce préchauffage initial. Nettoyer le panier
pour friture à air, le plateau pour cuisson/grillage, et grille du four avant l’utilisation.
Air Fry Mode (friture à air/ )
Utiliser le mode friture à air pour rendre les aliments plus croustillants en ajoutant très peu d’huile.
Certains aliments doivent être retournés, remués ou tournés à la moitié de la cuisson. Le mode de friture
à air permet de cuire et griller uniformément à l’aide d’une circulation d’air chaud forcé qui rend les
aliments croustillants sans ajouter d’huile ou très peu. Vérifier la cuisson des aliments avant la fin de la
durée de cuisson recommandée sur l’emballage. Pour une cuisson plus rapide, veuillez préchauffer le
four afin de réduire la durée de cuisson. La position de la grille utilisée en mode de friture à air dépend
de la taille des aliments à faire cuire. Laisser une espace d’au moins 2,5 cm (1 po) entre les aliments et
les éléments chauffants. Mettre les aliments de plus grande taille dans la position de la grille du milieu.
1. Brancher dans la prise de courant. Tourner
le cadran de fonction jusqu’au mode Air Fry
(friture à air/ ).
2. Ajouter les aliments dans le panier pour friture
à air. Mettre le panier dans le plateau pour
cuisson/grillage, sur la grille du four. Insérer la
grille du four de sorte que les aliments soient
à une distance d’au moins 2,5 cm (1 po) de
l’élément chauffant.
3. Tourner le cadran de température jusqu’au
mode 450/230/FRITURE À AIR.
4. Tourner le cadran de minuterie dans le sens
horaire au-delà de 10 et ensuite jusqu’à la
durée de cuisson souhaitée. Ou tourner la
minuterie à la position Stay On (rester allumé)
en appuyant et en maintenant les boutons
situés sur le côté du cadran.
5. Si une durée a été sélectionnée, la minuterie
émettra une sonorité lorsque la durée
sélectionnée est écoulée. Si vous avez
sélectionné la fonction Stay On (rester allumer)
tourner la minuterie à OFF ( /arrêt) pour
arrêter le cycle en tout temps.
6. Débrancher.
Mode Bake (cuisson/ )
Utiliser le mode Bake (cuisson) pour la cuisson de gâteaux, mets en cocotte, biscuits et pour le rôtissage
de viandes, volailles ou légumes. Placer la grille du four dans la position supérieure, du milieu, ou
inférieure. Il est nécessaire de préchauffer le four pendant 5 minutes lors de l’utilisation du mode Bake
(cuisson).
1. Brancher dans la prise de courant. Tourner le
cadran de température à la température dés
souhaitée, puis tourner le cadran de fonction
jusqu’au mode Bake (cuisson/ ).
2. Tourner la minuterie au-delà de 10 et ensuite
de retour à « dark toast » (rôtie foncée) pour
préchauffer le four pendant 5 minutes avant de
commencer la cuisson.
3. Une fois que le four est préchauffé, régler la
minuterie à la durée souhaitée en tournant
d’abord le cadran dans le sens horaire au-delà
de 10 et ensuite à la durée de cuisson souhaitée.
Ou tourner la minuterie à la position Stay On
(rester allumé) en appuyant et en maintenant les
boutons situés sur les côtés du cadran.
4. Tourner la minuterie à OFF ( /arrêt) pour arrêter
le cycle en tout temps.
5. Débrancher.
Fonction Stay On (rester allumé)
Le four peut être réglé pour rester allumer en tournant la minuterie à la position Stay On (Rester allumé)
tout en appuyant et en maintenant les boutons sur les côtés du cadran.
Mode Broil (griller/ )
Mettre la grille du four dans le four. Position supérieure pour des durées de cuisson plus rapides. Position
du milieu pour faire dorer les plats en casserole, griller les sandwichs ou faire fondre le fromage sur du
pain. Position inférieure pour les aliments nécessitant des durées de cuisson plus longues, comme le
poulet et les coupes de viande plus épaisses. Mettre le plateau pour grillage/cuisson sur la grille du four.
Mettre dans le four. NE PAS PRÉCHAUFFER LE FOUR. Les aliments doivent être placés à une distance
minimum de 2,5 cm (1 pouce) des éléments chauffants.


Join the conversation about this product
Here you can share what you think about the Hamilton Beach 31413 Oven. If you have a question, first carefully read the manual. Requesting a manual can be done by using our contact form.