Battery Installation
To help you get started quickly, the computer and transmitter batteries have been installed at
the factory. Under normal usage the batteries should last approximately one year. The FX10
uses a 3V CR2032 button cell battery in the computer and an A23/LR23 12V battery in the
sensor/transmitter, both of which are available at most camera and electronic shops.
NOTE: Most problems that occur with cyclocomputers are caused by dead or weak batteries.
Should you need to replace the batteries, follow the steps below.
Computer Head
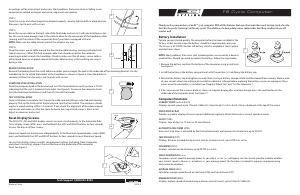
1. Remove the battery cap from the bottom of the computer using a small coin. See Figure 1.
2. Install the battery in the battery compartment with the positive (+) side facing the battery cap.
3. Reinstall the battery cap and tighten securely. NOTE: During a battery change, all data will be cleared from memory. Make
a note of your current wheel size settings and cumulative odometer mileage before replacing the battery so you can
reprogram these values once the new battery is installed (see “Program Wheel Size” and “Set the Odometer”).
4. If for some reason the screen is blank or shows an irregular display after a battery change, press the reset button on the
underside of the computer head. See Figure 8.
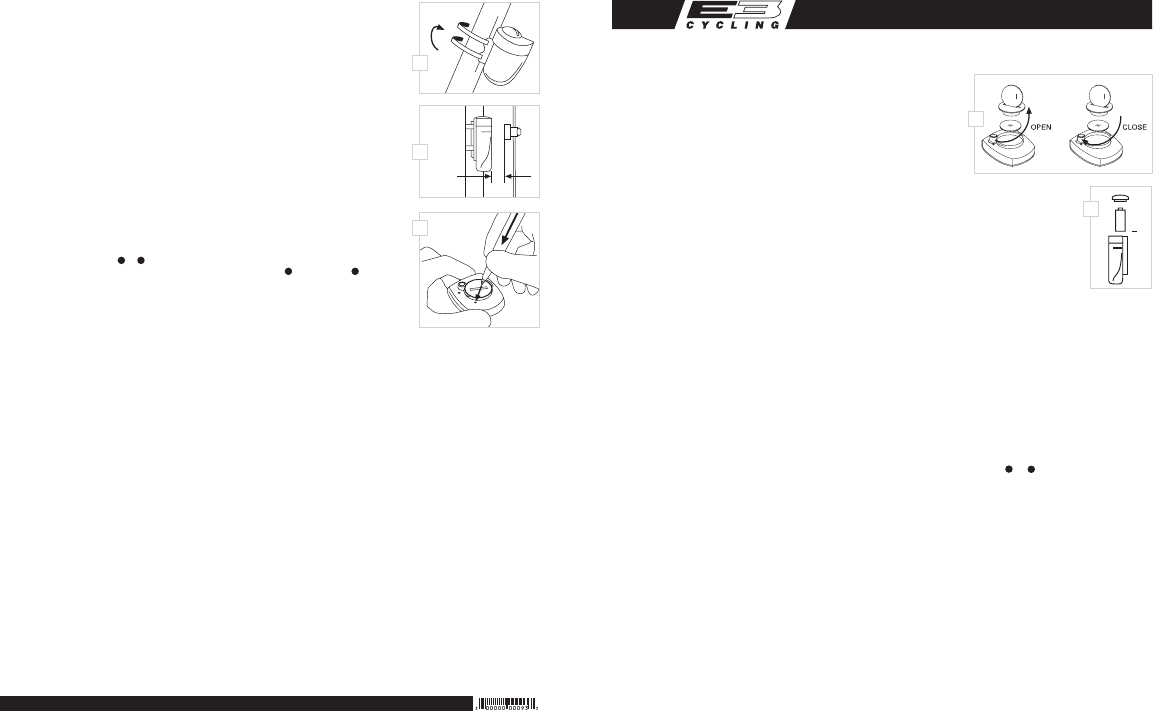
Sensor/Transmitter
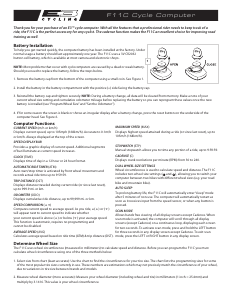
1. Remove the battery cap from the top of the transmitter using a small coin. Remove the old battery and dispose of properly.
2. Install a new battery with the positive (+) end facing the cap. See Figure 2. Reinstall the battery cap and tighten rmly, making sure that the
rubber O-ring does not get pinched or distorted, as this will compromise the unit’s watertight seal.
Determine Wheel Size
The FX10 uses wheel circumference (measured in millimeters) to calculate speed and distance. Before you can program the FX10 you must
calculate wheel circumference using one of the three methods below.
Tech Support 1(800)553-8324
0208_3
Made in China
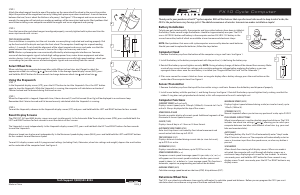
FX10 Cycle Computer
c
25
c
25
Thank you for your purchase of an E3™ cycle computer. With all the features that a professional rider needs to keep track of a ride, the
FX10 is the perfect accessory for any cyclist. The added convenience of wireless transmission makes installation simple!
STEP 2
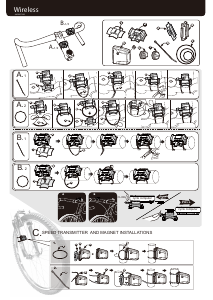
Attach the wheel magnet loosely to one of the spokes on the same side of the wheel as the sensor/transmitter.
Adjust the position of the magnet and sensor by sliding both pieces up or down to achieve 1-3mm of clearance
between the two (1mm is about the thickness of a penny). See Figure 7. If the magnet and sensor are not close
enough, the computer will not pick up a reading or readings will be inconsistent and erratic. Most problems that
occur when installing a new computer are related to magnet and sensor alignment and spacing.
STEP 3
Once the transmitter and wheel magnet are aligned properly, securely tighten both in place and trim the
excess zip-tie ends with scissors.
TEST OF INSTALLATION
Once installation is complete, test the unit to make sure everything is adjusted and working properly. Pick
up the front end of the bicycle and spin the front wheel. The computer should register a speed reading
within 1-2 seconds. If not, check the alignment of the wheel magnet and sensor, and make sure that the
space between the magnet and sensor is 3mm or less. Adjust as necessary and re-test.
NOTE: Wireless cyclocomputers are occasionally a ected by electromagnetic interference. Common
sources of electromagnetic signals include high voltage power lines, motor driven equipment and other
wireless devices (such as heart rate monitors). If you experience unusually high speed readings, check your
surroundings for possible sources of electromagnetic signals and move away from the source.
Select Wheel Size
When switching your computer between bikes with di erent wheel sizes, don’t forget to select the
appropriate wheel size setting (
1 or 2 ) for each bike. In the Average Speed display screen (AVG), press
and hold the RIGHT button for three seconds to change between wheel size
1 and wheel size 2 .
Using the Stopwatch
STEP 1
In the Stopwatch display screen (STP), press the LEFT button to start the Stopwatch. Press the LEFT button
again to stop the Stopwatch. While the Stopwatch is running, the computer will calculate an estimate of
Calories burned and Fat burned during the timed session.
STEP 2
When the Stopwatch is stopped, Stopwatch time, Calories burned (C) and Fat burned (Lb or Kg) will be displayed in a continuous loop.
Remember that Calories burned and Fat burned are only calculated while the Stopwatch is running.
STEP 3
To reset the Stopwatch, advance to the Stopwatch display screen (STP) and press and hold both the LEFT and RIGHT buttons for four seconds.
Reset Display Screens
The ATM, DST, AVS and MAX display screens are reset simultaneously. In the Automatic Ride Timer display screen (ATM), press and hold both the
LEFT and RIGHT buttons for four seconds to reset the data in all four screens.
The Stopwatch is reset independently. In the Stopwatch display screen (STP), press and hold both the LEFT and RIGHT buttons for four seconds
to reset the Stopwatch.
Maximum Speed can also be reset independently. In the Maximum Speed display screen (MAX), press and hold both the LEFT and RIGHT buttons
for four seconds to reset Maximum Speed.
To reset ALL display screens and ALL programmed settings (including Clock, Odometer, wheel size settings and weight), depress the reset button
on the underside of the computer head. See Figure 8.
1
8
Computer Functions
CURRENT SPEED (m/h or km/h)
Displays current speed, up to 105mph (168km/h). Accurate to 0.1m/h
or km/h. Always displayed at the top of the screen.
SPEED DISPLAY BAR
Provides a graphic display of current speed. Additional segments of bar
illuminate as current speed increases.
CLOCK (TIME)
Displays time of day in a 12 hour or 24 hour format.
AUTOMATIC RIDE TIMER (ATM)
Auto start/stop timer is activated by front wheel movement and
records actual ride time up to 9:59:59.
TRIP DISTANCE (DST)
Displays distance traveled during current ride (or since last reset),
up to 999.9 mi. or km.
ODOMETER (ODO)
Displays cumulative ride distance, up to 99,999 mi. or km.
SPEED COMPARISON (56)
Compares current speed to average speed. As you ride, a (5) or (6)
will appear next to current speed to indicate whether your current
speed is above (5) or below (6) your average speed. This function is
automatic, requires no programming and cannot be disabled.
AVERAGE SPEED (AVG)
Calculates average speed based on ride time (ATM) & trip distance (DST).
MAXIMUM SPEED (MAX)
Displays highest speed attained during a ride (or since last reset), up to
105m/h (168km/h).
STOPWATCH (STP)
Manual stopwatch allows you to time any portion of a ride, up to 9:59:59.
DUAL WHEEL SIZE SETTINGS
Wheel circumference is used to calculate speed and distance. The FX10
includes two wheel size settings (
1 and 2 ), allowing you to switch your
computer between two bikes with di erent wheel sizes (e.g. your road
bike and mountain bike).
AUTO SLEEP
To prolong battery life, the FX10 will automatically enter “sleep” mode
after 10 minutes of non-use. The computer will automatically restart as
soon as it receives input from the speed sensor, or when any button is
pressed.
SCAN MODE
Allows hands free viewing of all display screens. When scan mode is
activated, the computer will scroll through all display screens on a
continuous loop, displaying each screen for two seconds. To activate
scan mode, press and hold the LEFT button for three seconds in any
display screen. To exit scan mode, press the LEFT or RIGHT button in any
display screen.
+
2
6
1-3 mm
7


Join the conversation about this product
Here you can share what you think about the E3 FX10 Cycling Computer. If you have a question, first carefully read the manual. Requesting a manual can be done by using our contact form.