(SET THE ODOMETER)
STEP 8
After programming wheel size, the computer will automatically advance to the odometer setting screen. (If you don’t want to change the
odometer setting, press the RIGHT button ve times to exit the set-up mode.) The digit at the right of the screen will ash. Press the LEFT button
to adjust the value. Press the RIGHT button to advance to the next ashing digit.
STEP 9
Repeat this sequence until the odometer has been set to the appropriate value. Then press the RIGHT button to exit the set-up mode and return
to the Odometer display screen.
Input Weight
The FX10 uses body weight to estimate calories and fat burned during a ride.
STEP 1
Press the RIGHT button to advance to the Stopwatch display screen (STP). In the STP screen press and hold the RIGHT button for three seconds.
“Lb” or “Kg” will ash in the lower line of the display. Press the LEFT button to select pounds (Lb) or Kilograms (Kg). Press the RIGHT button to
con rm your selection and advance to the weight input screen.
STEP 2
The right digit will ash. Press the LEFT button to adjust the value. Press the RIGHT button to advance to the next ashing digit.
STEP 3
Repeat this sequence until you have entered your correct weight. Then press the RIGHT button to exit the set-up mode and return to the
Stopwatch display screen.
Set the Clock
The FX10 is equipped with a digital clock that displays time of day in a 12 hour or 24 hour format.
STEP 1
Press the RIGHT button to advance to the Clock display screen (TIME). In the TIME screen, press and hold the RIGHT button for three seconds.
STEP 2
“12” or “24” will ash in the lower line of the display. Press the LEFT button to select 12 hour or 24 hour mode. Press the RIGHT button to con rm
your selection and advance to the hours setting.
STEP 3
The hours will ash. Press the LEFT button (or press and hold) to advance the hours. Press the RIGHT button to advance to the minutes setting.
STEP 4
The minutes will ash. Press the LEFT button (or press and hold) to advance the minutes. Press the RIGHT button to set the time and return to the
Clock display screen.
Installation
Since the FX10 is wireless, installation is simple and straight forward. Begin by attaching the computer
mounting bracket to the handlebar
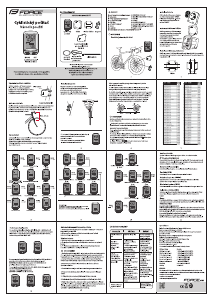
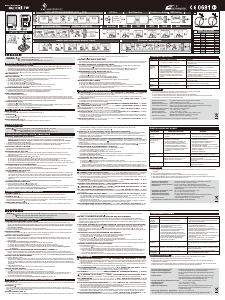
BRACKET INSTALLATION
Remove the backing from the small, adhesive rubber pad and apply the pad to the underside of the
mounting bracket. Use the included zip-ties to attach the bracket to the handlebar as shown in Figure 4.
Once the bracket is securely installed, trim the excess zip-tie ends with scissors.
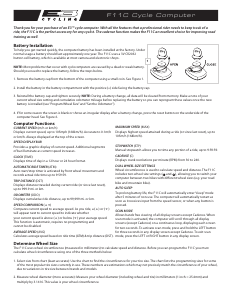
COMPUTER HEAD INSTALLATION
Place the computer head in the bracket and twist the head clockwise until you hear a ‘CLICK’, indicating
that the unit is locked in the bracket. See Figure 5. To remove the computer head, twist the head
counterclockwise and then lift it out of the bracket.
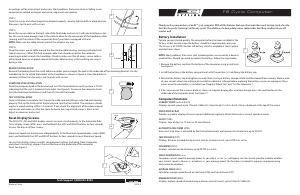
WHEEL MAGNET AND SENSOR INSTALLATION
STEP 1
Using the included rubber shim and zip-ties, loosely mount the sensor (so that you can slide it around) to the
fork blade so that it’s on the same side of the bike as the handlebar bracket. The sensor/transmitter battery
cap should face up. See Figure 6. The FX10 transmission range is 24” (60cm). The sensor/transmitter must be
mounted within 24” of the receiver (computer head) in order for the receiver to pick up the signal.
NOTE: We recommend mounting the sensor to the front (leading) edge of the fork blade to avoid problems should the sensor ever come into
contact with the spokes.
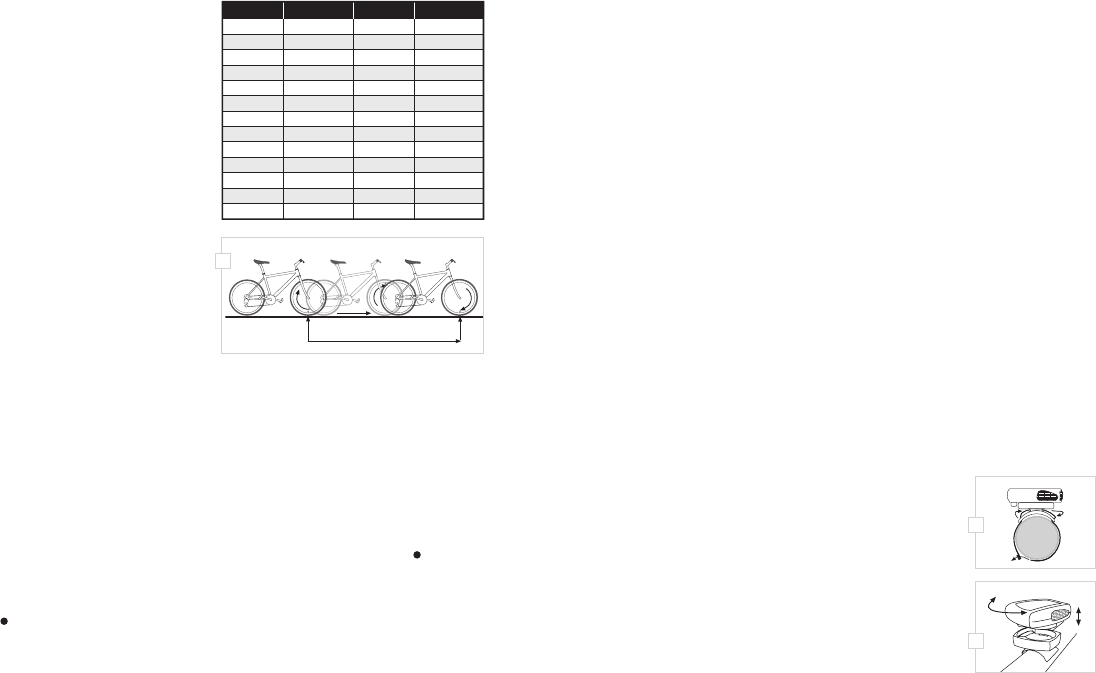
1. Select size from chart (least accurate): Use the chart at right to nd the
circumference for your tire size. The chart lists the programming sizes
for some of the most popular tire sizes currently in use. These numbers
are estimations which may not precisely match the circumference of
your wheel, due to variations in tire size between brands and models.
2. Measure wheel diameter (more accurate): Measure your wheel
diameter (including wheel and tire) in millimeters (1 inch = 25.4mm)
and multiply by 3.1416. This value is your wheel circumference.
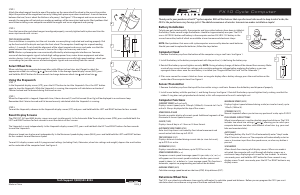
3. Perform roll-out test (most accurate): See Figure 3.
STEP 1
Stand your bicycle upright. With your tire in ated to its proper pressure,
rotate your front wheel so that the valve is located at the bottom (6
o’clock position). Make a mark on the oor to indicate the valve location.
STEP 2
Roll the bicycle forward in a straight line for one complete wheel
revolution, until the valve is again at the bottom (ideally, you should be
on the bike). Make a mark on the oor to indicate the valve location.
STEP 3
Measure the distance between the marks in millimeters
(1 inch = 25.4mm). This value is your wheel circumference.
Program the Computer
Before using your FX10, you must program wheel size (see “Determine
Wheel Size,” above), select a speed scale (miles or kilometers), set the
odometer (if desired), input your weight and set the clock. The rst step
is to select the speed scale.
Select Miles or Kilometers, Program Wheel Size
& Set the Odometer
The FX10 is capable of displaying speed and distance information in either miles or kilometers. Also, the odometer can be set so that cumulative
mileage can be restored after a battery change or transferred from another computer.
(SELECT MILES OR KILOMETERS)
STEP 1
Press the RIGHT button to advance to the Odometer display screen (ODO). In the ODO screen, press and hold the RIGHT button for
three seconds.
STEP 2
“km/h” or “m/h” will appear on the right side of the screen. Press the LEFT button to select miles (m/h) or kilometers (km/h).
STEP 3
Press the RIGHT button to con rm your selection and advance to the wheel size setting screen.
(PROGRAM WHEEL SIZE)
STEP 4
After the speed scale has been selected, the computer will automatically advance to the rst wheel size programming screen (
1 ). The digit at the
right of the screen will ash. Press the LEFT button to adjust the ashing digit according to the wheel circumference value determined above.
Press the RIGHT button to advance to the next ashing digit.
STEP 5
Repeat this sequence until the correct wheel size has been entered. Then press the RIGHT button to advance to the second wheel size
setting screen (
2 ).
STEP 6
The digit at the right of the screen will ash. Press the LEFT button to adjust the ashing digit. Press the RIGHT button to advance to the next
ashing digit.
STEP 7
Repeat this sequence until the second wheel size has been entered. Then press the RIGHT button to advance to the odometer setting screen.


Join the conversation about this product
Here you can share what you think about the E3 FX10 Cycling Computer. If you have a question, first carefully read the manual. Requesting a manual can be done by using our contact form.