Manual Denver TRC-1400 Weather Station

Need a manual for your Denver TRC-1400 Weather Station? Below you can view and download the PDF manual for free in English. This product currently has 5 frequently asked questions, 0 comments and has 0 votes. If this is not the manual you want, please contact us.

Is your product defective and the manual offers no solution? Go to a Repair Café for free repair services.

Manual

Loading…

~ P. 2 ~~ P. 1 ~
INDOOR & WIRELESS OUTDOOR THERMOMETER
WITH REAL TIME CLOCK & SNOOZE ALARM
MODEL: 883F01
INSTRUCTION MANUAL
1. INTRODUCTION
Thank you for purchasing our In/Outdoor thermometer with wireless thermometer sensor and real time clock. The
main unit is designed to receive temperature signals from maximum 3 remote sensors in different locations, and it is
also equipped with a snooze alarm. To ensure proper operations, please read this instruction manual carefully and
save it for future reference.
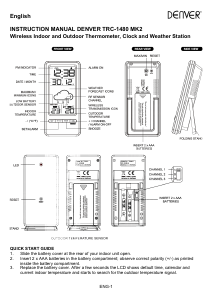
2. DESCRIPTION OF BUTTONS
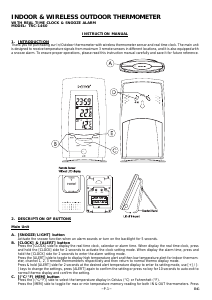
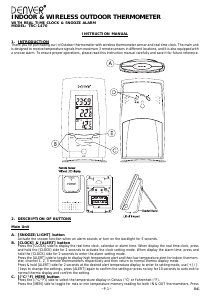
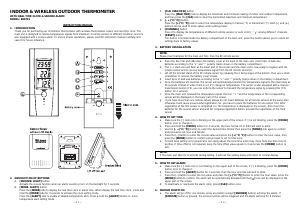
A. [SNOOZE/LIGHT] button
Activate the snooze function when an alarm sounds or turn on the backlight for 5 seconds.
B. [MODE ALERT] button
Press the [MODE] side to display the real time clock or alarm time. When display the real time clock, press and
hold the [MODE] side for 3 seconds to activate the clock setting mode.
Press the [ALERT] side to enable or disable temperature alert. Press & hold the [ALERT] button to enter
temperature alert setting mode.
C. [CLR MAX/MIN] button
Press the [MAX/MIN] side to display the maximum and minimum reading of indoor and outdoor temperature,
and then press the [CLR] side to clear the memorized maximum and minimum temperature.
D. [- +(°C/°F)] button
Press the [+(°C/°F)] side to select the temperature display in Celsius (°C) or Fahrenheit (°F). Both [-] and [+]
buttons can be used to enter values under setting mode.
E. [CHANNEL] button
Press it to display the temperatures of different remote sensors or auto scroll (
) among different channels.
F. [RESET] button
This button is located inside the battery compartment of the main unit, press this button allows you to return all
settings back to factory values.
3. BATTERY INSTALLATION
a. Press the door tab and slide down the battery cover at the back of the main unit. Insert 2pcs of AAA size
batteries according to the “+” and “-” polarity marks shown in the battery compartment.
b. The (---) dash icon will flash at the lower part of the screen and the main unit is now ready to register with the
remote sensor and to receive temperature signal from the RF remote sensor(s).
c. Lift off the bracket stand of the RF remote sensor by releasing the 2 fixing snaps at the bottom, then use a small
screwdriver to remove the battery cover screws.
d. Insert 2pcs of AAA size batteries according to the “+” and “-” polarity marks shown in the battery compartment.
e. Once the batteries are inserted, the sensor will automatically transmit the temperature signal to the main body at
30 seconds interval or when there is a 0.2°C change in temperature. The sensor is also equipped with a manual
transmission button (TX), you can enforce the sensor to transmit the temperature signal by pressing this (TX)
button for 2 seconds.
f. Once the main unit received the temperature signal, the icon “ 1 ” and the temperature of the corresponding
sensor will be displayed on the lower part of the screen.
g. If you have more than one remote sensor, please do not insert batteries for all remote sensors at the same time
otherwise it will cause unsuccessful registration. So, you have to place the batteries for one sensor first. After
registration of the first sensor is completed (i.e. the temperature is displayed on the screen), then insert the
batteries for the second sensor and wait for complete registration before proceed the registration of the third
sensor.
4. HOW TO SET TIME
a. Make sure the [:] colon icon is blinking on the upper part of the screen, if [:] is not blinking, press the [MODE]
button once to change it.
b. Press and hold the [MODE] button for 3 seconds, the hour format 12 or 24hr will start to blink.
c. Use the [- +(°C/°F)] button to select the desired time format then press the [MODE] side again to confirm
and proceed to set hour and minute.
d. Press the [-] button to enter the minute value and press the [+(°C/°F)] button to enter the hour value, then
press the [MODE] button to confirm and proceed to set T2 time zone.
e. T2 time zone setting is for people who can easily adjust the local time when they move from one time zone to
another. If time offset is not required, keep the time offset value equals to 0 and press the [MODE] button to
exit.
5. HOW TO SET ALARM
a. Make sure the [:] colon icon is not blinking on the upper part of the screen, if [:] is blinking, press the [MODE]
button once to change it.
b. Press and hold the [ALERT] button for 3 seconds, then the hour and min will start to blink.
c. Press the [-] button to enter the min value and press the [+(°C/°F)] button to enter the hour value, press the
[MODE] button to confirm, the alarm will be automatically activated and the [
] icon will be displayed on the
upper part of the screen.
d. To deactivate or reactivate the alarm clock, press [CLR] button once.
6. SNOOZE FUNCTION
a. The alarm will go off for one minute, press any button (except [SNOOZE] button) will stop the alarm. If
[SNOOZE] button is pressed, the snooze function will be triggered and the alarm will stop for 8 minutes.
NOTE:
If the main unit idles for 8 seconds during setting, it will exit the setting mode and return to normal display.
NOTE:
Please insert batteries for the main unit first, then the RF remote sensor.
Download manual in English (PDF, 0.72 MB)
(Consider the environment and only print this manual if it is really necessary)

Loading…

Rating

Let us know what you think about the Denver TRC-1400 Weather Station by leaving a product rating. Want to share your experiences with this product or ask a question? Please leave a comment at the bottom of the page.
Are you satisfied with the Denver TRC-1400 Weather Station?
Yes No
Be the first to rate this product
0 votes

Join the conversation about this product

Here you can share what you think about the Denver TRC-1400 Weather Station. If you have a question, first carefully read the manual. Requesting a manual can be done by using our contact form.

More about this manual

We understand that it’s nice to have a paper manual for your Denver TRC-1400 Weather Station. You can always download the manual from our website and print it yourself. If you would like to have an original manual, we recommend you contact Denver. They might be able to provide an original manual. Are you looking for the manual of your Denver TRC-1400 Weather Station in a different language? Choose your preferred language on our homepage and search for the model number to see if we have it available.

Specifications

Brand Denver
Model TRC-1400
Category Weather Stations
File type PDF
File size 0.72 MB

All manuals for Denver Weather Stations
More manuals of Weather Stations

Frequently Asked Questions about Denver TRC-1400 Weather Station

Our support team searches for useful product information and answers to frequently asked questions. If you find an inaccuracy in our frequently asked questions, please let us know by using our contact form.

My weather station prediced it would rain, but this didn't happen. Why is that? Verified

The prediction on the weather station is based on air pressure. In general low pressure means bad weather and high pressure means good weather. It's possible the weather pattern develops differently than the air pressure predicts.

This was helpful (1404) Read more

What is the best location for a weather station and its sensors? Verified

The weather station itself is placed inside and needs to be kept away from heat sources such as the kitchen, windows or electrical appliances. A separate outside temperature sensor needs to placed in shadow and at least 1,25m above the ground. A rain sensor needs to be placed in an open area where it can always collect rain. A wind sensor needs to be placed in an open area too, with any obstacles influencing the wind.

This was helpful (334) Read more

My weather station has a rain gauge, can it also measure the amount of snowfall? Verified

Some rain gauges are equipped with a heating element, making the snow melt and allowing it to be measured. Without heating element the rain gauge will clog and no measurement can be performed.

This was helpful (235) Read more

A battery in my device is oxidized, can I still safely use it? Verified

Ja, the device can still be safely used. Firstly, remove the oxidizd battery. Never use bare hands to do this. Then clean the battery compartment with a cotton swab dipped in vinegar or lemon juice. Let it dry and insert new batteries.

This was helpful (234) Read more

Can I leave a replacable battery in a device for a long time? Verified

Replacable batteries can remain in a device for a long time if the device is in use. When a device is being stored for a long time it is advisable to remove the batteries to prevent oxidation.

This was helpful (234) Read more
Manual Denver TRC-1400 Weather Station

Related products

Related categories