
1. Technical characteristics
• Powered by 2 1.5 V lithium batteries,
LR03/AAA type (supplied),10-year life
(if menu CF05=0)
• Blue backlit display
• Class III insulation
•
X3D wireless remote control device:
868.7 MHz to 869.2 MHz
• Maximum wireless power < 10mW
• Category 2 receiver
•
Wireless range from 100 to 300 metres outside, varies
depending on the associated equipment (the range can
vary depending on the installation conditions and the
electromagnetic environment).
• Dimensions: 81 x 88 x 21 mm
• Degree of protection: IP 30
• Wall mounting or base unit
• Storage temperature: -10°C to +70°C
• Operating temperature: 0°C to +40°C
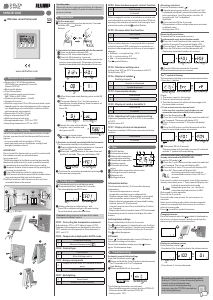
2. Location - Mounting
Since the temperature measurement sensor is inside
the box, you must install the thermostat ush-mount-
ing box:
- on an accessible wall at a height of 1.50 m
- away from heat sources (replaces, sunlight) and
draughts (windows, doors)
IMPORTANT:
Do not install the thermostat on a wall in contact with
the outdoors or with an unheated room
(e.g. garage, etc.)
The sleeve output in the ush-mounting box must be
blanked off (with mastic) in order to avoid unwanted
air movements that could bias the sensor reading.
❶ Separate the box from its base unit by pushing the
pin using a screwdriver.
❷ Insert the batteries, with the right polarity
❸ Wall mount: attach the mount with suitable fasten-
ings and remount the unit onto its mount.
Placed on furniture: ret the base on the unit, then
assemble these to the mount.
5
1
1
2
2
1
4
1,50 m
> 20 cm
A
B
2
3
3. Association
With the receiver(s):
❶ Press and hold the receiver button for 3 seconds
until the LED
ashes.
Release.
1- No receiver has been associated with the thermostat:
❷ Press any button to display rF01.
❸ Press on OK, the screen displays “00”
❹ Press the OK button for 3 seconds.
The screen ashes, and the thermostat searches for
receivers to associate with. The number of receivers
found and associated with is displayed on the screen.
1 2 3 4
1 2 3 4
1 2 3 4
3s
2
4
3
1 2 3 4
❺ When the screen stops ashing, press on the OK
button
❻ The screen displays “Loc”, the rst receiver is
identied by its relay ashing. Note the power of
the radiator in question.
Press OK.
❼
Report the value of the radiator
using the + and - buttons and
then press on OK.
❽ If required, repeat stages
❻ and ❼ for the other registered receivers.
2- Receivers are already associated with the thermostat.
The thermostat must be in shutdown mode.
❶ Press and hold the receiver button for 3 seconds
until the LED ashes. Release.
❷ Press the 1 and 2 buttons at the same time and
hold for 5 seconds. The screen will display rF01.
❸ Continue the association procedure from stage ❸
of the previous paragraph.
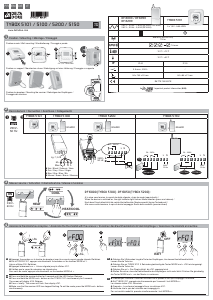
4. Conguration
The thermostat must be in shutdown mode.
❶ Press and hold the 1 button for 5 seconds.
The screen displays the CF01 menu.
❷ Make a selection or adjust using + and -.
Press OK to validate and go to the next setting.
To exit the mode, press the
button
Comment: the greyed-out sections of the tables
correspond to default values.
CF01 -
Correcting the temperature measured
Adjustable by -5°C to +5°C (default value: 0.0°C).
Example: if the temperature displayed by the unit is
19°C and the actual temperature (thermometer) is
20°C, set +1°C.
CF02 - Temperature displayed in AUTO mode
CF04 - Control type
0
PWM control,
1 All or Nothing control
CF05 - Energy saving mode
CF07 - Backlighting
... ... ...
> 3s
1 2 3 4
1 2 3 4
5 6
1 2 3 4
7
1 2 3 4 1 2 3 4
5s
1 2 3 4 1 2 3 4
0
Temperature setting
1
Measured temperature
0
Display turns off after a 10-seconds without
press
2 Display always illuminated
0
Deactivated
1 Enabled (off after timeout)
CF08 - Door/window magnetic contact function
When a magnetic contact is installed on a window and
associated with a receiver, activate function CF08: the
opening of the window will switch the heating to frost
protection mode, and the symbol ashes.
CF09 - Presence detection function
When a motion detector is associated with a receiver,
activate function CF09, resulting in an automatic re-
duction in the temperature in the case of a prolonged
absence:
• 1h30min -> current setting -1.5°C
• 3h -> current setting -3°C
• 48h -> Frost protection setting
The symbol ashes.
CF10 - Maximum setting value
Setting from 16°C to 40°C in increments of 0.5°C.
Default value: 30°C
CF16 - Display of symbol
(heating request)
CF19 - Consumption display
CF22 - Display of relative humidity %
CF26 -
Adjustment of frost protection setting
Adjustment possible from 5°C to 10°C in increments
of 0.5°C.
Default value: 8°C
CF27 -
Display of external temperature
Requires an outdoor X3D sensor associated with the
receiver.
5. Use
Information button
The information button ( i ) shows the following
information:
- Measured temperature or current
temperature setting (as per conguration),
- Outdoor temperature, if the receiver is associated
with an outdoor sensor (menu CF27 activated).
- Display of total consumption of associated heating
devices. (menu CF19 activated).
Counter reset to zero: Press and hold the C button
for 3 seconds.
- Display the relative humidity (menu CF22 activated)
Successively press the i button to display this infor-
mation.
Locking down settings
Press and hold the i button for 5 seconds.
The
symbol appears. In locked mode, only the Start
/ Stop ( ) and information ( i ) buttons are accessible.
To unlock, press and hold the i button for 5 seconds.
The
symbol disappears.
Off mode
Press . The thermostat emits a series of 3 beeps. In
this mode, heating is shut down.
To exit from shutdown mode, press the button
again. The thermostat beeps.
6. Troubleshooting
Automatic reset of initial settings
From the Shutdown mode (
) .
❶ Press and hold the 1 and 3 buttons simultaneously
for 10 seconds until "Init" is displayed
(slow ashing).
❷ Press and hold OK for 3 seconds.
5s
1 2 3 4 1 2 3 4
The following parameters are initiated:
- Door/window magnetic contact function (CF08=0),
- Presence detection function (CF09=0),
- Setting value: 19°C.
0
Deactivated
1 Activated
0
Deactivated
1 Activated
0
Symbol not displayed
1 Symbol displayed
0
Deactivated
1 Activated
0
Deactivated
1 Activated
0
Deactivated
1 Activated
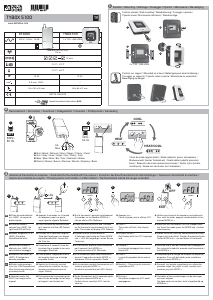
6 7 8 9
4
5
12
10
3
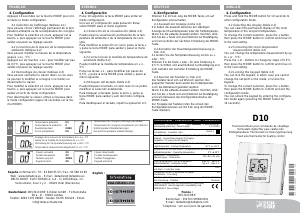
❶ On/Off button
❷ Information button
❸ Measured temperature
or temperature setting
❹ Measured temperature
❺ Heating request
❻ Presence detection
active
❼ Window/door magnetic contact active
❽ Locking of access to settings
❾ Batteries old
❿Settings buttons
All settings initialised
From the Shutdown mode (
) .
❶ Simultaneously press buttons 1 and 3 until "Init"
is displayed (slow ash). release the buttons and then
press on buttons 1 and 3 again for a further 10
seconds until "init" is displayed
(fast ash).
❷ Press and hold OK for 3 seconds.
All parameters of the conguration menu are reset
to default value.
Setting value: 19°C.
Removing all associations
To remove all the associated receivers.
The thermostat must be in shutdown mode.
❶ Press the 1 and 2 buttons at the same time and
hold for 5 seconds. The screen will display rF01.
❷ Press button 2 twice. The screen will display rF03.
❸ Press the OK button, and the thermostat will
display the associated number of receivers.
❹
Keep the OK button pressed for 3 seconds.
All the associated receivers are removed.
The "i" symbol is ashing.
The thermostat is indicating an error in wireless communication.
- Press the ( i ) button.
2s
Check:
1- The power supply to the system.
2- If one or more receivers are off.
3- That the thermostat is within wireless range of all
the associated receivers.
4- If one or more receivers does not work.
In the case that a receiver is out of order, you can
remove the association with this faulty receiver.
❶ Press the Stop button ( )
❷ Press the 1 and 2 buttons at the same time and hold
for 5 seconds. The screen will display rF01.
❸ Press 3 times on button 2. The screen will display
rF04.
❹ Press the OK button, and the thermostat will dis-
play the associated number of receivers.
❺ Then press OK for 3 seconds.
The association with the faulty receiver(s) is deleted,
and the "i" symbol will stop ashing.
Activating association wait mode for receivers
already associated with MINOR 1000.
From the Off mode (
).
❶ Press the 1 and 2 buttons at the same time and hold
for 5 seconds. The screen will display rF01.
❷ Press button 4 twice. The screen will display rF05.
❸ Press OK. The screen will display ALL:
Activating association wait mode for
all associated receivers. Press OK for 3
seconds.
If you want to select one receiver from all the receivers
already associated, press +. The screen will display Loc:
Individual association wait mode.
Repeatedly press the + or -- button to
select the required receiver, its LED
ashes and its relay operates.
Press OK for 3 seconds.
Proceed in the same manner for each receiver to
associate.
Next, associate the product (door/window magnetic
contact for example) with the receiver or receivers,
refer to its user guide.
Press (
) to exit the mode if necessary.
Changing batteries
Form the moment when the
symbol is displayed on
the screen, you have around 3 months to change the
batteries (see technical characteristics).
Display the software version
From shutdown mode (
).
- Press button 2 for 5 seconds to display the software version.
2s
5s
1 2 3 4
- Press button C to leave the mode.
5s
1 2 3 4 1 2 3 4 1 2 3 4
5s
1 2 3 4 1 2 3 4 1 2 3 4
1
2
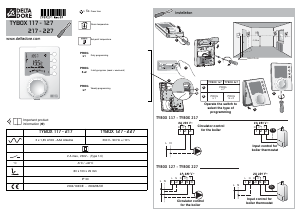
Remote control and programming option
Add the TYDOM 1.0 home automation gateway
to your system and benet from
remote control and programming
features using the TYDOM smartphone
and tablet application.
Wireless room thermostat
www.deltadore.com
EN
MINOR 1000
Standby mode:
When left idle for a given period of time, the thermo-
stat switches to standby. To wake the thermostat up,
press any button.


Join the conversation about this product
Here you can share what you think about the Delta Dore Minor 1000 Thermostat. If you have a question, first carefully read the manual. Requesting a manual can be done by using our contact form.