56
1
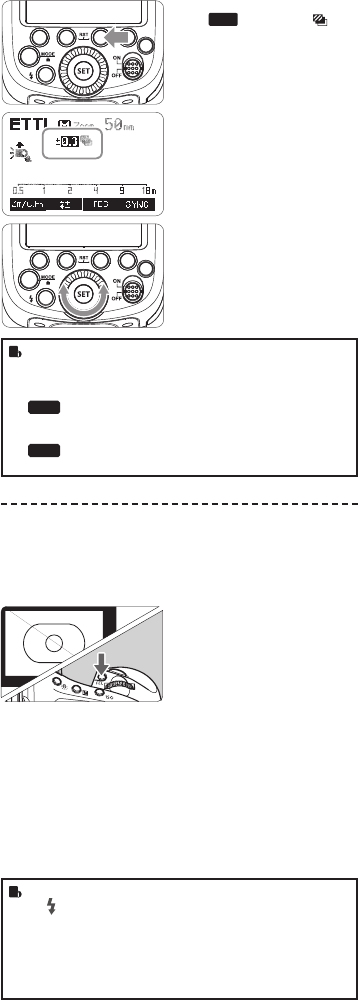
Press function button 3
<
FEB
>. The icon <
>
and the exposure bracketing
amount will be highlighted
on the LCD panel.
2
Set the ash exposure com-
pensation amount.
• Turn the Select Dial to set
the amount.
• “0.3”means 1/3 step,
“0.7”means 2/3 step.
3
Press < SET > button again
to conrm the setting. Then
your FEC and FEB settings
are displayed on the LCD
panel.
• FEB will be cancelled after three photos are taken.
• For best results, set the camera drive mode to “single”
and ensure the ash is ready before shooting.
• FEB can be used with FEC and FEL.
You can prevent the FEB from being cancelled
automatically after three photos are taken
(C.Fn-FEB, Page 81)
The FEB shooting sequence can be changed
(C.Fn-FEB, Page 81).
FEL: Flash Exposure Lock
FEL can lock the correct ash exposure setting for any part of
the scene. With < ETTL > displayed on the LCD panel, press the
camera’s < FEL > button. If the camera does not have the < FEL >
button, press the < * > button.
1
Focus the subject.
2
Press the <FEL> button.
• Aim the subject at the
center of the viewnder
and press <FEL> button.
• The camera ash will re
a preash and the required
ash output for the subject
is retained in memory.
• Each time the <FEL> but-
ton is pressed, a preash
will be red and a new ash
exposure setting will be
locked.
• If the subject is too far away and underexposure, the
< > icon will blink in the viewnder. Move closer to the
subject and try the FE lock again.
• If < ET TL > is not displayed on the LCD panel, FE lock
cannot be set.
• If the subject is too small, FE lock might not be very
effective.
Press function button 3
1 < >. The icon < >
and the exposure bracketing
amount will be highlighted on
the LCD panel.
Press < SET > button again
3 to confirm the setting. Then
your FEC and FEB settings
are displayed on the LCD
panel.
● FEB will be cancelled after three photos are taken.
● For best results, set the camera drive mode to “single” and
ensure the flash is ready before shooting.
● FEB can be used with FEC and FEL.
You can prevent the FEB from being cancelled
automatically after three photos are taken. (C.Fn-
FEB ACL , Page 74)
The FEB shooting sequence can be changed. (C.Fn-
FEB, Page 74)
C.Fn
FEB
Set the flash exposure
2 compensation amount.
● Turn the Select Dial to set
the amount.
● “0.3”means 1/3 step,
“0.7”means 2/3 step.
C.Fn
FEL: Flash Exposure Lock
FEL can lock the correct flash exposure setting for any part of the
scene. With <ETTL> displayed on the LCD panel, press the
camera’s <FEL> button. If the camera does not have the <FEL>
button, press the < * > button.
Focus the subject.
1
Press the <FEL> button.
2
● Aim the subject at the center of
the viewfinder and press <FEL>
button.
● The camera flash will fire a
preflash and the required flash
output for the subject is retained
in memory.
● Each time the <FEL> button is
pressed, a preflash will be fired
and a new flash exposure
setting will be locked.
● If the subject is too far away and underexposure, the < >
icon will blink in the viewfinder. Move closer to the subject
and try the FE lock again.
● If <ETTL> is not displayed on the LCD panel, FE lock
cannot be set.
● If the subject is too small, FE lock might not be very
effective.
● If you set a shutter speed that is the same as or slower than
the camera’s maximum flash sync speed, < > will not be
displayed in the viewfinder.
● With high-speed sync, the faster the shutter speed, the
shorter the effective flash range.
● To return to normal flash, press < > button again. Then
< > will disappear.
● Multi flash mode cannot be set in high-speed sync mode.
● Over-temperature protection may be activated after 15
consecutive high-speed sync flashes.
High-Speed Sync
High Speed Sync (FP flash) enables the flash to synchronize with all
camera shutter speeds. This is convenient when you want to use
aperture priority for fill-flash portraits.
Second-Curtain Sync
With a slow shutter speed, you can create a light train following the
subject. The flash fires right before the shutter closes.
Press function button 4 < >
button so that < > is displayed
on the LCD panel.
Press Function Button 2
1 < > so that < > is
displayed.
Check that < > is
2 displayed in the viewfinder.
SYNC
SYNC
SYNC
- 49 - - 50 -


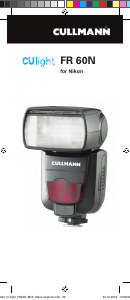

Join the conversation about this product
Here you can share what you think about the Cullmann CUlight FR 60C (for Canon) Flash. If you have a question, first carefully read the manual. Requesting a manual can be done by using our contact form.
reply | This was helpful (0) (Translated by Google)