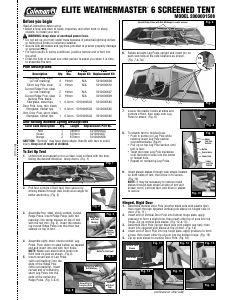
Manual Coleman Elite Weathermaster 6 Tent

Need a manual for your Coleman Elite Weathermaster 6 Tent? Below you can view and download the PDF manual for free in English. This product currently has 7 frequently asked questions, 0 comments and has 0 votes. If this is not the manual you want, please contact us.

Is your product defective and the manual offers no solution? Go to a Repair Café for free repair services.

Manual

Loading…

STITCH LINE
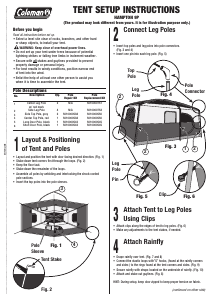
6. Rotate all eight Leg Poles upright and insert pin on
each web loop at the side locations as shown.
(Fig. 7 & 7A)
Fig. 6
Fig. 7
7A
Pin
7. Locate the plastic hooks at sides and
corners of tent, then snap onto Leg
Poles to attach. (Fig. 8)
9. Insert plastic stakes through web straps located
on both sides of tent, then drive in to secure.
(Fig. 10)
NOTE: It may be necessary to remove metal
stakes through web straps at side of tent and
screen room, pull tent taut, and drive in stakes
to secure.
Fig. 10
8. To stretch tent to finished size:
Push in button on Leg Pole while
twisting lower Leg Pole section
counterclockwise (Fig.9);
Pull up on top Leg Pole section until
tent is taut;
Twist the lower Leg Pole clockwise
until the button locks into the center
or lowest hole;
Repeat on remaining Leg Poles.
Fig. 8
Fig. 9
Button
Center Hole
Lower Hole
Lower
Leg Pole
Section
Upper
Leg Pole
Section
ELITE WEATHERMASTER
®
6 SCREENED TENT
MODEL 2000001588
Curved Ridge Poles with Red Markings in center sleeves
Hinged, Rigid Door
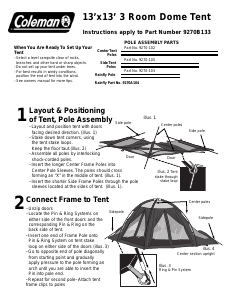
1. Assemble Vertical Door Pole (shorter black pole with plastic tips);
then insert through zippered vertical pole sleeve on hinged side of
door. (Fig. 11)
2. Insert end of Vertical Door Pole into bottom hinge plate, apply
pressure to form a slight bow, then insert other tip of pole into top
hinge. Zip up vertical pole sleeve. (Fig. 12 & 13)
3. Assemble Door Pole (longer black pole with plastic cap tips); then
insert into zippered pole sleeve at top of door. (Fig. 14)
4. Insert end of Door Pole into top hinge plate, apply pressure to form
a bow, then insert other tip of pole into the bottom hinge. (Fig. 15)
5. Zip up pole sleeve to enclose Door Pole. (Fig. 16)
Fig. 11 Fig. 12 Fig. 13
Fig. 14
Fig. 15
Fig. 16
Fig. 1
To Set Up Tent
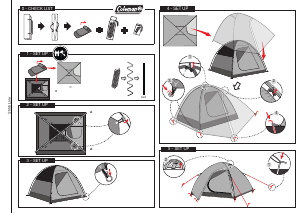
1. Unfold tent and spread out on a clean, level surface with the door
facing the desired direction. Unzip doors. (Fig. 1)
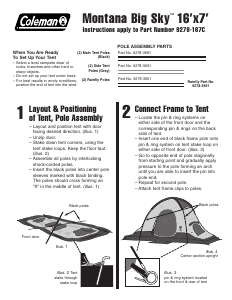
4. Assemble eight, steel, shock-corded, Leg
Poles. Push down on steel button on tapered
end and insert into end with four holes.
NOTE: Make sure steel button locks into
third hole on pole as shown. (Fig.4)
5. Insert curved end of Leg Poles
(with red marking) into the
ends of the Ridge Pole
(with red marking). Insert
curved end of remaining
short Leg Poles into the
ends of the remaining
Ridge Poles. (Fig. 5 & 6)
Door
Ridge Pole with
Red Marking
Button in third hole
Fig. 4
Fig. 5
Fig. 2
Sleeve
with Red
Trim
Curved End of
Long Leg Pole
2. Pull four corners of tent taut, then secure by
driving stakes through web loops at an angle for
better anchoring. (Fig. 2)
Ridge Pole
with Red
Marking
Fig. 3
Sleeve
with Red
Trim
3. Assemble four, steel, shock-corded, curved
Ridge Poles. Insert Ridge Poles (with red
marking) into center sleeves on top of tent
with the red trim (Fig. 3). Insert the remain-
ing curved Ridge Poles into the other two
sleeves on top of tent.
Vertical Pole
Sleeve
Door Hinge
Pole
Sleeve
Top
Door
Hinge
Pole
Sleeve
Top
Door
Hinge
(continued on other side)
Pole Descriptions
Pole Pole Pole
Description Qty. Dia. Repair Kit Replacement Kit
Long Leg Pole, steel
(w/ red marking) 4 19mm N/A 5010000608
Short Leg Pole, steel 4 19mm N/A 5010000610
Curved Ridge Pole, steel
(w/ red marking) 2 19mm N/A 5010000607
Curved Ridge Pole, steel 2 19mm N/A 5010000609
Awning Pole, black,
fiberglass, metal tips 1 6.3mm 5010000543 5010000545
Door Pole, long, thin, black,
fiberglass, rubber tips 1 6.3mm 5010000543 5010000545
Vert. Door Pole, short, black,
fiberglass, rubber tips 1 6.3mm 5010000543 5010000545
Before you begin
Read all instructions before set up.
• Select a level site clear of rocks, branches, and other hard or sharp
objects, to install your tent.
WARNING: Keep clear of overhead power lines
.
• Do not set up your tent under trees because of potential lightning strikes
or falling tree limbs in inclement weather.
• Secure with all
stakes and guylines provided to prevent property damage
or personal injury.
• For best results in windy conditions, position narrow end of tent into
the wind.
• Enlist the help of at least one other person to assist you when it is time
to assemble the tent.
Self-Rolling Window Spring Descriptions
Color Code Description Qty. Length Replacement Part No.
Red 1 360mm 5010000624
Green 3 610mm 5010000627
Orange 2 670mm 5010000628
CAUTION: “Springs” may have sharp edges. Handle with care to avoid
injury. Keep out of reach of children.
Download manual in English (PDF, 0.21 MB)
(Consider the environment and only print this manual if it is really necessary)

Loading…

Rating

Let us know what you think about the Coleman Elite Weathermaster 6 Tent by leaving a product rating. Want to share your experiences with this product or ask a question? Please leave a comment at the bottom of the page.
Are you satisfied with the Coleman Elite Weathermaster 6 Tent?
Yes No
Be the first to rate this product
0 votes

Join the conversation about this product

Here you can share what you think about the Coleman Elite Weathermaster 6 Tent. If you have a question, first carefully read the manual. Requesting a manual can be done by using our contact form.

More about this manual

We understand that it’s nice to have a paper manual for your Coleman Elite Weathermaster 6 Tent. You can always download the manual from our website and print it yourself. If you would like to have an original manual, we recommend you contact Coleman. They might be able to provide an original manual. Are you looking for the manual of your Coleman Elite Weathermaster 6 Tent in a different language? Choose your preferred language on our homepage and search for the model number to see if we have it available.

Specifications

Brand Coleman
Model Elite Weathermaster 6
Category Tents
File type PDF
File size 0.21 MB

All manuals for Coleman Tents
More manuals of Tents

Frequently Asked Questions about Coleman Elite Weathermaster 6 Tent

Our support team searches for useful product information and answers to frequently asked questions. If you find an inaccuracy in our frequently asked questions, please let us know by using our contact form.

Can I store my tent when it's wet? Verified

Only for very short periods of time. When a tent is stored while wet for a week or longer, it can get moldy. This is harmful for your tent and possibly your health.

This was helpful (384) Read more

How do I impregnate a tent? Verified

Pitch the tent, clean the cloth and let it dry. Apply the impregnation agent on the cloth with a plant sprayer or other spray. It is also possible to use a paint roller or brush. The cloth needs to be fully saturated with the impregnation agent. Also treat the inside of the tent. Thoroughly clean any windows with a moist cloth. Do not let the impregnation agent dry on it. Let the tent cloth fully dry. Repeat the treatment if needed.

This was helpful (285) Read more

Can I repair a tear or hole in the canvas of my tent myself? Verified

There are special pieces of self-adhesive patches of cloth available for synthetic tent canvases. Stick one of these patches on both sides of the hole or tear. For cotton tent canvases or mixed material tent canvases it's best to use patches that can be ironed on. This will require an iron.

This was helpful (218) Read more

The zipper of my tent won't run smoothly, what can I do? Verified

When a zipper is running smoothly, use a dry PTFE spray or silicone spray. Do not spray onto the cloth and preventively spray to prevent future problems.

This was helpful (156) Read more

There are water drops on the inside of the tent, does this mean it is leaking? Verified

No, this is probably condensation. Make sure the tent is properly ventilated to keep condensation at a minimum.

This was helpful (129) Read more

What tent pegs are best to use for which surfaces? Verified

On grassland or forest surfaces you can use semi circular or plastic pegs. On rocky surfaces you need to use rock pegs. On clay surfaces you can use semi circular, plastic or universal pegs. On gravel surfaces you need semi circular or universal pegs and on sand you need to use wooden pegs.

This was helpful (105) Read more

The impregnation agent leaves white stains or a white haze on the tent cloth, what can I do about this? Verified

If the agent leaves a white haze or white stains on the tent cloth, this means you have applied more impregnation agent on those areas. This is not harmful and the stains often disappear over time. It is not advisable to use less impregnation agent to prevent stains. The cloth needs to be fully saturated with the impregnation agent to give good results.

This was helpful (97) Read more
Manual Coleman Elite Weathermaster 6 Tent

Related products

Related categories