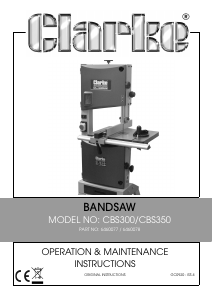
Fig. 6
Table securing
bolt
Trunnion Base
Bolt trunnions
to table
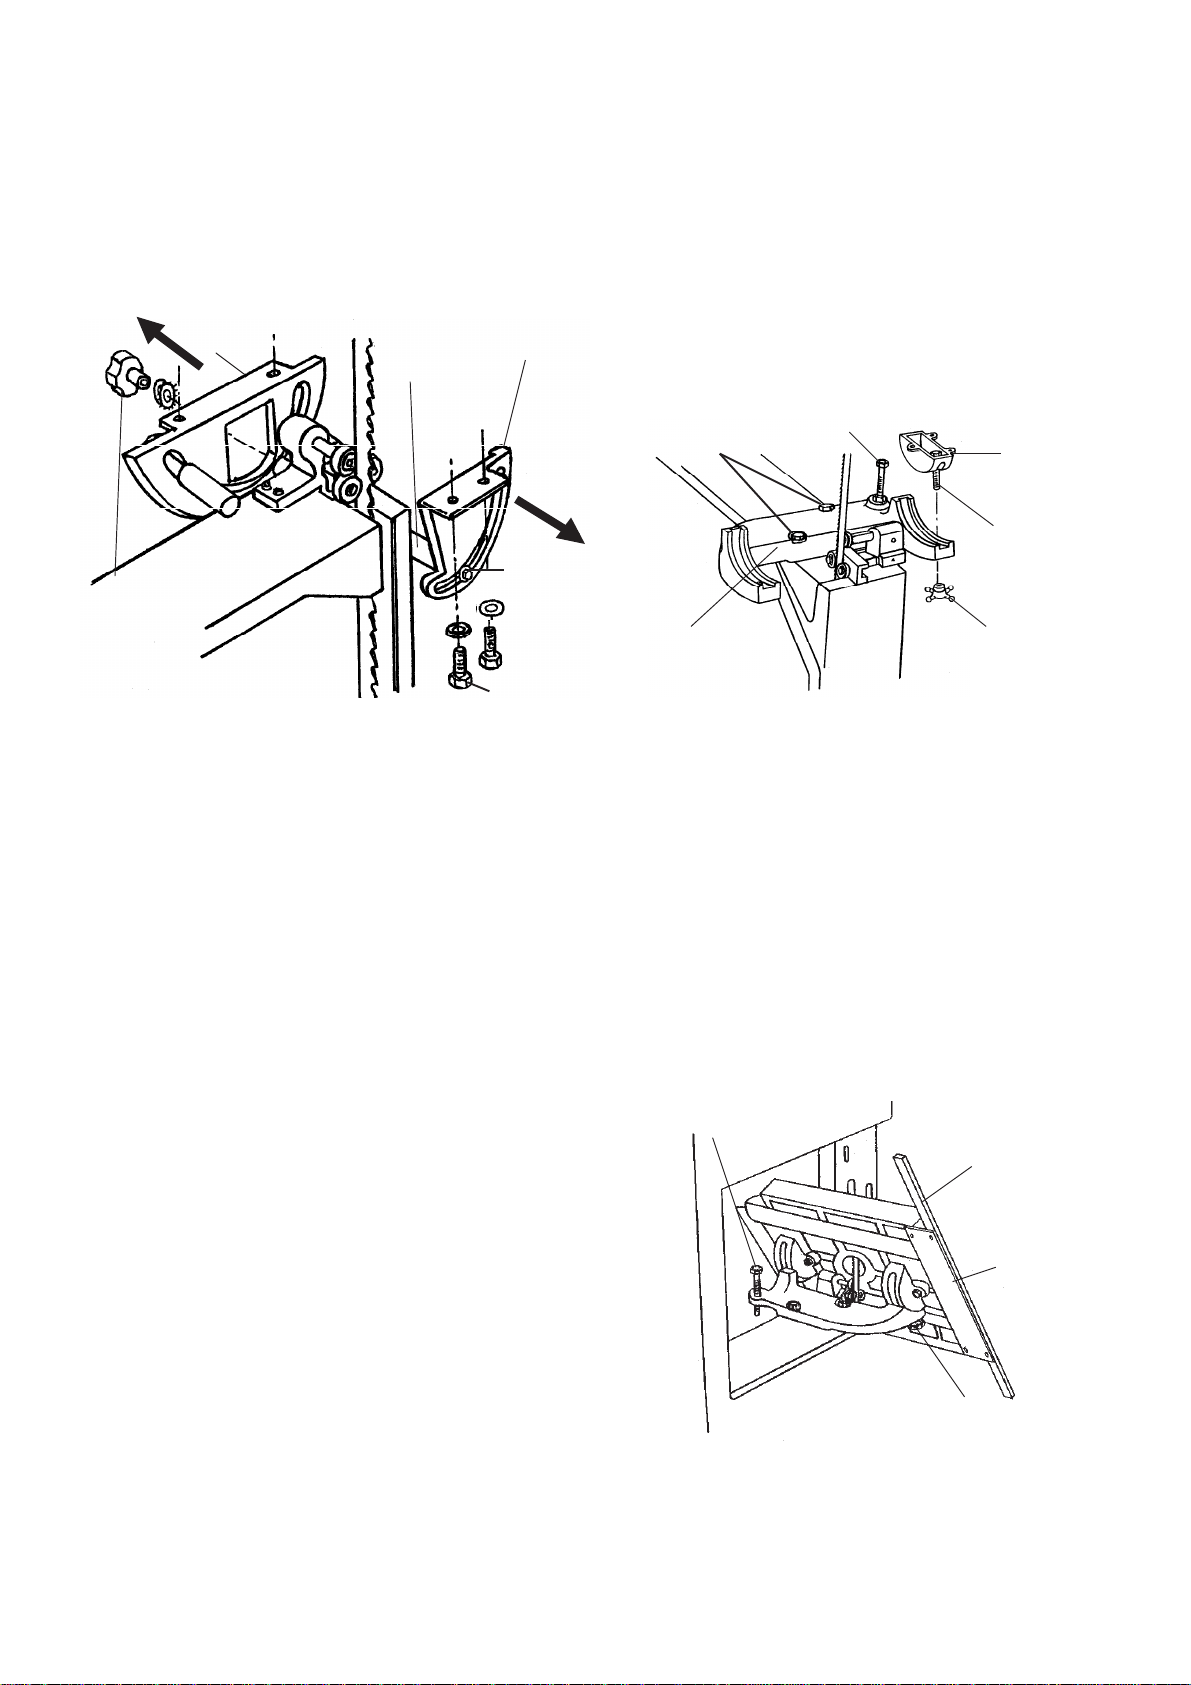
3. With the blade located in the centre hole, line up
the slotted holes of the larger rear trunnion, with
the long and short table tubes, and at the same
time position the slotted hole in the front trunnion
into the other end of the long tube, as shown in
fig 5.
Ensure the ends of the tubes sit neatly in the
grooves on the inside of the slotted holes in each
trunnion.
4. Thread the Trunnion Tension Bolt in through the
front trunnion, with a flat washer up against the
trunnion, and a spring washer between the flat
washer and the bolt head.
With the bolt fully home and protruding through
the rear trunnion, attach a flat washer followed by
a spring washer, and finally the table tilt adjuster
knob. i.e. the flat washer must be up against the
trunnion.
Do not tighten the adjuster knob at this stage.
5. Move the trunnions on their mountings away from
each other, to ensure there is a working clearance
between the trunnions and the table tubes, and
then tighten the trunnion mounting bolts.
IMPORTANT:The table should be capable of tilting
freely with the adjuster knob is loosened.
If it is tight and difficult to move, slacken off the trunnion
mounting bolts slightly and prise the trunnions apart
on their mountings, in the direction of the arrows in
fig. 5. Finally, re-tighten the mounting bolts.
NOTE: It helps, to ensure free movement of the table,
to apply grease to the trunnion slots during assembly.
6. A scale is provided on the larger (rear) trunnion,
with a pointer mounted on the casing to indicate
the degree of table tilt. Set the table so the pointer
is opposite the zero degres mark, (i.e. the table
is horizontal) and tighten the table tilt adjuster knob.
The table should be firm and stable, if there is any
movement when the adjuster knob is tightened,
the trunnion mounting bolts are loose.
7. Replace the Table Insert and the Taper Pin.
Fig. 5
Trunnion Mtg
Bolts
Rear
Trunnion
Front
Trunnion
Table Tilt
Adj. Knob
Long Table
Tube
2. CBS14WC
The table assembly comprises three main comp-
onents, the table itself, a pair of trunnions, and the
trunnion base.
1. Bolt the trunnions to the underside of the table,
ensuring the two table securing bolts are in place
as shown in fig 6, and the trunnion with the scale
attached is bolted to the front table mounting, so
that the scale faces towards the front of the
table. Leave the bolts finger tight.
2. Secure the trunnion base to the main body with
the nuts and bolts provided, and tighten firmly.
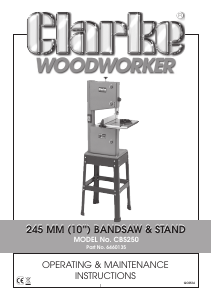
3. Attach the Rip Fence Guide Bar Mounting Plate
to the underside of the table with the screws
provided, and then attach the Rip Fence Guide
Bar to the Mounting Plate, (see fig.7).
4. Mount the table on the trunnion base, with the
table securing bolts protruding through the holes
in the trunnion mountings.
Screw on the table tilt adjusting knobs, and rock
the table, to bed the trunnions snugly on to their
mountings. When they move smoothly and
evenly, tighten the table tilt adjuster knobs, and
finally tighten the trunnion to table mounting bolts.
Slacken off the table tilt adjuster knobs once
again, and check to ensure the table moves
smoothly on its mountings.
The Rip Fence is slotted on to the guide bar, and
may be secured into place with the knob provided,
and the Mitre gauge when required, sits in the groove
in the table.
Table Tilt
Adj. Knob
IMPORTANT: Before use, the table must be correctly
adjusted, and set to the horizontal position. Please
refer to ‘Table Adjustments’ on page 8.
Table Stop
Screw
Fig. 7
Rip Fence
Guide Bar
Rip Fence
Guide Bar
Mounting Plate
Table Stop Screw
Table Tilt Adjuster Knob
Trunnion
Tension Bolt
Trunnion Base
Mtg Bolts
7


Join the conversation about this product
Here you can share what you think about the Clarke CBS14WC Bandsaw. If you have a question, first carefully read the manual. Requesting a manual can be done by using our contact form.