INCREASE
DECREASE
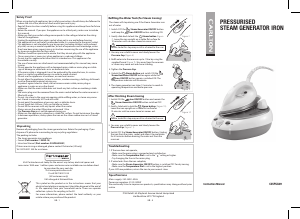
Control Panel on Steam Generator
Steam Knob
Steam Generator
ON/OFF button
Iron ON/OFF
button
maxmin
Figure 5
Figure 6
Figure 7
Do not iron
Synthetics. Set Iron to LOW ( • )
Wool, Silk. Set Iron to MEDIUM ( • • )
Cotton, Linen. Set Iron to HIGH ( • • • )
1. Make sure the iron is unplugged from the mains
socket, and the Steam Generator ON/OFF
button and the Iron ON/OFF button are
switched OFF .
2. Filling the water tank as described before.
3. Connect the mains cable to the mains socket. Switch
ON the Iron ON/OFF button and select the
correct temperature by turning the Temperature
Dial according to your garment label dot level
(Figure 4). The temperature indicator will illuminate.
3. Switch ON the Steam Generator ON/OFF
button. The steam generator iron takes 10 minutes
to reach its operating temperature and boiler
pressure.
4. Select a desired steam rate by turning the Steam
Knob on the steam generator. Turn clockwise to
increase and anticlockwise to reduce the steam rate
(Figure 5).
5. Press the Steam button on the iron handle to
release a shot of steam (Figure 6). You may press and
hold or gently slide the Steam button
backwards to lock for a continual steam (Figure 7).
6. Unlock the Steam button to disable the
continuous steam function.
Before Use
Ironing Temperatures
Check the ironing instructions attached to the article (they are on a label showing a
symbol of an iron). Always follow these ironing instructions. The indications on
the iron’s temperature dial and the table below will help you.
If there are no ironing instructions but you know the fabric, then use the table
below. The table is valid only for the actual materials and does not take into
account any nish applied to the fabric. Textiles to which a nish has been applied
(wrinkle relief, printed T shirts etc.) should be ironed at a lower temperature.
If the fabric contains mixed bres, select
the lowest ironing temperature of the
composition, e.g. iron a 60% polyester /
40% cotton mix at the temperature
indicated for polyester.
The iron heats up quicker than it cools down. Sort fabrics to be ironed into groups
according to temperature: wool with wool, cotton with cotton, etc. Start by ironing
articles requiring low temperature settings and progress to higher ones.
Note: Do not iron garments that are dirty or stained. The iron’s heat may set the
stain.
Pure (100%) wool fabrics may be pressed with the iron set to a steam position and
the garment protected by a dry cloth.
Inspect the iron carefully.
Check that the voltage marked on the rating matches your mains voltage.
Remove any protective lm from the soleplate. Polish the soleplate lightly with a
clean soft cloth to remove any residues.
Place the Steam Generator on the ironing board or at rigid surface.
GB - 2 GB - 3
GB - 4
Electrical Information
Before using this appliance ensure that the voltage of your electricity supply is
suitable for that indicated on the rating plate of the appliance.
THIS APPLIANCE MUST BE EARTHED.
The ultimate disconnection from the power source is the mains plug. Always make
sure it is easily accessible to be unplugged in the event of an emergency.
This appliance is tted with a fused three pin mains plug to BS 1363 which will be
suitable for use in all houses tted with mains sockets to current specications.
If the tted mains plug is not suitable, remove the fuse and dispose of the mains plug
safely, immediately after removing it from the mains cable.
Fitting a new mains plug
If for any reason you need to t a new mains plug, the mains cable must be
connected as shown here. The wires in the mains cable tted to this appliance are
coloured in accordance with the following code:
If the colours of the wires in the mains
cable of this appliance do not correspond
with the coloured markings identifying
the terminals in your mains plug, proceed
as follows:
The wire which is coloured
• Green and Yellow: MUST be connected
to the terminal which is marked with
the letter E (Earth) or symbol or
coloured Green.
• Blue: MUST be connected to the
terminal which is marked with the letter
N (Neutral) or coloured Blue or Black.
• Brown MUST be connected to the
terminal which is marked with the letter
L (Live) or coloured Brown or Red.
Before retting the mains plug cover, check that there are no cut or stray strands of
wire inside the mains plug. Only BSI or ASTA approved 13 Amp BS1362 fuses should
be used. If you are in any way unsure which mains plug or fuse to use, always refer to
a qualied electrician.
Note: After replacing or changing a fuse on a moulded mains plug which has a fuse
cover, the cover must be retted to the mains plug, the appliance must not be used
without a fuse cover. If lost, replacement fuse covers can be obtained from an
electrical shop.
Filling the Water Tank (for Steaming Ironing)
If you live in a hard water area, it is advisable to use distilled or de-mineralised water.
Avoid using water containing softeners, perfumes or additives.
1. Make sure the iron is unplugged from the mains socket, the Steam
Generator ON/OFF button and Iron ON/OFF button are switched OFF, and
the Temperature Dial is at the lowest setting.
2. Loosen the Pressure Cap.
3. Fill water into the reservoir up to 1 litre by using the supplied funnel. Do not
overll it (Figure 3).
4. Then tighten the Pressure Cap (Figure 2).
Maintaining the nish of the iron’s soleplate is essential. Keep the soleplate
smooth: do not scratch it on metal objects (e.g. the edge of the ironing
board, buttons, zippers, etc.) as these may impair performance.
The Temperature Indicator will turn o when the indicated setting reaches
the correct temperature. The iron is now ready for dry ironing. During use the
indicator will light on and o as the thermostat maintains the iron at the
correct temperature setting.
Never open the Pressue Cap during use.
Dry Ironing
CONNECT GREEN AND YELLOW TO EARTH (E)
CONNECT
BLUE TO
NEUTRAL (N)
MAKE SURE THE OUTER
SHEATH OF THE MAINS
CABLE IS SECURELY HELD
BY THE CLAMP
CONNECT
BROWN TO
LIVE (L)
13 AMP FUSE
Main Components
Steam Ironing
1. Make sure the iron is unplugged from the mains
socket, and the Steam Generator ON/OFF button
and the Iron ON/OFF button are switched OFF .
2. Select the correct temperature by turning the
Temperature Dial according to your garment label
dot level. Turn clockwise to increase and anticlockwise
to reduce temperature (Figure 1).
3. Connect the mains cable to the mains socket. Switch
ON the Iron ON/OFF button. The Temperature
indicator will illuminate.
The temperature indicator may turn o during the
10 minute warm-up period. But the iron is not
ready for steam ironing until 10 minutes have
passed. During use the indicator will light on and
o as the thermostat maintains the iron at the
correct temperature setting.
In between operations, always place the iron on
the silicon rubber iron rest of the steam generator.
Figure 2
Figure 3
Figure 1
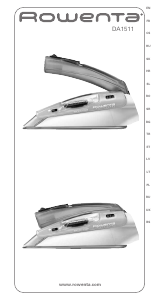
1
2
3
5
6
4
9
8
7
10
11
INCREASE
DECREASE
Figure 4
4
12
1. Funnel
2. Steam Button
3. Temperature Dial
4. Combined Hose
(Supply cable + Steam hose)
5. Temperature Indicator
6. Iron Soleplate
7. Pressure Cap
8. Silicon Rubber Iron Rest
9. Mains Cable
10. Steam Generator ON/OFF button
11. Steam Knob
12. Iron ON/OFF button


Join the conversation about this product
Here you can share what you think about the Carlton C35PSG09 Iron. If you have a question, first carefully read the manual. Requesting a manual can be done by using our contact form.