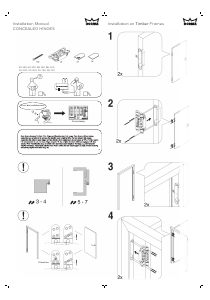
Easy-Hook
®
[1]
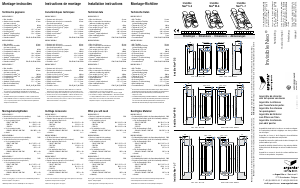
Dankzij het Easy-Hook
®
systeem kunt u eenvoudig de deur in
het kader hangen. Hiervoor dient u het scharniergedeelte dat
in het kader moet komen scheiden van het scharniergedeelte
dat in de deur komt.
Dit kunt u doen door met de inbussleutel de schroeven [A]
volledig los te schroeven.
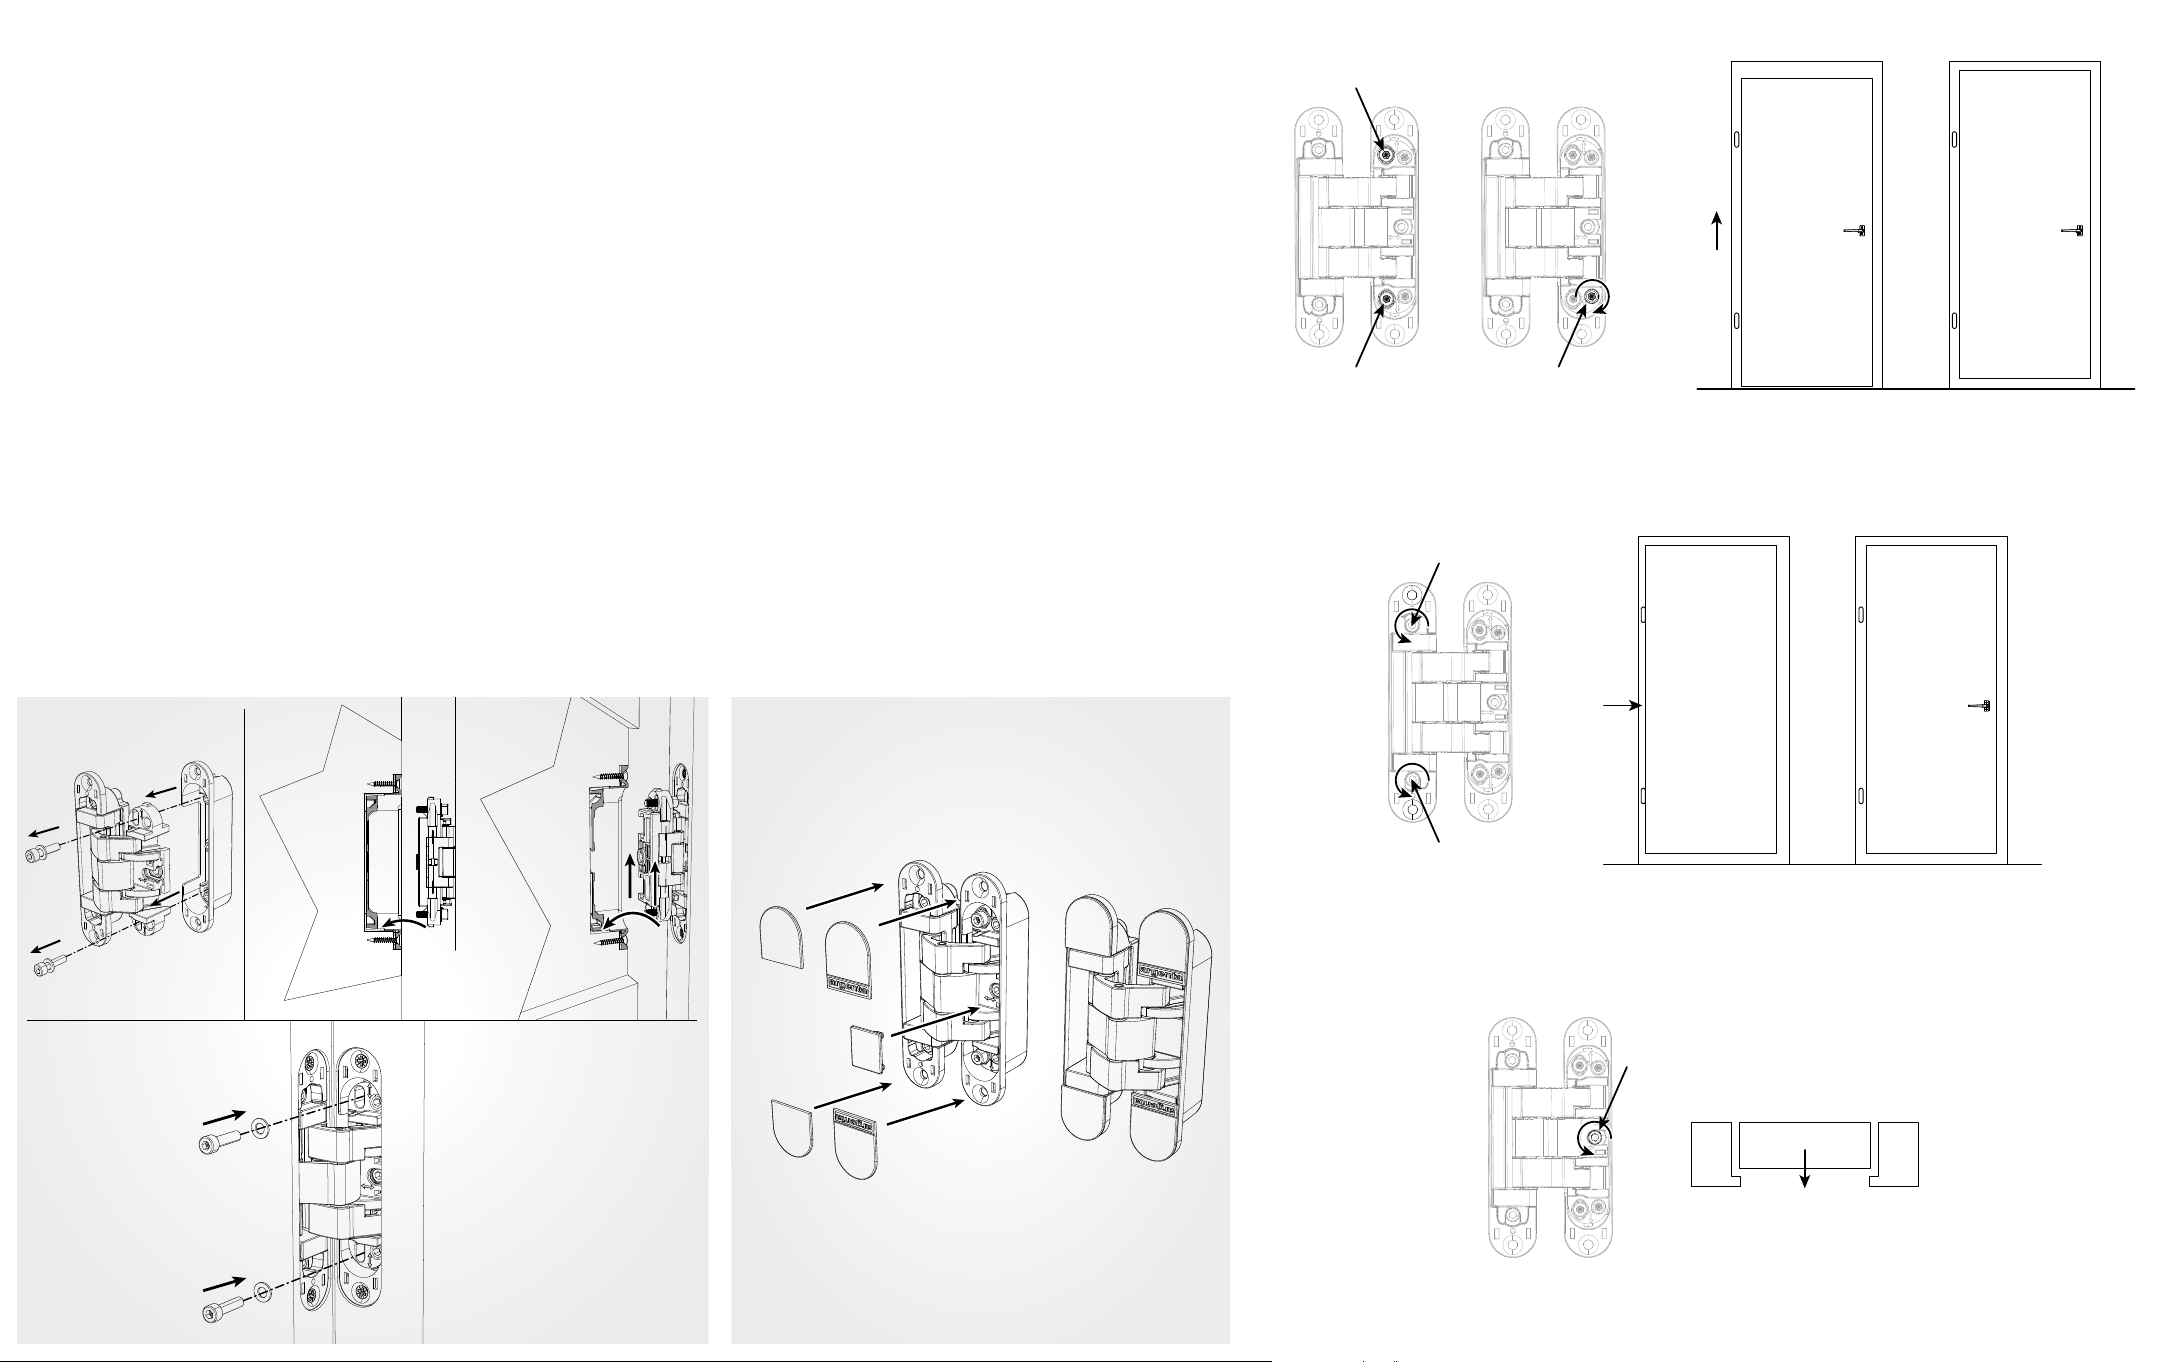
Bijregelen [2]
1. HOOGTE REGELING
Klemschroeven [A] met inbussleutel SW3 (invisible neo
S-5) of SW4 (invisible neo M-6 / L-7) losser schroeven
(draairichting links). Draai aan regelschroef [B] om de
hoogte in te stellen. Klemschroeven [A] terug vast zetten
(draairichting rechts)
nota: bij het volledig losschroeven van klemschroeven
[A] kan men de deur uit of in het frame haken dankzij het
ingebouwde “easy-hook” systeem.
2. BREEDTE (ZIJDELINGSE) REGELING
Regelschroeven [C] met de inbussleutel in de gewenste
richting instellen om de deur recht te laten hangen en aan
beide zijden van de deur dezelfde speling te bekomen.
3. AANDRUK (DIEPTE) REGELING
Regelschroef [D] met de inbussleutel in de gewenste
richting instellen om de diepte aan te passen zodat de deur
tegen de aanslagdichting drukt.
Afwerking [3]
Plaats, na het afregelen, de meegeleverde afdekplaatjes
op het scharnier door deze stevig op de voorziene plaats te
drukken.
Afdekplaatjes voorzien van het argenta
®
-logo (om de hoog-
teregeling te verbergen) en het kleine afdekplaatje (om de
aandrukregeling te verbergen) dienen op het gedeelte van het
scharnier dat in het kader (frame) zit geplaatst te worden.
Onderhoud
De lagerringen zijn uit zelfsmerende kunststof argentalon
®
waardoor het scharnier volledig smeringsvrij is.
Controleer 1x per jaar de speling en regel, indien nodig, bij.
Easy-Hook
®
[1]
Grâce au système Easy-Hook
®
, vous pouvez suspendre la
porte facilement dans le cadre. Pour cela vous devez séparer
la partie de la charnière qui vient dans le cadre de celle qui
vient dans la porte.
Vous pouvez le faire en dévissant les vis [A] au moyen de
la clé Allen.
Réglage [2]
1. RÉGLAGE EN HAUTEUR
Vis de serrage [A] dévisser (tourner vers la gauche) avec
la clé Allen SW3 (invisible neo S-5) ou SW4 (invisible neo
M-6 / L-7).
Tournez la vis [B] pour régler la hauteur. Fixez la vis de
serrage [A] à nouveau (tourner vers la droite)
Note : Une fois la vis de serrage [A] entièrement dévissée,
vous pouvez enlever ou pendre la porte dans le cadre grâce
au système “Easy-Hook” intégré.
2. RÉGLAGE EN LARGEUR - LATÉRAL
Tournez les vis de réglage [C] avec la clé Allen. Tourner
la vis dans la direction voulue pour que la porte pende bien
droite et afin que le jeu entre la porte et le cadre et la même
des deux côtés.
3. RÉGLAGE EN PROFONDEUR
Réglez la vis de réglage [D] avec la clé hexagonale dans la
direction souhaitée afin de régler la profondeur pour que la
porte pousse contre la butée.
Finition [3]
Placez, après réglage, les plaques de recouvrement fournies
en les poussant fermement sur les endroits prévus.
Les plaques munies du la logo argenta
®
(pour cacher le
réglage de la hauteur) et la petite plaque (pour cacher le
réglage de la pression) viennent sur la partie de la charnière
installée dans le cadre.
Entretien
Les roulements et les coulisses sont en matière synthétique
auto-lubrifiante argentalon
®
ce qui rend la charnière invisible
exempte d’entretien.
Vérifiez 1x par an le jeu et ajuster (si nécessaire).
Easy-Hook
®
[1]
Thanks to the Easy-Hook
®
system you can easily mount the
door in the frame. In order to do so, you’ll need to separate the
hinge part that must be installed in the frame from the hinge
part that must be installed in the doorpanel.
This can be done by unscrewing screws [A] completely
using the Allen key.
Alignment [2]
1. HEIGHT ALIGNMENT
Loosen (turn to the left, anticlockwise) the clamping screw
[A] using the Allen key SW3 (invisible neo S-5) or SW4
(invisible neo M-6 / L-7). Turn adjustment screw [B] in order
to adjust the height. Turn the locking screws [A] to the right
(clockwise) to tighten them completely again
Note: when fully unscrewing the screws [A], the door can be
hooked in or hooked out of the frame thanks to the integrated
“easy-hook” system.
2. WIDTH-SIDE ALIGNMENT
Adjust screw [C] using the Allen key in the desired direction
to allow the door to hang horizontally and in order to achieve
the same slack between the door and frame at both sides of
the doorpanel.
3. CLOSURE ALIGNMENT
Adjust alignment screw [D] using the Allen key in the
required direction so that the depth is adjusted and the door
presses against the closure strip.
Finishing [3]
After having adjusted the door, place the included cover plates
onto the hinge by pushing them firmly onto the intended
places.
The cover plates with the argenta
®
logo (to cover the height
adjustment) and the small cover plate (to conceal the pressure
adjustment) should be installed on the part of the hinge that is
situated in the frame.
Maintenance
Bearings and guides are made of self-lubricating plastic
argentalon
®
, meaning the invisible hinge needs no
lubrication at all.
Verify once a year the slack and adjust (if necessary).
Easy-Hook
®
[1]
Dank des Easy-Hook
®
-Systems können Sie die Tür problem-
los in den Rahmen hängen. Dafür muss das für den Rahmen
bestimmte Scharnierelement von dem für die Tür bestimmten
Scharnierelement getrennt werden. Zu diesem Zweck müssen
die Schrauben [A] mithilfe eines Inbusschlüssels vollständig
gelöst werden.
Abstellen [2]
1. HÖHENEINSTELLUNG
Klemmschraube [A] mit Inbusschlüssel SW3 (Invisible Neo
S-5) oder SW4 (Invisible Neo M-6 / L-7) lösen (Drehrichtung
links).Anschließend mit Regulierschraube [B] die Höhe
einstellen. Klemmschrauben [A] wieder festschrauben
(Drehrichtung rechts).
Anmerkung: Durch vollständiges Lösen der Klemmschrauben
[A] kann die Tür dank des eingebauten „Easy Hook“-Sys-
tems aus dem Rahmen entfernt oder in den Rahmen
eingesetzt werden.
2. SEITLICHE BREITENEINSTELLUNG
Stellschrauben [C] mit Sechskantschlüssel in die gewün-
schte Richtung stellen, sodass die Tür gerade hängt und An
beide Seiten den gleichen Spiel bekommt.
3. ANDRÜCKEINSTELLUNG
Stellschraube [D] mit Sechskantschlüssel in der gewünsch-
ten Richtung einstellen, um die Tür gegen die Anschlagsdicht-
ung zu drücken.
Fertigstellung [3]
Befestigen Sie nach dem Einstellen die mitgelieferten
Abdeckelemente auf dem Scharnier. Diese müssen fest auf die
vorgesehene Stelle gedrückt werden.
Die Abdeckelemente mit dem Argenta
®
-Logo (zum Verbergen
der Höheneinstellung) und das kleine Abdeckelement (zum
Verbergen der Andruckeinstellung) müssen an dem Teil des
Scharniers angebracht werden, das im Rahmen sitzt.
Wartung
Lagerringe und Führungen sind aus selbstschmierendem
Kunststoff argentalon
®
. Darum muss das unsichtbare Schar-
nier nie geschmiert werden
Überprüfen Sie 1x pro Jahr den Durchhang und passen Sie
ein (falls nötig).
[A]
[A] [B]
[C]
[C]
[D]
[1] [3]
[2]
[A]


Join the conversation about this product
Here you can share what you think about the Argenta Invisible Neo Hinge. If you have a question, first carefully read the manual. Requesting a manual can be done by using our contact form.