Manual Vango Rapier 100 Tent

Need a manual for your Vango Rapier 100 Tent? Below you can view and download the PDF manual for free in English. This product currently has 7 frequently asked questions, 0 comments and has 0 votes. If this is not the manual you want, please contact us.

Is your product defective and the manual offers no solution? Go to a Repair Café for free repair services.

Manual

Loading…

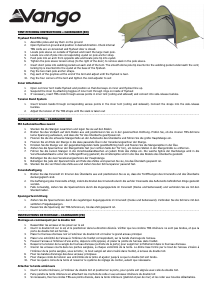
ISTRUZIONI PER IL MONTAGGIO RAPIER (IT)
Primo fissaggio interno
1. Montare il paletto.
2. Aprire la camera interna al suolo e posizionarla nella direzione richiesta.
3. Individuare il manicotto del paletto sulla camera interna e inserirvi il
paletto.
4. Inserire l'estremità del paletto nell'occhiello corrispondente sul retro della tenda.
5. Arcuare il paletto spingendo dal davanti della tenda e inserire il paletto nell'occhiello corrispondente della cinghia di ancoraggio del
paletto.
6. Stringere il regolatore della tensione del paletto sul davanti della tenda.
7. Fissare con picchetti le cinghie di ancoraggio alle estremità del paletto.
8. Fissare con picchetti gli angoli della camera interna.
Telo esterno
1. Aprire il telo esterno e posizionarlo in modo che l'ingresso dell'interno e quello del telo esterno siano allineati.
2. Fissare le 2 cinghie con il velcro attorno al paletto. 1 sopra alla porta e 1 sopra la presa d'aria posteriore.
3. Collegare le olivette sui lati della camera interna della tenda con le linguette corrispondenti sull'interno del telo esterno.
4. Agganciare le fibbie sul telo esterno alle fibbie corrispondenti sull'interno all'estremità del paletto.
5. Stringere le cinghie di tensione.
6. Posizionare i punti di fissaggio elastici del telo esterno attorno ai picchetti usati per gli angoli della camera interna della tenda. Spostare
i picchetti se necessario per mettere in tensione il telo esterno.
7. Fissare TUTTI i tiranti.
……………………………………………………………………………………………………………………………………………………………………………………………………………
OPZETINSTRUCTIE RAPIER (NL)
Binnenste Eerst Opzetten
1. Zet de stok in elkaar.
2. Open de binnentent op de grond en positioneer in gewenste richting.
3. Lokaliseer de stoksleuf aan de binnentent en steek de stok er door.
4. Steek het einde van de stok in het overeenkomende oogje aan de achterkant van de tent.
5. Duw de stuk vanaf de voorkant van de tent in een boog en steek het uiteinde in het overeenkomende oogje aan het ankerpunt.
6. Span de stok spanning regelaar aan de voorkant van de tent.
7. Zet de ankerpunten aan het einde van de stok vast met haringen.
8. Zet de binnenste hoeken vast met haringen.
Buitentent
1. Open de buitentent en positioneer zodat de deuren overeenkomen.
2. Bevestig de 2 haak en lus banden rond de stok. 1, boven de deur, en 1 boven het ventilatierooster aan de achterkant.
3. Verbind de knevels aan de zijkanten van de binnentent aan hun overeenkomende punten aan de binnenkant van de buitentent.
4. Clip de gespen op de buitentent aan de overeenkomende gespen aan de binnentent aan de uiteinden van de stok.
5. Span de spanbanden.
6. Plaats de elastische haringpunten aan de buitentent rond de haringen die gebruikt worden voor de hoeken van de binnentent. Vervang
de haringen indien nodig om de buitentent strak te spannen.
7. Zet ALLE spanbanden vast.
……………………………………………………………………………………………………………………………………………………………………………………………………………
NÁVOD KE STAVBĚ RAPIER (CS)
První se staví ložnice
1. Poskládejte tyčky.
2. Roztáhněte vnitřní část na zemi a umístěte v požadovaném směru.
3. Najděte tunýlky na vnitřní části stanu a vsuňte tyče.
4. Vsuňte konec tyče do odpovídajícího očka na zadní straně stanu.
5. Zepředu stanu ohněte tyč do oblouku a zapíchněte tyč do odpovídajícího očka na popruhu tyče.
6. Utáhněte seřizovač napínací tyče v přední části stanu.
7. Zakolíkujte popruhy na koncích tyče.
8. Zakolíkujte vnitřní rohy.
Tropiko
1. Rozšiřte tropiko a umístěte tak, aby vchod na vnitřní straně tropika byl seřazen.
2. Zapněte dva řemínky pomocí háčku na smyčku okolo tyče. 1 nad vchodem a 1 nad nad zadním větracím otvorem.
3. Spojte kolíčky na stranách vnitřního stanu s korespondujícími štítky na vnitřní straně tropika.
4. Sepněte přezky na tropiku s korespondujícími přezkami na vnitřku stanu na koncích tyčí.
5. Zatáhněte popruhy.
6. Umístěte elastické kolíkovací body na tropiko okolo háčků používaného pro rohy vnitřního stanu. Vyměňte háčky, v případě potřeby,
aby tropiko bylo napnuté.
7. Přikolíkujte VŠECHNY napínací šňůry
……………………………………………………………………………………………………………………………………………………………………………………………………………
Download manual in English (PDF, 0.25 MB)
(Consider the environment and only print this manual if it is really necessary)

Loading…

Rating

Let us know what you think about the Vango Rapier 100 Tent by leaving a product rating. Want to share your experiences with this product or ask a question? Please leave a comment at the bottom of the page.
Are you satisfied with the Vango Rapier 100 Tent?
Yes No
Be the first to rate this product
0 votes

Join the conversation about this product

Here you can share what you think about the Vango Rapier 100 Tent. If you have a question, first carefully read the manual. Requesting a manual can be done by using our contact form.

More about this manual

We understand that it’s nice to have a paper manual for your Vango Rapier 100 Tent. You can always download the manual from our website and print it yourself. If you would like to have an original manual, we recommend you contact Vango. They might be able to provide an original manual. Are you looking for the manual of your Vango Rapier 100 Tent in a different language? Choose your preferred language on our homepage and search for the model number to see if we have it available.

Specifications

Brand Vango
Model Rapier 100
Category Tents
File type PDF
File size 0.25 MB

All manuals for Vango Tents
More manuals of Tents

Frequently Asked Questions about Vango Rapier 100 Tent

Our support team searches for useful product information and answers to frequently asked questions. If you find an inaccuracy in our frequently asked questions, please let us know by using our contact form.

Can I store my tent when it's wet? Verified

Only for very short periods of time. When a tent is stored while wet for a week or longer, it can get moldy. This is harmful for your tent and possibly your health.

This was helpful (384) Read more

How do I impregnate a tent? Verified

Pitch the tent, clean the cloth and let it dry. Apply the impregnation agent on the cloth with a plant sprayer or other spray. It is also possible to use a paint roller or brush. The cloth needs to be fully saturated with the impregnation agent. Also treat the inside of the tent. Thoroughly clean any windows with a moist cloth. Do not let the impregnation agent dry on it. Let the tent cloth fully dry. Repeat the treatment if needed.

This was helpful (285) Read more

Can I repair a tear or hole in the canvas of my tent myself? Verified

There are special pieces of self-adhesive patches of cloth available for synthetic tent canvases. Stick one of these patches on both sides of the hole or tear. For cotton tent canvases or mixed material tent canvases it's best to use patches that can be ironed on. This will require an iron.

This was helpful (218) Read more

The zipper of my tent won't run smoothly, what can I do? Verified

When a zipper is running smoothly, use a dry PTFE spray or silicone spray. Do not spray onto the cloth and preventively spray to prevent future problems.

This was helpful (156) Read more

There are water drops on the inside of the tent, does this mean it is leaking? Verified

No, this is probably condensation. Make sure the tent is properly ventilated to keep condensation at a minimum.

This was helpful (129) Read more

What tent pegs are best to use for which surfaces? Verified

On grassland or forest surfaces you can use semi circular or plastic pegs. On rocky surfaces you need to use rock pegs. On clay surfaces you can use semi circular, plastic or universal pegs. On gravel surfaces you need semi circular or universal pegs and on sand you need to use wooden pegs.

This was helpful (105) Read more

The impregnation agent leaves white stains or a white haze on the tent cloth, what can I do about this? Verified

If the agent leaves a white haze or white stains on the tent cloth, this means you have applied more impregnation agent on those areas. This is not harmful and the stains often disappear over time. It is not advisable to use less impregnation agent to prevent stains. The cloth needs to be fully saturated with the impregnation agent to give good results.

This was helpful (97) Read more
Manual Vango Rapier 100 Tent

Related products

Related categories